Specification (English)
Page 1
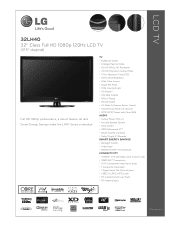
LCD TV 32LH40 32" Class Full HD 1080p 120Hz LCD TV (31.5" diagonal) Full HD 1080p performance, a robust feature set and Smart Energy Savings make the LH40 Series a standout. TV • TruMotion 120Hz • Intelligent Sensor Mode • Full HD 1080p HD Resolution • 70,000:1 Dynamic Contrast Ratio • 2.7ms Response Time (GTG) • ...
LCD TV 32LH40 32" Class Full HD 1080p 120Hz LCD TV (31.5" diagonal) Full HD 1080p performance, a robust feature set and Smart Energy Savings make the LH40 Series a standout. TV • TruMotion 120Hz • Intelligent Sensor Mode • Full HD 1080p HD Resolution • 70,000:1 Dynamic Contrast Ratio • 2.7ms Response Time (GTG) • ...
Specification (English)
Page 2
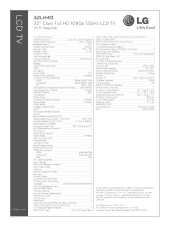
Component 60p/30p/24p - All rights reserved. LCD TV 32LH40 32" Class Full HD 1080p 120Hz LCD TV (31.5" diagonal) LGusa.com LCD SPECIFICATION Screen Size (Class) 32" Class (31.5" diagonal) Native Display Resolution 1920 x 1080p Brightness (cd/m2) 500 Dynamic Contrast ... • Quick Setup Guide • e-Manual • Parental Control w/V-Chip • Key Lock • Closed Caption • LG SIMPLINK (HDMI CEC) • CONVENIENCE FEATURES Language English/Spanish/French/Korean Auto Tuning/Programming • Channel Add/Delete • Channel ...
Component 60p/30p/24p - All rights reserved. LCD TV 32LH40 32" Class Full HD 1080p 120Hz LCD TV (31.5" diagonal) LGusa.com LCD SPECIFICATION Screen Size (Class) 32" Class (31.5" diagonal) Native Display Resolution 1920 x 1080p Brightness (cd/m2) 500 Dynamic Contrast ... • Quick Setup Guide • e-Manual • Parental Control w/V-Chip • Key Lock • Closed Caption • LG SIMPLINK (HDMI CEC) • CONVENIENCE FEATURES Language English/Spanish/French/Korean Auto Tuning/Programming • Channel Add/Delete • Channel ...

Owner's Manual (English)
Page 1
...to quality for ENERGY STAR in the "factory default (Home Use)" setting. The model and serial number of the TV is located on the back and one side of the TV. Record it for future reference. Model: Serial: This product qualifies for ENERGY STAR. 1-800-243-0000 USA,... Consumer User 1-888-865-3026 USA, Commercial User 1-888-542-2623 CANADA LG Customer Information Center P/NO : SAC33601903 (0904-REV03) www.lgusa.com / www.lg.ca LCD TV OWNER'S MANUAL 32LH40 37LH40 42LH40 47LH40 55LH40 32LH41 37LH41 42LH41 47LH41 55LH41 37LH55 42LH55 47LH55 55LH55 32CL40 42CL40 47CL40 Please...
...to quality for ENERGY STAR in the "factory default (Home Use)" setting. The model and serial number of the TV is located on the back and one side of the TV. Record it for future reference. Model: Serial: This product qualifies for ENERGY STAR. 1-800-243-0000 USA,... Consumer User 1-888-865-3026 USA, Commercial User 1-888-542-2623 CANADA LG Customer Information Center P/NO : SAC33601903 (0904-REV03) www.lgusa.com / www.lg.ca LCD TV OWNER'S MANUAL 32LH40 37LH40 42LH40 47LH40 55LH40 32LH41 37LH41 42LH41 47LH41 55LH41 37LH55 42LH55 47LH55 55LH55 32CL40 42CL40 47CL40 Please...
Owner's Manual (English)
Page 2
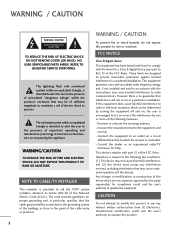
...device). Operation is connected. - These limits are not expressly approved by turning the equipment off and on a circuit different from LG Electronics. FCC NOTICE Class B digital device This equipment has been tested and found to comply with the instructions, may cause undesired .... This equipment generates, uses and can be of sufficient magnitude to rain or moisture. Consult the dealer or an experienced radio/TV technician for proper grounding and, in particular, specifies that interference will not occur in a residential installation. WARNING/CAUTION TO REDUCE ...
...device). Operation is connected. - These limits are not expressly approved by turning the equipment off and on a circuit different from LG Electronics. FCC NOTICE Class B digital device This equipment has been tested and found to comply with the instructions, may cause undesired .... This equipment generates, uses and can be of sufficient magnitude to rain or moisture. Consult the dealer or an experienced radio/TV technician for proper grounding and, in particular, specifies that interference will not occur in a residential installation. WARNING/CAUTION TO REDUCE ...
Owner's Manual (English)
Page 4
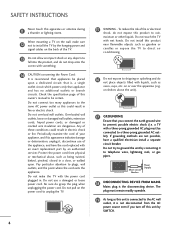
... a qualified electrician install a separate circuit breaker. The plug must be certain. Do not connect too many appliances to a three-prong grounded AC outlet). a TV with liquids, such as this unit is not disconnected from the AC power source even if you connect the earth ground wire to telephone wires..., lightening rods, or gas pipes. When mounting a TV on the power cord to plugs, wall outlets, and the point where the cord exits the appliance. Do not overload wall outlets. Overloaded wall...
... a qualified electrician install a separate circuit breaker. The plug must be certain. Do not connect too many appliances to a three-prong grounded AC outlet). a TV with liquids, such as this unit is not disconnected from the AC power source even if you connect the earth ground wire to telephone wires..., lightening rods, or gas pipes. When mounting a TV on the power cord to plugs, wall outlets, and the point where the cord exits the appliance. Do not overload wall outlets. Overloaded wall...
Owner's Manual (English)
Page 5
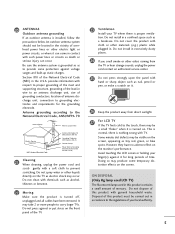
... there is turned off, unplugged and all cables have no adverse effect on the monitor's performance. ON DISPOSAL (Only Hg lamp used LCD TV) The fluorescent lamp used in this product with such power lines or circuits as nail, pencil or pen, or make a scratch on it can occur. .... 24 If you smell smoke or other electric light or power circuits, or where it . 26 Keep the product away from direct sunlight. 27 For LCD TV If the TV feels cold to the touch, there may be located in the vicinity of overhead power lines or other odors coming from the...
... there is turned off, unplugged and all cables have no adverse effect on the monitor's performance. ON DISPOSAL (Only Hg lamp used LCD TV) The fluorescent lamp used in this product with such power lines or circuits as nail, pencil or pen, or make a scratch on it can occur. .... 24 If you smell smoke or other electric light or power circuits, or where it . 26 Keep the product away from direct sunlight. 27 For LCD TV If the TV feels cold to the touch, there may be located in the vicinity of overhead power lines or other odors coming from the...
Owner's Manual (English)
Page 6
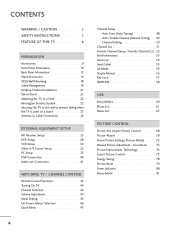
...75 Energy Saving 78 Picture Reset 79 Power Indicator 80 Demo Mode 81 CONTENTS WARNING / CAUTION 2 SAFETY INSTRUCTIONS 3 FEATURE OF THIS TV 8 PREPARATION Accessories 9 Front Panel Information 10 Back Panel Information 12 Stand Instruction 14 VESA Wall Mounting 18 Cable Management 19 Desktop Pedestal...VCR Setup 30 Other A/V Source Setup 32 PC Setup 33 USB Connection 40 Audio out Connection 41 WATCHING TV / CHANNEL CONTROL Remote Control Functions 42 Turning On TV 44 Channel Selection 44 Volume Adjustment 44 Initial Setting 45 On-Screen Menus Selection 46 Quick Menu 47 ...
...75 Energy Saving 78 Picture Reset 79 Power Indicator 80 Demo Mode 81 CONTENTS WARNING / CAUTION 2 SAFETY INSTRUCTIONS 3 FEATURE OF THIS TV 8 PREPARATION Accessories 9 Front Panel Information 10 Back Panel Information 12 Stand Instruction 14 VESA Wall Mounting 18 Cable Management 19 Desktop Pedestal...VCR Setup 30 Other A/V Source Setup 32 PC Setup 33 USB Connection 40 Audio out Connection 41 WATCHING TV / CHANNEL CONTROL Remote Control Functions 42 Turning On TV 44 Channel Selection 44 Volume Adjustment 44 Initial Setting 45 On-Screen Menus Selection 46 Quick Menu 47 ...

Owner's Manual (English)
Page 7
...Off Time Setting 97 Sleep Timer Setting 98 PARENTAL CONTROL / RATINGS Set Password & Lock System 99 Channel Blocking 102 Movie & TV Rating 103 Downloadable Rating 108 External Input Blocking 109 APPENDIX Troubleshooting 110 Maintenance 112 Product Specifications 113 IR Codes 115 External Control ...Sound Setting Adjustment - Digital Broadcasting System Captions 93 - Caption Option 94 TIME SETTING Clock Setting - User Mode 85 Balance 86 TV Speakers On/Off Setup 87 Audio Reset 88 Stereo/SAP Broadcasts Setup 89 Audio Language 90 On-Screen Menus Language Selection 91 Caption ...
...Off Time Setting 97 Sleep Timer Setting 98 PARENTAL CONTROL / RATINGS Set Password & Lock System 99 Channel Blocking 102 Movie & TV Rating 103 Downloadable Rating 108 External Input Blocking 109 APPENDIX Troubleshooting 110 Maintenance 112 Product Specifications 113 IR Codes 115 External Control ...Sound Setting Adjustment - Digital Broadcasting System Captions 93 - Caption Option 94 TIME SETTING Clock Setting - User Mode 85 Balance 86 TV Speakers On/Off Setup 87 Audio Reset 88 Stereo/SAP Broadcasts Setup 89 Audio Language 90 On-Screen Menus Language Selection 91 Caption ...
Owner's Manual (English)
Page 8
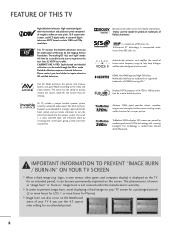
... become permanently imprinted on the screen. The resulting ISF "day" and "night" modes will then be made through the ISFccc mode. LG TV include a unique invisible speaker system, tuned by the Imaging Science Foundation. Displays HDTV programs in full 1920 x 1080p resolution for a ...crisper picture. A subset of Dolby Laboratories. Please contact your TV screen for a prolonged period (2 or more hours for LCD, 1 or more pixels, 16:9 aspect-ratio screens, and AC3 digital audio. Manufactured under license from Intertek &Tü...
... become permanently imprinted on the screen. The resulting ISF "day" and "night" modes will then be made through the ISFccc mode. LG TV include a unique invisible speaker system, tuned by the Imaging Science Foundation. Displays HDTV programs in full 1920 x 1080p resolution for a ...crisper picture. A subset of Dolby Laboratories. Please contact your TV screen for a prolonged period (2 or more hours for LCD, 1 or more pixels, 16:9 aspect-ratio screens, and AC3 digital audio. Manufactured under license from Intertek &Tü...
Owner's Manual (English)
Page 9
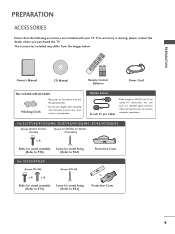
...Manual CD Manual Remote Control, Batteries Power Cord Not included with all models Polishing Cloth * Wipe spots on the exterior only with your TV. PREPARATION PREPARATION ACCESSORIES Ensure that the following accessories are included with the polishing cloth. * Do not wipe roughly when removing stain. ... (Refer to P.14) (Refer to maintain standards compliance. If an accessory is missing, please contact the dealer where you purchased the TV. Excessive pressure may differ from the images below. Option Extras D-sub 15 pin Cable When using the VGA (D-sub 15 pin cable)...
...Manual CD Manual Remote Control, Batteries Power Cord Not included with all models Polishing Cloth * Wipe spots on the exterior only with your TV. PREPARATION PREPARATION ACCESSORIES Ensure that the following accessories are included with the polishing cloth. * Do not wipe roughly when removing stain. ... (Refer to P.14) (Refer to maintain standards compliance. If an accessory is missing, please contact the dealer where you purchased the TV. Excessive pressure may differ from the images below. Option Extras D-sub 15 pin Cable When using the VGA (D-sub 15 pin cable)...
Owner's Manual (English)
Page 10
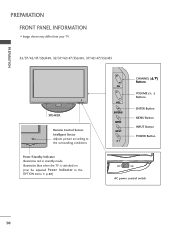
PREPARATION PREPARATION FRONT PANEL INFORMATION I Image shown may differ from your TV. 32/37/42/47/55LH40, 32/37/42/47/55LH41, 37/42/47/55LH55 SPEAKER Remote Control Sensor, Intelligent Sensor Adjusts picture according to the surrounding conditions Power/Standby Indicator Illuminates red in the OPTION menu. G p.80) CH VOL ENTER MENU INPUT CHANNEL (D,E) Buttons VOLUME (+, -) Buttons ENTER Button MENU Button INPUT Button POWER Button OFF ON AC power control switch 10 Illuminates blue when the TV is switched on. (Can be adjusted Power Indicator in standby mode.
PREPARATION PREPARATION FRONT PANEL INFORMATION I Image shown may differ from your TV. 32/37/42/47/55LH40, 32/37/42/47/55LH41, 37/42/47/55LH55 SPEAKER Remote Control Sensor, Intelligent Sensor Adjusts picture according to the surrounding conditions Power/Standby Indicator Illuminates red in the OPTION menu. G p.80) CH VOL ENTER MENU INPUT CHANNEL (D,E) Buttons VOLUME (+, -) Buttons ENTER Button MENU Button INPUT Button POWER Button OFF ON AC power control switch 10 Illuminates blue when the TV is switched on. (Can be adjusted Power Indicator in standby mode.

Owner's Manual (English)
Page 13
... standard definition video only (480i). 2 HDMI/DVI IN, HDMI IN Digital Connection. Supports HD. Accepts DVI video using an adapter or HDMI to operate the TV on DC power. 13 Supports HD video and Digital audio. This port is used for Service or Hotel mode. 7 COMPONENT IN Analog Connection.
... standard definition video only (480i). 2 HDMI/DVI IN, HDMI IN Digital Connection. Supports HD. Accepts DVI video using an adapter or HDMI to operate the TV on DC power. 13 Supports HD video and Digital audio. This port is used for Service or Hotel mode. 7 COMPONENT IN Analog Connection.
Owner's Manual (English)
Page 14
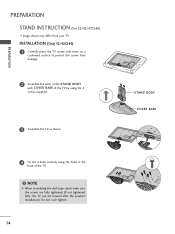
... tighten. 14 STAND BODY COVER BASE NOTE G When assembling the desk type stand, make sure the screws are fully tightened (If not tightened fully, the TV can tilt forward after the product installation). PREPARATION PREPARATION STAND INSTRUCTION (For 32/42/47CL40) I Image shown may differ from damage. 2 Assemble the parts ...of the STAND BODY with COVER BASE of the TV by using the 4 screws supplied. 3 Assemble the TV as shown. 4 Fix the 4 bolts securely using the holes in the back of the...
... tighten. 14 STAND BODY COVER BASE NOTE G When assembling the desk type stand, make sure the screws are fully tightened (If not tightened fully, the TV can tilt forward after the product installation). PREPARATION PREPARATION STAND INSTRUCTION (For 32/42/47CL40) I Image shown may differ from damage. 2 Assemble the parts ...of the STAND BODY with COVER BASE of the TV by using the 4 screws supplied. 3 Assemble the TV as shown. 4 Fix the 4 bolts securely using the holes in the back of the...

Owner's Manual (English)
Page 15
Press the PROTECTION COVER into the TV until you hear it click. 15 PROTECTION COVER After removing the stand, install the included protection cover over the hole for the stand. PREPARATION DETACHMENT 1 Carefully place the TV screen side down on a cushioned surface to protect the screen from damage. 2 Loose the bolts from TV. 3 Detach the stand from TV.
Press the PROTECTION COVER into the TV until you hear it click. 15 PROTECTION COVER After removing the stand, install the included protection cover over the hole for the stand. PREPARATION DETACHMENT 1 Carefully place the TV screen side down on a cushioned surface to protect the screen from damage. 2 Loose the bolts from TV. 3 Detach the stand from TV.
Owner's Manual (English)
Page 16
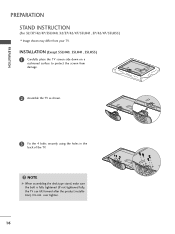
INSTALLATION (Except 55LH40, 55LH41, 55LH55) 1 Carefully place the TV screen side down on a cushioned surface to protect the screen from your TV. NOTE G When assembling the desk type stand, make sure the bolt is fully tightened (If not tightened fully, the TV can tilt forward after the product installation). PREPARATION PREPARATION STAND INSTRUCTION (For 32/37/42/47/55LH40, 32/37/42/47/55LH41, 37/42/47/55LH55) I Image shown may differ from damage. 2 Assemble the TV as shown. 3 Fix the 4 bolts securely using the holes in the back of the TV. ! Do not over tighten. 16
INSTALLATION (Except 55LH40, 55LH41, 55LH55) 1 Carefully place the TV screen side down on a cushioned surface to protect the screen from your TV. NOTE G When assembling the desk type stand, make sure the bolt is fully tightened (If not tightened fully, the TV can tilt forward after the product installation). PREPARATION PREPARATION STAND INSTRUCTION (For 32/37/42/47/55LH40, 32/37/42/47/55LH41, 37/42/47/55LH55) I Image shown may differ from damage. 2 Assemble the TV as shown. 3 Fix the 4 bolts securely using the holes in the back of the TV. ! Do not over tighten. 16

Owner's Manual (English)
Page 17
Press the PROTECTION COVER into the TV until you hear it click. 17 PREPARATION DETACHMENT 1 Carefully place the TV screen side down on a cushioned surface to protect the screen from damage. 2 Loose the bolts from TV. 3 Detach the stand from TV. PROTECTION COVER After removing the stand, install the included protection cover over the hole for the stand.
Press the PROTECTION COVER into the TV until you hear it click. 17 PREPARATION DETACHMENT 1 Carefully place the TV screen side down on a cushioned surface to protect the screen from damage. 2 Loose the bolts from TV. 3 Detach the stand from TV. PROTECTION COVER After removing the stand, install the included protection cover over the hole for the stand.
Owner's Manual (English)
Page 18
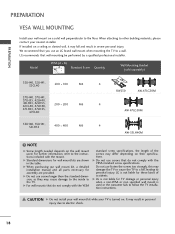
... use screws that wall mounting be performed by a qualified professional installer. Do not use an LG brand wall mount when mounting the TV to the TV. G LG is used . G Standard dimensions for these kinds of the screws may result in the table.... CAUTION G Do not install your wall mount kit while your TV is not liable for wall mount kits are provided. It may differ depending on . Model VESA (A * B) A B Standard Screw Quantity Wall Mounting Bracket (sold separately) 32LH40...
... use screws that wall mounting be performed by a qualified professional installer. Do not use an LG brand wall mount when mounting the TV to the TV. G LG is used . G Standard dimensions for these kinds of the screws may result in the table.... CAUTION G Do not install your wall mount kit while your TV is not liable for wall mount kits are provided. It may differ depending on . Model VESA (A * B) A B Standard Screw Quantity Wall Mounting Bracket (sold separately) 32LH40...
Owner's Manual (English)
Page 19
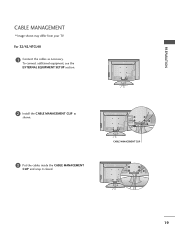
CABLE MANAGEMENT CLIP 19 PREPARATION CABLE MANAGEMENT I Image shown may differ from your TV. For 32/42/47CL40 1 Connect the cables as shown. 3 Put the cables inside the CABLE MANAGEMENT CLIP and snap it closed. To connect additional equipment, see the EXTERNAL EQUIPMENT SETUP section. 2 Install the CABLE MANAGEMENT CLIP as necessary.
CABLE MANAGEMENT CLIP 19 PREPARATION CABLE MANAGEMENT I Image shown may differ from your TV. For 32/42/47CL40 1 Connect the cables as shown. 3 Put the cables inside the CABLE MANAGEMENT CLIP and snap it closed. To connect additional equipment, see the EXTERNAL EQUIPMENT SETUP section. 2 Install the CABLE MANAGEMENT CLIP as necessary.
Owner's Manual (English)
Page 20
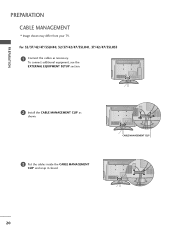
CABLE MANAGEMENT CLIP 20 To connect additional equipment, see the EXTERNAL EQUIPMENT SETUP section. 2 Install the CABLE MANAGEMENT CLIP as necessary. PREPARATION PREPARATION CABLE MANAGEMENT I Image shown may differ from your TV. For 32/37/42/47/55LH40, 32/37/42/47/55LH41, 37/42/47/55LH55 1 Connect the cables as shown. 3 Put the cables inside the CABLE MANAGEMENT CLIP and snap it closed.
CABLE MANAGEMENT CLIP 20 To connect additional equipment, see the EXTERNAL EQUIPMENT SETUP section. 2 Install the CABLE MANAGEMENT CLIP as necessary. PREPARATION PREPARATION CABLE MANAGEMENT I Image shown may differ from your TV. For 32/37/42/47/55LH40, 32/37/42/47/55LH41, 37/42/47/55LH55 1 Connect the cables as shown. 3 Put the cables inside the CABLE MANAGEMENT CLIP and snap it closed.

Owner's Manual (English)
Page 21
For proper ventilation, allow a clearance of heat source. G Do not mount near or above any type of 4 inches on all four sides from your viewing position. 21 SWIVEL STAND After installing the TV, you can adjust the TV set manually to suit your TV. PREPARATION DESKTOP PEDESTAL INSTALLATION I Image shown may differ from the wall. 4 inches 4 inches 4 inches 4 inches CAUTION G Ensure adequate ventilation by 20 degrees to the left or right direction by following the clearance recommendations.
For proper ventilation, allow a clearance of heat source. G Do not mount near or above any type of 4 inches on all four sides from your viewing position. 21 SWIVEL STAND After installing the TV, you can adjust the TV set manually to suit your TV. PREPARATION DESKTOP PEDESTAL INSTALLATION I Image shown may differ from the wall. 4 inches 4 inches 4 inches 4 inches CAUTION G Ensure adequate ventilation by 20 degrees to the left or right direction by following the clearance recommendations.


