Specification (English)
Page 2
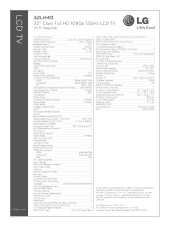
...Noise Reduction (Video Noise Filter 3D & MPEG) Color Temperature Control 3 Modes 24p Real Cinema • (5:5) 3:2 Pulldown • Picture Reset • AV Mode II (Picture & Sound) 3 Modes Picture Mode 8 Modes ISFccc Ready • Intelligent Sensor Mode • ...11/09 LG Electronics U.S.A., Inc. 1000 Sylvan Avenue Englewood Cliffs, NJ 07632 Customer Service and Technical Support: (800) 243-0000 All rights reserved. LCD TV 32LH40 32" Class Full HD 1080p 120Hz LCD TV (31.5" diagonal) LGusa.com LCD SPECIFICATION Screen Size (Class) 32" Class (31.5" diagonal) ...
...Noise Reduction (Video Noise Filter 3D & MPEG) Color Temperature Control 3 Modes 24p Real Cinema • (5:5) 3:2 Pulldown • Picture Reset • AV Mode II (Picture & Sound) 3 Modes Picture Mode 8 Modes ISFccc Ready • Intelligent Sensor Mode • ...11/09 LG Electronics U.S.A., Inc. 1000 Sylvan Avenue Englewood Cliffs, NJ 07632 Customer Service and Technical Support: (800) 243-0000 All rights reserved. LCD TV 32LH40 32" Class Full HD 1080p 120Hz LCD TV (31.5" diagonal) LGusa.com LCD SPECIFICATION Screen Size (Class) 32" Class (31.5" diagonal) ...
Owner's Manual (English)
Page 6
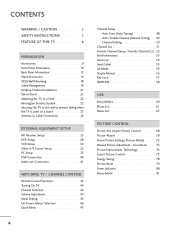
... Mode 73 Picture Improvement Technology 74 Expert Picture Control 75 Energy Saving 78 Picture Reset 79 Power Indicator 80 Demo Mode 81 CONTENTS WARNING / CAUTION 2 SAFETY INSTRUCTIONS 3 FEATURE OF THIS TV 8 PREPARATION Accessories 9 Front Panel Information 10 Back Panel Information 12 Stand Instruction ...Setup 30 Other A/V Source Setup 32 PC Setup 33 USB Connection 40 Audio out Connection 41 WATCHING TV / CHANNEL CONTROL Remote Control Functions 42 Turning On TV 44 Channel Selection 44 Volume Adjustment 44 Initial Setting 45 On-Screen Menus Selection 46 Quick Menu ...
... Mode 73 Picture Improvement Technology 74 Expert Picture Control 75 Energy Saving 78 Picture Reset 79 Power Indicator 80 Demo Mode 81 CONTENTS WARNING / CAUTION 2 SAFETY INSTRUCTIONS 3 FEATURE OF THIS TV 8 PREPARATION Accessories 9 Front Panel Information 10 Back Panel Information 12 Stand Instruction ...Setup 30 Other A/V Source Setup 32 PC Setup 33 USB Connection 40 Audio out Connection 41 WATCHING TV / CHANNEL CONTROL Remote Control Functions 42 Turning On TV 44 Channel Selection 44 Volume Adjustment 44 Initial Setting 45 On-Screen Menus Selection 46 Quick Menu ...

Owner's Manual (English)
Page 7
...Off Time Setting 97 Sleep Timer Setting 98 PARENTAL CONTROL / RATINGS Set Password & Lock System 99 Channel Blocking 102 Movie & TV Rating 103 Downloadable Rating 108 External Input Blocking 109 APPENDIX Troubleshooting 110 Maintenance 112 Product Specifications 113 IR Codes 115 External Control ... Adjustment - Analog Broadcasting System Captions 92 - Caption Option 94 TIME SETTING Clock Setting - User Mode 85 Balance 86 TV Speakers On/Off Setup 87 Audio Reset 88 Stereo/SAP Broadcasts Setup 89 Audio Language 90 On-Screen Menus Language Selection 91 Caption Mode -
...Off Time Setting 97 Sleep Timer Setting 98 PARENTAL CONTROL / RATINGS Set Password & Lock System 99 Channel Blocking 102 Movie & TV Rating 103 Downloadable Rating 108 External Input Blocking 109 APPENDIX Troubleshooting 110 Maintenance 112 Product Specifications 113 IR Codes 115 External Control ... Adjustment - Analog Broadcasting System Captions 92 - Caption Option 94 TIME SETTING Clock Setting - User Mode 85 Balance 86 TV Speakers On/Off Setup 87 Audio Reset 88 Stereo/SAP Broadcasts Setup 89 Audio Language 90 On-Screen Menus Language Selection 91 Caption Mode -
Owner's Manual (English)
Page 36
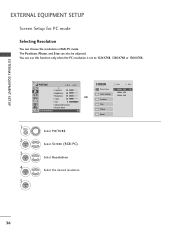
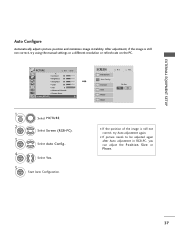
... x 768 36 PICTURE Move Enter E • Contrast 50 • Brightness 50 • Sharpness 50 • Color 50 • Tint 0R G • Advanced Control • Picture Reset Screen (RGB-PC) 1 MENU 2 ENTER 3 ENTER 4 ENTER 5 ENTER Select PICTURE. SCREEN Resolution Auto Config. Select Screen (RGB-PC). EXTERNAL EQUIPMENT SETUP EXTERNAL EQUIPMENT SETUP Screen...
... x 768 36 PICTURE Move Enter E • Contrast 50 • Brightness 50 • Sharpness 50 • Color 50 • Tint 0R G • Advanced Control • Picture Reset Screen (RGB-PC) 1 MENU 2 ENTER 3 ENTER 4 ENTER 5 ENTER Select PICTURE. SCREEN Resolution Auto Config. Select Screen (RGB-PC). EXTERNAL EQUIPMENT SETUP EXTERNAL EQUIPMENT SETUP Screen...
Owner's Manual (English)
Page 37
...; Contrast 50 • Brightness 50 • Sharpness 50 • Color 50 • Tint 0R G • Advanced Control • Picture Reset Screen (RGB-PC) 1 MENU 2 ENTER 3 ENTER Select PICTURE. Position Size Phase Reset Move Prev. After adjustment, if the image is still not correct, try using the manual settings or a different resolution or...
...; Contrast 50 • Brightness 50 • Sharpness 50 • Color 50 • Tint 0R G • Advanced Control • Picture Reset Screen (RGB-PC) 1 MENU 2 ENTER 3 ENTER Select PICTURE. Position Size Phase Reset Move Prev. After adjustment, if the image is still not correct, try using the manual settings or a different resolution or...

Owner's Manual (English)
Page 38
...Enter E • Contrast 50 • Brightness 50 • Sharpness 50 • Color 50 • Tint 0R G • Advanced Control • Picture Reset Screen (RGB-PC) 1 MENU 2 ENTER 3 ENTER 4 ENTER 5 ENTER Select PICTURE. Make appropriate adjustments. I P h a s e: This function allows you...or Phase. I S i z e: This function is to remove any vertical bars or stripes visible on the screen background. Position Size Phase Reset Move Prev. And the horizontal screen size will also change. SCREEN Resolution Auto Config. D F G E I Position: This function is not...
...Enter E • Contrast 50 • Brightness 50 • Sharpness 50 • Color 50 • Tint 0R G • Advanced Control • Picture Reset Screen (RGB-PC) 1 MENU 2 ENTER 3 ENTER 4 ENTER 5 ENTER Select PICTURE. Make appropriate adjustments. I P h a s e: This function allows you...or Phase. I S i z e: This function is to remove any vertical bars or stripes visible on the screen background. Position Size Phase Reset Move Prev. And the horizontal screen size will also change. SCREEN Resolution Auto Config. D F G E I Position: This function is not...
Owner's Manual (English)
Page 39
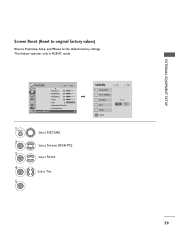
Select Reset. Position Size Phase Reset Move Prev. This feature operates only in RGB-PC mode. To Set Yes No 39 Select Screen (RGB-PC). SCREEN Resolution Auto Config. PICTURE Move Enter E • Contrast 50 • Brightness 50 • Sharpness 50 • Color 50 • Tint 0R G • Advanced Control • Picture Reset Screen (RGB-PC) 1 MENU 2 ENTER 3 ENTER 4 ENTER 5 ENTER Select PICTURE. Select Y e s. EXTERNAL EQUIPMENT SETUP Screen Reset (Reset to original factory values) Returns Position, S i z e, and Phase to the default factory settings.
Select Reset. Position Size Phase Reset Move Prev. This feature operates only in RGB-PC mode. To Set Yes No 39 Select Screen (RGB-PC). SCREEN Resolution Auto Config. PICTURE Move Enter E • Contrast 50 • Brightness 50 • Sharpness 50 • Color 50 • Tint 0R G • Advanced Control • Picture Reset Screen (RGB-PC) 1 MENU 2 ENTER 3 ENTER 4 ENTER 5 ENTER Select PICTURE. Select Y e s. EXTERNAL EQUIPMENT SETUP Screen Reset (Reset to original factory values) Returns Position, S i z e, and Phase to the default factory settings.
Owner's Manual (English)
Page 44
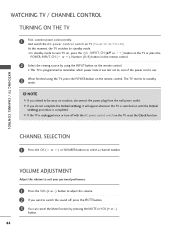
..., connect power cord correctly. And switch the AC power control switch on the TV, reset the Clock function. I In standby mode to be away on vacation, disconnect the power plug from the wall power outlet. VOLUME ADJUSTMENT Adjust the volume ... on the remote control. 2 Select the viewing source by pressing the MUTE or VOL (+ or -) button. 44 I This TV is programmed to switch the sound off with the AC power control switch on TV (Except 32/42/47CL40). G If you do not complete the Initial setting, it was last set to standby...
..., connect power cord correctly. And switch the AC power control switch on the TV, reset the Clock function. I In standby mode to be away on vacation, disconnect the power plug from the wall power outlet. VOLUME ADJUSTMENT Adjust the volume ... on the remote control. 2 Select the viewing source by pressing the MUTE or VOL (+ or -) button. 44 I This TV is programmed to switch the sound off with the AC power control switch on TV (Except 32/42/47CL40). G If you do not complete the Initial setting, it was last set to standby...
Owner's Manual (English)
Page 74
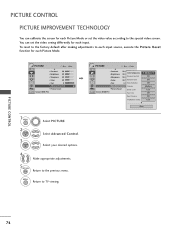
Select Advanced Control. MENU Return to each input source, execute the Picture Reset function for each Picture Mode. To reset to the factory default after making adjustments to TV viewing. You can calibrate the screen for each Picture Mode or set the video seeing differently for each input. PICTURE Move Enter E • Contrast 50...
Select Advanced Control. MENU Return to each input source, execute the Picture Reset function for each Picture Mode. To reset to the factory default after making adjustments to TV viewing. You can calibrate the screen for each Picture Mode or set the video seeing differently for each input. PICTURE Move Enter E • Contrast 50...

Owner's Manual (English)
Page 75
... menu option. 6 Make appropriate adjustments. 7 RETURN Return to TV viewing. 75 Select Expert1 or Expert2. This may also be used be a professional to help optimize the TV performance in the environment the TV is in. PICTURE CONTROL EXPERT PICTURE CONTROL By segmenting categories, ...50 • Color 50 Dynamic Contrast Noise Reduction Gamma Black Level • Tint 0 RReal CinemG a • Expert Control TruMotion 120Hz • Picture Reset Screen (RGB-PC) Color Standard Color Gamut F Off G Low Medium Low Off Low HD Standard Edge Enhancer High E Close 1 MENU 2 ENTER 3...
... menu option. 6 Make appropriate adjustments. 7 RETURN Return to TV viewing. 75 Select Expert1 or Expert2. This may also be used be a professional to help optimize the TV performance in the environment the TV is in. PICTURE CONTROL EXPERT PICTURE CONTROL By segmenting categories, ...50 • Color 50 Dynamic Contrast Noise Reduction Gamma Black Level • Tint 0 RReal CinemG a • Expert Control TruMotion 120Hz • Picture Reset Screen (RGB-PC) Color Standard Color Gamut F Off G Low Medium Low Off Low HD Standard Edge Enhancer High E Close 1 MENU 2 ENTER 3...

Owner's Manual (English)
Page 79
... selected picture modes return to TV viewing. PICTURE Move Enter E • Contrast 50 • Brightness 50 • Sharp?neAssll pic5tu0re settings will be resetted. Continue? • Color 50 • Tint 0R Yes • Advanced Control G No • Picture Reset Screen (RGB-PC) 1 MENU Select PICTURE. 2 ENTER Select Picture Reset. 3 ENTER Select Y e s. 4 ENTER Initialize the...
... selected picture modes return to TV viewing. PICTURE Move Enter E • Contrast 50 • Brightness 50 • Sharp?neAssll pic5tu0re settings will be resetted. Continue? • Color 50 • Tint 0R Yes • Advanced Control G No • Picture Reset Screen (RGB-PC) 1 MENU Select PICTURE. 2 ENTER Select Picture Reset. 3 ENTER Select Y e s. 4 ENTER Initialize the...

Owner's Manual (English)
Page 87
... • Level 3- + Balance 0L R Sound Mode : Standard • SRS TruSurround XT: Off • Treble 50 • Bass 50 • Reset TV Speaker : On AUDIO Move Enter E • Level 3- + Balance 0L R Sound Mode : Standard • SRS TruSurround XT: Off • Treble 50 ...• Bass 50 • Reset TV Speaker : On Off On 1 MENU 2 ENTER Select AUDIO. Select TV Speaker. 3 ENTER Select O n or O f f. 4 RETURN Return to use an external Hi-Fi system or a SRS ...
... • Level 3- + Balance 0L R Sound Mode : Standard • SRS TruSurround XT: Off • Treble 50 • Bass 50 • Reset TV Speaker : On AUDIO Move Enter E • Level 3- + Balance 0L R Sound Mode : Standard • SRS TruSurround XT: Off • Treble 50 ...• Bass 50 • Reset TV Speaker : On Off On 1 MENU 2 ENTER Select AUDIO. Select TV Speaker. 3 ENTER Select O n or O f f. 4 RETURN Return to use an external Hi-Fi system or a SRS ...

Owner's Manual (English)
Page 88
...: Off • Treble 50 • Bass 50 • Reset TV Speaker : On AUDIO Move Enter E • Level 3- + Balance 0L R Sound Mode : Standard • SRS TruSurround XT: Off • Treble 50 i Resetting audio configuration... • Bass 50 • Reset TV Speaker : On 1 MENU 2 ENTER Select AUDIO. Select Reset. 3 ENTER Initialize the adjusted value. 4 MENU Return to the...
...: Off • Treble 50 • Bass 50 • Reset TV Speaker : On AUDIO Move Enter E • Level 3- + Balance 0L R Sound Mode : Standard • SRS TruSurround XT: Off • Treble 50 i Resetting audio configuration... • Bass 50 • Reset TV Speaker : On 1 MENU 2 ENTER Select AUDIO. Select Reset. 3 ENTER Initialize the adjusted value. 4 MENU Return to the...

Owner's Manual (English)
Page 96
TIME SETTING Manual Clock Setup If the current time setting is unplugged once or turn off with the AC power control switch on the TV, reset the Clock function. TIME Clock Off Time On Time Sleep Timer Move Enter : Off : Off : Off 1 MENU Select T I M E. 2 ENTER Select Clock. 3 ENTER Select ... Date, Hour, or Minutes option. 5 Set the Year, Month, Date, Hour, or Minutes option. 6 RETURN Return to TV viewing. MENU Return to the previous menu. If this TV is wrong, reset the clock manually. TIME Clock Off Time On Time Sleep Timer Move : Off : Off : Off Enter F Month Date Year ...
TIME SETTING Manual Clock Setup If the current time setting is unplugged once or turn off with the AC power control switch on the TV, reset the Clock function. TIME Clock Off Time On Time Sleep Timer Move Enter : Off : Off : Off 1 MENU Select T I M E. 2 ENTER Select Clock. 3 ENTER Select ... Date, Hour, or Minutes option. 5 Set the Year, Month, Date, Hour, or Minutes option. 6 RETURN Return to TV viewing. MENU Return to the previous menu. If this TV is wrong, reset the clock manually. TIME Clock Off Time On Time Sleep Timer Move : Off : Off : Off Enter F Month Date Year ...


