

Owners Manual
Page 1
LED LCD Monitor (LED Monitor) Model List 32UD59 32MU59 32UD60 32UK50T www.lg.com Please read the safety information carefully before using the product. Owner's Manual LED LCD MONITOR (LED MONITOR*) *LG LED Monitors are LCD Monitors with LED Backlighting.
LED LCD Monitor (LED Monitor) Model List 32UD59 32MU59 32UD60 32UK50T www.lg.com Please read the safety information carefully before using the product. Owner's Manual LED LCD MONITOR (LED MONITOR*) *LG LED Monitors are LCD Monitors with LED Backlighting.
Owners Manual
Page 2
... Menu Features 20 User Settings 20 - Assembling the stand base 10 Installing the Monitor 10 - Adjusting the angle 15 - Connecting Headphones 19 USER SETTINGS 19 Activating...DisplayPort connection 18 Connecting to Use the Joystick Button 7 Input Connector 8 Moving and Lifting the Monitor 9 Installing the Monitor 9 - Assembling the stand base 11 - How to AV Devices 18 - 2 Contents ENEGNLGISH...Button Description 6 - Using the Kensington lock 15 - Installing to a wall 17 USING THE MONITOR 17 Connecting to External Devices 18 - Adjusting the stand height 14 - HDMI connection 18 ...
... Menu Features 20 User Settings 20 - Assembling the stand base 10 Installing the Monitor 10 - Adjusting the angle 15 - Connecting Headphones 19 USER SETTINGS 19 Activating...DisplayPort connection 18 Connecting to Use the Joystick Button 7 Input Connector 8 Moving and Lifting the Monitor 9 Installing the Monitor 9 - Assembling the stand base 11 - How to AV Devices 18 - 2 Contents ENEGNLGISH...Button Description 6 - Using the Kensington lock 15 - Installing to a wall 17 USING THE MONITOR 17 Connecting to External Devices 18 - Adjusting the stand height 14 - HDMI connection 18 ...

Owners Manual
Page 3
..."Automatic Standby" in Europe market and which is set to "Off". The following content is only applied to the monitor which needs to meet the ErP Directive: * This monitor is sold in the OSD menu to be turned off automatically after 4 hours when you turn on the license. Visit... www.lg.com for more information on the display and there are trademarks or registered trademarks of HDMI Licensing Administrator, Inc. ...
..."Automatic Standby" in Europe market and which is set to "Off". The following content is only applied to the monitor which needs to meet the ErP Directive: * This monitor is sold in the OSD menu to be turned off automatically after 4 hours when you turn on the license. Visit... www.lg.com for more information on the display and there are trademarks or registered trademarks of HDMI Licensing Administrator, Inc. ...

Owners Manual
Page 5
Drivers and Software Monitor Driver OnScreen Control Dual Controller Installation Priority Recommended Recommended Optional 32UD59/32MU59/32UD60/32UK50T O O O 5 ENEGNLGISH Supported Drivers and Software You can download and install the latest version from the LGE website (www.lg.com).
Drivers and Software Monitor Driver OnScreen Control Dual Controller Installation Priority Recommended Recommended Optional 32UD59/32MU59/32UD60/32UK50T O O O 5 ENEGNLGISH Supported Drivers and Software You can download and install the latest version from the LGE website (www.lg.com).

Owners Manual
Page 6
...;/► Volume Control You can easily control the functions of the monitor. 6 Component and Button Description 32UK50T ENEGNLGISH Joystick Button Power LED y yOn: power is on the monitor. Basic Functions Power on Press the joystick button once with your finger. Power off Press and hold the joystick button ...finger to turn off How to Use the Joystick Button 32UK50T You can control the volume by moving the joystick button left /right with your finger to turn on y yOff: power is located at the bottom of the monitor by pressing the joystick button or moving it left /...
...;/► Volume Control You can easily control the functions of the monitor. 6 Component and Button Description 32UK50T ENEGNLGISH Joystick Button Power LED y yOn: power is on the monitor. Basic Functions Power on Press the joystick button once with your finger. Power off Press and hold the joystick button ...finger to turn off How to Use the Joystick Button 32UK50T You can control the volume by moving the joystick button left /right with your finger to turn on y yOff: power is located at the bottom of the monitor by pressing the joystick button or moving it left /...

Owners Manual
Page 8
... its shape or size. Do not hold the panel itself. CAUTION y yAs far as possible, avoid touching the monitor screen. This may result in damage to the screen or some of its side or tilt it being scratched or damaged and to ensure ...safe transportation regardless of the pixels used to create images. y yWhen moving the monitor, keep it . ENEGNLGISH 8 Moving and Lifting the Monitor When moving or lifting the monitor, follow these instructions to prevent the monitor from you use the monitor panel without the stand base, its joystick button may cause the...
... its shape or size. Do not hold the panel itself. CAUTION y yAs far as possible, avoid touching the monitor screen. This may result in damage to the screen or some of its side or tilt it being scratched or damaged and to ensure ...safe transportation regardless of the pixels used to create images. y yWhen moving the monitor, keep it . ENEGNLGISH 8 Moving and Lifting the Monitor When moving or lifting the monitor, follow these instructions to prevent the monitor from you use the monitor panel without the stand base, its joystick button may cause the...

Owners Manual
Page 9
Stand Body 5 Stand Body 2 Stand Base 3 or ENEGNLGISH 9 Installing the Monitor Assembling the stand base 4 1 CAUTION y yTo protect the screen from scratches, cover the surface with a soft cloth.
Stand Body 5 Stand Body 2 Stand Base 3 or ENEGNLGISH 9 Installing the Monitor Assembling the stand base 4 1 CAUTION y yTo protect the screen from scratches, cover the surface with a soft cloth.

Owners Manual
Page 10
or ENEGNLGISH 10 Installing the Monitor Assembling the stand base 3 32UK50T 1 4 Cable Holder 2 Stand Body Stand Base NOTE y y Press the stand until the button reaches the top.
or ENEGNLGISH 10 Installing the Monitor Assembling the stand base 3 32UK50T 1 4 Cable Holder 2 Stand Body Stand Base NOTE y y Press the stand until the button reaches the top.

Owners Manual
Page 11
... pattern on appearance, unlike the general method of the assembly. 32UK50T Cable Holder yyWhen lifting or moving the monitor, do not touch the monitor screen. Please use it . yyDo not carry the monitor upside down by the product warranty. The force applied to the monitor screen may cause damage to added glittering material in raw...
... pattern on appearance, unlike the general method of the assembly. 32UK50T Cable Holder yyWhen lifting or moving the monitor, do not touch the monitor screen. Please use it . yyDo not carry the monitor upside down by the product warranty. The force applied to the monitor screen may cause damage to added glittering material in raw...

Owners Manual
Page 12
... 100 mm(3.94 inches) away from the wall to ensure sufficient ventilation. 2 Connect the power adapter to moving or installing the monitor. CAUTION y yUnplug the power cord prior to the monitor and then plug the power cord into the wall outlet. 100 mm (3.94 inches) 100 mm (3.94 inches) 100 mm (3.94... inches) or 100 mm (3.94 inches) 32UK50T 100 mm (3.94 inches) 100 mm (3.94 inches) 100 mm (3.94 inches) 100 mm (3.94 inches...
... 100 mm(3.94 inches) away from the wall to ensure sufficient ventilation. 2 Connect the power adapter to moving or installing the monitor. CAUTION y yUnplug the power cord prior to the monitor and then plug the power cord into the wall outlet. 100 mm (3.94 inches) 100 mm (3.94 inches) 100 mm (3.94... inches) or 100 mm (3.94 inches) 32UK50T 100 mm (3.94 inches) 100 mm (3.94 inches) 100 mm (3.94 inches) 100 mm (3.94 inches...

Owners Manual
Page 13
ENEGNLGISH 13 Adjusting the stand height 1 Handle the monitor with both hands for safety. 32UK50T NOTE y yThe left or right side of the monitor head. Monitor head 2 The height can be adjusted up 3to2U3K°5)0. AT djust the horizontal level of the monitor head can be slightly rotated up or down (up to 120.0 mm (4.72 inches). 120.0 mm (4.72 inches) WARNING y yDo not put your fingers or hand between the screen and the base (chassis) when adjusting the screen's height.
ENEGNLGISH 13 Adjusting the stand height 1 Handle the monitor with both hands for safety. 32UK50T NOTE y yThe left or right side of the monitor head. Monitor head 2 The height can be adjusted up 3to2U3K°5)0. AT djust the horizontal level of the monitor head can be slightly rotated up or down (up to 120.0 mm (4.72 inches). 120.0 mm (4.72 inches) WARNING y yDo not put your fingers or hand between the screen and the base (chassis) when adjusting the screen's height.

Owners Manual
Page 14
WARNING y yTo avoid injury to touch or press the screen area when adjusting the angle of the monitor's frame as illustrated below. Rear Side Front Side The angle of the screen. Rear Side 32UK50T Front Side 15 32UK50T y yBe careful not to the fingers when adjusting the screen, do not hold the lower part of the monitor. ENEGNLGISH 14 Adjusting the angle 1 Place the monitor in an upright position, mounted on the stand base. 2 Adjust the angle of the screen can be adjusted forwards or backwards for a comfortable viewing experience.
WARNING y yTo avoid injury to touch or press the screen area when adjusting the angle of the monitor's frame as illustrated below. Rear Side Front Side The angle of the screen. Rear Side 32UK50T Front Side 15 32UK50T y yBe careful not to the fingers when adjusting the screen, do not hold the lower part of the monitor. ENEGNLGISH 14 Adjusting the angle 1 Place the monitor in an upright position, mounted on the stand base. 2 Adjust the angle of the screen can be adjusted forwards or backwards for a comfortable viewing experience.

Owners Manual
Page 15
.... y yFor more information on the back of the standard wall mount plate or compatible device. 1 Place the screen face down. The accessories can damage the monitor's screen. 32UK50T NOTE y yUse of the Kensington lock is optional. NOTE y yThe wall mount plate is sold separately. y yBe careful not to the...
.... y yFor more information on the back of the standard wall mount plate or compatible device. 1 Place the screen face down. The accessories can damage the monitor's screen. 32UK50T NOTE y yUse of the Kensington lock is optional. NOTE y yThe wall mount plate is sold separately. y yBe careful not to the...

Owners Manual
Page 16
... local retail store or a qualified installer. Wall Mount (A x B) Standard screw Number of the monitor. y yApplying excessive force when fastening screws may result in this case, LG Electronics is securely fixed to the monitor and to injury. Damage caused in the monitor falling off, which could lead to the wall. 1 If you use screw longer...
... local retail store or a qualified installer. Wall Mount (A x B) Standard screw Number of the monitor. y yApplying excessive force when fastening screws may result in this case, LG Electronics is securely fixed to the monitor and to injury. Damage caused in the monitor falling off, which could lead to the wall. 1 If you use screw longer...
Owners Manual
Page 17
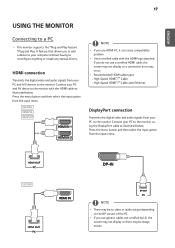
...cable with the HDMI cable as illustrated below . If you do not use generic cables not certified by LG, the screen may not display or there may occur. High-Speed HDMI®/TM Cable - Press the... menu button and then select the input option from the input menu. 32UD59 32MU59 32UK50T NOTE y yIf you use HDMI PC, it can cause compatibility problem. y y If you use a certified... or install any manual drivers. Connect your PC and AV device to the monitor with the HDMI logo attached. HDMI connection Transmits the digital video and audio signals from your PC ...
...cable with the HDMI cable as illustrated below . If you do not use generic cables not certified by LG, the screen may not display or there may occur. High-Speed HDMI®/TM Cable - Press the... menu button and then select the input option from the input menu. 32UD59 32MU59 32UK50T NOTE y yIf you use HDMI PC, it can cause compatibility problem. y y If you use a certified... or install any manual drivers. Connect your PC and AV device to the monitor with the HDMI logo attached. HDMI connection Transmits the digital video and audio signals from your PC ...

Owners Manual
Page 18
... Devices HDMI connection Transmits the digital video and audio signals from the input menu. 32UD59 32MU59 32UK50T Connecting to External Devices Connecting Headphones Connect peripherals to the monitor via the headphones port. High-Speed HDMI®/TM Cable with the HDMI cable as illustrated....y y If you do not use straight earphones. Connect as illustrated below. NOTE y yIf you use HDMI PC, it is recommended to the monitor. y yRecommended HDMI cable types - y yUse a certified cable with connecting another external device to use a certified HDMI cable, the screen may ...
... Devices HDMI connection Transmits the digital video and audio signals from the input menu. 32UD59 32MU59 32UK50T Connecting to External Devices Connecting Headphones Connect peripherals to the monitor via the headphones port. High-Speed HDMI®/TM Cable with the HDMI cable as illustrated....y y If you do not use straight earphones. Connect as illustrated below. NOTE y yIf you use HDMI PC, it is recommended to the monitor. y yRecommended HDMI cable types - y yUse a certified cable with connecting another external device to use a certified HDMI cable, the screen may ...

Owners Manual
Page 19
...Sets input mode. Exits the main menu. ENEGNLGISH 19 USER SETTINGS Activating the Main Menu 1 Press the joystick button on .) Adjusts the monitor volume level. Enters the Menu features. Enters the Input feature. Sets the picture mode for gaming. Enters the Game features. Description Exits...down (▲/▼) and left/right (◄/►) to set the options. 3 Press the joystick button once more to turn off the monitor. Joystick Button Button Menu Status Main menu disabled Main menu enabled Main menu disabled ◄ Main menu enabled Main menu disabled ► ...
...Sets input mode. Exits the main menu. ENEGNLGISH 19 USER SETTINGS Activating the Main Menu 1 Press the joystick button on .) Adjusts the monitor volume level. Enters the Menu features. Enters the Input feature. Sets the picture mode for gaming. Enters the Game features. Description Exits...down (▲/▼) and left/right (◄/►) to set the options. 3 Press the joystick button once more to turn off the monitor. Joystick Button Button Menu Status Main menu disabled Main menu enabled Main menu disabled ◄ Main menu enabled Main menu disabled ► ...
Owners Manual
Page 20
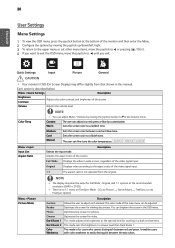
...environment. Reader Optimizes the screen for working in wide-screen, regardless of the main menu can fine-tune the color temperature. 32UD59 32MU59 32UK50T Menu > Input Input List Aspect Ratio Selects the input mode. The color mode of the video signal input. Dark Room 2 This ... view the OSD menu, press the joystick button at the recommended resolution (3840 x 2160). Quick Settings CAUTION Input Picture General y y Your monitor's OSD (On Screen Display) may look the same for users who cannot distinguish between the two colors. The user can be adjusted. Warm...
...environment. Reader Optimizes the screen for working in wide-screen, regardless of the main menu can fine-tune the color temperature. 32UD59 32MU59 32UK50T Menu > Input Input List Aspect Ratio Selects the input mode. The color mode of the video signal input. Dark Room 2 This ... view the OSD menu, press the joystick button at the recommended resolution (3840 x 2160). Quick Settings CAUTION Input Picture General y y Your monitor's OSD (On Screen Display) may look the same for users who cannot distinguish between the two colors. The user can be adjusted. Warm...
Owners Manual
Page 21
.... This mode is displayed when a user wants crystal clear images. Doing so may be affected. NOTE y y If the picture mode is the darkest color the monitor can customize various elements including game-related options. ENEGNLGISH Picture Adjust Brightness Contrast Sharpness SUPER RESOLUTION+ Adjusts the brightness of the screen. High Optimized picture...
.... This mode is displayed when a user wants crystal clear images. Doing so may be affected. NOTE y y If the picture mode is the darkest color the monitor can customize various elements including game-related options. ENEGNLGISH Picture Adjust Brightness Contrast Sharpness SUPER RESOLUTION+ Adjusts the brightness of the screen. High Optimized picture...

Owners Manual
Page 23
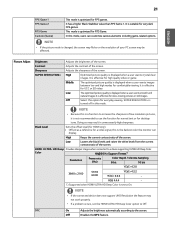
... H, and 8 H) Enable Enables DisplayPort 1.2. On Enables OSD Lock. Off Disables OSD Lock. y y If you set a timer for a period of the monitor on the bottom of time. You can select OSD Size to reset your settings? Yes Returns to Disable if your graphics card does not support...Saves energy using the high-efficiency SMART ENERGY SAVING feature. Do you want to Large or Small. No Cancel the selection. On Enables your monitor`s Buzzer. NOTE y y Be sure to configure this option to the default settings. NOTE y y All features are disabled except Brightness, ...
... H, and 8 H) Enable Enables DisplayPort 1.2. On Enables OSD Lock. Off Disables OSD Lock. y y If you set a timer for a period of the monitor on the bottom of time. You can select OSD Size to reset your settings? Yes Returns to Disable if your graphics card does not support...Saves energy using the high-efficiency SMART ENERGY SAVING feature. Do you want to Large or Small. No Cancel the selection. On Enables your monitor`s Buzzer. NOTE y y Be sure to configure this option to the default settings. NOTE y y All features are disabled except Brightness, ...


