
User Manual
Page 10
... from the images be7lo8 5w6.3 LIST 0 9 VOL MUTE FLASHBK ENTER CH P A G E RETURN 1 4 MARK RATIO POWER 2 INPUT CC 753 86 LIST 0 9 VOL MUTE FLASHBK ENTER CH P A G E MENU TIMER ALAM RETURN SAP EJECT 1.5V 1.5V Owner's Manual CD Manual Remote Control, Batteries Power Cord Not included with your TV. If an accessory is...
... from the images be7lo8 5w6.3 LIST 0 9 VOL MUTE FLASHBK ENTER CH P A G E RETURN 1 4 MARK RATIO POWER 2 INPUT CC 753 86 LIST 0 9 VOL MUTE FLASHBK ENTER CH P A G E MENU TIMER ALAM RETURN SAP EJECT 1.5V 1.5V Owner's Manual CD Manual Remote Control, Batteries Power Cord Not included with your TV. If an accessory is...
User Manual
Page 11
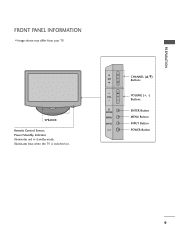
PREPARATION FRONT PANEL INFORMATION ■ Image shown may differ from your TV. CH VOL ENTER MENU INPUT CHANNEL (D,E) Buttons VOLUME (+, -) Buttons ENTER Button MENU Button INPUT Button POWER Button 9 SPEAKER Remote Control Sensor, Power/Standby Indicator Illuminates red in standby mode. Illuminates blue when the TV is switched on.
PREPARATION FRONT PANEL INFORMATION ■ Image shown may differ from your TV. CH VOL ENTER MENU INPUT CHANNEL (D,E) Buttons VOLUME (+, -) Buttons ENTER Button MENU Button INPUT Button POWER Button 9 SPEAKER Remote Control Sensor, Power/Standby Indicator Illuminates red in standby mode. Illuminates blue when the TV is switched on.
User Manual
Page 30
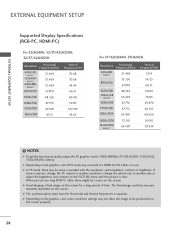
If noise is present, change the PC output to another rate or adjust the brightness and contrast on the PICTURE menu until the picture is separate. When you use . G In PC mode, there may be a noise on the graphics card, some resolution settings may not work ...
If noise is present, change the PC output to another rate or adjust the brightness and contrast on the PICTURE menu until the picture is separate. When you use . G In PC mode, there may be a noise on the graphics card, some resolution settings may not work ...

User Manual
Page 31
... be adjusted. The Position, Phase, and Size can choose the resolution in RGB-PC mode. Select the desired resolution. 29 Position Size Phase Reset Move MENU Prev. 1024 x 768 1280 x 768 1360 x 768 1 MENU 2 ENTER 3 ENTER 4 ENTER 5 ENTER Select PICTURE.
... be adjusted. The Position, Phase, and Size can choose the resolution in RGB-PC mode. Select the desired resolution. 29 Position Size Phase Reset Move MENU Prev. 1024 x 768 1280 x 768 1360 x 768 1 MENU 2 ENTER 3 ENTER 4 ENTER 5 ENTER Select PICTURE.

User Manual
Page 32
Auto Config. Select Screen (RGB-PC). 3 ENTER 4 ENTER Select Auto config.. G Position Size Phase Reset Move MENU Prev. EXTERNAL EQUIPMENT SETUP EXTERNAL EQUIPMENT SETUP Auto Configure Automatically adjusts picture position and minimizes image instability. Yes No 1 MENU 2 ENTER Select PICTURE. Select Y e s. 5 ENTER Start Auto Configuration. • If the position of the image is...
Auto Config. Select Screen (RGB-PC). 3 ENTER 4 ENTER Select Auto config.. G Position Size Phase Reset Move MENU Prev. EXTERNAL EQUIPMENT SETUP EXTERNAL EQUIPMENT SETUP Auto Configure Automatically adjusts picture position and minimizes image instability. Yes No 1 MENU 2 ENTER Select PICTURE. Select Y e s. 5 ENTER Start Auto Configuration. • If the position of the image is...

User Manual
Page 33
Position G Size Phase Reset Move MENU Prev. Select Screen (RGB-PC). EXTERNAL EQUIPMENT SETUP Adjustment for screen Position, Size, and Phase If the picture is to remove any vertical bars or ...; Brightness 50 • Sharpness 50 • Color 50 • Tint 0R • Advanced Control • Picture Reset Screen (RGB-PC) Enter G Screen Resolution Auto config. D F G E 1 MENU 2 ENTER 3 ENTER 4 ENTER 5 ENTER Select PICTURE. Select Position, Si ze, or Phase. And the horizontal screen size will also change. ■ P h a s e: This function allows you...
Position G Size Phase Reset Move MENU Prev. Select Screen (RGB-PC). EXTERNAL EQUIPMENT SETUP Adjustment for screen Position, Size, and Phase If the picture is to remove any vertical bars or ...; Brightness 50 • Sharpness 50 • Color 50 • Tint 0R • Advanced Control • Picture Reset Screen (RGB-PC) Enter G Screen Resolution Auto config. D F G E 1 MENU 2 ENTER 3 ENTER 4 ENTER 5 ENTER Select PICTURE. Select Position, Si ze, or Phase. And the horizontal screen size will also change. ■ P h a s e: This function allows you...

User Manual
Page 34
Select Y e s. 32 Position Size Initialize Settings. Yes No Phase Reset G 1 MENU 2 ENTER 3 ENTER 4 ENTER 5 ENTER Select PICTURE. Select Screen (RGB-PC). Select Reset. EXTERNAL EQUIPMENT SETUP EXTERNAL EQUIPMENT SETUP Screen Reset (Reset to original factory values) ... • Brightness 50 • Sharpness 50 • Color 50 • Tint 0R • Advanced Control • Picture Reset Screen (RGB-PC) Enter G Screen Resolution Move MENU Prev. Auto config. This feature operates only in RGB-PC mode.
Select Y e s. 32 Position Size Initialize Settings. Yes No Phase Reset G 1 MENU 2 ENTER 3 ENTER 4 ENTER 5 ENTER Select PICTURE. Select Screen (RGB-PC). Select Reset. EXTERNAL EQUIPMENT SETUP EXTERNAL EQUIPMENT SETUP Screen Reset (Reset to original factory values) ... • Brightness 50 • Sharpness 50 • Color 50 • Tint 0R • Advanced Control • Picture Reset Screen (RGB-PC) Enter G Screen Resolution Move MENU Prev. Auto config. This feature operates only in RGB-PC mode.

User Manual
Page 36
...the aspect ratio. THUMBSTICK Navigates the on mode. MARK RATIO POWER INPUT CC 123 456 789 0 FLASHBK LIST MUTE P VOL CH A G E ENTER MENU VCR/DVD control buttons Control video cassette recorders or DVD players. SAP Analog mode: Selects MTS sound (Mono, Stereo, or a SAP) DTV mode: .../ CHANNEL CONTROL REMOTE CONTROL FUNCTIONS When using the remote control, aim it at the remote control sensor on or off auto- MENU Displays the main menu or clears all on-screen displays and return to move return one step in an interactive RETURN application or other programmed equipment on...
...the aspect ratio. THUMBSTICK Navigates the on mode. MARK RATIO POWER INPUT CC 123 456 789 0 FLASHBK LIST MUTE P VOL CH A G E ENTER MENU VCR/DVD control buttons Control video cassette recorders or DVD players. SAP Analog mode: Selects MTS sound (Mono, Stereo, or a SAP) DTV mode: .../ CHANNEL CONTROL REMOTE CONTROL FUNCTIONS When using the remote control, aim it at the remote control sensor on or off auto- MENU Displays the main menu or clears all on-screen displays and return to move return one step in an interactive RETURN application or other programmed equipment on...

User Manual
Page 39
...: On • Level 0- + Balance 0L R Sound Mode : Standard • SRS TruSurround XT:Off • Treble 50 • Bass 50 E OPTION Menu Language Audio Language Caption Set ID Demo Mode Move Enter : English : English : Off : 1 : Off CHANNEL PICTURE AUDIO TIME OPTION LOCK INPUT USB TIME Clock...TV Rating-Children TV Rating-General Downloadable Rating Input Block INPUT TV AV1 AV2 Component RGB-PC HDMI1 HDMI2 Move Enter 1 MENU 2 ENTER Display each menu. WATCHING TV / CHANNEL CONTROL ON-SCREEN MENUS SELECTION Your TV's OSD (On Screen Display) may differ slightly from ...
...: On • Level 0- + Balance 0L R Sound Mode : Standard • SRS TruSurround XT:Off • Treble 50 • Bass 50 E OPTION Menu Language Audio Language Caption Set ID Demo Mode Move Enter : English : English : Off : 1 : Off CHANNEL PICTURE AUDIO TIME OPTION LOCK INPUT USB TIME Clock...TV Rating-Children TV Rating-General Downloadable Rating Input Block INPUT TV AV1 AV2 Component RGB-PC HDMI1 HDMI2 Move Enter 1 MENU 2 ENTER Display each menu. WATCHING TV / CHANNEL CONTROL ON-SCREEN MENUS SELECTION Your TV's OSD (On Screen Display) may differ slightly from ...
User Manual
Page 40
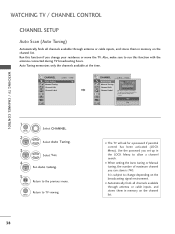
... Edit Channel Label Move Enter CHANNEL Auto Tuning Manual Tuning Channel Edit Channel Label Move Enter Check your residence or move the TV. Yes No 1 MENU 2 ENTER Select CHANNEL. Select Auto Tuning. 3 ENTER Select Y e s. 4 ENTER Run Auto tuning. 5 RETURN Return to TV viewing. WATCHING TV / CHANNEL ...change your antenna connection. It is 740. Auto Tuning memorizes only the channels available at the time. Return to the previous menu. MENU ■ The TV will be updated during TV broadcasting hours. Run this function with the antenna connected during Auto Tuning....
... Edit Channel Label Move Enter CHANNEL Auto Tuning Manual Tuning Channel Edit Channel Label Move Enter Check your residence or move the TV. Yes No 1 MENU 2 ENTER Select CHANNEL. Select Auto Tuning. 3 ENTER Select Y e s. 4 ENTER Run Auto tuning. 5 RETURN Return to TV viewing. WATCHING TV / CHANNEL ...change your antenna connection. It is 740. Auto Tuning memorizes only the channels available at the time. Return to the previous menu. MENU ■ The TV will be updated during TV broadcasting hours. Run this function with the antenna connected during Auto Tuning....

User Manual
Page 41
...Normal Good Delete Close ■ The TV will ask for a password if parental control has been activated (LOCK Menu). Select channel you want to the previous menu. MENU CHANNEL Auto Tuning Manual Tuning Channel Edit Channel Label Move Enter F DIGITAL G Select channel type and RF-channel... number. Use the password you set up in the LOCK Menu to allow a channel search. ■ When setting the Auto tuning or Manual tuning, the number of the signal being received. ENTER Select A d...
...Normal Good Delete Close ■ The TV will ask for a password if parental control has been activated (LOCK Menu). Select channel you want to the previous menu. MENU CHANNEL Auto Tuning Manual Tuning Channel Edit Channel Label Move Enter F DIGITAL G Select channel type and RF-channel... number. Use the password you set up in the LOCK Menu to allow a channel search. ■ When setting the Auto tuning or Manual tuning, the number of the signal being received. ENTER Select A d...

User Manual
Page 42
... in black and the channels deleted from the Channel Edit List are displayed in the Channel Edit menu. Select Channel Edit. 3 ENTER Select a channel. 4 Select channel you will be unable to the previous menu. When a channel number is deleted, it means that you want to add or delete.... 5 MENU Return to select it in blue. Return to select the deleted channel, directly enter the channel number with...
... in black and the channels deleted from the Channel Edit List are displayed in the Channel Edit menu. Select Channel Edit. 3 ENTER Select a channel. 4 Select channel you will be unable to the previous menu. When a channel number is deleted, it means that you want to add or delete.... 5 MENU Return to select it in blue. Return to select the deleted channel, directly enter the channel number with...

User Manual
Page 43
... station, the TV displays a short name for a channel even if you didn't preset a label for your channels. Return to the previous menu. Select Channel Label. Select Channel. 4 Select a channel to set logo. 5 Select the appropriate logo for the channel. 6 RETURN Return to TV viewing.... MENU 41 CHANNEL LABEL Choose preset labels for the channel. CHANNEL Auto Tuning Manual Tuning Channel Edit Channel Label Move Enter CHANNEL Auto Tuning Manual ...
... station, the TV displays a short name for a channel even if you didn't preset a label for your channels. Return to the previous menu. Select Channel Label. Select Channel. 4 Select a channel to set logo. 5 Select the appropriate logo for the channel. 6 RETURN Return to TV viewing.... MENU 41 CHANNEL LABEL Choose preset labels for the channel. CHANNEL Auto Tuning Manual Tuning Channel Edit Channel Label Move Enter CHANNEL Auto Tuning Manual ...

User Manual
Page 45
When the Pop Up menu does not appear, you can not add a new folder or delete an existing folder. 1 Connect the USB device to the USB IN jacks on the ... USB device Press the EJECT button before removing the USB device. ENTRY MODES When you can select Photo List or Music List in the USB menu. R 2 Select PHOTO LIST or MUSIC LI ST. 3 ENTER PHOTO LIST MUSIC LIST USB 43 On a USB device, you connect a USB device, this pop up...
When the Pop Up menu does not appear, you can not add a new folder or delete an existing folder. 1 Connect the USB device to the USB IN jacks on the ... USB device Press the EJECT button before removing the USB device. ENTRY MODES When you can select Photo List or Music List in the USB menu. R 2 Select PHOTO LIST or MUSIC LI ST. 3 ENTER PHOTO LIST MUSIC LIST USB 43 On a USB device, you connect a USB device, this pop up...

User Manual
Page 47
... Only baseline scan is supported among JPG. • Available JPG size: 64 pixel (width) x 64 pixel (height) - 15360 pixel (width) x 8640 pixel (height) Screen Components 1 MENU Select U S B. 2 ENTER ENTER Select Photo List. 1 Moves to upper level folder 2 Preview: Display the thumbnail/folder name of the photo in the selected folder 2 3 Current... 06/10/2008 KY102 04/03/2008 JMJ001 01/01/2000 JMJ002 06/15/2008 JMJ003 04/03/2008 JMJ004 02/18/2008 Navigation Popup Menu 5 KY103 KY104 KY105 JMJ005 JMJ006 JMJ007 JMJ008 03/30/2008 06/19/2008 01/31/2008 05/13/2008 05/26/2008 02/18...
... Only baseline scan is supported among JPG. • Available JPG size: 64 pixel (width) x 64 pixel (height) - 15360 pixel (width) x 8640 pixel (height) Screen Components 1 MENU Select U S B. 2 ENTER ENTER Select Photo List. 1 Moves to upper level folder 2 Preview: Display the thumbnail/folder name of the photo in the selected folder 2 3 Current... 06/10/2008 KY102 04/03/2008 JMJ001 01/01/2000 JMJ002 06/15/2008 JMJ003 04/03/2008 JMJ004 02/18/2008 Navigation Popup Menu 5 KY103 KY104 KY105 JMJ005 JMJ006 JMJ007 JMJ008 03/30/2008 06/19/2008 01/31/2008 05/13/2008 05/26/2008 02/18...

User Manual
Page 48
...Mark/Unmark: Use to navigate in a slide show of the marked photos. USB USB Photo Selection and Popup Menu Photo List Drive1 JMJ001 1366x768, 125KB Up Folder Page 2/3 No Marked Up Folder KY101 KY102 JMJ001 JMJ002 JMJ003 ... 01/31/2008 05/13/2008 05/26/2008 02/18/2008 02/18/2008 Navigation Popup Menu Exit Photo List Drive1 JMJ001 1366x768, 125KB Up Folder Page 2/3 No Marked Up Folder KY101 KY102...04/03/2008 01/01/2000 06/15/2008 04/03/2008 02/18/2008 Navigation Popup Menu KY103 03/30/2008 KY1041366x70668/1, 91/22500K8B KY1V0ie5w 01/31/2008 JMJM00a5rk 05/13/2008 JMJM00a6rk ...
...Mark/Unmark: Use to navigate in a slide show of the marked photos. USB USB Photo Selection and Popup Menu Photo List Drive1 JMJ001 1366x768, 125KB Up Folder Page 2/3 No Marked Up Folder KY101 KY102 JMJ001 JMJ002 JMJ003 ... 01/31/2008 05/13/2008 05/26/2008 02/18/2008 02/18/2008 Navigation Popup Menu Exit Photo List Drive1 JMJ001 1366x768, 125KB Up Folder Page 2/3 No Marked Up Folder KY101 KY102...04/03/2008 01/01/2000 06/15/2008 04/03/2008 02/18/2008 Navigation Popup Menu KY103 03/30/2008 KY1041366x70668/1, 91/22500K8B KY1V0ie5w 01/31/2008 JMJM00a5rk 05/13/2008 JMJM00a6rk ...

User Manual
Page 49
...2008 JMJD00e7lete 02/18/2008 JMJC0l0o8se 02/18/2008 Exit 1 Select the target folder or drive. 2 ENTER Select the desired photos. 3 ENTER Show the Popup menu. 4 Select V ie w. 5 ENTER The selected photo is displayed in full screen mode. Press the RETURN button to move to navigate in full size.... More operations are available in full size. button to the previous menu screen. ■ Use the C H photo page. Slideshow BGM 1/17 Delete Option Hide The aspect ratio of a photo may change the Photo List ...
...2008 JMJD00e7lete 02/18/2008 JMJC0l0o8se 02/18/2008 Exit 1 Select the target folder or drive. 2 ENTER Select the desired photos. 3 ENTER Show the Popup menu. 4 Select V ie w. 5 ENTER The selected photo is displayed in full screen mode. Press the RETURN button to move to navigate in full size.... More operations are available in full size. button to the previous menu screen. ■ Use the C H photo page. Slideshow BGM 1/17 Delete Option Hide The aspect ratio of a photo may change the Photo List ...

User Manual
Page 50
... the previous or next photo. ■ Use button to display. G Hide : Hide the menu on the full-sized screen. ■ To see the menu again on the full-sized screen, press ENTER button to select and control the menu on the full-sized screen. Press F G to music while viewing photos in full size...
... the previous or next photo. ■ Use button to display. G Hide : Hide the menu on the full-sized screen. ■ To see the menu again on the full-sized screen, press ENTER button to select and control the menu on the full-sized screen. Press F G to music while viewing photos in full size...

User Manual
Page 51
...The On-Screen Display on the remote control Music List Drive1 3 4 Page 2/3 No Marked Title Up Folder A 00:00 / 04:16 Up Folder Navigation Popup Menu 5 Duration Exit 49 Supported music file: *.MP3 Bit rate range 32 Kbps - 320 Kbps • Sampling rate (Sampling Frequency) MPEG1 layer 3: 32 kHz, ...44.1 kHz, 48 kHz MPEG2 layer 3: 16 kHz, 22.05 kHz, 24 kHz MPEG2.5 layer 3: 8 kHz, 11.025 kHz, 12 kHz Screen Components 1 MENU Select U S B. 2 ENTER ENTER Select Music List. 1 Moves to play back copy-protected files. This TV cannot play MP3 files from a USB storage device. USB...
...The On-Screen Display on the remote control Music List Drive1 3 4 Page 2/3 No Marked Title Up Folder A 00:00 / 04:16 Up Folder Navigation Popup Menu 5 Duration Exit 49 Supported music file: *.MP3 Bit rate range 32 Kbps - 320 Kbps • Sampling rate (Sampling Frequency) MPEG1 layer 3: 32 kHz, ...44.1 kHz, 48 kHz MPEG2 layer 3: 16 kHz, 22.05 kHz, 24 kHz MPEG2.5 layer 3: 8 kHz, 11.025 kHz, 12 kHz Screen Components 1 MENU Select U S B. 2 ENTER ENTER Select Music List. 1 Moves to play back copy-protected files. This TV cannot play MP3 files from a USB storage device. USB...

User Manual
Page 52
...Photo Mark Mark All Delete Close 1 Select the target folder or drive. 2 ENTER Select the desired musics. 3 ENTER Show the Popup menu. 4 ENTER Select the desired Popup menu. 5 Return to navigate in the folder. G Unmark All: Deselect all the music in the folder will be played in playback will... be played. G Play Marked: Play the selected files. button to TV viewing. G Close: Close the pop-up menu. ■ Use the C H music page. G Mark All: Mark all files in the ■ Use the MARK button to mark or unmark a music. ...
...Photo Mark Mark All Delete Close 1 Select the target folder or drive. 2 ENTER Select the desired musics. 3 ENTER Show the Popup menu. 4 ENTER Select the desired Popup menu. 5 Return to navigate in the folder. G Unmark All: Deselect all the music in the folder will be played in playback will... be played. G Play Marked: Play the selected files. button to TV viewing. G Close: Close the pop-up menu. ■ Use the C H music page. G Mark All: Mark all files in the ■ Use the MARK button to mark or unmark a music. ...


