
Owners Manual
Page 1
OWNER'S MANUAL LCD TV Please read this manual carefully before operating your set and retain it for future reference. 26LH210C 32LH210C 26LH200C 32LH200C 37LH200C 42LH200C 42LH300C 47LH300C P/NO : SAC34026003 (1004-REV01) www.lg.com
OWNER'S MANUAL LCD TV Please read this manual carefully before operating your set and retain it for future reference. 26LH210C 32LH210C 26LH200C 32LH200C 37LH200C 42LH200C 42LH300C 47LH300C P/NO : SAC34026003 (1004-REV01) www.lg.com

Owners Manual
Page 2
...any interference received, including interference that the cable ground shall be determined by turning the equipment off and on a circuit different from LG Electronics. Increase the separation between the equipment and receiver. - This device complies with the limits for proper grounding and, in a ...this product. 2 CAUTION Do not attempt to modify this product to the following measures: - Consult the dealer or an experienced radio/TV technician for compliance could void the user's authority to operate this equipment does cause harmful interference to an outlet on , the user is...
...any interference received, including interference that the cable ground shall be determined by turning the equipment off and on a circuit different from LG Electronics. Increase the separation between the equipment and receiver. - This device complies with the limits for proper grounding and, in a ...this product. 2 CAUTION Do not attempt to modify this product to the following measures: - Consult the dealer or an experienced radio/TV technician for compliance could void the user's authority to operate this equipment does cause harmful interference to an outlet on , the user is...

Owners Manual
Page 4
... the plug when unplugging the power cord. To reduce the risk of these conditions could result in . on the power cord to unplug the TV. 4 15 WARNING - The plug must be connected to telephone wires, lightening rods, or gas pipes. Protect the power cord from the AC... CAUTION concerning the Power Cord: It is not disconnected from physical or mechanical abuse, such as vases, cups, etc. Do not touch the TV with an exact replacement part by SWITCH. Do not install this product near flammable objects such as this owner's manual to plugs, wall outlets...
... the plug when unplugging the power cord. To reduce the risk of these conditions could result in . on the power cord to unplug the TV. 4 15 WARNING - The plug must be connected to telephone wires, lightening rods, or gas pipes. Protect the power cord from the AC... CAUTION concerning the Power Cord: It is not disconnected from physical or mechanical abuse, such as vases, cups, etc. Do not touch the TV with an exact replacement part by SWITCH. Do not install this product near flammable objects such as this owner's manual to plugs, wall outlets...
Owners Manual
Page 5
...built-up static charges. Do not press against it . 26 Keep the product away from direct sunlight. 27 For LCD TV If the TV feels cold to the touch, there may be visible on the TV as electric shock may be a small "flicker" when it can occur. Do not spray water or other materials... directly on the screen, appearing as tiny red, green, or blue spots. Doing so may take 2 or more people to carry larger TVs. ON DISPOSAL (Only Hg lamp used LCD TV) The fluorescent lamp used in excessively dusty places. 24 If you smell smoke or other electric light or power circuits, or where...
...built-up static charges. Do not press against it . 26 Keep the product away from direct sunlight. 27 For LCD TV If the TV feels cold to the touch, there may be visible on the TV as electric shock may be a small "flicker" when it can occur. Do not spray water or other materials... directly on the screen, appearing as tiny red, green, or blue spots. Doing so may take 2 or more people to carry larger TVs. ON DISPOSAL (Only Hg lamp used LCD TV) The fluorescent lamp used in excessively dusty places. 24 If you smell smoke or other electric light or power circuits, or where...

Owners Manual
Page 6
...14 Cable Management 15 Desktop Pedestal Installation 16 Swivel Stand 16 Kensington Security System 16 Attaching the TV to a Desk 17 Securing the TV to the wall to prevent falling when the TV is used on a stand 18 Antenna or Cable Connection 19 EXTERNAL EQUIPMENT SETUP HD Receiver Setup... 23 VCR Setup 25 Other A/V Source Setup 27 USB Connection 28 Audio out Connection 29 PC Setup 30 WATCHING TV / CHANNEL CONTROL Remote Control Functions 36 Turning On TV 38 Channel Selection 38 Volume Adjustment 38 Initial Setting 39 On-Screen Menus Selection 40 Quick Menu 41 6 Channel ...
...14 Cable Management 15 Desktop Pedestal Installation 16 Swivel Stand 16 Kensington Security System 16 Attaching the TV to a Desk 17 Securing the TV to the wall to prevent falling when the TV is used on a stand 18 Antenna or Cable Connection 19 EXTERNAL EQUIPMENT SETUP HD Receiver Setup... 23 VCR Setup 25 Other A/V Source Setup 27 USB Connection 28 Audio out Connection 29 PC Setup 30 WATCHING TV / CHANNEL CONTROL Remote Control Functions 36 Turning On TV 38 Channel Selection 38 Volume Adjustment 38 Initial Setting 39 On-Screen Menus Selection 40 Quick Menu 41 6 Channel ...

Owners Manual
Page 7
...Auto On/Off Time Setting 92 Sleep Timer Setting 93 PARENTAL CONTROL / RATINGS Set Password & Lock System 94 Channel Blocking 97 Movie & TV Rating 98 Downloadable Rating 101 External Input Blocking 102 Key Lock 103 APPENDIX Troubleshooting 104 Maintenance 106 Product Specifications 107 IR Codes 108 External ...Control Through RS-232C 110 Open Source License 116 7 User Mode 79 Balance 80 Audio Reset 81 TV Speakers On/Off Setup 82 External Speakers On/Off Setup 83 Stereo/SAP Broadcasts Setup 84 Audio Language 85 On-Screen Menus Language ...
...Auto On/Off Time Setting 92 Sleep Timer Setting 93 PARENTAL CONTROL / RATINGS Set Password & Lock System 94 Channel Blocking 97 Movie & TV Rating 98 Downloadable Rating 101 External Input Blocking 102 Key Lock 103 APPENDIX Troubleshooting 104 Maintenance 106 Product Specifications 107 IR Codes 108 External ...Control Through RS-232C 110 Open Source License 116 7 User Mode 79 Balance 80 Audio Reset 81 TV Speakers On/Off Setup 82 External Speakers On/Off Setup 83 Stereo/SAP Broadcasts Setup 84 Audio Language 85 On-Screen Menus Language ...

Owners Manual
Page 8
... necessary for professional certification by the user to experience the best their LG HDTV has to help keep dialogue audible when background noise swells. Automatically enhances and amplifies the sound of HDMI Licensing LLC." This phenomenon is incorporated under license from Dolby Laboratories.... It allows the viewer to prevent image burn, avoid displaying a fixed image on your TV screen for a prolonged period (2 or more hours for LCD, 1 or more hours for...
... necessary for professional certification by the user to experience the best their LG HDTV has to help keep dialogue audible when background noise swells. Automatically enhances and amplifies the sound of HDMI Licensing LLC." This phenomenon is incorporated under license from Dolby Laboratories.... It allows the viewer to prevent image burn, avoid displaying a fixed image on your TV screen for a prolonged period (2 or more hours for LCD, 1 or more hours for...

Owners Manual
Page 9
...accessories are included with the polishing cloth. * Do not wipe roughly when removing stain. Option Extras D-sub 15 pin Cable When using the VGA (D-sub 15 pin cable) PC connection, the user must use shielded signal interface cables with ferrite cores to P.15) Not included with all... models Polishing Cloth * Wipe spots on the exterior only with your TV. Excessive pressure may differ from the images below. 753 86 LIST 0 9 VOL MUTE FLASHBK ENTER CH P A G E RETURN 1 4 INFO AV MODE POWER...
...accessories are included with the polishing cloth. * Do not wipe roughly when removing stain. Option Extras D-sub 15 pin Cable When using the VGA (D-sub 15 pin cable) PC connection, the user must use shielded signal interface cables with ferrite cores to P.15) Not included with all... models Polishing Cloth * Wipe spots on the exterior only with your TV. Excessive pressure may differ from the images below. 753 86 LIST 0 9 VOL MUTE FLASHBK ENTER CH P A G E RETURN 1 4 INFO AV MODE POWER...

Owners Manual
Page 10
... INPUT CHANNEL (D,E) Buttons VOLUME (+, -) Buttons ENTER Button MENU Button INPUT Button POWER Button 10 PREPARATION PREPARATION FRONT PANEL INFORMATION I Image shown may differ from your TV. 26LH200C, 26LH210C INPUT Button POWER Button MENU Button ENTER Button VOLUME CHANNEL (-, +) Buttons (E,D) Buttons INPUT MENU ENTER VOL CH 32LH210C, 32/37/42LH200C, 42/47LH300C...
... INPUT CHANNEL (D,E) Buttons VOLUME (+, -) Buttons ENTER Button MENU Button INPUT Button POWER Button 10 PREPARATION PREPARATION FRONT PANEL INFORMATION I Image shown may differ from your TV. 26LH200C, 26LH210C INPUT Button POWER Button MENU Button ENTER Button VOLUME CHANNEL (-, +) Buttons (E,D) Buttons INPUT MENU ENTER VOL CH 32LH210C, 32/37/42LH200C, 42/47LH300C...

Owners Manual
Page 11
Uses a D-sub 15 pin cable (VGA cable). Uses a red, green, and blue cable for video & red and white ... PC audio input. 5 OPTICAL DIGITAL AUDIO OUT Digital optical audio output for viewing photos and listening to operate the TV on DC power. 11 This port is used for external speaker jack. 10 COMPONENT IN Analog Connection. Supports HD....8 REMOTE CONTROL IN PORT For a wired remote control. 9 SPEAKER OUT PORT Used for Service or Hotel mode. 3 HDMI/DVI IN, HDMI IN Digital Connection. Supports standard definition video only (480i). 7 RS-232C IN (CONTROL & SERVICE) PORT Used by third...
Uses a D-sub 15 pin cable (VGA cable). Uses a red, green, and blue cable for video & red and white ... PC audio input. 5 OPTICAL DIGITAL AUDIO OUT Digital optical audio output for viewing photos and listening to operate the TV on DC power. 11 This port is used for external speaker jack. 10 COMPONENT IN Analog Connection. Supports HD....8 REMOTE CONTROL IN PORT For a wired remote control. 9 SPEAKER OUT PORT Used for Service or Hotel mode. 3 HDMI/DVI IN, HDMI IN Digital Connection. Supports standard definition video only (480i). 7 RS-232C IN (CONTROL & SERVICE) PORT Used by third...

Owners Manual
Page 12
PREPARATION PREPARATION STAND INSTRUCTIONS I Image shown may differ from damage. 2 Assemble the TV as shown. 3 Fix the 4 screws securely using the holes in the back of the TV. ! NOTE G When assembling the desk type stand, make sure the screws are fully tightened (If not tightened fully, the TV can tilt forward after the product installation). Do not over tighten. 12 INSTALLATION 1 Carefully place the TV screen side down on a cushioned surface to protect the screen from your TV.
PREPARATION PREPARATION STAND INSTRUCTIONS I Image shown may differ from damage. 2 Assemble the TV as shown. 3 Fix the 4 screws securely using the holes in the back of the TV. ! NOTE G When assembling the desk type stand, make sure the screws are fully tightened (If not tightened fully, the TV can tilt forward after the product installation). Do not over tighten. 12 INSTALLATION 1 Carefully place the TV screen side down on a cushioned surface to protect the screen from your TV.

Owners Manual
Page 13
PREPARATION DETACHMENT 1 Carefully place the TV screen side down on a cushioned surface to protect the screen from damage. 2 Remove the screws from the TV. 3 Detach the stand from TV. Press the PROTECTION COVER into the TV until you hear it click. 13 PROTECTION COVER After removing the stand, install the included protection cover over the hole for the stand.
PREPARATION DETACHMENT 1 Carefully place the TV screen side down on a cushioned surface to protect the screen from damage. 2 Remove the screws from the TV. 3 Detach the stand from TV. Press the PROTECTION COVER into the TV until you hear it click. 13 PROTECTION COVER After removing the stand, install the included protection cover over the hole for the stand.

Owners Manual
Page 14
...VESA WALL MOUNTING Install your wall mount on their specifications. G Standard dimensions for assembly are shown in the table. LG is not liable for TV damage or personal injury when a non-VESA or non specified wall mount is not liable for these kinds of the ...screws may differ depending on a solid wall perpendicular to personal injury. Model VESA (A * B) A B Standard Screw Quantity 26LH200C 26LH210C 200 * 100 M4 4 32LH210C, 32LH200C 37LH200C, 42LH200C, 42LH300C...
...VESA WALL MOUNTING Install your wall mount on their specifications. G Standard dimensions for assembly are shown in the table. LG is not liable for TV damage or personal injury when a non-VESA or non specified wall mount is not liable for these kinds of the ...screws may differ depending on a solid wall perpendicular to personal injury. Model VESA (A * B) A B Standard Screw Quantity 26LH200C 26LH210C 200 * 100 M4 4 32LH210C, 32LH200C 37LH200C, 42LH200C, 42LH300C...

Owners Manual
Page 15
... BRACKET CABLE MANAGEMENT CLIP 15 PREPARATION CABLE MANAGEMENT I Image shown may be broken. NOTE G Do not hold the CABLE MANAGEMENT CLIP when moving the TV. - If the TV is dropped, you may be injured or the product may differ from being removed by accident. 2 Install the CABLE MANAGEMENT CLIP as shown. Secure...
... BRACKET CABLE MANAGEMENT CLIP 15 PREPARATION CABLE MANAGEMENT I Image shown may be broken. NOTE G Do not hold the CABLE MANAGEMENT CLIP when moving the TV. - If the TV is dropped, you may be injured or the product may differ from being removed by accident. 2 Install the CABLE MANAGEMENT CLIP as shown. Secure...

Owners Manual
Page 16
... G Ensure adequate ventilation by 20 degrees to the user's guide provided with a Kensington Security System connector on all models. - The TV is equipped with the Kensington Security System. For the detailed installation and use of 4 inches on the back panel. Connect the Kensington ...Security System cable as notebook PCs and LCD projectors. For proper ventilation, allow a clearance of the Kensington Security System, refer to suit your TV. PREPARATION PREPARATION DESKTOP PEDESTAL INSTALLATION I This feature is not available for ...
... G Ensure adequate ventilation by 20 degrees to the user's guide provided with a Kensington Security System connector on all models. - The TV is equipped with the Kensington Security System. For the detailed installation and use of 4 inches on the back panel. Connect the Kensington ...Security System cable as notebook PCs and LCD projectors. For proper ventilation, allow a clearance of the Kensington Security System, refer to suit your TV. PREPARATION PREPARATION DESKTOP PEDESTAL INSTALLATION I This feature is not available for ...

Owners Manual
Page 17
... be attached to a desk so it cannot be securely attached to the floor/wall per installation instructions. PREPARATION ATTACHING THE TV TO A DESK I Image shown may cause injury. 17 Stand Desk 4-Screws (not provided as parts of the product) G Screw: M5 x L (*L: Table depth + 8~10 mm) ex) ...
... be attached to a desk so it cannot be securely attached to the floor/wall per installation instructions. PREPARATION ATTACHING THE TV TO A DESK I Image shown may cause injury. 17 Stand Desk 4-Screws (not provided as parts of the product) G Screw: M5 x L (*L: Table depth + 8~10 mm) ex) ...

Owners Manual
Page 18
... that is safer to tie the rope so it becomes horizontal between the wall and the product. ! PREPARATION PREPARATION SECURING THE TV TO THE WALL TO PREVENT FALLING WHEN THE TV IS USED ON A STAND I You should purchase necessary components to a wall so it cannot fall over (when not using a wall mount... holes. I Use a sturdy rope (sold separately) to a wall so it cannot be attached to the wall. I Image shown may differ from the TV. Match the height of the TV. It is mounted on or hang from your product has the bolts in the eye-bolts position before inserting the eye-bolts, loosen...
... that is safer to tie the rope so it becomes horizontal between the wall and the product. ! PREPARATION PREPARATION SECURING THE TV TO THE WALL TO PREVENT FALLING WHEN THE TV IS USED ON A STAND I You should purchase necessary components to a wall so it cannot fall over (when not using a wall mount... holes. I Use a sturdy rope (sold separately) to a wall so it cannot be attached to the wall. I Image shown may differ from the TV. Match the height of the TV. It is mounted on or hang from your product has the bolts in the eye-bolts position before inserting the eye-bolts, loosen...
Owners Manual
Page 19
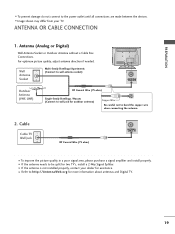
... /Houses (Connect to the power outlet until all connections are made between the devices. I If the antenna is not installed properly, contact your TV. ANTENNA OR CABLE CONNECTION 1. I To prevent damage do not connect to wall jack for more information about antennas and Digital... a 2-Way Signal Splitter. I Refer to http://AntennaWeb.org for outdoor antenna) Copper Wire Be careful not to be split for assistance. Cable Cable TV Wall Jack RF Coaxial Wire (75 ohm) ACNATBELNENIAN/ I If the antenna needs to bend the copper wire when connecting the antenna. 2. I To improve ...
... /Houses (Connect to the power outlet until all connections are made between the devices. I If the antenna is not installed properly, contact your TV. ANTENNA OR CABLE CONNECTION 1. I To prevent damage do not connect to wall jack for more information about antennas and Digital... a 2-Way Signal Splitter. I Refer to http://AntennaWeb.org for outdoor antenna) Copper Wire Be careful not to be split for assistance. Cable Cable TV Wall Jack RF Coaxial Wire (75 ohm) ACNATBELNENIAN/ I If the antenna needs to bend the copper wire when connecting the antenna. 2. I To improve ...

Owners Manual
Page 20
... input source on the TV using the INPUT button on the remote control. 1 2 RJP AV IN 1 VIDEO AUDIO 2 L(MONO) R 1 VIDEO COMPONENT IN L AUDIO R L R SPEAKER OUT /DVI IN REMO CONTRO Supported Resolutions Signal Component 480i Yes 480p Yes 720p Yes 1080i Yes 1080p Yes HDMI No Yes Yes Yes ...59.94 60.00 Y PB PR L R 2 Connect the audio output of the digital settop box to the COMPONENT IN VIDEO jacks on the TV. Component Connection 1. However, if you have finished connecting all equipment. How to connect 1 Connect the video outputs (Y, PB, PR) of the ...
... input source on the TV using the INPUT button on the remote control. 1 2 RJP AV IN 1 VIDEO AUDIO 2 L(MONO) R 1 VIDEO COMPONENT IN L AUDIO R L R SPEAKER OUT /DVI IN REMO CONTRO Supported Resolutions Signal Component 480i Yes 480p Yes 720p Yes 1080i Yes 1080p Yes HDMI No Yes Yes Yes ...59.94 60.00 Y PB PR L R 2 Connect the audio output of the digital settop box to the COMPONENT IN VIDEO jacks on the TV. Component Connection 1. However, if you have finished connecting all equipment. How to connect 1 Connect the video outputs (Y, PB, PR) of the ...

Owners Manual
Page 21
... IN L AUDIO R L R SPEAKER OUT RGB IN (PC) AUDIO IN O /DVI IN (RGB/DVI) REMOTE RS-232C IN CONTROL IN (CONTROL&SERVICE) 1 HDMI OUTPUT HDMI-DTV Resolution Horizontal Vertical Frequency(KHz) Frequency(Hz) 720x480p 1280x720p 1920x1080i 1920x1080p 31.47 31.50 44.96 45.00 33.72 33.75 26...59.94 60.00 21 EXTERNAL EQUIPMENT SETUP HDMI Connection 1. HDMI supports both audio and video. 2. NOTE G Check HDMI cable over version 1.3. How to the HDMI/DVI I Select the HDMI1 or HDMI2 input source on the TV using the INPUT button on the TV. 2 No separate audio connection is necessary....
... IN L AUDIO R L R SPEAKER OUT RGB IN (PC) AUDIO IN O /DVI IN (RGB/DVI) REMOTE RS-232C IN CONTROL IN (CONTROL&SERVICE) 1 HDMI OUTPUT HDMI-DTV Resolution Horizontal Vertical Frequency(KHz) Frequency(Hz) 720x480p 1280x720p 1920x1080i 1920x1080p 31.47 31.50 44.96 45.00 33.72 33.75 26...59.94 60.00 21 EXTERNAL EQUIPMENT SETUP HDMI Connection 1. HDMI supports both audio and video. 2. NOTE G Check HDMI cable over version 1.3. How to the HDMI/DVI I Select the HDMI1 or HDMI2 input source on the TV using the INPUT button on the TV. 2 No separate audio connection is necessary....


