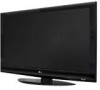
Specification (English)
Page 1
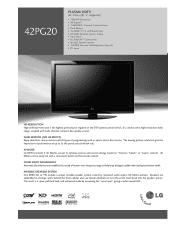
...use minute vibrations to 3x the panels actual refresh rate. AV MODE LG HDTVs include 3 AV Modes, preset to help keep dialogue audible when background noise swells. AV Modes can be easily set with all types of human voice frequency range to optimize picture and.... Speakers are embedded in the US. The moving picture resolution give the impression of performance of TVs include a unique invisible speaker system, tuned by increasing the "sweet spot", giving a wider sound field. 42PG20 PLASMA HDTV 42" Class (41.5" diagonal) • 720p HD Resolution • XD Engine™ •...
...use minute vibrations to 3x the panels actual refresh rate. AV MODE LG HDTVs include 3 AV Modes, preset to help keep dialogue audible when background noise swells. AV Modes can be easily set with all types of human voice frequency range to optimize picture and.... Speakers are embedded in the US. The moving picture resolution give the impression of performance of TVs include a unique invisible speaker system, tuned by increasing the "sweet spot", giving a wider sound field. 42PG20 PLASMA HDTV 42" Class (41.5" diagonal) • 720p HD Resolution • XD Engine™ •...

Owner's Manual (English)
Page 1
...set of power-saving guidelines issued by the U.S. As an ENERGY STAR Partner LGE U. S. has determined that this product meets the ENERGY STAR guidelines for future reference. See the label attached on the back cover and quote this information to your set. ENERGY STAR is a set . A.,Inc. Environmental Protection Agency(EPA). PLASMA TV... OWNER'S MANUAL 42PG10 42PG20 42PG20C 50PG30 50PG30C 50PG10 50PG20 50PG20C 60PG30 60PG30C Please...
...set of power-saving guidelines issued by the U.S. As an ENERGY STAR Partner LGE U. S. has determined that this product meets the ENERGY STAR guidelines for future reference. See the label attached on the back cover and quote this information to your set. ENERGY STAR is a set . A.,Inc. Environmental Protection Agency(EPA). PLASMA TV... OWNER'S MANUAL 42PG10 42PG20 42PG20C 50PG30 50PG30C 50PG10 50PG20 50PG20C 60PG30 60PG30C Please...
Owner's Manual (English)
Page 6
Channel Editing 38 Input List 39 Input Label 40 AV Mode 41 SIMPLINK 42 PICTURE CONTROL Picture Size (Aspect Ratio) Control 44 Preset Picture Settings - Expert Control 49 Picture Improvement Technology 50 Advanced Control - Add / Delete Channel (Manual Tuning 37 - Preset 47 Manual ...Setup 21 Other A/V Source Setup 23 Audio Out Connection 23 PC Setup 24 WATCHING TV / CHANNEL CONTROL Remote Control Functions 30 Turning On TV 32 Channel Selection 32 Volume Adjustment 32 Initial Setting 33 Quick Menu 34 On-Screen Menus Selection 35 Channel Setup - Picture Mode ...
Channel Editing 38 Input List 39 Input Label 40 AV Mode 41 SIMPLINK 42 PICTURE CONTROL Picture Size (Aspect Ratio) Control 44 Preset Picture Settings - Expert Control 49 Picture Improvement Technology 50 Advanced Control - Add / Delete Channel (Manual Tuning 37 - Preset 47 Manual ...Setup 21 Other A/V Source Setup 23 Audio Out Connection 23 PC Setup 24 WATCHING TV / CHANNEL CONTROL Remote Control Functions 30 Turning On TV 32 Channel Selection 32 Volume Adjustment 32 Initial Setting 33 Quick Menu 34 On-Screen Menus Selection 35 Channel Setup - Picture Mode ...
Owner's Manual (English)
Page 7
... 65 Caption Mode - Auto Clock Setup 69 Manual Clock Setup 70 Auto On/Off Time Setting 71 Sleep Timer Setting 72 Auto Shut-off Setting 73 PARENTAL CONTROL / RATINGS Set Password & Lock System 74 Channel Blocking 77 Movie & TV Rating 78 Downloadable Rating 83 External Input Blocking 84 Key lock 85 APPENDIX Troubleshooting 86 Maintenance...
... 65 Caption Mode - Auto Clock Setup 69 Manual Clock Setup 70 Auto On/Off Time Setting 71 Sleep Timer Setting 72 Auto Shut-off Setting 73 PARENTAL CONTROL / RATINGS Set Password & Lock System 74 Channel Blocking 77 Movie & TV Rating 78 Downloadable Rating 83 External Input Blocking 84 Key lock 85 APPENDIX Troubleshooting 86 Maintenance...

Owner's Manual (English)
Page 16
Caution: Please make sure that you set up the TV close to a wall so it becomes horizontal between the wall and the product. ! Secure the wall brackets with the bolts (not provided as shown in the picture. * If your TV. Match the height of the product, must purchase separately) to tie the ...from your product has the bolts in the eye-bolts position before inserting the eye-bolts, loosen the bolts. * Insert the eye-bolts or TV brackets/bolts and tighten them securely in a forward direction, potentially causing injury or damaging the product. Ensure the eye-bolts or brackets are the...
Caution: Please make sure that you set up the TV close to a wall so it becomes horizontal between the wall and the product. ! Secure the wall brackets with the bolts (not provided as shown in the picture. * If your TV. Match the height of the product, must purchase separately) to tie the ...from your product has the bolts in the eye-bolts position before inserting the eye-bolts, loosen the bolts. * Insert the eye-bolts or TV brackets/bolts and tighten them securely in a forward direction, potentially causing injury or damaging the product. Ensure the eye-bolts or brackets are the...
Owner's Manual (English)
Page 18
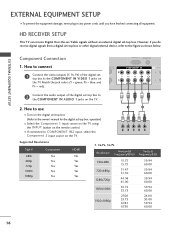
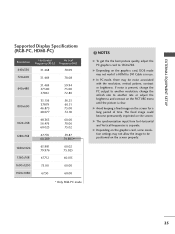
...the figure as shown below. How to connect MOTE TROL IN 2 1 Connect the video outputs (Y, PB, PR) of the digital set-top box to the COMPONENT IN VIDEO 1 jacks on the TV. 1 2 Y PB PR L R Supported Resolutions Signal 480i 480p 720p 1080i 1080p Component Yes Yes Yes Yes Yes HDMI No Yes... 67.43 67.50 24.00 30.00 59.94 60.00 ( 16 Component Connection 1. HD RECEIVER SETUP This TV can receive Digital Over-the-air/Cable signals without an external digital set -top box. Match the jack colors (Y = green, PB = blue, and( ) PR = red). I Select the Component 1 input source ...
...the figure as shown below. How to connect MOTE TROL IN 2 1 Connect the video outputs (Y, PB, PR) of the digital set-top box to the COMPONENT IN VIDEO 1 jacks on the TV. 1 2 Y PB PR L R Supported Resolutions Signal 480i 480p 720p 1080i 1080p Component Yes Yes Yes Yes Yes HDMI No Yes... 67.43 67.50 24.00 30.00 59.94 60.00 ( 16 Component Connection 1. HD RECEIVER SETUP This TV can receive Digital Over-the-air/Cable signals without an external digital set -top box. Match the jack colors (Y = green, PB = blue, and( ) PR = red). I Select the Component 1 input source ...
Owner's Manual (English)
Page 19
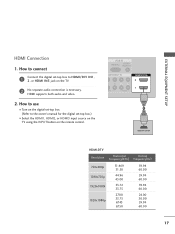
How to use I Turn on the digital set-top box. (Refer to the owner's manual for the digital set -top box to connect 1 Connect the digital set -top box.) I Select the HDMI1, HDMI2, or HDMI3 input source on the TV using the INPUT button on the TV. 2 No separate audio connection is necessary. ( ) HDMI supports both...
How to use I Turn on the digital set-top box. (Refer to the owner's manual for the digital set -top box to connect 1 Connect the digital set -top box.) I Select the HDMI1, HDMI2, or HDMI3 input source on the TV using the INPUT button on the TV. 2 No separate audio connection is necessary. ( ) HDMI supports both...

Owner's Manual (English)
Page 20
.../DVI IN 2 1 2 1 ! R L DVI-DTV OUTPUT 18 How to use ( ) I Select the HDMI1, HDMI2, or HDMI3 input source on the TV using the INPUT button on the remote control. How to connect 1 Connect the DVI output of the digital set-top box to the HDMI/DVI IN1, 2, or HDMI IN3 jack on the... TV. 2 Connect the audio output of the digital set-top box to the owner's manual for this connection. NOTE G A DVI to HDMI Connection 1. EXTERNAL...
.../DVI IN 2 1 2 1 ! R L DVI-DTV OUTPUT 18 How to use ( ) I Select the HDMI1, HDMI2, or HDMI3 input source on the TV using the INPUT button on the remote control. How to connect 1 Connect the DVI output of the digital set-top box to the HDMI/DVI IN1, 2, or HDMI IN3 jack on the... TV. 2 Connect the audio output of the digital set-top box to the owner's manual for this connection. NOTE G A DVI to HDMI Connection 1. EXTERNAL...
Owner's Manual (English)
Page 23
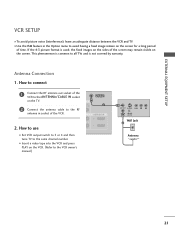
...tape into the VCR and press PLAY on the screen for a long period of the VCR to all TVs and is used; EXTERNAL EQUIPMENT SETUP VCR SETUP I Use the ISM feature in socket of the VCR.... 2. the fixed images on the sides of the screen may remain visible on the TV. 2 Connect the antenna cable to the RF antenna in the Option menu to avoid having a fixed image... time. This pheno( m)enon is common to the ANTENNA/CABLE IN socket on the screen. I Set VCR output switch to 3 or 4 and then tune TV to the VCR owner's manual.) ANTENNA/ CABLE IN IO DVI) 1 HDMI/DVI IN 2 R ...
...tape into the VCR and press PLAY on the screen for a long period of the VCR to all TVs and is used; EXTERNAL EQUIPMENT SETUP VCR SETUP I Use the ISM feature in socket of the VCR.... 2. the fixed images on the sides of the screen may remain visible on the TV. 2 Connect the antenna cable to the RF antenna in the Option menu to avoid having a fixed image... time. This pheno( m)enon is common to the ANTENNA/CABLE IN socket on the screen. I Set VCR output switch to 3 or 4 and then tune TV to the VCR owner's manual.) ANTENNA/ CABLE IN IO DVI) 1 HDMI/DVI IN 2 R ...
Owner's Manual (English)
Page 25
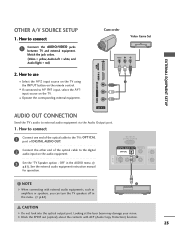
...AV IN1 input, select the A V 1 input source on the TV. EXTERNAL EQUIPMENT SETUP OTHER A/V SOURCE SETUP 1. I Select the A V 2 input source on the TV using 1 the INPUT button on the audio equipment. 3 Set the "TV Speaker option - I Operate the corresponding external equipment. How to ...Left = white, and Audio Right = red) Camcorder Video Game Set VIDEO L R USB SERVICE ONLY HDMI IN 3 VIDEO L/MONO AUDIO R 2. AV IN 2 AUDIO OUT CONNECTION Send the TV's audio to connect 1 Connect the AUDIO/VIDEO jacks between TV and external equipment. Off" in the menu. (G p.61) ...
...AV IN1 input, select the A V 1 input source on the TV. EXTERNAL EQUIPMENT SETUP OTHER A/V SOURCE SETUP 1. I Select the A V 2 input source on the TV using 1 the INPUT button on the audio equipment. 3 Set the "TV Speaker option - I Operate the corresponding external equipment. How to ...Left = white, and Audio Right = red) Camcorder Video Game Set VIDEO L R USB SERVICE ONLY HDMI IN 3 VIDEO L/MONO AUDIO R 2. AV IN 2 AUDIO OUT CONNECTION Send the TV's audio to connect 1 Connect the AUDIO/VIDEO jacks between TV and external equipment. Off" in the menu. (G p.61) ...

Owner's Manual (English)
Page 26
... the PC audio output to the (RGB/DVI) jack on the TV. 2. A U D I Select the HDMI1, HDMI2 or HDMI3 input source on the TV using the INPUT button on the PC and the TV. I O (RGB/DVI) jack on the TV. How to connect 1 Connect the DVI output of the PC to the RG B... remote control. RGB IN RGB(PC) AUDIO (RGB/DVI) N 2 COMPONENT IN Y 1 PB PR VIDEO L R AUDIO HDMI/DV 2 1 1 2 RGB OUTPUT AUDIO DVI to the TV's settings. RGB IN RGB(PC) AUDIO (RGB/DVI) COMPONENT IN PB PR L R VIDEO AUDIO HDMI/DVI IN 2 1 2 1 24 AUDIO DVI-PC OUTPUT I O( ) 2. VGA (D-Sub...
... the PC audio output to the (RGB/DVI) jack on the TV. 2. A U D I Select the HDMI1, HDMI2 or HDMI3 input source on the TV using the INPUT button on the PC and the TV. I O (RGB/DVI) jack on the TV. How to connect 1 Connect the DVI output of the PC to the RG B... remote control. RGB IN RGB(PC) AUDIO (RGB/DVI) N 2 COMPONENT IN Y 1 PB PR VIDEO L R AUDIO HDMI/DV 2 1 1 2 RGB OUTPUT AUDIO DVI to the TV's settings. RGB IN RGB(PC) AUDIO (RGB/DVI) COMPONENT IN PB PR L R VIDEO AUDIO HDMI/DVI IN 2 1 2 1 24 AUDIO DVI-PC OUTPUT I O( ) 2. VGA (D-Sub...
Owner's Manual (English)
Page 27
... mode may not work if a HDMI to be noise associated with the resolution, vertical pattern, contrast or brightness. G Depending on the graphics card, some resolution settings may be positioned on the screen properly. 25 NOTES G To get the the best picture quality, adjust the PC graphics card to another resolution, change...
... mode may not work if a HDMI to be noise associated with the resolution, vertical pattern, contrast or brightness. G Depending on the graphics card, some resolution settings may be positioned on the screen properly. 25 NOTES G To get the the best picture quality, adjust the PC graphics card to another resolution, change...

Owner's Manual (English)
Page 29
...; Sharpness 50 • Color 50 • Tint 0R G • Advanced Control • Reset Screen (RGB-PC) Screen Resolution Auto config. Select Screen (RGB-PC). To Set Yes No 1 MENU 2 ENTER 3 ENTER Select PICTURE. EXTERNAL EQUIPMENT SETUP Auto Configure Automatically adjusts picture position and minimizes image instability. After adjustment, if the image...
...; Sharpness 50 • Color 50 • Tint 0R G • Advanced Control • Reset Screen (RGB-PC) Screen Resolution Auto config. Select Screen (RGB-PC). To Set Yes No 1 MENU 2 ENTER 3 ENTER Select PICTURE. EXTERNAL EQUIPMENT SETUP Auto Configure Automatically adjusts picture position and minimizes image instability. After adjustment, if the image...

Owner's Manual (English)
Page 31
Auto config. Select Screen (RGB-PC). Position Size Initialize Settings. Select Y e s. This feature operates only in RGB-PC mode. Yes No Phase Reset G 29 PICTURE Move Enter E • Contrast 50 • Brightness 50 • Sharpness ... Select PICTURE. Screen Resolution Move MENU Prev. EXTERNAL EQUIPMENT SETUP Screen Reset (Reset to original factory values) Returns Position, S i z e, and Phase to the default factory settings. Select Reset.
Auto config. Select Screen (RGB-PC). Position Size Initialize Settings. Select Y e s. This feature operates only in RGB-PC mode. Yes No Phase Reset G 29 PICTURE Move Enter E • Contrast 50 • Brightness 50 • Sharpness ... Select PICTURE. Screen Resolution Move MENU Prev. EXTERNAL EQUIPMENT SETUP Screen Reset (Reset to original factory values) Returns Position, S i z e, and Phase to the default factory settings. Select Reset.
Owner's Manual (English)
Page 33
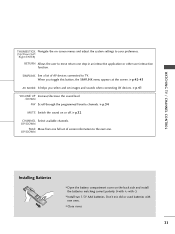
...two 1.5V AAA batteries. G p.32 CHANNEL Select available channels. When you select and set of AV devices connected to TV. WATCHING TV / CHANNEL CONTROL THUMBSTICK Navigate the on-screen menus and adjust the system settings to your preference. (Up/Down/Left Right/ENTER) RETURN Allows the user to move ...return one . G p.42-43 AV MODE It helps you toggle this button, the SIMPLINK menu...
...two 1.5V AAA batteries. G p.32 CHANNEL Select available channels. When you select and set of AV devices connected to TV. WATCHING TV / CHANNEL CONTROL THUMBSTICK Navigate the on-screen menus and adjust the system settings to your preference. (Up/Down/Left Right/ENTER) RETURN Allows the user to move ...return one . G p.42-43 AV MODE It helps you toggle this button, the SIMPLINK menu...

Owner's Manual (English)
Page 34
... a channel number. NOTE G If you want to switch the sound off, press the MUTE button. 3 You can cancel the Mute function by using the TV, press the POWER button on the remote control. 2 Select the viewing source by pressing the MUTE or VOL (+ or -) button. 32 I In standby ... the INPUT button on vacation, disconnect the power plug from the wall power outlet. I This TV is programmed to remember which power state it was last set to turn TV on, press the , INPUT, C H (D or E) button on the TV or press the POWER, INPUT, C H ( or ), Number (0~9 ) button on the remote control. At...
... a channel number. NOTE G If you want to switch the sound off, press the MUTE button. 3 You can cancel the Mute function by using the TV, press the POWER button on the remote control. 2 Select the viewing source by pressing the MUTE or VOL (+ or -) button. 32 I In standby ... the INPUT button on vacation, disconnect the power plug from the wall power outlet. I This TV is programmed to remember which power state it was last set to turn TV on, press the , INPUT, C H (D or E) button on the TV or press the POWER, INPUT, C H ( or ), Number (0~9 ) button on the remote control. At...

Owner's Manual (English)
Page 35
... for the first time when purchasing the TV. WATCHING TV / CHANNEL CONTROL Step1. Choose the setting mode you want . Option Setting Step3. Audio Language Setting F English G French Enter RETURN Exit 1 Select OSD Language Setting or Audio Language Setting. 2 Select your home environment. Auto ...52 Eastern Off Enter RETURN Exit 1 Select Auto or Manual. 2 Select desired time option. 3 ENTER Step3. We recommend setting the TV to start Auto Tuning? Mode Setting ! Enter 1 ENTER Enter RETURN Exit Start Auto Tuning. ! Selecting the environment. Do you want to "H o m ...
... for the first time when purchasing the TV. WATCHING TV / CHANNEL CONTROL Step1. Choose the setting mode you want . Option Setting Step3. Audio Language Setting F English G French Enter RETURN Exit 1 Select OSD Language Setting or Audio Language Setting. 2 Select your home environment. Auto ...52 Eastern Off Enter RETURN Exit 1 Select Auto or Manual. 2 Select desired time option. 3 ENTER Step3. We recommend setting the TV to start Auto Tuning? Mode Setting ! Enter 1 ENTER Enter RETURN Exit Start Auto Tuning. ! Selecting the environment. Do you want to "H o m ...
Owner's Manual (English)
Page 37
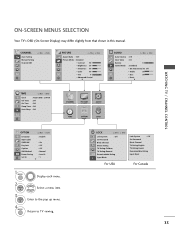
LOCK Move Enter Lock System : Off Set Password Block Channel Movie Rating TV Rating-Children TV Rating-General Downloadable Rating Input Block Lock System : Off Set Password Block Channel TV Rating-English TV Rating-French Downloadable Rating Input Block For USA For Canada 35 CHANNEL Auto Tuning Manual Tuning ...Enter Language : English Input Label SIMPLINK : On Key Lock : Off Caption : Off ISM Method : Normal Power Saving : Level 0 Set ID : 1 E 1 MENU Display each menu. 2 ENTER Select a menu item. 3 ENTER Enter to the pop up menu. 4 MENU Return to...
LOCK Move Enter Lock System : Off Set Password Block Channel Movie Rating TV Rating-Children TV Rating-General Downloadable Rating Input Block Lock System : Off Set Password Block Channel TV Rating-English TV Rating-French Downloadable Rating Input Block For USA For Canada 35 CHANNEL Auto Tuning Manual Tuning ...Enter Language : English Input Label SIMPLINK : On Key Lock : Off Caption : Off ISM Method : Normal Power Saving : Level 0 Set ID : 1 E 1 MENU Display each menu. 2 ENTER Select a menu item. 3 ENTER Enter to the pop up menu. 4 MENU Return to...

Owner's Manual (English)
Page 41
..., you can be activated and selected. 1 INPUT TV AV1 AV2 Component1 Component2 ENTER Select the desired input source. WATCHING TV / CHANNEL CONTROL INPUT LIST Only these input signals which are connected to a TV can select your desired Input Q.MENU Input Label RETURN... Exit Label with using Q.MENU button. I C o m p o n e n t 1 - 2: Select them to watch a VCR or other external equipment. I AV 1-2: Select them to watch DVD or a Digital set...
..., you can be activated and selected. 1 INPUT TV AV1 AV2 Component1 Component2 ENTER Select the desired input source. WATCHING TV / CHANNEL CONTROL INPUT LIST Only these input signals which are connected to a TV can select your desired Input Q.MENU Input Label RETURN... Exit Label with using Q.MENU button. I C o m p o n e n t 1 - 2: Select them to watch a VCR or other external equipment. I AV 1-2: Select them to watch DVD or a Digital set...

Owner's Manual (English)
Page 42
... label. 5 RETURN Return to TV viewing. MENU Return to the previous menu. OPTION Move Enter Language : English Input Label AV1 F G SIMPLINK : On Key Lock : OAffV2 Caption : OCfof mponent1 ISM Method : NCoormmpaol nent2 Power Saving : LeRvGeBl-0PC Set ID : 1HDMI1 E HDMI2 HDMI3... : 1 With using INPUT button 1 INPUT Select the source. 2Q. MENU Select the label. 3 RETURN Return to TV viewing. 40 MENU Return to the previous menu. WATCHING TV / CHANNEL CONTROL WATCHING TV / CHANNEL CONTROL INPUT LABEL You can set a label for each input source when it's not in use.
... label. 5 RETURN Return to TV viewing. MENU Return to the previous menu. OPTION Move Enter Language : English Input Label AV1 F G SIMPLINK : On Key Lock : OAffV2 Caption : OCfof mponent1 ISM Method : NCoormmpaol nent2 Power Saving : LeRvGeBl-0PC Set ID : 1HDMI1 E HDMI2 HDMI3... : 1 With using INPUT button 1 INPUT Select the source. 2Q. MENU Select the label. 3 RETURN Return to TV viewing. 40 MENU Return to the previous menu. WATCHING TV / CHANNEL CONTROL WATCHING TV / CHANNEL CONTROL INPUT LABEL You can set a label for each input source when it's not in use.


