
Owners Manual
Page 1
PLASMA TV OWNER'S MANUAL 42PQ10 50PQ10 50PS11 60PS11 42PQ12 50PQ12 Please read this manual carefully before operating your set and retain it below should you ever need service. The model and serial number of the TV is located on the back and one side of the TV. Model: Serial: This product qualifies for ...ENERGY STAR. 1-800-243-0000 USA, Consumer User 1-888-865-3026 USA, Commercial User 1-888-542-2623 CANADA LG Customer Information Center P/NO : SAC33575902...
PLASMA TV OWNER'S MANUAL 42PQ10 50PQ10 50PS11 60PS11 42PQ12 50PQ12 Please read this manual carefully before operating your set and retain it below should you ever need service. The model and serial number of the TV is located on the back and one side of the TV. Model: Serial: This product qualifies for ...ENERGY STAR. 1-800-243-0000 USA, Consumer User 1-888-865-3026 USA, Commercial User 1-888-542-2623 CANADA LG Customer Information Center P/NO : SAC33575902...

Owners Manual
Page 4
...if its appearance indicates damage or deterioration, unplug it is recommend that appliances be certain. SAFETY INSTRUCTIONS 11 Never touch this owner's manual to prevent possible electric shock (i.e. Periodically examine the cord of fire or electrical shock, do not place objects filled with liquids,...it to the AC wall outlet, it , discontinue use a damaged or loose power cord. If grounding methods are dangerous. When mounting a TV on the back of the appliance, and have a qualified electrician install a separate circuit breaker. Do not try to ground the unit by ...
...if its appearance indicates damage or deterioration, unplug it is recommend that appliances be certain. SAFETY INSTRUCTIONS 11 Never touch this owner's manual to prevent possible electric shock (i.e. Periodically examine the cord of fire or electrical shock, do not place objects filled with liquids,...it to the AC wall outlet, it , discontinue use a damaged or loose power cord. If grounding methods are dangerous. When mounting a TV on the back of the appliance, and have a qualified electrician install a separate circuit breaker. Do not try to ground the unit by ...
Owners Manual
Page 6
Add / Delete Channel (Manual Tuning 40 - Channel Editing 41 Channel List 42 Favorite Channel Setup 43 Favorite Channel List 43 Brief Information 44 Input List 45 Input Label 46 AV Mode 47 SIMPLINK 48 USB Entry ...) Control 58 Energy Saving 60 Preset Picture Settings(Picture Mode 61 Manual Picture Adjustment - User Mode 62 Picture Improvement Technology 63 Expert Picture Control 64 Picture Reset 66 Image Sticking Minimization (ISM) Method 67 Demo Mode 68 4 FEATURES OF THIS TV 6 PREPARATION Accessories 7 Front Panel Information 8 Back Panel Information 10 Stand ...
Add / Delete Channel (Manual Tuning 40 - Channel Editing 41 Channel List 42 Favorite Channel Setup 43 Favorite Channel List 43 Brief Information 44 Input List 45 Input Label 46 AV Mode 47 SIMPLINK 48 USB Entry ...) Control 58 Energy Saving 60 Preset Picture Settings(Picture Mode 61 Manual Picture Adjustment - User Mode 62 Picture Improvement Technology 63 Expert Picture Control 64 Picture Reset 66 Image Sticking Minimization (ISM) Method 67 Demo Mode 68 4 FEATURES OF THIS TV 6 PREPARATION Accessories 7 Front Panel Information 8 Back Panel Information 10 Stand ...
Owners Manual
Page 7
...Mode 71 Sound Setting Adjustment - Digital Broadcasting System Captions 80 - Caption Option 81 TIME SETTING Clock Setting - Auto Clock Setup 82 Manual Clock Setup 83 Auto On/Off Time Setting 84 Sleep Timer Setting 85 PARENTAL CONTROL / RATINGS Set Password & Lock System 86 Channel ...Blocking 89 Movie & TV Rating 90 Downloadable Rating 95 External Input Blocking 96 Key lock 97 APPENDIX Troubleshooting 98 Maintenance 100 Product Specifications 101 Programming The ...
...Mode 71 Sound Setting Adjustment - Digital Broadcasting System Captions 80 - Caption Option 81 TIME SETTING Clock Setting - Auto Clock Setup 82 Manual Clock Setup 83 Auto On/Off Time Setting 84 Sleep Timer Setting 85 PARENTAL CONTROL / RATINGS Set Password & Lock System 86 Channel ...Blocking 89 Movie & TV Rating 90 Downloadable Rating 95 External Input Blocking 96 Key lock 97 APPENDIX Troubleshooting 98 Maintenance 100 Product Specifications 101 Programming The ...

Owners Manual
Page 9
Owner's Manual TV 1 4 VOL MUTE 2 RETURN Q. Excessive pressure may...the power plug, the better it is missing, please contact the dealer where you purchased the TV. Install the power plug closely. 7 PREPARATION PREPARATION ACCESSORIES Ensure that the following accessories are included...reduce the electromagnetic wave when connecting the power cord. MESNTUB POWER MENU INPUENTERGY SDAVVINDG ENTER FAVMARK AV MODE CH P A G E INFO 42/50PQ10 AV MODE 1CH P A G E 42 POWER POWERINSAPVINUGT 753 86 LIST 0 9 VOL MUTE FLASHBK 7 5 3 8 6 LIST 0 9 ENTER or CH P A G...
Owner's Manual TV 1 4 VOL MUTE 2 RETURN Q. Excessive pressure may...the power plug, the better it is missing, please contact the dealer where you purchased the TV. Install the power plug closely. 7 PREPARATION PREPARATION ACCESSORIES Ensure that the following accessories are included...reduce the electromagnetic wave when connecting the power cord. MESNTUB POWER MENU INPUENTERGY SDAVVINDG ENTER FAVMARK AV MODE CH P A G E INFO 42/50PQ10 AV MODE 1CH P A G E 42 POWER POWERINSAPVINUGT 753 86 LIST 0 9 VOL MUTE FLASHBK 7 5 3 8 6 LIST 0 9 ENTER or CH P A G...

Owners Manual
Page 14
... may differ from your viewing position. G Do not mount near or above any type of 4 inches on all models.) After installing the TV, you can adjust the TV manually to suit your TV. CABLE ARRANGEMENT I Image shown may differ from the wall. 4 inches 4 inches 4 inches 4 inches CAUTION G Ensure adequate ventilation by 20 degrees to...
... may differ from your viewing position. G Do not mount near or above any type of 4 inches on all models.) After installing the TV, you can adjust the TV manually to suit your TV. CABLE ARRANGEMENT I Image shown may differ from the wall. 4 inches 4 inches 4 inches 4 inches CAUTION G Ensure adequate ventilation by 20 degrees to...

Owners Manual
Page 15
... on their specifications. G When purchasing our wall mount kit, a detailed installation manual and all parts necessary for TV damage or personal injury when a non-VESA or non specified wall mount is ...fall , leading to electric shock. 13 NOTE G Screw length needed depends on . G LG is turned on the wall mount used or the consumer fails to a wall. When attaching ...length of accidents. Model VESA (A * B) A Standard Screw Quantity B Wall Mounting bracket (sold separately) 42/50PQ10, 42/50PQ12, 50PS11 400 * 400 M6 4 AW-50PG60MS 60PS11 600 * 400 M8 4 AW-60PG60MS ! For ...
... on their specifications. G When purchasing our wall mount kit, a detailed installation manual and all parts necessary for TV damage or personal injury when a non-VESA or non specified wall mount is ...fall , leading to electric shock. 13 NOTE G Screw length needed depends on . G LG is turned on the wall mount used or the consumer fails to a wall. When attaching ...length of accidents. Model VESA (A * B) A Standard Screw Quantity B Wall Mounting bracket (sold separately) 42/50PQ10, 42/50PQ12, 50PS11 400 * 400 M6 4 AW-50PG60MS 60PS11 600 * 400 M8 4 AW-60PG60MS ! For ...
Owners Manual
Page 18
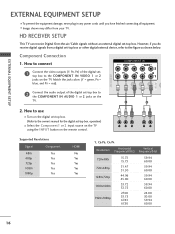
...(MONO) AUDIO 1 2 2. operation) I Select the Component1 or 2 input source on the TV using the INPUT button on the TV. How to connect 1 Connect the video outputs (Y, PB, PR) of the digital set-top box to the owner's manual for the digital set -top box. Component Connection 1. How to use I Turn on...SETUP EXTERNAL EQUIPMENT SETUP I To prevent the equipment damage, never plug in any power cords until you do receive digital signals from your TV. I Image shown may differ from a digital set-top box or other digital external device, refer to the COMPONENT IN VIDEO 1 or...
...(MONO) AUDIO 1 2 2. operation) I Select the Component1 or 2 input source on the TV using the INPUT button on the TV. How to connect 1 Connect the video outputs (Y, PB, PR) of the digital set-top box to the owner's manual for the digital set -top box. Component Connection 1. How to use I Turn on...SETUP EXTERNAL EQUIPMENT SETUP I To prevent the equipment damage, never plug in any power cords until you do receive digital signals from your TV. I Image shown may differ from a digital set-top box or other digital external device, refer to the COMPONENT IN VIDEO 1 or...

Owners Manual
Page 19
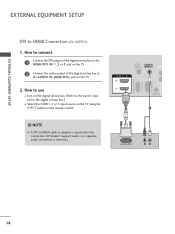
... version 1.3, it can cause flickers or no screen display. HDMI supports both audio and video. How to the HDMI IN 1 or 2 (For 42/50PQ10, 42/50PQ12, 50PS11), HDMI/DVI IN 1, 2 or 3 (For 60PS11) jack on the remote control. In this case use 1 I Refer to the DVD ...player's manual for operating instructions. ! I Select the HDMI1, 2 or 3(For 60PS11) input source on the TV using the INPUT button on the TV. 2 No separate audio connection is necessary...
... version 1.3, it can cause flickers or no screen display. HDMI supports both audio and video. How to the HDMI IN 1 or 2 (For 42/50PQ10, 42/50PQ12, 50PS11), HDMI/DVI IN 1, 2 or 3 (For 60PS11) jack on the remote control. In this case use 1 I Refer to the DVD ...player's manual for operating instructions. ! I Select the HDMI1, 2 or 3(For 60PS11) input source on the TV using the INPUT button on the TV. 2 No separate audio connection is necessary...
Owners Manual
Page 20
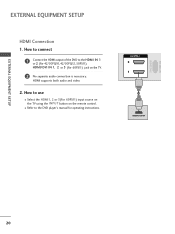
... HDMI cable or adapter is necessary. NOTE G A DVI to the AUDIO IN (RGB/DVI) jack on the TV. 2. OPTICAL DIGITAL AUDIO OUT AUDIO IN (RGB/DVI) HDMI/DVI IN 2 1 REMOTE CONTROL IN 1 2 DVI... OUTPUT R L AV IN 1 18 How to use I Select the HDMI1, 2 or 3 input source on the TV using the INPUT button on the remote control. ! RGB IN (PC) RS-232C IN (CONTROL & SERVICE) EXTERNAL ...EQUIPMENT SETUP EXTERNAL EQUIPMENT SETUP DVI to the HDMI/DVI IN 1, 2 or 3 jack on the TV. 2 Connect the audio output of the digital set-top box to HDMI Connection (For 60PS11) 1. How ...
... HDMI cable or adapter is necessary. NOTE G A DVI to the AUDIO IN (RGB/DVI) jack on the TV. 2. OPTICAL DIGITAL AUDIO OUT AUDIO IN (RGB/DVI) HDMI/DVI IN 2 1 REMOTE CONTROL IN 1 2 DVI... OUTPUT R L AV IN 1 18 How to use I Select the HDMI1, 2 or 3 input source on the TV using the INPUT button on the remote control. ! RGB IN (PC) RS-232C IN (CONTROL & SERVICE) EXTERNAL ...EQUIPMENT SETUP EXTERNAL EQUIPMENT SETUP DVI to the HDMI/DVI IN 1, 2 or 3 jack on the TV. 2 Connect the audio output of the digital set-top box to HDMI Connection (For 60PS11) 1. How ...

Owners Manual
Page 21
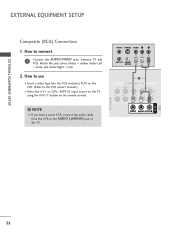
...Connection 1. Component ports on the TV Y Y Video output ports Y on the remote control. How to connect 1 Connect the video outputs (Y, PB, PR) of the DVD to the component input ports as shown below. I Refer to the DVD player's manual for operating instructions. Match the... jack colors (Y = green, PB = blue, and PR = red). 2 Connect the audio outputs of the DVD to use I Turn on the TV. 2. COMPONENT IN VIDEO AUDIO 2 L R 1 VIDEO (MONO) AUDIO 1...
...Connection 1. Component ports on the TV Y Y Video output ports Y on the remote control. How to connect 1 Connect the video outputs (Y, PB, PR) of the DVD to the component input ports as shown below. I Refer to the DVD player's manual for operating instructions. Match the... jack colors (Y = green, PB = blue, and PR = red). 2 Connect the audio outputs of the DVD to use I Turn on the TV. 2. COMPONENT IN VIDEO AUDIO 2 L R 1 VIDEO (MONO) AUDIO 1...
Owners Manual
Page 22
IN 2 1 1 HDMI-DVD OUTPUT 20 I Select the HDMI1, 2 or 3(For 60PS11) input source on the TV using the INPUT button on the TV. 2 No separate audio connection is necessary. How to connect 1 Connect the HDMI output of the DVD to the DVD player's manual for operating instructions. HDMI supports both audio and video. 2. RS-232C IN (SERVICE ONLY) EXTERNAL EQUIPMENT SETUP EXTERNAL EQUIPMENT SETUP HDMI Connection 1. How to use I Refer to the HDMI IN 1 or 2 (For 42/50PQ10, 42/50PQ12, 50PS11), HDMI/DVI IN 1, 2 or 3 (For 60PS11) jack on the remote control.
IN 2 1 1 HDMI-DVD OUTPUT 20 I Select the HDMI1, 2 or 3(For 60PS11) input source on the TV using the INPUT button on the TV. 2 No separate audio connection is necessary. How to connect 1 Connect the HDMI output of the DVD to the DVD player's manual for operating instructions. HDMI supports both audio and video. 2. RS-232C IN (SERVICE ONLY) EXTERNAL EQUIPMENT SETUP EXTERNAL EQUIPMENT SETUP HDMI Connection 1. How to use I Refer to the HDMI IN 1 or 2 (For 42/50PQ10, 42/50PQ12, 50PS11), HDMI/DVI IN 1, 2 or 3 (For 60PS11) jack on the remote control.

Owners Manual
Page 23
I Set VCR output switch to 3 or 4 and then tune TV to the same channel number. EXTERNAL EQUIPMENT SETUP VCR SETUP Antenna Connection 1. How to use I Insert a video tape into the VCR and press PLAY on the TV. 2 Connect the antenna cable to the RF antenna in socket of the VCR to the ANTENNA/CABLE IN socket on the VCR. (Refer to connect 1 Connect the RF antenna out socket of the VCR. 2. How to the VCR owner's manual.) ANTENNA/ CABLE IN 1 ANT OUT S-VIDEO VIDEO L R ANT IN OUTPUT SWITCH Wall Jack 2 Antenna 21
I Set VCR output switch to 3 or 4 and then tune TV to the same channel number. EXTERNAL EQUIPMENT SETUP VCR SETUP Antenna Connection 1. How to use I Insert a video tape into the VCR and press PLAY on the TV. 2 Connect the antenna cable to the RF antenna in socket of the VCR to the ANTENNA/CABLE IN socket on the VCR. (Refer to connect 1 Connect the RF antenna out socket of the VCR. 2. How to the VCR owner's manual.) ANTENNA/ CABLE IN 1 ANT OUT S-VIDEO VIDEO L R ANT IN OUTPUT SWITCH Wall Jack 2 Antenna 21
Owners Manual
Page 24
... the VCR and press PLAY on the VCR. (Refer to connect 1 Connect the AUDIO/VIDEO jacks between TV and VCR. How to the VCR owner's manual.) I Select the A V 1 or 2(For 60PS11) input source on the TV using the INPUT button on the remote control. ! ANT IN S-VIDEO VIDEO L R ANT OUT OUTPUT... R 1 VIDEO (MONO) AUDIO 22 NOTE G If you have a mono VCR, connect the audio cable from the VCR to the AUDIO L(MONO) jack of the TV. Match the jack colors (Video = yellow, Audio Left = white, and Audio Right = red) 2. AV IN USB SERVICE ONLY EXTERNAL EQUIPMENT SETUP EXTERNAL EQUIPMENT SETUP ...
... the VCR and press PLAY on the VCR. (Refer to connect 1 Connect the AUDIO/VIDEO jacks between TV and VCR. How to the VCR owner's manual.) I Select the A V 1 or 2(For 60PS11) input source on the TV using the INPUT button on the remote control. ! ANT IN S-VIDEO VIDEO L R ANT OUT OUTPUT... R 1 VIDEO (MONO) AUDIO 22 NOTE G If you have a mono VCR, connect the audio cable from the VCR to the AUDIO L(MONO) jack of the TV. Match the jack colors (Video = yellow, Audio Left = white, and Audio Right = red) 2. AV IN USB SERVICE ONLY EXTERNAL EQUIPMENT SETUP EXTERNAL EQUIPMENT SETUP ...
Owners Manual
Page 25
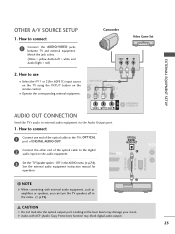
...Do not look into the optical output port. OTHER A/V SOURCE SETUP 1. I Select the A V 1 or 2(For 60PS11) input source on the TV using the INPUT button on the audio equipment. NOTE G When connecting with ACP (Audio Copy Protection) function may damage your vision. Match the jack colors...3 Set the "TV Speaker option - OPTICAL DIGITAL AUDIO OUT 2 Connect the other end of the optical cable to external audio equipment via the Audio Output port. 1. How to use I Operate the corresponding external equipment. See the external audio equipment instruction manual for operation. USB ...
...Do not look into the optical output port. OTHER A/V SOURCE SETUP 1. I Select the A V 1 or 2(For 60PS11) input source on the TV using the INPUT button on the audio equipment. NOTE G When connecting with ACP (Audio Copy Protection) function may damage your vision. Match the jack colors...3 Set the "TV Speaker option - OPTICAL DIGITAL AUDIO OUT 2 Connect the other end of the optical cable to external audio equipment via the Audio Output port. 1. How to use I Operate the corresponding external equipment. See the external audio equipment instruction manual for operation. USB ...

Owners Manual
Page 29
To Set Yes No 1 MENU 2 ENTER 3 ENTER Select PICTURE. After adjustment, if the image is still not correct, try using the manual settings or a different resolution or refresh rate on the PC. G Position Size Phase Reset Move MENU Prev. The Position, Phase, and Size can adjust the ...
To Set Yes No 1 MENU 2 ENTER 3 ENTER Select PICTURE. After adjustment, if the image is still not correct, try using the manual settings or a different resolution or refresh rate on the PC. G Position Size Phase Reset Move MENU Prev. The Position, Phase, and Size can adjust the ...

Owners Manual
Page 30
... Prev. I P h a s e: This function allows you prefer. I S i z e: This function is not clear after auto adjustment and especially if characters are still trembling, adjust the picture phase manually. Select Screen (RGB-PC).
... Prev. I P h a s e: This function allows you prefer. I S i z e: This function is not clear after auto adjustment and especially if characters are still trembling, adjust the picture phase manually. Select Screen (RGB-PC).

Owners Manual
Page 37
... "Home Use" mode for the first time. Picture mode" manually while inspecting the TV, but the TV will be displayed on the screen when turning the TV on until the Initial setting procedure is switched on for the best picture in your antenna connection. Choose the setting mode you...Selecting Language English Español Français Next 1 ENTER Select menu Language. Previous Next 1 ENTER Start Auto Tuning. 35 WATCHING TV / CHANNEL CONTROL INITIAL SETTING This Function guides the user to easily set when you want. Step2. Time setting Time Setting Current Time Setting ...
... "Home Use" mode for the first time. Picture mode" manually while inspecting the TV, but the TV will be displayed on the screen when turning the TV on until the Initial setting procedure is switched on for the best picture in your antenna connection. Choose the setting mode you...Selecting Language English Español Français Next 1 ENTER Select menu Language. Previous Next 1 ENTER Start Auto Tuning. 35 WATCHING TV / CHANNEL CONTROL INITIAL SETTING This Function guides the user to easily set when you want. Step2. Time setting Time Setting Current Time Setting ...
Owners Manual
Page 38
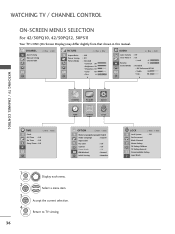
...42/50PQ10, 42/50PQ12, 50PS11 Your TV's OSD (On Screen Display) may differ slightly from that shown in this manual. Return to TV viewing. 36 LOCK Move Enter Lock System : Off Set Password Block Channel Movie Rating TV Rating-Children TV Rating-General Downloadable Rating Input Block CHANNEL Auto Tuning Manual...Level 0- + Balance 0L R Sound Mode : Standard • SRS TruSurround XT:Off • Treble 50 • Bass 50 E WATCHING TV / CHANNEL CONTROL TIME Clock Off Time : Off On Time : Off Sleep Timer : Off Move Enter CHANNEL PICTURE AUDIO TIME OPTION LOCK ...
...42/50PQ10, 42/50PQ12, 50PS11 Your TV's OSD (On Screen Display) may differ slightly from that shown in this manual. Return to TV viewing. 36 LOCK Move Enter Lock System : Off Set Password Block Channel Movie Rating TV Rating-Children TV Rating-General Downloadable Rating Input Block CHANNEL Auto Tuning Manual...Level 0- + Balance 0L R Sound Mode : Standard • SRS TruSurround XT:Off • Treble 50 • Bass 50 E WATCHING TV / CHANNEL CONTROL TIME Clock Off Time : Off On Time : Off Sleep Timer : Off Move Enter CHANNEL PICTURE AUDIO TIME OPTION LOCK ...

Owners Manual
Page 39
... HDMI3 Move Enter USB Photo List Music List Move Enter 37 For 60PS11 Your TV's OSD (On Screen Display) may differ slightly from that shown in this manual. CHANNEL Auto Tuning Manual Tuning Channel Edit Move Enter PICTURE Move Aspect Ratio : 16:9 Energy Saving :... On • Level 0- + 0L R : Standard • SRS TruSurround XT:Off • Treble 50 • Bass 50 • Reset E WATCHING TV / CHANNEL CONTROL OPTION Move Enter Menu Language(Language): English Audio Language : English Input Label SIMPLINK : On Key Lock : Off Caption : Off Demo Mode :...
... HDMI3 Move Enter USB Photo List Music List Move Enter 37 For 60PS11 Your TV's OSD (On Screen Display) may differ slightly from that shown in this manual. CHANNEL Auto Tuning Manual Tuning Channel Edit Move Enter PICTURE Move Aspect Ratio : 16:9 Energy Saving :... On • Level 0- + 0L R : Standard • SRS TruSurround XT:Off • Treble 50 • Bass 50 • Reset E WATCHING TV / CHANNEL CONTROL OPTION Move Enter Menu Language(Language): English Audio Language : English Input Label SIMPLINK : On Key Lock : Off Caption : Off Demo Mode :...

