Owner's Manual (English)
Page 6
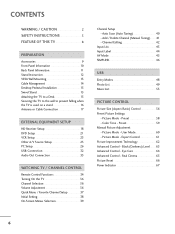
...42 Input List 43 Input Label 44 AV Mode 45 SIMPLINK 46 USB Entry Modes 48 Photo List 49 Music List 53 PICTURE... 67 6 Auto Scan (Auto Tuning 40 - CONTENTS WARNING / CAUTION 2 SAFETY INSTRUCTIONS 3 FEATURE OF THIS TV 8 PREPARATION Accessories 9 Front Panel Information 10 Back Panel Information 11 Stand Instruction 12 VESA Wall Mounting 13 Cable... USB Connection 32 Audio Out Connection 33 WATCHING TV / CHANNEL CONTROL Remote Control Functions 34 Turning On the TV 36 Channel Selection 36 Volume Adjustment 36 Quick Menu / Favorite Channel Setup 37 Initial Setting 38 ...
...42 Input List 43 Input Label 44 AV Mode 45 SIMPLINK 46 USB Entry Modes 48 Photo List 49 Music List 53 PICTURE... 67 6 Auto Scan (Auto Tuning 40 - CONTENTS WARNING / CAUTION 2 SAFETY INSTRUCTIONS 3 FEATURE OF THIS TV 8 PREPARATION Accessories 9 Front Panel Information 10 Back Panel Information 11 Stand Instruction 12 VESA Wall Mounting 13 Cable... USB Connection 32 Audio Out Connection 33 WATCHING TV / CHANNEL CONTROL Remote Control Functions 34 Turning On the TV 36 Channel Selection 36 Volume Adjustment 36 Quick Menu / Favorite Channel Setup 37 Initial Setting 38 ...

Owner's Manual (English)
Page 9
MESNTUB MENU POWER DVD INPVUTCR ENTER VOL FAV AV MODE 1 4 MUTE 2 7 5 3 8 6 0 9 FLASHBK CH P A G E 1.5V 1.5V Copyright© 2007 LGE, All Rights Reserved. RETURN TV Q. Excessive pressure may differ from the images below. PREPARATION PREPARATION ACCESSORIES Ensure that the following ...user must use shielded signal interface cables with ferrite cores to P.15) * Wipe spots on the exterior only with your TV. The accessories included may cause (This feature is not available scratch or discoloration. Owner's Manual CD Manual Remote Control, Batteries...
MESNTUB MENU POWER DVD INPVUTCR ENTER VOL FAV AV MODE 1 4 MUTE 2 7 5 3 8 6 0 9 FLASHBK CH P A G E 1.5V 1.5V Copyright© 2007 LGE, All Rights Reserved. RETURN TV Q. Excessive pressure may differ from the images below. PREPARATION PREPARATION ACCESSORIES Ensure that the following ...user must use shielded signal interface cables with ferrite cores to P.15) * Wipe spots on the exterior only with your TV. The accessories included may cause (This feature is not available scratch or discoloration. Owner's Manual CD Manual Remote Control, Batteries...

Owner's Manual (English)
Page 10
... Sensor Adjusts picture according to the surrounding conditions Power/Standby Indicator Illuminates red in the OPTION menu. I Image shown may differ from your TV has a protection tape attached, remove the tape. Illuminates blue when the set is included with a cloth (If a polishing ...cloth is switched on. (Can be adjusted using Power Indicator in standby mode. And then wipe the TV with your TV, use it). G p.67) Remote Control Sensor POWER Button CH CHANNEL ( , ) Buttons VOL ENTER MENU INPUT VOLUME (+, -) Buttons ENTER Button MENU Button INPUT Button 10
... Sensor Adjusts picture according to the surrounding conditions Power/Standby Indicator Illuminates red in the OPTION menu. I Image shown may differ from your TV has a protection tape attached, remove the tape. Illuminates blue when the set is included with a cloth (If a polishing ...cloth is switched on. (Can be adjusted using Power Indicator in standby mode. And then wipe the TV with your TV, use it). G p.67) Remote Control Sensor POWER Button CH CHANNEL ( , ) Buttons VOL ENTER MENU INPUT VOLUME (+, -) Buttons ENTER Button MENU Button INPUT Button 10

Owner's Manual (English)
Page 27
... G Depending on the graphics card, some resolution settings may not work if a HDMI to DVI Cable is clear. EXTERNAL EQUIPMENT SETUP ! G Depending on the PICTURE menu until the picture is in HDMI-PC 1920x1080, change the refresh rate to another resolution, change aspect ratio to Just scan. G If there are overscan...
... G Depending on the graphics card, some resolution settings may not work if a HDMI to DVI Cable is clear. EXTERNAL EQUIPMENT SETUP ! G Depending on the PICTURE menu until the picture is in HDMI-PC 1920x1080, change the refresh rate to another resolution, change aspect ratio to Just scan. G If there are overscan...

Owner's Manual (English)
Page 28
... 60 • Tint 0R G • Advanced Control • Reset Screen (RGB-PC) SCREEN Resolution G Auto config. Position Size Phase Reset Move MENU Prev. 1024 x 768 1280 x 768 1360 x 768 1 MENU 2 ENTER 3 ENTER 4 ENTER 5 ENTER Select PICTURE. Select Resolution. EXTERNAL EQUIPMENT SETUP EXTERNAL EQUIPMENT SETUP Screen Setup for PC mode Selecting Resolution You...
... 60 • Tint 0R G • Advanced Control • Reset Screen (RGB-PC) SCREEN Resolution G Auto config. Position Size Phase Reset Move MENU Prev. 1024 x 768 1280 x 768 1360 x 768 1 MENU 2 ENTER 3 ENTER 4 ENTER 5 ENTER Select PICTURE. Select Resolution. EXTERNAL EQUIPMENT SETUP EXTERNAL EQUIPMENT SETUP Screen Setup for PC mode Selecting Resolution You...
Owner's Manual (English)
Page 29
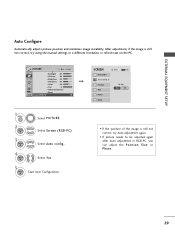
...; Backlight 80 • Contrast 90 • Brightness 50 • Sharpness 60 • Color 60 • Tint 0R G • Advanced Control • Reset Screen (RGB-PC) 1 MENU 2 ENTER 3 ENTER Select PICTURE. Select Auto config.. 4 ENTER Select Y e s. 5 ENTER Start Auto Configuration. G Position Size Phase Reset Move...
...; Backlight 80 • Contrast 90 • Brightness 50 • Sharpness 60 • Color 60 • Tint 0R G • Advanced Control • Reset Screen (RGB-PC) 1 MENU 2 ENTER 3 ENTER Select PICTURE. Select Auto config.. 4 ENTER Select Y e s. 5 ENTER Start Auto Configuration. G Position Size Phase Reset Move...

Owner's Manual (English)
Page 30
... Tint 0R G • Advanced Control • Reset Screen (RGB-PC) SCREEN Resolution Auto config. Select Screen (RGB-PC). Position G Size Phase Reset Move MENU Prev. I S i z e: This function is to left/right and up/down as you to remove any vertical bars or stripes visible on the screen background. ... i z e, or Phase. I Position: This function is not clear after auto adjustment and especially if characters are still trembling, adjust the picture phase manually. D F G E 1 MENU 2 ENTER 3 ENTER 4 ENTER 5 ENTER Select PICTURE. And the horizontal screen size will also change.
... Tint 0R G • Advanced Control • Reset Screen (RGB-PC) SCREEN Resolution Auto config. Select Screen (RGB-PC). Position G Size Phase Reset Move MENU Prev. I S i z e: This function is to left/right and up/down as you to remove any vertical bars or stripes visible on the screen background. ... i z e, or Phase. I Position: This function is not clear after auto adjustment and especially if characters are still trembling, adjust the picture phase manually. D F G E 1 MENU 2 ENTER 3 ENTER 4 ENTER 5 ENTER Select PICTURE. And the horizontal screen size will also change.

Owner's Manual (English)
Page 31
... 50 • Sharpness 60 • Color 60 • Tint 0R G • Advanced Control • Reset Screen (RGB-PC) 1 MENU 2 ENTER 3 ENTER 4 ENTER 5 ENTER Select PICTURE. Select Screen (RGB-PC). Position Size Phase Reset G Move MENU Prev. Select Reset. Select Y e s. EXTERNAL EQUIPMENT SETUP Screen Reset (Reset to original factory values) Returns Position, S i z e, and...
... 50 • Sharpness 60 • Color 60 • Tint 0R G • Advanced Control • Reset Screen (RGB-PC) 1 MENU 2 ENTER 3 ENTER 4 ENTER 5 ENTER Select PICTURE. Select Screen (RGB-PC). Position Size Phase Reset G Move MENU Prev. Select Reset. Select Y e s. EXTERNAL EQUIPMENT SETUP Screen Reset (Reset to original factory values) Returns Position, S i z e, and...

Owner's Manual (English)
Page 33
.... 3 Set the "TV Speaker option - How to connect 1 Connect audio outputs to the TV's AUDIO OUT jacks. G Block the SPDIF out (optical/coaxial) about the contents with external audio equipments, such as amplifiers or speakers, you can turn the TV speakers off in the AUDIO menu. (G p.73). Off..." in the AUDIO menu. (G p.73). ANTENNA/ CABLE IN DIGITAL AUDIO OUT IO REMOTE DVI) CONTROL IN OPTICAL COAXIAL RS-232C IN...
.... 3 Set the "TV Speaker option - How to connect 1 Connect audio outputs to the TV's AUDIO OUT jacks. G Block the SPDIF out (optical/coaxial) about the contents with external audio equipments, such as amplifiers or speakers, you can turn the TV speakers off in the AUDIO menu. (G p.73). Off..." in the AUDIO menu. (G p.73). ANTENNA/ CABLE IN DIGITAL AUDIO OUT IO REMOTE DVI) CONTROL IN OPTICAL COAXIAL RS-232C IN...

Owner's Manual (English)
Page 34
...37 MUTE Switch the sound on the TV. TV/STB/DVD/VCR Select the remote operating mode: TV, STB, DVD, or VCR. Clear all on the mode. UP/DOWN NUMBER button - (DASH) Used to the last channel viewed. TV POWER DVD STB VCR Q. MENU MENU INPUT ENTER RETURN AV MODE FAV ...VOL MUTE 12 P A CH G E 3 456 789 0 FLASHBK 34 WATCHING TV / CHANNEL CONTROL WATCHING TV / CHANNEL CONTROL REMOTE CONTROL FUNCTIONS When using the remote control, aim it...
...37 MUTE Switch the sound on the TV. TV/STB/DVD/VCR Select the remote operating mode: TV, STB, DVD, or VCR. Clear all on the mode. UP/DOWN NUMBER button - (DASH) Used to the last channel viewed. TV POWER DVD STB VCR Q. MENU MENU INPUT ENTER RETURN AV MODE FAV ...VOL MUTE 12 P A CH G E 3 456 789 0 FLASHBK 34 WATCHING TV / CHANNEL CONTROL WATCHING TV / CHANNEL CONTROL REMOTE CONTROL FUNCTIONS When using the remote control, aim it...

Owner's Manual (English)
Page 35
...move return one step in an interactive application or other user interaction function. When you select and set images and sounds. G p.45 WATCHING TV / CHANNEL CONTROL Installing Batteries I Open the battery compartment cover on -screen menus and adjust the system settings to your preference. (Up/...Down/Left Right/ENTER) RETURN Allows the user to TV. I Close cover. 35 Don't mix old or used batteries with -). G p.46-47 AV MODE It helps you toggle this button, the SIMPLINK menu appears at the screen. I Install two 1.5V AAA batteries. THUMBSTICK Navigate ...
...move return one step in an interactive application or other user interaction function. When you select and set images and sounds. G p.45 WATCHING TV / CHANNEL CONTROL Installing Batteries I Open the battery compartment cover on -screen menus and adjust the system settings to your preference. (Up/...Down/Left Right/ENTER) RETURN Allows the user to TV. I Close cover. 35 Don't mix old or used batteries with -). G p.46-47 AV MODE It helps you toggle this button, the SIMPLINK menu appears at the screen. I Install two 1.5V AAA batteries. THUMBSTICK Navigate ...
Owner's Manual (English)
Page 37
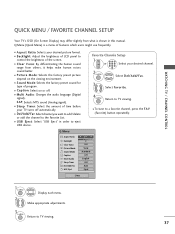
... the human sound range from what is a menu of LCD panel to a favorite channel, press the F A V (Favorite) button repeatedly. I Backlight: Adjust the brightness of features which users might use frequently. I Caption: Select on the viewing environment. MENU 2 Display each menu. Favorite Channle Setup 1 CH 123 or 4 5 6 Select your TV turns off . I Aspect Ratio: Selects your...
... the human sound range from what is a menu of LCD panel to a favorite channel, press the F A V (Favorite) button repeatedly. I Backlight: Adjust the brightness of features which users might use frequently. I Caption: Select on the viewing environment. MENU 2 Display each menu. Favorite Channle Setup 1 CH 123 or 4 5 6 Select your TV turns off . I Aspect Ratio: Selects your...

Owner's Manual (English)
Page 38
...time. Enter 1 ENTER Enter RETURN Exit Start Auto Tuning. ! It will automatically return to easily set the essential items for viewing the TV for use in the OPTION menu. Auto Tuning Step4. Auto Tuning Auto Tuning can also be displayed on the screen when turning the... TV on for the best picture in your desired language. 3 ENTER Step4. I You can adjust the "Picture menu - WATCHING TV / CHANNEL CONTROL Step1. Mode Setting Step1. In Store Home Enter RETURN Exit 1 Select H o me Mode...
...time. Enter 1 ENTER Enter RETURN Exit Start Auto Tuning. ! It will automatically return to easily set the essential items for viewing the TV for use in the OPTION menu. Auto Tuning Step4. Auto Tuning Auto Tuning can also be displayed on the screen when turning the... TV on for the best picture in your desired language. 3 ENTER Step4. I You can adjust the "Picture menu - WATCHING TV / CHANNEL CONTROL Step1. Mode Setting Step1. In Store Home Enter RETURN Exit 1 Select H o me Mode...

Owner's Manual (English)
Page 39
...-General Downloadable Rating Input Block Lock System : Off Set Password Block Channel TV Rating-English TV Rating-French Downloadable Rating Input Block For USA For Canada 1 MENU Display each menu. 2 ENTER Select a menu item. 3 ENTER Enter to the pop up menu. 4 MENU Return to TV viewing. INPUT Move Enter Antenna Cable AV1 AV2 Component1 Component2 RGB-PC HDMI1...
...-General Downloadable Rating Input Block Lock System : Off Set Password Block Channel TV Rating-English TV Rating-French Downloadable Rating Input Block For USA For Canada 1 MENU Display each menu. 2 ENTER Select a menu item. 3 ENTER Enter to the pop up menu. 4 MENU Return to TV viewing. INPUT Move Enter Antenna Cable AV1 AV2 Component1 Component2 RGB-PC HDMI1...

Owner's Manual (English)
Page 40
... CHANNEL. 2 ENTER Select Auto Tuning. 3 ENTER Select Y e s. 4 ENTER Run Auto tuning. 5 RETURN Return to TV viewing. MENU Return to the previous menu. WATCHING TV / CHANNEL CONTROL WATCHING TV / CHANNEL CONTROL CHANNEL SETUP Auto Scan (Auto Tuning) Automatically finds all channels available through antenna or cable inputs, and stores them in memory on . 40 ...
... CHANNEL. 2 ENTER Select Auto Tuning. 3 ENTER Select Y e s. 4 ENTER Run Auto tuning. 5 RETURN Return to TV viewing. MENU Return to the previous menu. WATCHING TV / CHANNEL CONTROL WATCHING TV / CHANNEL CONTROL CHANNEL SETUP Auto Scan (Auto Tuning) Automatically finds all channels available through antenna or cable inputs, and stores them in memory on . 40 ...
Owner's Manual (English)
Page 41
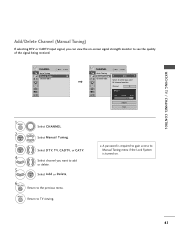
... or CADTV input signal, you want to add or delete. Select D T V, T V, CADTV, or C A T V. ENTER Select A d d or D e l e t e. 6 RETURN Return to TV viewing. CHANNEL Auto Tuning Manual Tuning Channel Edit Move Enter CHANNEL Auto Tuning Manual Tuning Channel Edit Move Enter F DTV G Select channel type and RF...-channel number. MENU Return to the previous menu. Select Manual Tuning. I A password is required to gain access to Manual Tuning menu if the Lock System is turned on -screen signal strength monitor to see the ...
... or CADTV input signal, you want to add or delete. Select D T V, T V, CADTV, or C A T V. ENTER Select A d d or D e l e t e. 6 RETURN Return to TV viewing. CHANNEL Auto Tuning Manual Tuning Channel Edit Move Enter CHANNEL Auto Tuning Manual Tuning Channel Edit Move Enter F DTV G Select channel type and RF...-channel number. MENU Return to the previous menu. Select Manual Tuning. I A password is required to gain access to Manual Tuning menu if the Lock System is turned on -screen signal strength monitor to see the ...

Owner's Manual (English)
Page 42
... in gray. Select Channel Edit. 3 ENTER Select a channel. 4 ENTER 5 MENU Select channel you can be created by referring to the small window at the topright corner of the screen. Return to TV viewing. 42 Once a channel is highlighted you want to add or delete. CHANNEL... Auto Tuning Manual Tuning Channel Edit Move Enter Add/Delete Move CH Move Page MENU Previous RETURN Exit 1 MENU 2 ENTER Select CHANNEL. RETURN Return to the previous menu. WATCHING TV / CHANNEL CONTROL WATCHING TV / CHANNEL CONTROL CHANNEL SETUP Channel Editing A custom list can add or delete the ...
... in gray. Select Channel Edit. 3 ENTER Select a channel. 4 ENTER 5 MENU Select channel you can be created by referring to the small window at the topright corner of the screen. Return to TV viewing. 42 Once a channel is highlighted you want to add or delete. CHANNEL... Auto Tuning Manual Tuning Channel Edit Move Enter Add/Delete Move CH Move Page MENU Previous RETURN Exit 1 MENU 2 ENTER Select CHANNEL. RETURN Return to the previous menu. WATCHING TV / CHANNEL CONTROL WATCHING TV / CHANNEL CONTROL CHANNEL SETUP Channel Editing A custom list can add or delete the ...

Owner's Manual (English)
Page 43
Antenna Cable AV1 HDMI3 HDMI2 Except 42/47/52LG50DC AV2 Component1 Component2 HDMI1 RGB-PC Disconnected inputs are connected to a TV can select Q.MENU Input Label RETURN Exit your desired Input Label with using Q. G p.44 I Antenna: Select it to watch high definition devices. 43 I ...: Select it to view PC input. I : Select them to watch over-the-air broadcasts. Then, you can be activated and selected. MENU button. Antenna Cable AV1 AV2 Component1 1 INPUT ENTER Select the desired input source. I A V: Select them to watch cable and digital cable. WATCHING...
Antenna Cable AV1 HDMI3 HDMI2 Except 42/47/52LG50DC AV2 Component1 Component2 HDMI1 RGB-PC Disconnected inputs are connected to a TV can select Q.MENU Input Label RETURN Exit your desired Input Label with using Q. G p.44 I Antenna: Select it to watch high definition devices. 43 I ...: Select it to view PC input. I : Select them to watch over-the-air broadcasts. Then, you can be activated and selected. MENU button. Antenna Cable AV1 AV2 Component1 1 INPUT ENTER Select the desired input source. I A V: Select them to watch cable and digital cable. WATCHING...

Owner's Manual (English)
Page 44
... You can select input source that you can set a label for HDMI input will not be displayed. ! MENU Return to appreciate. Do you want to TV viewing. Select input source that you want to appreciate. I But, when selecting "SIMPLINK - I When new...AV2 Component1 Component2 RGB-PC : HomeHDMI1 HDMI2 HDMI3 Close G Except 42/47/52LG50DC WATCHING TV / CHANNEL CONTROL With using INPUT button 1 INPUT Select the source. 2Q. MENU Return to the previous menu. With using OPTION menu 1 MENU Select OPTION. 2 ENTER 3 ENTER Select Input Label. Select the source. 4 Select...
... You can select input source that you can set a label for HDMI input will not be displayed. ! MENU Return to appreciate. Do you want to TV viewing. Select input source that you want to appreciate. I But, when selecting "SIMPLINK - I When new...AV2 Component1 Component2 RGB-PC : HomeHDMI1 HDMI2 HDMI3 Close G Except 42/47/52LG50DC WATCHING TV / CHANNEL CONTROL With using INPUT button 1 INPUT Select the source. 2Q. MENU Return to the previous menu. With using OPTION menu 1 MENU Select OPTION. 2 ENTER 3 ENTER Select Input Label. Select the source. 4 Select...

Owner's Manual (English)
Page 45
I If you select "O f f" in AV mode, Cinema will be selected both for "PICTURE menu - Sound Mode" respectively. WATCHING TV / CHANNEL CONTROL AV MODE You can select the optimal images and sounds. Picture Mode" and "AUDIO menu - Off Cinema Game Sport 1AV MODE Press the AV MODE button repeatedly to select the desired source. 2 ENTER I If you select "Cinema" in AV mode, the "Picture Mode" and "Sound Mode" return to previous selected value. 45
I If you select "O f f" in AV mode, Cinema will be selected both for "PICTURE menu - Sound Mode" respectively. WATCHING TV / CHANNEL CONTROL AV MODE You can select the optimal images and sounds. Picture Mode" and "AUDIO menu - Off Cinema Game Sport 1AV MODE Press the AV MODE button repeatedly to select the desired source. 2 ENTER I If you select "Cinema" in AV mode, the "Picture Mode" and "Sound Mode" return to previous selected value. 45


