Owners Manual
Page 2
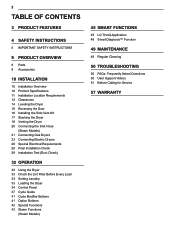
... 10 Product Specifications 11 Installation Location Requirements 12 Clearances 14 Leveling the Dryer 15 Reversing the Door 16 Installing the Side Vent Kit 17 Stacking the Dryer 18 Venting the Dryer 20 Connecting the Inlet Hose (Steam Models) 21 Connecting Gas Dryers 23 Connecting Electric Dryers ... 37 Cycle Guide 41 Cycle Modifier Buttons 41 Option Buttons 42 Special Functions 43 Steam Functions (Steam Models) 45 SMART FUNCTIONS 45 LG ThinQ Application 48 Smart Diagnosis™ Function 49 MAINTENANCE 49 Regular Cleaning 50 TROUBLESHOOTING 50 FAQs: Frequently Asked Questions 50 User Support ...
... 10 Product Specifications 11 Installation Location Requirements 12 Clearances 14 Leveling the Dryer 15 Reversing the Door 16 Installing the Side Vent Kit 17 Stacking the Dryer 18 Venting the Dryer 20 Connecting the Inlet Hose (Steam Models) 21 Connecting Gas Dryers 23 Connecting Electric Dryers ... 37 Cycle Guide 41 Cycle Modifier Buttons 41 Option Buttons 42 Special Functions 43 Steam Functions (Steam Models) 45 SMART FUNCTIONS 45 LG ThinQ Application 48 Smart Diagnosis™ Function 49 MAINTENANCE 49 Regular Cleaning 50 TROUBLESHOOTING 50 FAQs: Frequently Asked Questions 50 User Support ...
Owners Manual
Page 9
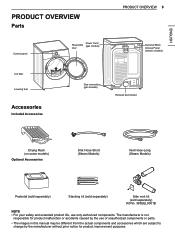
... Duct Outlet Drying Rack (on some models) Optional Accessories Inlet Hose-Short (Steam Models) Inlet Hose-Long (Steam Models) Pedestal (sold separately) Stacking kit (sold separately) Side vent kit (sold separately) Kit No. 383EEL9001B NOTE • For your safety and extended product life, use of unauthorized components or parts. • The images in this...
... Duct Outlet Drying Rack (on some models) Optional Accessories Inlet Hose-Short (Steam Models) Inlet Hose-Long (Steam Models) Pedestal (sold separately) Stacking kit (sold separately) Side vent kit (sold separately) Kit No. 383EEL9001B NOTE • For your safety and extended product life, use of unauthorized components or parts. • The images in this...
Owners Manual
Page 17
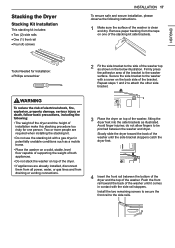
...other side bracket. Firmly press the adhesive area of the bracket. Two or more people are required when installing the stacking kit. • Do not use the stacking kit with a gas dryer in potentially unstable conditions such as a mobile home. • Place the washer on a solid... toward the back of the washer top as illustrated. Repeat steps 1 and 2 to the side rails. Avoid finger injuries; Stacking the Dryer Stacking Kit Installation This stacking kit includes: ••Two (2) side rails ••One (1) front rail ••Four (4) screws INSTALLATION 17 To...
...other side bracket. Firmly press the adhesive area of the bracket. Two or more people are required when installing the stacking kit. • Do not use the stacking kit with a gas dryer in potentially unstable conditions such as a mobile home. • Place the washer on a solid... toward the back of the washer top as illustrated. Repeat steps 1 and 2 to the side rails. Avoid finger injuries; Stacking the Dryer Stacking Kit Installation This stacking kit includes: ••Two (2) side rails ••One (1) front rail ••Four (4) screws INSTALLATION 17 To...


