
Owner's Manual
Page 3
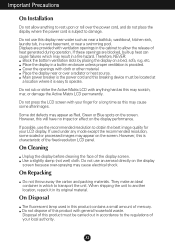
...On Repacking Do not throw away the carton and packing materials. On Disposal The fluorescent lamp used under any mode except the recommended resolution, some afterimages. Displays are blocked, built-up heat can cause failures which to another location, repack it is subject to allow ...LCD with your finger for your local authority. However, this product with ventilation openings in enclosure unless proper ventilation is characteristic of the fixed-resolution LCD panel. A2 Place the display in a built-in the cabinet to damage. Use a slightly damp (not wet) cloth. Do ...
...On Repacking Do not throw away the carton and packing materials. On Disposal The fluorescent lamp used under any mode except the recommended resolution, some afterimages. Displays are blocked, built-up heat can cause failures which to another location, repack it is subject to allow ...LCD with your finger for your local authority. However, this product with ventilation openings in enclosure unless proper ventilation is characteristic of the fixed-resolution LCD panel. A2 Place the display in a built-in the cabinet to damage. Use a slightly damp (not wet) cloth. Do ...
Owner's Manual
Page 7
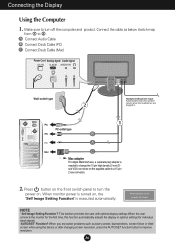
... the AUTO/SET function button to turn off the computer and product. Press button on the front switch panel to improve resolution. NOTE ' Self Image Setting Function'? Make sure to a 15 pin 2 row connector. 2. A6 A Connect Audio Cable B Connect Dsub Cable (PC) C Connect Dsub Cable (Mac) Power ...
... the AUTO/SET function button to turn off the computer and product. Press button on the front switch panel to improve resolution. NOTE ' Self Image Setting Function'? Make sure to a 15 pin 2 row connector. 2. A6 A Connect Audio Cable B Connect Dsub Cable (PC) C Connect Dsub Cable (Mac) Power ...
Owner's Manual
Page 9
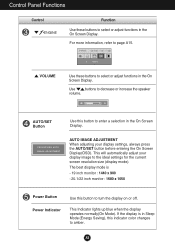
.../SET button before entering the On Screen Display(OSD). AUTO IMAGE ADJUSTMENT When adjusting your display image to the ideal settings for the current screen resolution size (display mode). VOLUME Use these buttons to decrease or increase the speaker volume.
.../SET button before entering the On Screen Display(OSD). AUTO IMAGE ADJUSTMENT When adjusting your display image to the ideal settings for the current screen resolution size (display mode). VOLUME Use these buttons to decrease or increase the speaker volume.
Owner's Manual
Page 15
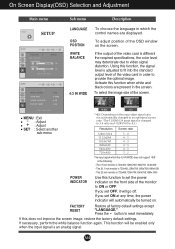
... may deteriorate due to provide the optimal image. WIDE 4:3 ME+-NU : : : Exit Adjust Adjust SET : Select another sub-menu * 4:3 : Depending on . Press the button to 4:3.) Resolution Screen ratio 1280x1024 5 : 4 1152x864 4 : 3 1024x768 4 : 3 800x600 4 : 3 640x480 4 : 3 720x480 3 : 2 The input signal which the control names are present in order to video signal distortion. FACTORY RESET...
... may deteriorate due to provide the optimal image. WIDE 4:3 ME+-NU : : : Exit Adjust Adjust SET : Select another sub-menu * 4:3 : Depending on . Press the button to 4:3.) Resolution Screen ratio 1280x1024 5 : 4 1152x864 4 : 3 1024x768 4 : 3 800x600 4 : 3 640x480 4 : 3 720x480 3 : 2 The input signal which the control names are present in order to video signal distortion. FACTORY RESET...
Owner's Manual
Page 18
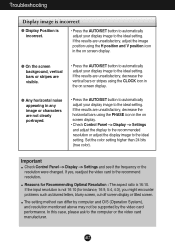
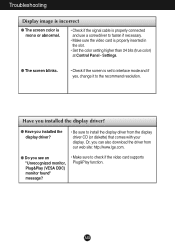
... --> Display --> Settings and adjust the display to the recommended resolution or adjust the display image to the ideal setting. If the input resolution is 16:10. In this case, please ask to the recommend resolution. Important Check Control Panel --> Display --> Settings and see if... the frequency or the resolution were changed. The setting method can differ by computer and O/S (Operation System), and resolution mentioned above may not be supported by the video card performance. Reasons for Recommending Optimal Resolution : The aspect ratio is not 16:10 (for...
... --> Display --> Settings and adjust the display to the recommended resolution or adjust the display image to the ideal setting. If the input resolution is 16:10. In this case, please ask to the recommend resolution. Important Check Control Panel --> Display --> Settings and see if... the frequency or the resolution were changed. The setting method can differ by computer and O/S (Operation System), and resolution mentioned above may not be supported by the video card performance. Reasons for Recommending Optimal Resolution : The aspect ratio is not 16:10 (for...
Owner's Manual
Page 19
... mode and if yes, change it to fasten if necessary. • Make sure the video card is properly connected and use a screwdriver to the recommend resolution. Have you installed the display driver? ● Have you see an "Unrecognized monitor, Plug&Play (VESA DDC) monitor found" message? • Make sure to install...
... mode and if yes, change it to fasten if necessary. • Make sure the video card is properly connected and use a screwdriver to the recommend resolution. Have you installed the display driver? ● Have you see an "Unrecognized monitor, Plug&Play (VESA DDC) monitor found" message? • Make sure to install...

Owner's Manual
Page 20
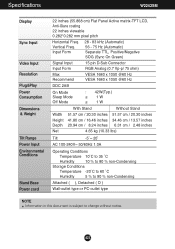
Vertical Freq. Specifications W1942SM Display Sync Input Video Input Resolution Plug&Play Power Consumption Dimensions & Weight Tilt Range Power Input Environmental Conditions Stand Base Power cord 19 inches (48.14 cm) Flat Panel Active matrix-...
Vertical Freq. Specifications W1942SM Display Sync Input Video Input Resolution Plug&Play Power Consumption Dimensions & Weight Tilt Range Power Input Environmental Conditions Stand Base Power cord 19 inches (48.14 cm) Flat Panel Active matrix-...

Owner's Manual
Page 21
...-outlet type or PC-outlet type NOTE Information in this document is subject to change without notice. A20 Specifications W2042SM Display Sync Input Video Input Resolution Plug&Play Power Consumption Dimensions & Weight Tilt Range Power Input Environmental Conditions Stand Base Power cord 20.1 inches (51.11 cm) Flat Panel Active matrix...
...-outlet type or PC-outlet type NOTE Information in this document is subject to change without notice. A20 Specifications W2042SM Display Sync Input Video Input Resolution Plug&Play Power Consumption Dimensions & Weight Tilt Range Power Input Environmental Conditions Stand Base Power cord 20.1 inches (51.11 cm) Flat Panel Active matrix...
Owner's Manual
Page 22
Specifications W2242SM Display Sync Input Video Input Resolution Plug&Play Power Consumption Dimensions & Weight Tilt Range Power Input Environmental Conditions Stand Base Power cord 22 inches (55.868 cm) Flat Panel Active matrix-...
Specifications W2242SM Display Sync Input Video Input Resolution Plug&Play Power Consumption Dimensions & Weight Tilt Range Power Input Environmental Conditions Stand Base Power cord 22 inches (55.868 cm) Flat Panel Active matrix-...
Owner's Manual
Page 23
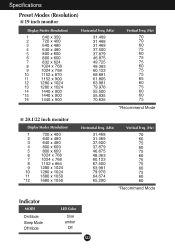
Specifications Preset Modes (Resolution) 19 inch monitor Display Modes (Resolution) 1 640 x 350 2 720 x 400 3 640 x 480 4 640 x 480 5 800 x 600 6 800 x 600 7 832 x 624 8 1024 x 768 9 1024 x 768 10 1152 x 870 11 1152 x 900 12 .... (Hz) 70 70 60 75 60 75 75 60 75 75 65 60 75 60 60 75 *Recommend Mode 20.1/22 inch monitor Display Modes (Resolution) 1 720 x 400 2 640 x 480 3 640 x 480 4 800 x 600 5 800 x 600 6 1024 x 768 7 1024 x 768 8 1152 x 864 9 1280 x 1024 10 1280 x 1024 11 1680 x 1050 *12...
Specifications Preset Modes (Resolution) 19 inch monitor Display Modes (Resolution) 1 640 x 350 2 720 x 400 3 640 x 480 4 640 x 480 5 800 x 600 6 800 x 600 7 832 x 624 8 1024 x 768 9 1024 x 768 10 1152 x 870 11 1152 x 900 12 .... (Hz) 70 70 60 75 60 75 75 60 75 75 65 60 75 60 60 75 *Recommend Mode 20.1/22 inch monitor Display Modes (Resolution) 1 720 x 400 2 640 x 480 3 640 x 480 4 800 x 600 5 800 x 600 6 1024 x 768 7 1024 x 768 8 1152 x 864 9 1280 x 1024 10 1280 x 1024 11 1680 x 1050 *12...


