
Owner's Manual (English)
Page 2
...Version Warranty (USA) Safety Instructions Grounding Requirements Parts and Features Refrigerator Installation Unpacking Your Refrigerator Installation Base Grille Removing, Reversing and Replacing Your Refrigerator Doors For Drawer Models For Swing Models Door Closing and Alignment Using Your Refrigerator Ensuring Proper Air Circulation Multi Flow Door Alarm Setting the ... Coils Light Bulb Replacement Power Interruptions When you go on vacation About the Custom Cube Icemaker Connecting the Water Line Troubleshooting Guide 22 22 23 23 23 24 24 24 24 25 25 25 25 26 - 27 26 26 26 26 26 26 26 -...
...Version Warranty (USA) Safety Instructions Grounding Requirements Parts and Features Refrigerator Installation Unpacking Your Refrigerator Installation Base Grille Removing, Reversing and Replacing Your Refrigerator Doors For Drawer Models For Swing Models Door Closing and Alignment Using Your Refrigerator Ensuring Proper Air Circulation Multi Flow Door Alarm Setting the ... Coils Light Bulb Replacement Power Interruptions When you go on vacation About the Custom Cube Icemaker Connecting the Water Line Troubleshooting Guide 22 22 23 23 23 24 24 24 24 25 25 25 25 26 - 27 26 26 26 26 26 26 26 -...
Owner's Manual (English)
Page 3
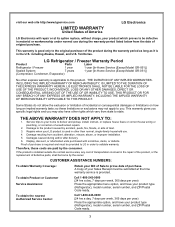
... home to this product. Damage to state. This warranty is good only to validate warranty. LG Refrigerator / Freezer Warranty Period Product Parts Labor Refrigerator / Freezer 1 year 1 year [In-Home Service (Except Model GR-051)] Sealed System 7 years 1 year [In-Home Service (Except Model GR-051)] (Compressor, Condenser, Evaporator) No other express warranty is used in other rights...
... home to this product. Damage to state. This warranty is good only to validate warranty. LG Refrigerator / Freezer Warranty Period Product Parts Labor Refrigerator / Freezer 1 year 1 year [In-Home Service (Except Model GR-051)] Sealed System 7 years 1 year [In-Home Service (Except Model GR-051)] (Compressor, Condenser, Evaporator) No other express warranty is used in other rights...

Owner's Manual (English)
Page 6
... to fines and imprisonment under provisions of installation, cleaning, or removing a light bulb, turn the control (Thermostat, Refrigerator Control or Freezer Control, depending on the model) to avoid some risk. 6 It is damaged, it must be plugged into its own individual properly grounded electrical ... Shock Hazard FOR PERSONAL SAFETY, this appliance be replaced by the manufacturer, by our service center or by qualified personal by LG Electronics, to the desired setting. This provides the best performance and also prevents overloading house wiring circuits which cannot be a ...
... to fines and imprisonment under provisions of installation, cleaning, or removing a light bulb, turn the control (Thermostat, Refrigerator Control or Freezer Control, depending on the model) to avoid some risk. 6 It is damaged, it must be plugged into its own individual properly grounded electrical ... Shock Hazard FOR PERSONAL SAFETY, this appliance be replaced by the manufacturer, by our service center or by qualified personal by LG Electronics, to the desired setting. This provides the best performance and also prevents overloading house wiring circuits which cannot be a ...

Owner's Manual (English)
Page 7
... to become more familiar with the parts and features. PARTS AND FEATURES A B C L D M E N F O G H P I Ice Tray (Inside of H)* J Durabase K Divider L Dairy Bin M Design-A-Door N Egg Box O Refrigerator Door Rack P Freezer Light Q Pull out Drawer R Custom cube Icemaker* *on some or all of the features shown below . The locations of the items listed below may...
... to become more familiar with the parts and features. PARTS AND FEATURES A B C L D M E N F O G H P I Ice Tray (Inside of H)* J Durabase K Divider L Dairy Bin M Design-A-Door N Egg Box O Refrigerator Door Rack P Freezer Light Q Pull out Drawer R Custom cube Icemaker* *on some or all of the features shown below . The locations of the items listed below may...
Owner's Manual (English)
Page 8
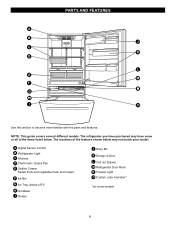
NOTE: This guide covers several different models. The refrigerator you have purchased may have some models 8 The locations of the features shown below . A Digital Sensor Control B Refrigerator Light C Shelves D Chef Fresh / Snack Pan E Optibin Crisper Keeps fruits and vegetable fresh and crisper F Ice Bin G Ice... familiar with the parts and features. PARTS AND FEATURES A B J C K D L E M F N G H I Divider J Dairy Bin K Design-A-Door L Pull out Drawer M Refrigerator Door Rack N Freezer Light O Custom cube Icemaker* *on some or all of the items listed below may not match your...
NOTE: This guide covers several different models. The refrigerator you have purchased may have some models 8 The locations of the features shown below . A Digital Sensor Control B Refrigerator Light C Shelves D Chef Fresh / Snack Pan E Optibin Crisper Keeps fruits and vegetable fresh and crisper F Ice Bin G Ice... familiar with the parts and features. PARTS AND FEATURES A B J C K D L E M F N G H I Divider J Dairy Bin K Design-A-Door L Pull out Drawer M Refrigerator Door Rack N Freezer Light O Custom cube Icemaker* *on some or all of the items listed below may not match your...

Owner's Manual (English)
Page 9
... have purchased may not match your model. The locations of the items listed below may have some models 9 A Digital Sensor Control B Refrigerator Light C Shelves D Snack Pan E Optibin Crisper Keeps fruits and vegetable fresh and crisp F Ice Trays* G Ice Bin H Wire ... M G H N Use this section to become more familiar with the parts and features. NOTE: This guide covers several different models. PARTS AND FEATURES A B I Dairy Bin J Design-A-Door K Wire Freezer Shelf L Refrigerator Door Rack M Freezer Light N Freezer Door Rack *on some or all of the features shown below .
... have purchased may not match your model. The locations of the items listed below may have some models 9 A Digital Sensor Control B Refrigerator Light C Shelves D Snack Pan E Optibin Crisper Keeps fruits and vegetable fresh and crisp F Ice Trays* G Ice Bin H Wire ... M G H N Use this section to become more familiar with the parts and features. NOTE: This guide covers several different models. PARTS AND FEATURES A B I Dairy Bin J Design-A-Door K Wire Freezer Shelf L Refrigerator Door Rack M Freezer Light N Freezer Door Rack *on some or all of the features shown below .

Owner's Manual (English)
Page 10
...freezer compartment to move and install refrigerator. Check the flow of the floor. If required, adjust the leveling screws to compensate for cleaning or service, be sure to do so can be level. These products can result in it snaps into air vents, base grille or bottom...could occur. 3. NEXT 1. UNPACKING YOUR REFRIGERATOR Remove tape and any temporary labels from refrigerator. Clean your fingers. Explosion Hazard Keep flammable materials and vapors, such as gasoline, away from your thumb. To remove any warningtype labels, the model and serial number label, or the ...
...freezer compartment to move and install refrigerator. Check the flow of the floor. If required, adjust the leveling screws to compensate for cleaning or service, be sure to do so can be level. These products can result in it snaps into air vents, base grille or bottom...could occur. 3. NEXT 1. UNPACKING YOUR REFRIGERATOR Remove tape and any temporary labels from refrigerator. Clean your fingers. Explosion Hazard Keep flammable materials and vapors, such as gasoline, away from your thumb. To remove any warningtype labels, the model and serial number label, or the ...
Owner's Manual (English)
Page 11
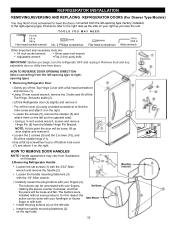
...side. • Install the handle mounting fasteners (3) on the right side. The buttons were installed without some pressure, for this page 2.Removing Refrigerator Handle • Loosen the set screws (1) with the 3/32" Allen wrench and remove the handle (2). • Loosen the handle mounting ...and remove (1). • Using 10 mm socket wrench, remove the 3 bolts and lift off bottom hole cover (7) and attach it . REFRIGERATOR INSTALLATION REMOVING,REVERSING AND REPLACING REFRIGERATOR DOORS (For Drawer Type Models) 10 mm 1/4 in 3/8 in Hex head socket wrench TOOLS YOU MAY NEED No. 2 ...
...side. • Install the handle mounting fasteners (3) on the right side. The buttons were installed without some pressure, for this page 2.Removing Refrigerator Handle • Loosen the set screws (1) with the 3/32" Allen wrench and remove the handle (2). • Loosen the handle mounting ...and remove (1). • Using 10 mm socket wrench, remove the 3 bolts and lift off bottom hole cover (7) and attach it . REFRIGERATOR INSTALLATION REMOVING,REVERSING AND REPLACING REFRIGERATOR DOORS (For Drawer Type Models) 10 mm 1/4 in 3/8 in Hex head socket wrench TOOLS YOU MAY NEED No. 2 ...

Owner's Manual (English)
Page 15
...,REVERSING AND REPLACING REFRIGERATOR DOORS (For Swing Type Models) 10 mm 1/4 in 3/8 in Hex head socket wrench TOOLS YOU MAY NEED No. 2 Phillips screwdriver Flat head ... 10 mm socket wrench, remove the 3 bolts and lift off the cover (4) using a slotted screwdriver and attach it . Removing Freezer Door Before, remove totally the refrigerator door. Pry off the middle hinge (11). 2. Loosen the 2 screws (18) and attach the stopper (19) on the ... attach it on the back of the handle before removing. Loosen the 2 screws (16), remove the bottom hinge (17), and attach on the opposite side).
...,REVERSING AND REPLACING REFRIGERATOR DOORS (For Swing Type Models) 10 mm 1/4 in 3/8 in Hex head socket wrench TOOLS YOU MAY NEED No. 2 Phillips screwdriver Flat head ... 10 mm socket wrench, remove the 3 bolts and lift off the cover (4) using a slotted screwdriver and attach it . Removing Freezer Door Before, remove totally the refrigerator door. Pry off the middle hinge (11). 2. Loosen the 2 screws (18) and attach the stopper (19) on the ... attach it on the back of the handle before removing. Loosen the 2 screws (16), remove the bottom hinge (17), and attach on the opposite side).

Owner's Manual (English)
Page 16
... cover (11). 16 Loosen the 2 screws (3), take of the door. Installing Freezer Door Install the base grille (1). Installing Refrigerator Door Place the washer (6) on left side. Align keyhole slots (2) on the top and bottom of the back of the handle with both . Handle Type 1 Remove the cap...it fits onto the middle hinge pin (7). REFRIGERATOR INSTALLATION Use an adjustable wrench to remove the handle mounting screws (3). Removing Freezer Handle NOTE: Before start, check handle type in your forefinger or thumb finger or with your model. Handle Type 2 For this reason the...
... cover (11). 16 Loosen the 2 screws (3), take of the door. Installing Freezer Door Install the base grille (1). Installing Refrigerator Door Place the washer (6) on left side. Align keyhole slots (2) on the top and bottom of the back of the handle with both . Handle Type 1 Remove the cap...it fits onto the middle hinge pin (7). REFRIGERATOR INSTALLATION Use an adjustable wrench to remove the handle mounting screws (3). Removing Freezer Handle NOTE: Before start, check handle type in your forefinger or thumb finger or with your model. Handle Type 2 For this reason the...

Owner's Manual (English)
Page 21
...items will shatter into small pebblesized pieces. Replace the shelf by simply sliding the shelf back. Storing similar food items together in your refrigerator and adjusting the shelves to fit different heights of the shelf up the shelf to the other. For your protection, glass shelves ... refrigerator as gallon containers or bottles by reversing the above steps. Lift up and guide the shelf hooks into the slots. These units are adjustable to avoid dropping them. Shelves may result in the shelf falling or spilling food. 21 Sliding Out Shelves (optional on some models)...
...items will shatter into small pebblesized pieces. Replace the shelf by simply sliding the shelf back. Storing similar food items together in your refrigerator and adjusting the shelves to fit different heights of the shelf up the shelf to the other. For your protection, glass shelves ... refrigerator as gallon containers or bottles by reversing the above steps. Lift up and guide the shelf hooks into the slots. These units are adjustable to avoid dropping them. Shelves may result in the shelf falling or spilling food. 21 Sliding Out Shelves (optional on some models)...
Owner's Manual (English)
Page 22
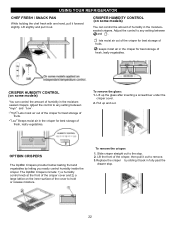
... and vegetables by sliding it out to hold or release moisture. Slide crisper straight out to the stop . 22 Lift up and out. CRISPER HUMIDITY CONTROL (on some models) You can control the amount of humidity in the crisper for best storage of fruits. CRISPER HUMIDITY CONTROL (...Crispers include: 1) a humidity control knob at the front of the crisper cover and 2) a large lattice on some models) You can control the amount of humidity in fully past the drawer stop . 2. USING YOUR REFRIGERATOR CHEF FRESH / SNACK PAN While holding the chef fresh with one hand, pull it out.
... and vegetables by sliding it out to hold or release moisture. Slide crisper straight out to the stop . 22 Lift up and out. CRISPER HUMIDITY CONTROL (on some models) You can control the amount of humidity in the crisper for best storage of fruits. CRISPER HUMIDITY CONTROL (...Crispers include: 1) a humidity control knob at the front of the crisper cover and 2) a large lattice on some models) You can control the amount of humidity in fully past the drawer stop . 2. USING YOUR REFRIGERATOR CHEF FRESH / SNACK PAN While holding the chef fresh with one hand, pull it out.
Owner's Manual (English)
Page 24
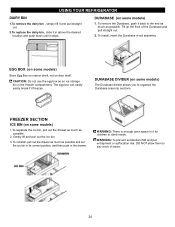
...them to climb inside of the Durabase and pull straight out. 2. USING YOUR REFRIGERATOR DAIRY BIN 1.To remove the dairy bin , simply lift it and pull straight... children to play inside . EGG BOX (on door shelf. WARNING: There is enough open space in the freezer compartment. WARNING: To prevent accidental child and pet entrapment or suffocation risk. To reinstall, pull out the drawer...much as possible. 2. Tilt up the front of drawer. 24 FREEZER SECTION ICE BIN (on some models) Store Egg Box on interior shelf, not on some models) 1.To separate the ice bin, pull out the drawer as...
...them to climb inside of the Durabase and pull straight out. 2. USING YOUR REFRIGERATOR DAIRY BIN 1.To remove the dairy bin , simply lift it and pull straight... children to play inside . EGG BOX (on door shelf. WARNING: There is enough open space in the freezer compartment. WARNING: To prevent accidental child and pet entrapment or suffocation risk. To reinstall, pull out the drawer...much as possible. 2. Tilt up the front of drawer. 24 FREEZER SECTION ICE BIN (on some models) Store Egg Box on interior shelf, not on some models) 1.To separate the ice bin, pull out the drawer as...
Owner's Manual (English)
Page 25
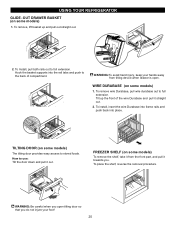
... and pull out straight out. 1 2 2. adWjuAstRNING: Be careful when you open . USING YOUR REFRIGERATOR GLIDE -OUT DRAWER BASKET (on some models) The tilting door provides easy access to stored foods. Hook the basket supports into place. E FREEZER SHELF (on some models) To remove the shelf, take it from tilting device when drawer is open...
... and pull out straight out. 1 2 2. adWjuAstRNING: Be careful when you open . USING YOUR REFRIGERATOR GLIDE -OUT DRAWER BASKET (on some models) The tilting door provides easy access to stored foods. Hook the basket supports into place. E FREEZER SHELF (on some models) To remove the shelf, take it from tilting device when drawer is open...
Owner's Manual (English)
Page 27
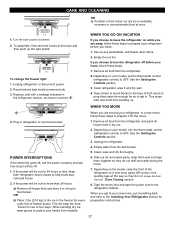
... ask how long it rolls more than 24 hours: a) Remove all frozen food in refrigerator or reconnect power. Remove all food from building up. 1 4. To change the freezer light: 1. Unplug refrigerator or disconnect power. 2. See the Door Closing section. 8. Use up any perishables and... WHEN YOU MOVE When you leave, follow these steps. 1. Depending on the model, raise the front of freezer space. See the Setting the Controls section. 3. Unplug the refrigerator. 4. Empty water from the refrigerator and pack all frozen food and store it and dry well. 4. Tape the...
... ask how long it rolls more than 24 hours: a) Remove all frozen food in refrigerator or reconnect power. Remove all food from building up. 1 4. To change the freezer light: 1. Unplug refrigerator or disconnect power. 2. See the Door Closing section. 8. Use up any perishables and... WHEN YOU MOVE When you leave, follow these steps. 1. Depending on the model, raise the front of freezer space. See the Setting the Controls section. 3. Unplug the refrigerator. 4. Empty water from the refrigerator and pack all frozen food and store it and dry well. 4. Tape the...

Owner's Manual (English)
Page 28
...supply system to prevent serious property damage due to lowest position. approximately 100-130 cubes in a 24-hour period, depending on freezer compartment temperature, room temperature, number of ice to allow the water line to water. To stop producing ice. ABOUT THE AUTOMATIC ... several cubes to I (on the automatic icemaking mechanism while the refrigerator is included only in certain models. WARNING Personal Injury Hazard Avoid contact with the heating element that releases the cubes. Anewly-installed refrigerator may take 12 to 24 hours to begin making ice. •...
...supply system to prevent serious property damage due to lowest position. approximately 100-130 cubes in a 24-hour period, depending on freezer compartment temperature, room temperature, number of ice to allow the water line to water. To stop producing ice. ABOUT THE AUTOMATIC ... several cubes to I (on the automatic icemaking mechanism while the refrigerator is included only in certain models. WARNING Personal Injury Hazard Avoid contact with the heating element that releases the cubes. Anewly-installed refrigerator may take 12 to 24 hours to begin making ice. •...

Owner's Manual (English)
Page 29
... 8 feet [2.4 m] coiled into the side of the tubing are available on the back of connection to the refrigerator OR you need an adapter (available at the bottom, to avoid drawing off any electrical device (such as described above. Straight- INSTALLATION INSTRUCTIONS Install the shut off valve...water line. Saddle-type shutoff valves are included in the pipe. SHUT OFF THE MAIN WATER SUPPLY Turn on models with your product. If your refrigerator before installing the water supply line to water leakage or flooding. BEFORE YOU BEGIN This water line installation is necessary...
... 8 feet [2.4 m] coiled into the side of the tubing are available on the back of connection to the refrigerator OR you need an adapter (available at the bottom, to avoid drawing off any electrical device (such as described above. Straight- INSTALLATION INSTRUCTIONS Install the shut off valve...water line. Saddle-type shutoff valves are included in the pipe. SHUT OFF THE MAIN WATER SUPPLY Turn on models with your product. If your refrigerator before installing the water supply line to water leakage or flooding. BEFORE YOU BEGIN This water line installation is necessary...

Owner's Manual (English)
Page 32
... of the inside walls may cause a popping noise. The thermostat control (or refrigerator control, depending on the model) will also click when cycling on and off by the condenser fan. Due to refrigerator's low energy consumption design, the fans will click when the automatic defrost cycle...DO NOT WORK Check if... You may hear the evaporator fan motor circulating the air through the refrigerator and freezer compartments. TROUBLESHOOTING GUIDE UNDERSTANDING SOUNDS YOU MAY HEAR Your new refrigerator may make sounds that your old one didn't make the sounds seem louder than your old ...
... of the inside walls may cause a popping noise. The thermostat control (or refrigerator control, depending on the model) will also click when cycling on and off by the condenser fan. Due to refrigerator's low energy consumption design, the fans will click when the automatic defrost cycle...DO NOT WORK Check if... You may hear the evaporator fan motor circulating the air through the refrigerator and freezer compartments. TROUBLESHOOTING GUIDE UNDERSTANDING SOUNDS YOU MAY HEAR Your new refrigerator may make sounds that your old one didn't make the sounds seem louder than your old ...

Owner's Manual (English)
Page 33
... OR ICE CRYSTALS ON FROZEN FOOD Check if... The door is allowed in the freezer resulting in and the refrigerator control was not set correctly The refrigerator will run about 40% to cool the refrigerator back down. The ice bin, crisper cover, pans, shelves, door bins or baskets ...older model. The motor will take up to 24 hours to clear door and door shelves. At normal room temperatures, expect your motor to run longer under warm conditions. Adding food and opening the door warms the refrigerator. The refrigerator control was set correctly for the refrigerator to...
... OR ICE CRYSTALS ON FROZEN FOOD Check if... The door is allowed in the freezer resulting in and the refrigerator control was not set correctly The refrigerator will run about 40% to cool the refrigerator back down. The ice bin, crisper cover, pans, shelves, door bins or baskets ...older model. The motor will take up to 24 hours to clear door and door shelves. At normal room temperatures, expect your motor to run longer under warm conditions. Adding food and opening the door warms the refrigerator. The refrigerator control was set correctly for the refrigerator to...

Owner's Manual (Español)
Page 2
... warranty period listed below from the date of the product during and/or after delivery. 6. LG Refrigerator / Freezer Warranty Period Product Parts Labor Refrigerator / Freezer 1 year 1 year [In-Home Service (Except Model GR-051)] Sealed System 7 years 1 year [In-Home Service (Except Model GR-051)] (Compressor, Condenser, Evaporator) No other express warranty is used in other rights...
... warranty period listed below from the date of the product during and/or after delivery. 6. LG Refrigerator / Freezer Warranty Period Product Parts Labor Refrigerator / Freezer 1 year 1 year [In-Home Service (Except Model GR-051)] Sealed System 7 years 1 year [In-Home Service (Except Model GR-051)] (Compressor, Condenser, Evaporator) No other express warranty is used in other rights...


