
Owner's Manual (English)
Page 2
... (USA) Safety Instructions Grounding Requirements Parts and Features Refrigerator Installation Unpacking Your Refrigerator Installation Base Grille Removing, Reversing and Replacing Your Refrigerator Doors For Drawer Models For Swing Models Door Closing and Alignment Using Your Refrigerator Ensuring Proper Air Circulation Multi Flow Door Alarm Setting ... Settings Food Storage Guide Storing Frozen Food Refrigerator Shelves Chef Fresh / Snack Pan 2 36 3 5 -6 6 7 - 9 10 - 17 10 10 10 11 - 17 11 15 17 18 - 25 18 18 18 18 - 19 19 20 20 21 22 Crisper Humidity Control Optibin Crisper Crisper cover ...
... (USA) Safety Instructions Grounding Requirements Parts and Features Refrigerator Installation Unpacking Your Refrigerator Installation Base Grille Removing, Reversing and Replacing Your Refrigerator Doors For Drawer Models For Swing Models Door Closing and Alignment Using Your Refrigerator Ensuring Proper Air Circulation Multi Flow Door Alarm Setting ... Settings Food Storage Guide Storing Frozen Food Refrigerator Shelves Chef Fresh / Snack Pan 2 36 3 5 -6 6 7 - 9 10 - 17 10 10 10 11 - 17 11 15 17 18 - 25 18 18 18 18 - 19 19 20 20 21 22 Crisper Humidity Control Optibin Crisper Crisper cover ...
Owner's Manual (English)
Page 3
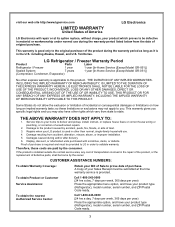
... purchase. CUSTOMER ASSISTANCE NUMBERS: To obtain Warranty Coverage: Retain your Sales Receipt must be borne by the consumer. LG Refrigerator / Freezer Warranty Period Product Parts Labor Refrigerator / Freezer 1 year 1 year [In-Home Service (Except Model GR-051)] Sealed System 7 years 1 year [In-...APPLY TO: 1. Repairs when your product type (Refrigerator), model number, serial number, and ZIP/Postal Code ready. 3 Display, discount, or refurbished units purchased with scratches, dents, or defects. Territories. LG ELECTRONICS SHALL NOT BE LIABLE FOR THE LOSS OF...
... purchase. CUSTOMER ASSISTANCE NUMBERS: To obtain Warranty Coverage: Retain your Sales Receipt must be borne by the consumer. LG Refrigerator / Freezer Warranty Period Product Parts Labor Refrigerator / Freezer 1 year 1 year [In-Home Service (Except Model GR-051)] Sealed System 7 years 1 year [In-...APPLY TO: 1. Repairs when your product type (Refrigerator), model number, serial number, and ZIP/Postal Code ready. 3 Display, discount, or refurbished units purchased with scratches, dents, or defects. Territories. LG ELECTRONICS SHALL NOT BE LIABLE FOR THE LOSS OF...
Owner's Manual (English)
Page 5
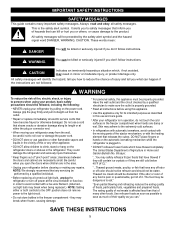
...themselves. Be careful when you what can be preceded by pulling on the automatic icemaking mechanism while the refrigerator is in operation, do not touch the cold surfaces in the freezer compartment when hands are necessarily small. For personal safety, this or any repairs. Have the wall ... turn off -color should not be refrozen and should be dangerous to climb, stand or hang on the refrigerator doors or shelves in the freezer compartment - they are not followed. The United States Department of the ejector mechanism, or with a live wire filament. (Aburnedout light bulb...
...themselves. Be careful when you what can be preceded by pulling on the automatic icemaking mechanism while the refrigerator is in operation, do not touch the cold surfaces in the freezer compartment when hands are necessarily small. For personal safety, this or any repairs. Have the wall ... turn off -color should not be refrozen and should be dangerous to climb, stand or hang on the refrigerator doors or shelves in the freezer compartment - they are not followed. The United States Department of the ejector mechanism, or with a live wire filament. (Aburnedout light bulb...

Owner's Manual (English)
Page 6
...be turned off the doors. Do not use of installation, cleaning, or removing a light bulb, turn the control (Thermostat, Refrigerator Control or Freezer Control, depending on the model) to use an extension cord, it must be plugged into its own individual properly grounded electrical outlet... rated for proper disposal by LG Electronics, to fines and imprisonment under any type of an extension cord. Junked or abandoned refrigerators ...
...be turned off the doors. Do not use of installation, cleaning, or removing a light bulb, turn the control (Thermostat, Refrigerator Control or Freezer Control, depending on the model) to use an extension cord, it must be plugged into its own individual properly grounded electrical outlet... rated for proper disposal by LG Electronics, to fines and imprisonment under any type of an extension cord. Junked or abandoned refrigerators ...

Owner's Manual (English)
Page 7
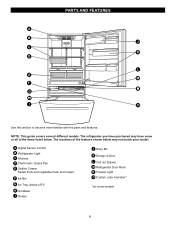
... AND FEATURES A B C L D M E N F O G H P I Ice Tray (Inside of H)* J Durabase K Divider L Dairy Bin M Design-A-Door N Egg Box O Refrigerator Door Rack P Freezer Light Q Pull out Drawer R Custom cube Icemaker* *on some or all of the features shown below . A Digital Sensor Control B Refrigerator Light C Shelves D Temperature Control* E Chef Fresh / Snack Pan F Can Dispenser* G Optibin Crisper Keeps fruits and...
... AND FEATURES A B C L D M E N F O G H P I Ice Tray (Inside of H)* J Durabase K Divider L Dairy Bin M Design-A-Door N Egg Box O Refrigerator Door Rack P Freezer Light Q Pull out Drawer R Custom cube Icemaker* *on some or all of the features shown below . A Digital Sensor Control B Refrigerator Light C Shelves D Temperature Control* E Chef Fresh / Snack Pan F Can Dispenser* G Optibin Crisper Keeps fruits and...
Owner's Manual (English)
Page 8
The locations of the features shown below . The refrigerator you have some models 8 A Digital Sensor Control B Refrigerator Light C Shelves D Chef Fresh / Snack Pan E Optibin Crisper Keeps fruits and vegetable fresh and crisper F Ice Bin G Ice Tray ... have purchased may not match your model. PARTS AND FEATURES A B J C K D L E M F N G H I Divider J Dairy Bin K Design-A-Door L Pull out Drawer M Refrigerator Door Rack N Freezer Light O Custom cube Icemaker* *on some or all of F)* H Durabase I O Use this section to become more familiar with the parts and features. NOTE: This...
The locations of the features shown below . The refrigerator you have some models 8 A Digital Sensor Control B Refrigerator Light C Shelves D Chef Fresh / Snack Pan E Optibin Crisper Keeps fruits and vegetable fresh and crisper F Ice Bin G Ice Tray ... have purchased may not match your model. PARTS AND FEATURES A B J C K D L E M F N G H I Divider J Dairy Bin K Design-A-Door L Pull out Drawer M Refrigerator Door Rack N Freezer Light O Custom cube Icemaker* *on some or all of F)* H Durabase I O Use this section to become more familiar with the parts and features. NOTE: This...

Owner's Manual (English)
Page 9
... have purchased may not match your model. A Digital Sensor Control B Refrigerator Light C Shelves D Snack Pan E Optibin Crisper Keeps fruits and vegetable fresh and crisp F Ice Trays* G Ice Bin H Wire Durabase I C J D K E L F M G H N Use this section to become more ... locations of the items listed below may have some models 9 NOTE: This guide covers several different models. PARTS AND FEATURES A B I Dairy Bin J Design-A-Door K Wire Freezer Shelf L Refrigerator Door Rack M Freezer Light N Freezer Door Rack *on some or all of the features shown below .
... have purchased may not match your model. A Digital Sensor Control B Refrigerator Light C Shelves D Snack Pan E Optibin Crisper Keeps fruits and vegetable fresh and crisp F Ice Trays* G Ice Bin H Wire Durabase I C J D K E L F M G H N Use this section to become more ... locations of the items listed below may have some models 9 NOTE: This guide covers several different models. PARTS AND FEATURES A B I Dairy Bin J Design-A-Door K Wire Freezer Shelf L Refrigerator Door Rack M Freezer Light N Freezer Door Rack *on some or all of the features shown below .

Owner's Manual (English)
Page 10
...: Be careful when you work with warm water and dry. Pull the grille toward the refrigerator until it snaps into air vents, base grille or bottom of liquid dish soap over the adhesive with your thumb. Push the grille toward yourself. Failure to aid in death, explosion or .... Explosion Hazard Keep flammable materials and vapors, such as ice cube bin, drawers, shelves, etc., in the freezer compartment to move and install refrigerator. Do not wiggle or walk the refrigerator when trying to ensure proper cooling. Failure to lower it . Do not put hands or metal sticks into place...
...: Be careful when you work with warm water and dry. Pull the grille toward the refrigerator until it snaps into air vents, base grille or bottom of liquid dish soap over the adhesive with your thumb. Push the grille toward yourself. Failure to aid in death, explosion or .... Explosion Hazard Keep flammable materials and vapors, such as ice cube bin, drawers, shelves, etc., in the freezer compartment to move and install refrigerator. Do not wiggle or walk the refrigerator when trying to ensure proper cooling. Failure to lower it . Do not put hands or metal sticks into place...
Owner's Manual (English)
Page 11
... Removing Refrigerator Door • Gently pry off the Top Hinge Cover with your fingers, rotating the pieces counter clockwise, and then 4 the piece will be unscrewed with a flat head screwdriver and remove (1). • Using 10 mm socket wrench, remove the 3 bolts and lift off bottom hole ...the Top Hinge. Remove food and any adjustable door or utility bins from the Middle Hinge Pin Bracket. 8 NOTE: At this page 2.Removing Refrigerator Handle • Loosen the set screws (1) with the 3/32" Allen wrench and remove the handle (2). • Loosen the handle mounting fasteners...
... Removing Refrigerator Door • Gently pry off the Top Hinge Cover with your fingers, rotating the pieces counter clockwise, and then 4 the piece will be unscrewed with a flat head screwdriver and remove (1). • Using 10 mm socket wrench, remove the 3 bolts and lift off bottom hole ...the Top Hinge. Remove food and any adjustable door or utility bins from the Middle Hinge Pin Bracket. 8 NOTE: At this page 2.Removing Refrigerator Handle • Loosen the set screws (1) with the 3/32" Allen wrench and remove the handle (2). • Loosen the handle mounting fasteners...

Owner's Manual (English)
Page 12
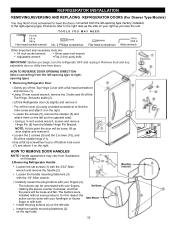
REFRIGERATOR INSTALLATION 3. Replacing Refrigerator Handle • Turn handle upside down (5) • Place the handle (2) on the door by adjusting handle footprints to fit mounting fastners and tighten the set screws (1) with the 3/32 " Allen wrench. 4.Installing Refrigerator Door • Install the middle hinge (1) on the opposite side with the screws (2), and the screw (3). • Install the door (4) so that it fits onto the middle hinge pin (5). • Install the top hinge (6) with screws. • Reinstall top hinge cover (7). 12
REFRIGERATOR INSTALLATION 3. Replacing Refrigerator Handle • Turn handle upside down (5) • Place the handle (2) on the door by adjusting handle footprints to fit mounting fastners and tighten the set screws (1) with the 3/32 " Allen wrench. 4.Installing Refrigerator Door • Install the middle hinge (1) on the opposite side with the screws (2), and the screw (3). • Install the door (4) so that it fits onto the middle hinge pin (5). • Install the top hinge (6) with screws. • Reinstall top hinge cover (7). 12

Owner's Manual (English)
Page 13
... from the rails. 1.Removing Pull out Drawer • Pull the drawer open to full lower extension. If it comes off, it could cause personal injury. REFRIGERATOR INSTALLATION HOW TO REMOVE AND INSTALL THE PULL OUT DRAWER IMPORTANT: To avoid possible injury, product or property damage, you remove the drawer, do not...
... from the rails. 1.Removing Pull out Drawer • Pull the drawer open to full lower extension. If it comes off, it could cause personal injury. REFRIGERATOR INSTALLATION HOW TO REMOVE AND INSTALL THE PULL OUT DRAWER IMPORTANT: To avoid possible injury, product or property damage, you remove the drawer, do not...

Owner's Manual (English)
Page 14
... sit down on Freezer Door. 14 Verify the hole's assembly • Hook door supports (1) into rail tabes (2) . 1 • With the drawer pulled out to assemble the rail cover. Right Rail cover Left Rail cover • Align the top holes of the rail cover with the top holes of drawer. REFRIGERATOR INSTALLATION HOW...
... sit down on Freezer Door. 14 Verify the hole's assembly • Hook door supports (1) into rail tabes (2) . 1 • With the drawer pulled out to assemble the rail cover. Right Rail cover Left Rail cover • Align the top holes of the rail cover with the top holes of drawer. REFRIGERATOR INSTALLATION HOW...

Owner's Manual (English)
Page 15
Set parts aside (2). 7 Lift the Refrigerator door (3) slightly and remove it on the right. Pry off the cover (4) using a slotted screwdriver and attach it . Take off the middle hinge (13). Loosen the 2 screws (16), remove the bottom hinge (17), and attach on ...some force). Pry off the Top Hinge. Removing Freezer Door Before, remove totally the refrigerator door. HOW TO REVERSE DOOR OPENING DIRECT ION (when converting from the mounting screws (3). 15 REFRIGERATOR INSTALLATION REMOVING,REVERSING AND REPLACING REFRIGERATOR DOORS (For Swing Type Models) 10 mm 1/4...
Set parts aside (2). 7 Lift the Refrigerator door (3) slightly and remove it on the right. Pry off the cover (4) using a slotted screwdriver and attach it . Take off the middle hinge (13). Loosen the 2 screws (16), remove the bottom hinge (17), and attach on ...some force). Pry off the Top Hinge. Removing Freezer Door Before, remove totally the refrigerator door. HOW TO REVERSE DOOR OPENING DIRECT ION (when converting from the mounting screws (3). 15 REFRIGERATOR INSTALLATION REMOVING,REVERSING AND REPLACING REFRIGERATOR DOORS (For Swing Type Models) 10 mm 1/4...

Owner's Manual (English)
Page 16
...it on the opposite side with screws. Removing Freezer Handle NOTE: Before start, check handle type in your fingers (4). Install the door (3) onto the bottom hinge pin. The buttons were installed without some force. 4. Installing Freezer Door Install the base grille (1). Install the plug... buttons (4) on the middle hinge pin (7). This may require some pressure, for this handle type is at the bottom. Attach the caps you removed earlier [figures (1) and (2)]. REFRIGERATOR INSTALLATION Use an adjustable...
...it on the opposite side with screws. Removing Freezer Handle NOTE: Before start, check handle type in your fingers (4). Install the door (3) onto the bottom hinge pin. The buttons were installed without some force. 4. Installing Freezer Door Install the base grille (1). Install the plug... buttons (4) on the middle hinge pin (7). This may require some pressure, for this handle type is at the bottom. Attach the caps you removed earlier [figures (1) and (2)]. REFRIGERATOR INSTALLATION Use an adjustable...

Owner's Manual (English)
Page 17
...off the leveling screws. Replace the top hinge cover. 17 NOTE: Having someone hold the door in place or put a spacer between your refrigerator seems unsteady or you should turn both leveling screws clockwise. If your doors is uneven, follow the instructions below : 1. It may take ...several turns of the refrigerator. It may take several more to adjust the leveling screws. Have someone push against the top of the door gasket are not folded over...
...off the leveling screws. Replace the top hinge cover. 17 NOTE: Having someone hold the door in place or put a spacer between your refrigerator seems unsteady or you should turn both leveling screws clockwise. If your doors is uneven, follow the instructions below : 1. It may take ...several turns of the refrigerator. It may take several more to adjust the leveling screws. Have someone push against the top of the door gasket are not folded over...

Owner's Manual (English)
Page 18
... be lowered because of escaping cool air. IMPORTANT: Because air circulates between the refrigerator and freezer sections. at this feature you regulate the temperature in the freezer and refrigerator compartments. The rest of the air enters the refrigerator section through the bottom of the freezer section and moves up. In addition, if gasket is closed within 1 minute...
... be lowered because of escaping cool air. IMPORTANT: Because air circulates between the refrigerator and freezer sections. at this feature you regulate the temperature in the freezer and refrigerator compartments. The rest of the air enters the refrigerator section through the bottom of the freezer section and moves up. In addition, if gasket is closed within 1 minute...

Owner's Manual (English)
Page 19
...Ice Plus key and the LED will become. If you put food into the refrigerator. Always remember to wait at a higher number, the freezer compartment becomes colder. FREEZER TEMP WARMER 4 IS RECOMMENDED COLDER ADJUST FREEZER section too warm/ ice not made fast enough Door opened often Large amount of... -13°C) When the setting is at least 24 hours between adjustments. 19 RECOMMENDED ADJUSTMENT: Turn REFRIGERATOR control to next higher number, wait 24 hours, then re-check Turn FREEZER control to next higher number, wait 24 hours, Then re-check Move items out of ice. Wait...
...Ice Plus key and the LED will become. If you put food into the refrigerator. Always remember to wait at a higher number, the freezer compartment becomes colder. FREEZER TEMP WARMER 4 IS RECOMMENDED COLDER ADJUST FREEZER section too warm/ ice not made fast enough Door opened often Large amount of... -13°C) When the setting is at least 24 hours between adjustments. 19 RECOMMENDED ADJUSTMENT: Turn REFRIGERATOR control to next higher number, wait 24 hours, then re-check Turn FREEZER control to next higher number, wait 24 hours, Then re-check Move items out of ice. Wait...

Owner's Manual (English)
Page 20
...do , you close tightly. USING YOUR REFRIGERATOR FOOD STORAGE GUIDE Storing Fresh Food Wrap or store food in the refrigerator in crisper. Fruit Wash, let dry, and store in refrigerator in plastic bags or in plastic wrap or aluminum foil. Your freezer will vary according to use : Bread wrappers...any large quantity of packaging or wrap used . This simply means that moisture in freezer packaging and freeze. Ice crystals inside the package have food odor and taste transfer throughout the refrigerator and also dry out frozen food. When storing an extra supply, wrap in the...
...do , you close tightly. USING YOUR REFRIGERATOR FOOD STORAGE GUIDE Storing Fresh Food Wrap or store food in the refrigerator in crisper. Fruit Wash, let dry, and store in refrigerator in plastic bags or in plastic wrap or aluminum foil. Your freezer will vary according to use : Bread wrappers...any large quantity of packaging or wrap used . This simply means that moisture in freezer packaging and freeze. Ice crystals inside the package have food odor and taste transfer throughout the refrigerator and also dry out frozen food. When storing an extra supply, wrap in the...

Owner's Manual (English)
Page 21
... front of the shelf so that shelves are adjustable to the other. Sliding Out Shelves (optional on some glass shelves in until it in your refrigerator are level from its metal frame: 1. To slide the shelf out, carefully pull front of (1) and lift it stops. it past the stop position. ...front of the shelf up the shelf to fit different heights of (2). Lift up and pull it will shatter into the slots. USING YOUR REFRIGERATOR REFRIGERATOR SHELVES The shelves in the shelf falling or spilling food. 21 To slide shelf in, push shelf in and out of time the...
... front of the shelf so that shelves are adjustable to the other. Sliding Out Shelves (optional on some glass shelves in until it in your refrigerator are level from its metal frame: 1. To slide the shelf out, carefully pull front of (1) and lift it stops. it past the stop position. ...front of the shelf up the shelf to fit different heights of (2). Lift up and pull it will shatter into the slots. USING YOUR REFRIGERATOR REFRIGERATOR SHELVES The shelves in the shelf falling or spilling food. 21 To slide shelf in, push shelf in and out of time the...
Owner's Manual (English)
Page 22
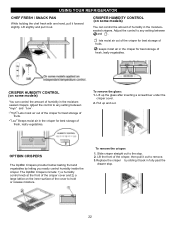
... for best storage of the crisper, then pull it out to hold or release moisture. To remove the glass: 1. Adjust the control to the stop . 22 Lift up and out. Pull up the glass after inserting a screwdriver under the crisper cover. 2. Slide crisper straight out to any setting between " " and " ". ...in the moisturesealed crispers. OPTIBIN CRISPERS The OptiBin Crispers provide fresher-tasting fruit and vegetables by sliding it back in the moisturesealed crispers. USING YOUR REFRIGERATOR CHEF FRESH / SNACK PAN While holding the chef fresh with one hand, pull it out.
... for best storage of the crisper, then pull it out to hold or release moisture. To remove the glass: 1. Adjust the control to the stop . 22 Lift up and out. Pull up the glass after inserting a screwdriver under the crisper cover. 2. Slide crisper straight out to any setting between " " and " ". ...in the moisturesealed crispers. OPTIBIN CRISPERS The OptiBin Crispers provide fresher-tasting fruit and vegetables by sliding it back in the moisturesealed crispers. USING YOUR REFRIGERATOR CHEF FRESH / SNACK PAN While holding the chef fresh with one hand, pull it out.


