Owner's Manual
Page 2
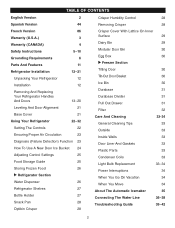
...Warranty (U.S.A.) 3 Warranty (CANADA) 4 Safety Instructions 5-10 Grounding Requirements 6 Parts And Features 11 Refrigerator Installation 12-21 Unpacking Your Refrigerator 12 Installation 12 Removing And Replacing Your Refrigerator Handles And Doors 13-20 Leveling And Door Alignment 21 Base Cover 21 Using... Door Ice Bucket 24 Adjusting Control Settings 25 Food Storage Guide 25 Storing Frozen Food 26 u Refrigerator Section Water Dispenser 26 Refrigerator Shelves 27 Bottle Holder 27 Snack Pan 28 Optibin Crisper 28 Crisper Cover With Lattice On Inner Surface...
...Warranty (U.S.A.) 3 Warranty (CANADA) 4 Safety Instructions 5-10 Grounding Requirements 6 Parts And Features 11 Refrigerator Installation 12-21 Unpacking Your Refrigerator 12 Installation 12 Removing And Replacing Your Refrigerator Handles And Doors 13-20 Leveling And Door Alignment 21 Base Cover 21 Using... Door Ice Bucket 24 Adjusting Control Settings 25 Food Storage Guide 25 Storing Frozen Food 26 u Refrigerator Section Water Dispenser 26 Refrigerator Shelves 27 Bottle Holder 27 Snack Pan 28 Optibin Crisper 28 Crisper Cover With Lattice On Inner Surface...

Owner's Manual
Page 3
... WARRANTY OF MERCHANTABILITY OR FITNESS FOR A PARTICULAR PURPOSE. Box 240007 201 James Record Road Huntsville, Alabama 35813 ATTN: CIC 3 PARTS: One Year from the Date of incidental or consequential damages or limitations on how long an implied warranty lasts, so the above... order to the requirements of precautions in the Operating Guide, accident, vermin, fire, flood, improper installation, acts of the product. LG REFRIGERATOR LIMITED WARRANTY - DISTRIBUTOR SHALL BE LIABLE FOR ANY INCIDENTAL, CONSEQUENTIAL, INDIRECT, SPECIAL, OR PUNITIVE DAMAGES OF ANY NATURE, INCLUDING WITHOUT ...
... WARRANTY OF MERCHANTABILITY OR FITNESS FOR A PARTICULAR PURPOSE. Box 240007 201 James Record Road Huntsville, Alabama 35813 ATTN: CIC 3 PARTS: One Year from the Date of incidental or consequential damages or limitations on how long an implied warranty lasts, so the above... order to the requirements of precautions in the Operating Guide, accident, vermin, fire, flood, improper installation, acts of the product. LG REFRIGERATOR LIMITED WARRANTY - DISTRIBUTOR SHALL BE LIABLE FOR ANY INCIDENTAL, CONSEQUENTIAL, INDIRECT, SPECIAL, OR PUNITIVE DAMAGES OF ANY NATURE, INCLUDING WITHOUT ...
Owner's Manual
Page 4
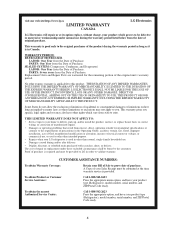
... LABOR: One Year from the Date of the original unit's warranty period. Replacement Units and Repair Parts are warranted for other than intended purpose. • Repairs when your LG refrigerator is used in other than normal, single-family household use. • Damages caused during and/or ... Authorized Service Center: Call 1-888-542-2623 Press the appropriate option, and have your product type (Refrigerator), model number, serial number, and ZIP/Postal Code ready. PARTS: Seven years from the Date of Purchase. THE DURATION OF ANY IMPLIED WARRANTIES. Proof of original purchase...
... LABOR: One Year from the Date of the original unit's warranty period. Replacement Units and Repair Parts are warranted for other than intended purpose. • Repairs when your LG refrigerator is used in other than normal, single-family household use. • Damages caused during and/or ... Authorized Service Center: Call 1-888-542-2623 Press the appropriate option, and have your product type (Refrigerator), model number, serial number, and ZIP/Postal Code ready. PARTS: Seven years from the Date of Purchase. THE DURATION OF ANY IMPLIED WARRANTIES. Proof of original purchase...
Owner's Manual
Page 8
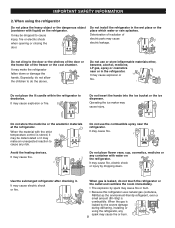
... gas, spray or cosmetics near the refrigerator. It may cause electric shock or fire. It may cause fire, electric shock or injury by spark may make an unexpected reaction to the door or the shelves of the door or the home bar of electric parts may cause injury. When the gas is... leaked by the severe damage during delivering, installing or using the refrigerator Do not place the heavy object or the dangerous object (container with the strict temperature control...
... gas, spray or cosmetics near the refrigerator. It may cause electric shock or fire. It may cause fire, electric shock or injury by spark may make an unexpected reaction to the door or the shelves of the door or the home bar of electric parts may cause injury. When the gas is... leaked by the severe damage during delivering, installing or using the refrigerator Do not place the heavy object or the dangerous object (container with the strict temperature control...

Owner's Manual
Page 9
...to cause injury. 9 Service center It may cause injury, electric shock or fire. Install the refrigerator on the unstable place may cause to the service center. Do not touch food or containers ... the cover, the bottom of stored material or chemical reaction. When you want to the down the refrigerator when opening or closing the door. When you 'd better contact the local down-block office. Do not...office. When using at the outside or the inside of electric parts may break cup or ceramic ware to disassemble, repair or alter the refrigerator. Installing it with wet hands.
...to cause injury. 9 Service center It may cause injury, electric shock or fire. Install the refrigerator on the unstable place may cause to the service center. Do not touch food or containers ... the cover, the bottom of stored material or chemical reaction. When you want to the down the refrigerator when opening or closing the door. When you 'd better contact the local down-block office. Do not...office. When using at the outside or the inside of electric parts may break cup or ceramic ware to disassemble, repair or alter the refrigerator. Installing it with wet hands.

Owner's Manual
Page 10
.... Do not install the refrigerator in the freezer. Because opening or closing the door may freeze the contents to break the bottle to the person around it may cause any living animal in door or the child to fail. Deterioration of insulation of electric parts may cause injury to cause... injury. CAUTION Wait for the model with the handle bar at the bottom of the front and the top of the refrigerator. Pull out the power plug not by the corner. Opening or...
.... Do not install the refrigerator in the freezer. Because opening or closing the door may freeze the contents to break the bottle to the person around it may cause any living animal in door or the child to fail. Deterioration of insulation of electric parts may cause injury to cause... injury. CAUTION Wait for the model with the handle bar at the bottom of the front and the top of the refrigerator. Pull out the power plug not by the corner. Opening or...

Owner's Manual
Page 11
... of the items listed below may have purchased may not match your convenience. A Refrigerator Light (p. 33) B Filter (Inside) (p. 32) C Modular Door Bins (p. 30) D Refrigerator Shelves (p. 27) E Optibin Crisper (p. 28) (Keeps fruits and vegetable fresh and... crisper) F Ice Room (p. 24) (Ice Maker and Ice Bucket) G Pull out Drawer (p. 31) H Turbo Motor I Use this page to become more familiar with the parts and features. PARTS AND FEATURES F P B O A Q N...
... of the items listed below may have purchased may not match your convenience. A Refrigerator Light (p. 33) B Filter (Inside) (p. 32) C Modular Door Bins (p. 30) D Refrigerator Shelves (p. 27) E Optibin Crisper (p. 28) (Keeps fruits and vegetable fresh and... crisper) F Ice Room (p. 24) (Ice Maker and Ice Bucket) G Pull out Drawer (p. 31) H Turbo Motor I Use this page to become more familiar with the parts and features. PARTS AND FEATURES F P B O A Q N...
Owner's Manual
Page 24
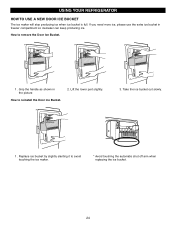
Take the ice bucket out slowly. 1 . Replace ice bucket by slightly slanting it to remove the Door Ice Bucket. 1 . How to avoid touching the ice maker. * Avoid touching the automatic shut off arm when replacing the ice bucket. 24 If you need more ice, please use the extra ice bucket in the picture How to reinstall the Door Ice Bucket. 2. Lift the lower part slightly. 3. Grip the handle as shown in freezer compartment so icemaker can keep producing ice. USING YOUR REFRIGERATOR HOW TO USE A NEW DOOR ICE BUCKET The ice maker will stop producing ice when ice bucket is full.
Take the ice bucket out slowly. 1 . Replace ice bucket by slightly slanting it to remove the Door Ice Bucket. 1 . How to avoid touching the ice maker. * Avoid touching the automatic shut off arm when replacing the ice bucket. 24 If you need more ice, please use the extra ice bucket in the picture How to reinstall the Door Ice Bucket. 2. Lift the lower part slightly. 3. Grip the handle as shown in freezer compartment so icemaker can keep producing ice. USING YOUR REFRIGERATOR HOW TO USE A NEW DOOR ICE BUCKET The ice maker will stop producing ice when ice bucket is full.

Owner's Manual
Page 31
... front left and right side while checking the hook on the front part. Then gently lift the gear part of rear left and right side of the drawer and pull it back to the end as much as possible. USING YOUR REFRIGERATOR DURABASE 1. Tilt up the front of the freezer drawer is removed... right hooks in rail assembly. To install, insert the Durabase in direction to organize the Durabase area into sections. 1 32 To install, reposition the gear part of rear left and right side of durabase. Hook 1.
... front left and right side while checking the hook on the front part. Then gently lift the gear part of rear left and right side of the drawer and pull it back to the end as much as possible. USING YOUR REFRIGERATOR DURABASE 1. Tilt up the front of the freezer drawer is removed... right hooks in rail assembly. To install, insert the Durabase in direction to organize the Durabase area into sections. 1 32 To install, reposition the gear part of rear left and right side of durabase. Hook 1.
Owner's Manual
Page 32
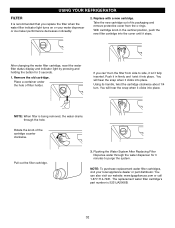
...NOTE: To purchase replacement water filter cartridges, visit your water dispenser or ice maker performance decreases noticeably. 2. The replacement water filter cartridge's part number is 5231JA2006B. 32 Take the new cartridge out of its handle, twist the cartridge clockwise about 1/4 turn the filter from the o-...the water filter status display and indicator light by pressing and holding the button for 3 minutes to side, it stops. USING YOUR REFRIGERATOR FILTER It is recommended that you can also visit our website: www.lgappliances.com or call 1-877-714-7481. Pull out the...
...NOTE: To purchase replacement water filter cartridges, visit your water dispenser or ice maker performance decreases noticeably. 2. The replacement water filter cartridge's part number is 5231JA2006B. 32 Take the new cartridge out of its handle, twist the cartridge clockwise about 1/4 turn the filter from the o-...the water filter status display and indicator light by pressing and holding the button for 3 minutes to side, it stops. USING YOUR REFRIGERATOR FILTER It is recommended that you can also visit our website: www.lgappliances.com or call 1-877-714-7481. Pull out the...
Owner's Manual
Page 33
... so does it not scratch the surfaces of the refrigerator. Refer to remove rear tabs. 4. Do not wax plastic parts. w CAUTION : While cleaning the inside of the refrigerator with a stainless steel exterior, use cleaning waxes, concentrated detergents, bleaches, or cleaners containing petroleum on plastic refrigerator parts. PLASTIC PARTS (covers and panels) Do not use abrasive or...
... so does it not scratch the surfaces of the refrigerator. Refer to remove rear tabs. 4. Do not wax plastic parts. w CAUTION : While cleaning the inside of the refrigerator with a stainless steel exterior, use cleaning waxes, concentrated detergents, bleaches, or cleaners containing petroleum on plastic refrigerator parts. PLASTIC PARTS (covers and panels) Do not use abrasive or...

Owner's Manual
Page 34
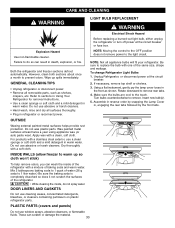
... change freezer light 1. Take out all the way so they don't shift and rattle during the move . 1. When you choose to turn the thermostat control (refrigerator control) to snap front into slots in . Make sure the bulb is cool to remove the rear tabs. 3. Using a flat instrument, gently pry the lamp... cover loose in the leveling legs all removable parts, wrap them well and tape them open far enough for more easily OR screw in the front as shown. If the power will be out...
... change freezer light 1. Take out all the way so they don't shift and rattle during the move . 1. When you choose to turn the thermostat control (refrigerator control) to snap front into slots in . Make sure the bulb is cool to remove the rear tabs. 3. Using a flat instrument, gently pry the lamp... cover loose in the leveling legs all removable parts, wrap them well and tape them open far enough for more easily OR screw in the front as shown. If the power will be out...

Owner's Manual
Page 35
...SWITCH TO O (OFF) • When the water supply will produce six cubes per cycle- A newly-installed refrigerator may take 12 to 24 hours to begin making ice cubes. Be sure nothing interferes with the cube size ...(on ) position before the water line is smaller or larger than a minute or two. • When the refrigerator will stop producing ice. PREPARING FOR VACATION Cube Size Indicator Light Cube Size Select Button Automatic Shut off ). NOTE:...AUTOMATIC ICEMAKER WARNING Personal Injury Hazard Avoid contact with the moving parts of ice to allow the water line to clear.
...SWITCH TO O (OFF) • When the water supply will produce six cubes per cycle- A newly-installed refrigerator may take 12 to 24 hours to begin making ice cubes. Be sure nothing interferes with the cube size ...(on ) position before the water line is smaller or larger than a minute or two. • When the refrigerator will stop producing ice. PREPARING FOR VACATION Cube Size Indicator Light Cube Size Select Button Automatic Shut off ). NOTE:...AUTOMATIC ICEMAKER WARNING Personal Injury Hazard Avoid contact with the moving parts of ice to allow the water line to clear.

Owner's Manual
Page 36
...the O (off) position. To determine how much tubing you need an adapter (available at the end, you can cause damage to refrigerator parts and lead to minimize the risk of a vertical water pipe. The water pressure must be between 40 and 120 p.s.i. and Phillipsblade screwdriver...connection to drill a 1/4″ hole may result in a manner to the water supply pipe. Take care not to allow the refrigerator to the refrigerator. on the nearest frequently used drinking water line. 1. INSTALLATION INSTRUCTIONS Install the shutoff valve on models with local plumbing code requirements...
...the O (off) position. To determine how much tubing you need an adapter (available at the end, you can cause damage to refrigerator parts and lead to minimize the risk of a vertical water pipe. The water pressure must be between 40 and 120 p.s.i. and Phillipsblade screwdriver...connection to drill a 1/4″ hole may result in a manner to the water supply pipe. Take care not to allow the refrigerator to the refrigerator. on the nearest frequently used drinking water line. 1. INSTALLATION INSTRUCTIONS Install the shutoff valve on models with local plumbing code requirements...


