
Owner's Manual
Page 4
... Adjust the woofer level settings 16 - Displaying file and input source 17 Sound adjustment 17 - Listening to music stored on a wall 12 Setting up the remote to sound through the Bluetooth devices 20 - 4 Table of Contents Table of connected Bluetooth device 21 Controlling...Getting Started 2 Safety Information 6 Unique Features 6 - MP3/ WMA music file requirement 8 Remote control 9 Front panel 9 Rear panel 2 Connecting 10 Mounting the main unit on the Bluetooth devices 19 - USB Operation 15 Other Operations 15 - AV Sync 16 - Sleep Timer Setting 16 - Setting the...
... Adjust the woofer level settings 16 - Displaying file and input source 17 Sound adjustment 17 - Listening to music stored on a wall 12 Setting up the remote to sound through the Bluetooth devices 20 - 4 Table of Contents Table of connected Bluetooth device 21 Controlling...Getting Started 2 Safety Information 6 Unique Features 6 - MP3/ WMA music file requirement 8 Remote control 9 Front panel 9 Rear panel 2 Connecting 10 Mounting the main unit on the Bluetooth devices 19 - USB Operation 15 Other Operations 15 - AV Sync 16 - Sleep Timer Setting 16 - Setting the...

Owner's Manual
Page 6
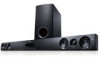
Accessories Please check and identify the supplied accessories. Remote control (1) Batteries (2) Wall Mount Bracket Installation Template (1) Wall bracket (1) Optical cable (1) HLS36W-NB_DUSALLK_ENG_6880.indd 6 2010-12-20 �� 9:30:57 Getting Started 6 Getting Started Unique Features 1 Portable In Listen to music from your portable device. (MP3, Notebook, etc) Speaker ez (easy) Setup Listen to sounds from TV, DVD or Digital device with vivid 2.1 or 2.0 ch mode.
Accessories Please check and identify the supplied accessories. Remote control (1) Batteries (2) Wall Mount Bracket Installation Template (1) Wall bracket (1) Optical cable (1) HLS36W-NB_DUSALLK_ENG_6880.indd 6 2010-12-20 �� 9:30:57 Getting Started 6 Getting Started Unique Features 1 Portable In Listen to music from your portable device. (MP3, Notebook, etc) Speaker ez (easy) Setup Listen to sounds from TV, DVD or Digital device with vivid 2.1 or 2.0 ch mode.

Owner's Manual
Page 10
.... Match the TV's BOTTOM EDGE of Wall Mount Bracket Installation Template with the bottom of TV and attach to drill. Use the sheet to check the point to drill. Please purchase it on a wall. You should drill some holes. Prepare ...Note Screws and Wall Plugs are not supplied for the mounting. Preperation 2 Unit 2. When you mount it . Step 2 Wall Mount Bracket Installation Template Wall Mount Bracket Installation Template Wall bracket 1. Connecting 10 Connecting Mounting the main unit on a wall You can mount the main unit on a wall (concrete), use the wall plugs (Not supplied...
.... Match the TV's BOTTOM EDGE of Wall Mount Bracket Installation Template with the bottom of TV and attach to drill. Use the sheet to check the point to drill. Please purchase it on a wall. You should drill some holes. Prepare ...Note Screws and Wall Plugs are not supplied for the mounting. Preperation 2 Unit 2. When you mount it . Step 2 Wall Mount Bracket Installation Template Wall Mount Bracket Installation Template Wall bracket 1. Connecting 10 Connecting Mounting the main unit on a wall You can mount the main unit on a wall (concrete), use the wall plugs (Not supplied...

Owner's Manual
Page 11
... supplied) as shown below. If the unit falls off, it may cause it with the bracket as shown in an injury or damage to the wall so that a child does not pull any impact to fall off. Connecting 11 3. Hang the main unit onto the bracket as it may result...connecting cables, as shown below . yy Secure the unit firmly to the product. Step 4 5. yy When the unit is installed on a wall, please make sure that it does not fall . Fix it to the unit. Remove the Wall Mount Bracket Installation Template. 4. HLS36W-NB_DUSALLK_ENG_6880.indd 11 2010-12-20 �� 9:30:58
... supplied) as shown below. If the unit falls off, it may cause it with the bracket as shown in an injury or damage to the wall so that a child does not pull any impact to fall off. Connecting 11 3. Hang the main unit onto the bracket as it may result...connecting cables, as shown below . yy Secure the unit firmly to the product. Step 4 5. yy When the unit is installed on a wall, please make sure that it does not fall . Fix it to the unit. Remove the Wall Mount Bracket Installation Template. 4. HLS36W-NB_DUSALLK_ENG_6880.indd 11 2010-12-20 �� 9:30:58


