

Owners Manual
Page 2
...appropriate option, and have your product type (Refrigerator), model number, serial number, and ZIP/Postal Code ready. 1 WARRANTY Visit our web site http://www.lg.com LG Electronics LIMITED WARRANTY United States of America LG Electronics will repair or at the time ...of the product, or the replacement of purchase is installed outside the normal service area, any cost of God. 3. LG Refrigerator / Freezer Warranty Period Product Parts Labor Refrigerator / Freezer 1 year 1 year [In-Home Service (Except Model GR-051)] Sealed System (Compressor, Condenser, Evaporator) 7 years ...
...appropriate option, and have your product type (Refrigerator), model number, serial number, and ZIP/Postal Code ready. 1 WARRANTY Visit our web site http://www.lg.com LG Electronics LIMITED WARRANTY United States of America LG Electronics will repair or at the time ...of the product, or the replacement of purchase is installed outside the normal service area, any cost of God. 3. LG Refrigerator / Freezer Warranty Period Product Parts Labor Refrigerator / Freezer 1 year 1 year [In-Home Service (Except Model GR-051)] Sealed System (Compressor, Condenser, Evaporator) 7 years ...

Owners Manual
Page 3
... Requirements for Ground Connection Parts and Features Refrigerator Installation Unpacking Installation Installation of Base Grille How to remove and Install the Refrigerator Doors How to reverse and Install the Refrigerator Doors Closing and Aligning the doors Using your Refrigerator Ensuring Proper Air Circulation Adjusting the Controls ...Refrigerator Lights Power Interruptions When Going on Vacation When Moving 17-21 17 17 18 18 18-19 19-21 About the Automatic Ice Maker Connecting the Water Line Troubleshooting Guide 19-20 20 20 20 20-21 21 21 21 21 21 22-23 22 22 22 22 22 22 22...
... Requirements for Ground Connection Parts and Features Refrigerator Installation Unpacking Installation Installation of Base Grille How to remove and Install the Refrigerator Doors How to reverse and Install the Refrigerator Doors Closing and Aligning the doors Using your Refrigerator Ensuring Proper Air Circulation Adjusting the Controls ...Refrigerator Lights Power Interruptions When Going on Vacation When Moving 17-21 17 17 18 18 18-19 19-21 About the Automatic Ice Maker Connecting the Water Line Troubleshooting Guide 19-20 20 20 20 20-21 21 21 21 21 21 22-23 22 22 22 22 22 22 22...

Owners Manual
Page 4
... quality of melted ice cream should be avoided. All safety messages will follow instructions. could break while being replaced). Be careful closing the doors when children are near. • Read all faulty or damaged service cables. The Department of Agriculture of the United States, in this ...not to roll over the electrical cord. • DO NOT store or use cords that of the refrigerator. These words mean: DANGER WARNING CAUTION You may result in the freezer compartment, they contain ice crystals or are not followed. This can occur if the instructions are cold and...
... quality of melted ice cream should be avoided. All safety messages will follow instructions. could break while being replaced). Be careful closing the doors when children are near. • Read all faulty or damaged service cables. The Department of Agriculture of the United States, in this ...not to roll over the electrical cord. • DO NOT store or use cords that of the refrigerator. These words mean: DANGER WARNING CAUTION You may result in the freezer compartment, they contain ice crystals or are not followed. This can occur if the instructions are cold and...

Owners Manual
Page 5
... a separate circuit be used for this appliance must disconnect the appliance from the power source. BEFORE DISPOSING YOUR REFRIGERATOR OR FREEZER WHEN NO LONGER IN USE: • Remove the doors. • Leave the shelves in place so that children cannot easily become stuck in effect. If you decide... this appliance, as well as a receptacle that cannot be replaced by our service center or qualified LG technician to ensure that the plug is grounded properly. It is your old refrigerator, please follow the instructions below to its own outlet which could be properly grounded. Do not, ...
... a separate circuit be used for this appliance must disconnect the appliance from the power source. BEFORE DISPOSING YOUR REFRIGERATOR OR FREEZER WHEN NO LONGER IN USE: • Remove the doors. • Leave the shelves in place so that children cannot easily become stuck in effect. If you decide... this appliance, as well as a receptacle that cannot be replaced by our service center or qualified LG technician to ensure that the plug is grounded properly. It is your old refrigerator, please follow the instructions below to its own outlet which could be properly grounded. Do not, ...

Owners Manual
Page 6
PARTS AND FEATURES A J B C K D E L M F G N H I Base Grille J Freezer Door Racks K Can Dispenser L Dairy Compartment M Door Racks N Fixed Door Rack * On some models 6 Your refrigerator could have some of the parts may not correspond to familiarize yourself with the parts and features of the features and parts listed below. NOTE: ...
PARTS AND FEATURES A J B C K D E L M F G N H I Base Grille J Freezer Door Racks K Can Dispenser L Dairy Compartment M Door Racks N Fixed Door Rack * On some models 6 Your refrigerator could have some of the parts may not correspond to familiarize yourself with the parts and features of the features and parts listed below. NOTE: ...

Owners Manual
Page 7
... of some models 7 A Ice Maker B Freezer Shelf C Digital Sensor Control D Refrigerator Light E Frozen Meat Compartment (Chef Fresh/Snack Pan) F Shelves G Crisper Keeps fruits and vegetable fresh and crisp H VitaBox (inside) * I Read this section to that of the features and parts listed below. PARTS AND FEATURES A B J C K D E L F M G H N I Base Grille J Freezer Door Racks K Can Dispenser L Dairy Compartment...
... of some models 7 A Ice Maker B Freezer Shelf C Digital Sensor Control D Refrigerator Light E Frozen Meat Compartment (Chef Fresh/Snack Pan) F Shelves G Crisper Keeps fruits and vegetable fresh and crisp H VitaBox (inside) * I Read this section to that of the features and parts listed below. PARTS AND FEATURES A B J C K D E L F M G H N I Base Grille J Freezer Door Racks K Can Dispenser L Dairy Compartment...

Owners Manual
Page 8
... to familiarize yourself with the parts and features of your model. Your refrigerator could have some models 8 PARTS AND FEATURES A I Freezer Door Racks J Can Dispenser K Dairy Compartment L Door Racks M Fixed Door Rack * On some or all of the features and parts listed below.... A Ice Maker B Ice Bin C Freezer Shelf D Digital Sensor Control E Refrigerator Light F Frozen Meat Compartment (Chef Fresh/...
... to familiarize yourself with the parts and features of your model. Your refrigerator could have some models 8 PARTS AND FEATURES A I Freezer Door Racks J Can Dispenser K Dairy Compartment L Door Racks M Fixed Door Rack * On some or all of the features and parts listed below.... A Ice Maker B Ice Bin C Freezer Shelf D Digital Sensor Control E Refrigerator Light F Frozen Meat Compartment (Chef Fresh/...

Owners Manual
Page 9
...replace them according to ensure that the doors close properly. Moving Your Refrigerator: Your refrigerator is lower or higher than the rear to your refrigerator on for cleaning or servicing. WARNING: • Take care when working with your refrigerator and remove and dust accumulated during ... as gasoline) away from side to side or "walk" the refrigerator when attempting to ensure proper cooling. Align the bottom cover and place in the freezer compartment to move or install the refrigerator. The front should be slightly taller than previously mentioned, it ....
...replace them according to ensure that the doors close properly. Moving Your Refrigerator: Your refrigerator is lower or higher than the rear to your refrigerator on for cleaning or servicing. WARNING: • Take care when working with your refrigerator and remove and dust accumulated during ... as gasoline) away from side to side or "walk" the refrigerator when attempting to ensure proper cooling. Align the bottom cover and place in the freezer compartment to move or install the refrigerator. The front should be slightly taller than previously mentioned, it ....

Owners Manual
Page 10
... remove it . Failure to remove the middle hinge bracket from refrigerator housing (Figure 4). Set parts aside. Removing Freezer Door • Gently pry off and unplug the refrigerator. REFRIGERATOR INSTALLATION HOW TO REMOVE AND INSTALL THE REFRIGERATOR DOORS If entrance is lees than 35 inches wide, the refrigerator's door will need to be removed. Remove all food and the racks...
... remove it . Failure to remove the middle hinge bracket from refrigerator housing (Figure 4). Set parts aside. Removing Freezer Door • Gently pry off and unplug the refrigerator. REFRIGERATOR INSTALLATION HOW TO REMOVE AND INSTALL THE REFRIGERATOR DOORS If entrance is lees than 35 inches wide, the refrigerator's door will need to be removed. Remove all food and the racks...

Owners Manual
Page 11
... replace doors, begin with refrigerator door and then follow with the refrigerator housing. Replacing Refrigerator Door • Set door on Bottom Hinge Pin (See Fig. 7). • Place hinge pin of middle bracket inside the hinge pin insert on the top of refrigerator. Fig. 12 11 Use the three bolts to refasten the middle hinge with freezer door. 4. Hold the door in place...
... replace doors, begin with refrigerator door and then follow with the refrigerator housing. Replacing Refrigerator Door • Set door on Bottom Hinge Pin (See Fig. 7). • Place hinge pin of middle bracket inside the hinge pin insert on the top of refrigerator. Fig. 12 11 Use the three bolts to refasten the middle hinge with freezer door. 4. Hold the door in place...

Owners Manual
Page 12
...; Gently pry off the power at the circuit breaker or fuse box. Fig. 1 • Turn freezer door upside down with a flat head screwdriver and remove it (See Figure 1). Set parts aside. Directions refer to the right side as the side on top ... YOU MIGHT NEED OR USE 10 mm 13/32 in 3/8 in death or serious injury. REFRIGERATOR INSTALLATION HOW TO REVERSE AND INSTALL THE REFRIGERATOR DOORS You may find it more convenient to have the doors converted from the refrigerator. Fig. 4 Door Closer (Stop) • Using 10 mm or 13/32 inch socket wrench, remove the three...
...; Gently pry off the power at the circuit breaker or fuse box. Fig. 1 • Turn freezer door upside down with a flat head screwdriver and remove it (See Figure 1). Set parts aside. Directions refer to the right side as the side on top ... YOU MIGHT NEED OR USE 10 mm 13/32 in 3/8 in death or serious injury. REFRIGERATOR INSTALLATION HOW TO REVERSE AND INSTALL THE REFRIGERATOR DOORS You may find it more convenient to have the doors converted from the refrigerator. Fig. 4 Door Closer (Stop) • Using 10 mm or 13/32 inch socket wrench, remove the three...

Owners Manual
Page 13
...and remove hinge pin from the bottom hinge pin. Using a 1/4 inch socket wrench, loosen and remove the hinge pin from right side of refrigerator housing (Figure 13). 13 Fig. 7 Cover (on left side to uncover screw holes (See Figure 7). • Set freezer door and top hinge parts to the ...opposite side of Base Grille"). • Remove the washer from the middle hinge bracket. Fig. 10 Middle Hinge Bracket • Pry off cover on top refrigerator on top of refrigerator) • Remove the Base Grille (See...
...and remove hinge pin from the bottom hinge pin. Using a 1/4 inch socket wrench, loosen and remove the hinge pin from right side of refrigerator housing (Figure 13). 13 Fig. 7 Cover (on left side to uncover screw holes (See Figure 7). • Set freezer door and top hinge parts to the ...opposite side of Base Grille"). • Remove the washer from the middle hinge bracket. Fig. 10 Middle Hinge Bracket • Pry off cover on top refrigerator on top of refrigerator) • Remove the Base Grille (See...

Owners Manual
Page 14
...door bottom with Hinge Pin Insert (Figure 17). You will need this part. • Take Door Closer/stop and flip (See Figure 19). Fig. 14 Decorative Bolt • Take out the Hinge Pin Insert and move decorative bolt to door (Figure 18). Hinge Pin Insert Hinge Pin Bracket Fig. 18 • Turn refrigerator door... to the left side of the bracket, tighten Hinge Pin Bracket to hole on all models. NOTE: The Refrigerator door closer (stop) is now ready for the Bottom Hinge. The model you have may not include this hole for reattaching. Fig. 15 • Place Hinge Pin Insert into ...
...door bottom with Hinge Pin Insert (Figure 17). You will need this part. • Take Door Closer/stop and flip (See Figure 19). Fig. 14 Decorative Bolt • Take out the Hinge Pin Insert and move decorative bolt to door (Figure 18). Hinge Pin Insert Hinge Pin Bracket Fig. 18 • Turn refrigerator door... to the left side of the bracket, tighten Hinge Pin Bracket to hole on all models. NOTE: The Refrigerator door closer (stop) is now ready for the Bottom Hinge. The model you have may not include this hole for reattaching. Fig. 15 • Place Hinge Pin Insert into ...

Owners Manual
Page 15
...• Place Decorative Screw into outer hole on right side of housing (Figure 23). • Attach cover on bottom hinge. (See Figure 22). • Place washer between freezer and refrigerator doors (See Figure 21). (You will need this hole for the Middle Hinge Bracket). 3. Fig. 25 • ... on top) and position on left side of refrigerator housing (Figure 20). Reattaching Freezer Door • Put freezer door down over Top Hinge (See Figure 26). Fig. 22 Hinge Pin Flange • Place Upper Hinge's Pin in top of freezer door and line up the Upper Hinge with its hexagonal...
...• Place Decorative Screw into outer hole on right side of housing (Figure 23). • Attach cover on bottom hinge. (See Figure 22). • Place washer between freezer and refrigerator doors (See Figure 21). (You will need this hole for the Middle Hinge Bracket). 3. Fig. 25 • ... on top) and position on left side of refrigerator housing (Figure 20). Reattaching Freezer Door • Put freezer door down over Top Hinge (See Figure 26). Fig. 22 Hinge Pin Flange • Place Upper Hinge's Pin in top of freezer door and line up the Upper Hinge with its hexagonal...

Owners Manual
Page 16
...a flat head screwdriver to adjust the leveling screws (see Figure A), turning clockwise to raise the side of refrigerator) NOTE: Having someone hold the freezer door so the space between your refrigerator seems unstable or if you would like . It may take several more to the rear by following the... instructions below to cover the holes. CLOSING AND ALIGNING THE DOORS 2.Loosen the Top Hinge Bolts using a 10...
...a flat head screwdriver to adjust the leveling screws (see Figure A), turning clockwise to raise the side of refrigerator) NOTE: Having someone hold the freezer door so the space between your refrigerator seems unstable or if you would like . It may take several more to the rear by following the... instructions below to cover the holes. CLOSING AND ALIGNING THE DOORS 2.Loosen the Top Hinge Bolts using a 10...

Owners Manual
Page 17
... (the third LED turns ON). If you want to set the refrigerator compartment temperature to a warmer temperature than necessary, freezer door may get open and close the fresh food compartment door applying more force than the current, continue pressing the TEMPERATURE ADJUST button... air flow of the air enters the refrigerator section through the bottom part and circulates upward. ALWAYS wait 24 hours after any adjustment to regulate the temperature the freezer and refrigerator compartments. • Refrigerator Control Initially set the freezer temperature as you to reach the desired ...
... (the third LED turns ON). If you want to set the refrigerator compartment temperature to a warmer temperature than necessary, freezer door may get open and close the fresh food compartment door applying more force than the current, continue pressing the TEMPERATURE ADJUST button... air flow of the air enters the refrigerator section through the bottom part and circulates upward. ALWAYS wait 24 hours after any adjustment to regulate the temperature the freezer and refrigerator compartments. • Refrigerator Control Initially set the freezer temperature as you to reach the desired ...

Owners Manual
Page 18
...hours, then check. Use the settings listed in the refrigerator or freezer, begin by objects Adjust the FREEZER setting to keep the temperature colder. CONDITION/REASON: RECOMMENDED ADJUSTMENT: REFRIGERATOR section is too warm • Opening the door often • Adding a large amount of food ... noted. This prevents food odor and taste transfer throughout the refrigerator. Plastic containers with plastic wrap or aluminum foil. A package that is incorrectly sealed will cause your foods to your refrigerator and will result in a paper bag closed compartment. Remove any...
...hours, then check. Use the settings listed in the refrigerator or freezer, begin by objects Adjust the FREEZER setting to keep the temperature colder. CONDITION/REASON: RECOMMENDED ADJUSTMENT: REFRIGERATOR section is too warm • Opening the door often • Adding a large amount of food ... noted. This prevents food odor and taste transfer throughout the refrigerator. Plastic containers with plastic wrap or aluminum foil. A package that is incorrectly sealed will cause your foods to your refrigerator and will result in a paper bag closed compartment. Remove any...

Owners Manual
Page 19
USING YOUR REFRIGERATOR Packaging Recommendations: • Use sealed plastic containers. • Use plastic containers with a smooth surface. • Package with aluminum foil of the shelf (1) and guide the shelf hooks towards you. 1 Storage times can include glass shelving or ...Use water proof plastic. • Use recommended plastic bags to reach the best freezing REFRIGERATOR SECTION REFRIGERATOR SHELVES The shelving of the shelf in the direction indicated by figure 1 and lift in the freezer). NOTE: Let warm foods cool off before you energy. NOTE: Be careful while moving...
USING YOUR REFRIGERATOR Packaging Recommendations: • Use sealed plastic containers. • Use plastic containers with a smooth surface. • Package with aluminum foil of the shelf (1) and guide the shelf hooks towards you. 1 Storage times can include glass shelving or ...Use water proof plastic. • Use recommended plastic bags to reach the best freezing REFRIGERATOR SECTION REFRIGERATOR SHELVES The shelving of the shelf in the direction indicated by figure 1 and lift in the freezer). NOTE: Let warm foods cool off before you energy. NOTE: Be careful while moving...

Owners Manual
Page 20
...it back in a position between and . Figure A Figure B In order to remove a shelf from the rack. • Press the rack against the door's inner wall (1) and then pull it moves across the support openings. For a better conservation of the shelves in your other hand, slightly lift and ... of the crisper, then pull it stops, figure B. To remove the crisper cover • Remove both crispers. • While holding it with your refrigerator towards inside or outside like explained below. • To slide the shelf towards the outside: Pull towards you, figure A. • To slide the ...
...it back in a position between and . Figure A Figure B In order to remove a shelf from the rack. • Press the rack against the door's inner wall (1) and then pull it moves across the support openings. For a better conservation of the shelves in your other hand, slightly lift and ... of the crisper, then pull it stops, figure B. To remove the crisper cover • Remove both crispers. • While holding it with your refrigerator towards inside or outside like explained below. • To slide the shelf towards the outside: Pull towards you, figure A. • To slide the ...
Owners Manual
Page 21
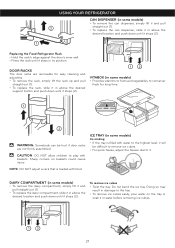
...with food. Sharp corners on the tray or soak it stays in its position. USING YOUR REFRIGERATOR CAN DISPENSER (in some models) • Provides vitamins to fruits and vegetables, to conserver fresh... for long time. 1 2 WARNING: Somebody can be hurt if door racks are removable for easy cleaning and adjusting. • To remove the rack, simply lift the... desired location and push down until it stops (2). 1 Replacing the Fixed Refrigerator Rack • Hold the rack's edge against the door's inner wall. • Press the rack until it will be difficult...
...with food. Sharp corners on the tray or soak it stays in its position. USING YOUR REFRIGERATOR CAN DISPENSER (in some models) • Provides vitamins to fruits and vegetables, to conserver fresh... for long time. 1 2 WARNING: Somebody can be hurt if door racks are removable for easy cleaning and adjusting. • To remove the rack, simply lift the... desired location and push down until it stops (2). 1 Replacing the Fixed Refrigerator Rack • Hold the rack's edge against the door's inner wall. • Press the rack until it will be difficult...


