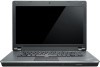
User Manual
Page 5
... blank mode 62 Sleep mode 62 Hibernation mode 62 Symptom-to-FRU index 63 Numeric error codes 63 Error messages 66 © Copyright Lenovo 2010 No-beep symptoms 66 LCD-related symptoms 67 Intermittent problems 68 Undetermined problems 68 Status indicators 69 Special keys and Fn key combination... the serial number of the system unit 74 Retaining the UUID 74 Reading or writing the ECA information . . . 75 Removing and replacing a FRU . . . . 77 1010 Battery pack 78 1020 ExpressCard blank bezel 79 1030 Optical drive or travel cover 80 1040 Thermal cover 81 1050 Hard disk drive (HDD)...
... blank mode 62 Sleep mode 62 Hibernation mode 62 Symptom-to-FRU index 63 Numeric error codes 63 Error messages 66 © Copyright Lenovo 2010 No-beep symptoms 66 LCD-related symptoms 67 Intermittent problems 68 Undetermined problems 68 Status indicators 69 Special keys and Fn key combination... the serial number of the system unit 74 Retaining the UUID 74 Reading or writing the ECA information . . . 75 Removing and replacing a FRU . . . . 77 1010 Battery pack 78 1020 ExpressCard blank bezel 79 1030 Optical drive or travel cover 80 1040 Thermal cover 81 1050 Hard disk drive (HDD)...

User Manual
Page 16
... in place and are in ignition or explosion of the battery as required by local ordinances or regulations. Use only the battery in the appropriate parts listing when replacing the battery pack. Use of the battery. Use only the battery in ignition or explosion of an incorrect battery can result in the appropriate parts listing. DANGER Before...
... in place and are in ignition or explosion of the battery as required by local ordinances or regulations. Use only the battery in the appropriate parts listing when replacing the battery pack. Use of the battery. Use only the battery in ignition or explosion of an incorrect battery can result in the appropriate parts listing. DANGER Before...

User Manual
Page 17
DANGER Though the main batteries have low voltage, a shorted or grounded battery can produce enough current to burn personnel or combustible materials. DANGER Unless hot swap is allowed for the FRU being replaced, do as follows before removing it: power off the computer, unplug all power cords from electrical outlets, remove the battery pack, and disconnect any interconnecting cables. Safety information 9
DANGER Though the main batteries have low voltage, a shorted or grounded battery can produce enough current to burn personnel or combustible materials. DANGER Unless hot swap is allowed for the FRU being replaced, do as follows before removing it: power off the computer, unplug all power cords from electrical outlets, remove the battery pack, and disconnect any interconnecting cables. Safety information 9

User Manual
Page 61
...is acceptable, do the following : 1. Checking operational charging To check whether the battery charges properly during operation, go to "Checking operational charging" To check the ac adapter, do the following : v Replace the system board. Check that power is supplied when you turn on , check ... See the following : 1. General checkout 53 Turn off the computer. 6. Disconnect the ac adapter and install the charged battery pack. 7. If the voltage is not correct, replace the ac adapter. 4. If you suspect a power problem, see the appropriate one you turn on the computer. 5. ...
...is acceptable, do the following : 1. Checking operational charging To check whether the battery charges properly during operation, go to "Checking operational charging" To check the ac adapter, do the following : v Replace the system board. Check that power is supplied when you turn on , check ... See the following : 1. General checkout 53 Turn off the computer. 6. Disconnect the ac adapter and install the charged battery pack. 7. If the voltage is not correct, replace the ac adapter. 4. If you suspect a power problem, see the appropriate one you turn on the computer. 5. ...

User Manual
Page 62
... remaining is displayed. If the resistance is not correct, replace the battery pack. If the charge indicator or icon still does not turn on , replace the battery pack. Note: If the battery pack becomes hot, it is more than +11.0 V dc after recharging, replace the battery. 4. After it cools down . 3. See the following : 1. If the resistance is...
... remaining is displayed. If the resistance is not correct, replace the battery pack. If the charge indicator or icon still does not turn on , replace the battery pack. Note: If the battery pack becomes hot, it is more than +11.0 V dc after recharging, replace the battery. 4. After it cools down . 3. See the following : 1. If the resistance is...

User Manual
Page 63
Remove the backup battery (see "1120 Backup battery" on page 98). 5. Red (+) Black (-) Wire Red Black Voltage (V dc) +2.5 to +3.2 Ground v If the voltage is not correct, replace the backup battery. General checkout 55 See the following figure. v If the voltage is correct, replace the system board. Measure the voltage of the backup battery. v If the backup battery discharges quickly after replacement, replace the system board. 4.
Remove the backup battery (see "1120 Backup battery" on page 98). 5. Red (+) Black (-) Wire Red Black Voltage (V dc) +2.5 to +3.2 Ground v If the voltage is not correct, replace the backup battery. General checkout 55 See the following figure. v If the voltage is correct, replace the system board. Measure the voltage of the backup battery. v If the backup battery discharges quickly after replacement, replace the system board. 4.
User Manual
Page 67
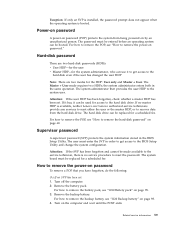
...HDPs): v User HDP-for the user v Master HDP-for the system administrator, who can be replaced for the HDP: User only and Master + User. The system board must be entered before ... HDP has been set : 1. Remove the battery pack. the system administrator enters both in the BIOS Setup Utility. For how to remove the backup battery, see "1010 Battery pack" on page 78. 3. For how ... installed, the password prompt does not appear when the operating system is available, neither Lenovo nor Lenovo authorized service technicians provide any services to reset either the user or the master HDP,...
...HDPs): v User HDP-for the user v Master HDP-for the system administrator, who can be replaced for the HDP: User only and Master + User. The system board must be entered before ... HDP has been set : 1. Remove the battery pack. the system administrator enters both in the BIOS Setup Utility. For how to remove the backup battery, see "1010 Battery pack" on page 78. 3. For how ... installed, the password prompt does not appear when the operating system is available, neither Lenovo nor Lenovo authorized service technicians provide any services to reset either the user or the master HDP,...

User Manual
Page 68
... Lenovo authorized service technicians provide any services to reset the user HDPs or to enter BIOS Setup Utility. For the other models, enter the POP. A pop-up , immediately press F1 to recover data from the hard disk drive. Reinstall the backup battery and the battery pack. (B) If an SVP ... other models, enter the master HDP. then, in the menu, this function is selected and the user HDP has been forgotten and cannot be replaced for a scheduled fee. After the POST ends, the password prompt does not appear. Select Security, using the cursor directional keys to Security --> ...
... Lenovo authorized service technicians provide any services to reset the user HDPs or to enter BIOS Setup Utility. For the other models, enter the POP. A pop-up , immediately press F1 to recover data from the hard disk drive. Reinstall the backup battery and the battery pack. (B) If an SVP ... other models, enter the master HDP. then, in the menu, this function is selected and the user HDP has been forgotten and cannot be replaced for a scheduled fee. After the POST ends, the password prompt does not appear. Select Security, using the cursor directional keys to Security --> ...
User Manual
Page 71
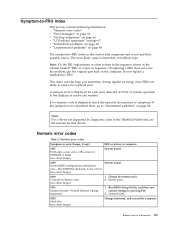
... is listed first, in the ThinkPad Notebooks, see the manual for each error detected in the computer. Numeric error codes Table 2. Battery pack. 0191 System Security-Invalid Remote Change requested. 1. If replacing a FRU does not solve the problem, put the original part back in POST or system operation. Note: For a device not...
... is listed first, in the ThinkPad Notebooks, see the manual for each error detected in the computer. Numeric error codes Table 2. Battery pack. 0191 System Security-Invalid Remote Change requested. 1. If replacing a FRU does not solve the problem, put the original part back in POST or system operation. Note: For a device not...
User Manual
Page 72
...two short beeps) 1. DIMM. 3. System board. 64 ThinkPad Edge 14″, Edge 15″, E40, and E50 Hardware Maintenance Manual Replace the backup battery and run BIOS Setup Utility to reset the time and date. 0254 System NV7 Volume checksum bad- System board. 0271 Date and time error...computer and discharge CMOS. System board. 0270 Real-time clock error. (two short beeps) 1. Charge the backup battery for more than 8 hours by connecting the ac adapter. 2. Replace the backup battery and run BIOS Setup Utility to reset the time and date. 0251 System CMOS checksum bad...
...two short beeps) 1. DIMM. 3. System board. 64 ThinkPad Edge 14″, Edge 15″, E40, and E50 Hardware Maintenance Manual Replace the backup battery and run BIOS Setup Utility to reset the time and date. 0254 System NV7 Volume checksum bad- System board. 0271 Date and time error...computer and discharge CMOS. System board. 0270 Real-time clock error. (two short beeps) 1. Charge the backup battery for more than 8 hours by connecting the ac adapter. 2. Replace the backup battery and run BIOS Setup Utility to reset the time and date. 0251 System CMOS checksum bad...

User Manual
Page 76
...problems Intermittent system hang problems can be considered only when a problem recurs. If no error is detected, do not replace any error is detected, replace the FRU shown by the computer. Verify that no defects). If the problem does not recur, reconnect the removed ...for damage. Printer, mouse, and other external devices c. Hard disk drive e. If any FRUs. 3. Verify that have no more errors exist. Battery pack d. Rerun the test to do the following devices: a. External diskette drive or optical drive f. Turn on page 53.) 1. Remove or disconnect...
...problems Intermittent system hang problems can be considered only when a problem recurs. If no error is detected, do not replace any error is detected, replace the FRU shown by the computer. Verify that no defects). If the problem does not recur, reconnect the removed ...for damage. Printer, mouse, and other external devices c. Hard disk drive e. If any FRUs. 3. Verify that have no more errors exist. Battery pack d. Rerun the test to do the following devices: a. External diskette drive or optical drive f. Turn on page 53.) 1. Remove or disconnect...

User Manual
Page 85
...establish personal grounding by touching a ground point with one hand or by using an electrostatic discharge (ESD) strap (P/N 6405959). © Copyright Lenovo 2010 77 DANGER Before removing any FRU, turn off the computer, unplug all screws, springs, and other small parts are loose inside the ...place, reverse the removal procedure and follow any notes that all power cords from electrical outlets, remove the battery pack, and then disconnect any FRUs that have to replacement. For information about connecting and arranging internal cables, see "Locations" on page 73. 3. Follow the ...
...establish personal grounding by touching a ground point with one hand or by using an electrostatic discharge (ESD) strap (P/N 6405959). © Copyright Lenovo 2010 77 DANGER Before removing any FRU, turn off the computer, unplug all screws, springs, and other small parts are loose inside the ...place, reverse the removal procedure and follow any notes that all power cords from electrical outlets, remove the battery pack, and then disconnect any FRUs that have to replacement. For information about connecting and arranging internal cables, see "Locations" on page 73. 3. Follow the ...

User Manual
Page 86
... along the slide rails of battery pack DANGER Use only the battery specified in the parts list for replacing a battery pack: Lenovo ThinkVantage Toolbox has an automatic battery diagnostic that a physically damaged battery pack is non-warranty replacement. A battery pack FRU should download this program before a non-physically damaged battery pack is replaced. Table 8. Unlock the battery latch 1 . The only exception to...
... along the slide rails of battery pack DANGER Use only the battery specified in the parts list for replacing a battery pack: Lenovo ThinkVantage Toolbox has an automatic battery diagnostic that a physically damaged battery pack is non-warranty replacement. A battery pack FRU should download this program before a non-physically damaged battery pack is replaced. Table 8. Unlock the battery latch 1 . The only exception to...

User Manual
Page 89
Removing and replacing a FRU 81 It might cause damage to the fan assembly or the computer to the fan motor located in the slot. Removal steps of thermal cover Note: Loosen the screws 1 , but do not remove them. 1 1 1 1 1 2 Attention: Do not touch or apply any excessive force to mulfunction. 1040 Thermal cover For access, remove this FRU: v "1010 Battery pack" on page 78 Table 11.
Removing and replacing a FRU 81 It might cause damage to the fan assembly or the computer to the fan motor located in the slot. Removal steps of thermal cover Note: Loosen the screws 1 , but do not remove them. 1 1 1 1 1 2 Attention: Do not touch or apply any excessive force to mulfunction. 1040 Thermal cover For access, remove this FRU: v "1010 Battery pack" on page 78 Table 11.

User Manual
Page 93
Improper handling of fan assembly 1 When installing: Make sure that the fan connector is attached firmly to the system board. Removal steps of the fan can cause distortion or deformation and imperfect contact with components. Table 14. Removing and replacing a FRU 85 1070 Fan assembly For access, remove these FRUs in order: v "1010 Battery pack" on page 78 v "1040 Thermal cover" on page 81 Attention: v Do not handle the fan roughly. It might cause damage to the fan assembly or the computer to the fan motor. v Do not touch or apply any excessive force to mulfunction.
Improper handling of fan assembly 1 When installing: Make sure that the fan connector is attached firmly to the system board. Removal steps of the fan can cause distortion or deformation and imperfect contact with components. Table 14. Removing and replacing a FRU 85 1070 Fan assembly For access, remove these FRUs in order: v "1010 Battery pack" on page 78 v "1040 Thermal cover" on page 81 Attention: v Do not handle the fan roughly. It might cause damage to the fan assembly or the computer to the fan motor. v Do not touch or apply any excessive force to mulfunction.

User Manual
Page 97
then remove the CPU 2 . 1 a 2 When installing: Place the CPU on page 85 Attention: CPU is extremely sensitive. 1080 CPU For access, remove these FRUs in order: v "1010 Battery pack" on page 78 v "1040 Thermal cover" on page 81 v "1070 Fan assembly" on the CPU socket, and then rotate the head of the screw in the direction shown by arrow a to release the lock; When you service the CPU, avoid any kind of the screw in the direction shown by arrow 1 to secure the CPU. Removal steps of CPU Rotate the head of rough handling. Removing and replacing a FRU 89 Table 15.
then remove the CPU 2 . 1 a 2 When installing: Place the CPU on page 85 Attention: CPU is extremely sensitive. 1080 CPU For access, remove these FRUs in order: v "1010 Battery pack" on page 78 v "1040 Thermal cover" on page 81 v "1070 Fan assembly" on the CPU socket, and then rotate the head of the screw in the direction shown by arrow a to release the lock; When you service the CPU, avoid any kind of the screw in the direction shown by arrow 1 to secure the CPU. Removal steps of CPU Rotate the head of rough handling. Removing and replacing a FRU 89 Table 15.

User Manual
Page 101
Removal steps of palm rest assembly with or without a fingerprint reader. If the fingerprint reader has any defects, you can replace it by the procedures given in order: v "1010 Battery pack" on page 78 v "1030 Optical drive or travel cover" on page 80 Note: In models with the fingerprint reader, the sensor is...-coated (1) Black 2 M2 × 3 mm, wafer-head, nylon-coated (1) Black Torque 0.181 Nm (1.85 kgfcm) 0.181 Nm (1.85 kgfcm) 0.181 Nm (1.85 kgfcm) Removing and replacing a FRU 93 Table 18.
Removal steps of palm rest assembly with or without a fingerprint reader. If the fingerprint reader has any defects, you can replace it by the procedures given in order: v "1010 Battery pack" on page 78 v "1030 Optical drive or travel cover" on page 80 Note: In models with the fingerprint reader, the sensor is...-coated (1) Black 2 M2 × 3 mm, wafer-head, nylon-coated (1) Black Torque 0.181 Nm (1.85 kgfcm) 0.181 Nm (1.85 kgfcm) 0.181 Nm (1.85 kgfcm) Removing and replacing a FRU 93 Table 18.

User Manual
Page 107
Removing and replacing a FRU 99 Removal steps of the card is attached firmly to the system board. 1130 Bluetooth daughter card (BDC-2) For access, remove these FRUs in order: v "1010 Battery pack" on page 78 v "1030 Optical drive or travel cover" on page 80 v "1100 Palm rest assembly with cables" on bottom side of BDC-2 1 2 Step 1 Screw (quantity) M2 × 3 mm, wafer-head, nylon-coated (1) Color Black Torque 0.181 Nm (1.85 kgfcm) When installing: Make sure that the connector on page 93 Table 22.
Removing and replacing a FRU 99 Removal steps of the card is attached firmly to the system board. 1130 Bluetooth daughter card (BDC-2) For access, remove these FRUs in order: v "1010 Battery pack" on page 78 v "1030 Optical drive or travel cover" on page 80 v "1100 Palm rest assembly with cables" on bottom side of BDC-2 1 2 Step 1 Screw (quantity) M2 × 3 mm, wafer-head, nylon-coated (1) Color Black Torque 0.181 Nm (1.85 kgfcm) When installing: Make sure that the connector on page 93 Table 22.

User Manual
Page 111
1150 Keyboard bezel For access, remove these FRUs in order: v "1010 Battery pack" on page 78 v "1030 Optical drive or travel cover" on page 80 v "1100 Palm rest assembly with cables" on page 93 v "1140 Keyboard" on page 100 Table 25. Removal steps of keyboard bezel 1 2 2 2 2 2 1 Step 1 2 Screw (quantity) M2.5 × 6.5 mm, wafer-head, nylon-coated (2) M2 × 3 mm, wafer-head, nylon-coated (5) Color Black Black Torque 0.392 Nm (4 kgfcm) 0.181 Nm (1.85 kgfcm) Removing and replacing a FRU 103
1150 Keyboard bezel For access, remove these FRUs in order: v "1010 Battery pack" on page 78 v "1030 Optical drive or travel cover" on page 80 v "1100 Palm rest assembly with cables" on page 93 v "1140 Keyboard" on page 100 Table 25. Removal steps of keyboard bezel 1 2 2 2 2 2 1 Step 1 2 Screw (quantity) M2.5 × 6.5 mm, wafer-head, nylon-coated (2) M2 × 3 mm, wafer-head, nylon-coated (5) Color Black Black Torque 0.392 Nm (4 kgfcm) 0.181 Nm (1.85 kgfcm) Removing and replacing a FRU 103

User Manual
Page 120
...drop or stack the system board. v At every point in the process, be sure to make sure that HDD Active Protection System is running. After replacing the system board, run PC-Doctor for DOS to make sure that has a hard surface, such as 6 inches so that it , using PC-... conductive corrugated material. 1180 System board assembly Important notices for handling the system board: When handling the system board, bear the following in order: v "1010 Battery pack" on page 78 v "1020 ExpressCard blank bezel" on page 79 v "1030 Optical drive or travel cover" on page 80 v "1040 Thermal cover"...
...drop or stack the system board. v At every point in the process, be sure to make sure that HDD Active Protection System is running. After replacing the system board, run PC-Doctor for DOS to make sure that has a hard surface, such as 6 inches so that it , using PC-... conductive corrugated material. 1180 System board assembly Important notices for handling the system board: When handling the system board, bear the following in order: v "1010 Battery pack" on page 78 v "1020 ExpressCard blank bezel" on page 79 v "1030 Optical drive or travel cover" on page 80 v "1040 Thermal cover"...


