
Hardware Maintenance Manual - Lenovo E4325
Page 3
... blank mode 32 Sleep mode 32 Hibernation mode 32 Chapter 4. FRU replacement notices 47 Important notice for wireless LAN . . 55 1080 Backup battery 56 1090 Keyboard 56 1100 Keyboard bezel 59 1110 LED board 61 1120 Power board 62 1140 Input/output (I/O) board 62 1150 System board...1010 Battery pack 50 1020 Bottom slot cover 50 1030 Optical drive 51 1040 Memory module 52 1050 Hard disk drive assembly 53 1060 PCI Express Mini Card for replacing FRUs 47 Screw notices 48 Chapter 8. Contents About this manual iii Chapter 1. Notices 79 Trademarks 80 © Copyright Lenovo ...
... blank mode 32 Sleep mode 32 Hibernation mode 32 Chapter 4. FRU replacement notices 47 Important notice for wireless LAN . . 55 1080 Backup battery 56 1090 Keyboard 56 1100 Keyboard bezel 59 1110 LED board 61 1120 Power board 62 1140 Input/output (I/O) board 62 1150 System board...1010 Battery pack 50 1020 Bottom slot cover 50 1030 Optical drive 51 1040 Memory module 52 1050 Hard disk drive assembly 53 1060 PCI Express Mini Card for replacing FRUs 47 Screw notices 48 Chapter 8. Contents About this manual iii Chapter 1. Notices 79 Trademarks 80 © Copyright Lenovo ...

Hardware Maintenance Manual - Lenovo E4325
Page 9
...). 2. Notes: 1. Chapter 1. Check the power cord for cracked or bulging batteries. 5. Use a meter to protect users and service technicians from injury. Remove the cover. 6. Check inside the unit for any non-Lenovo alterations. 7. Switch off , and the power cord disconnected. A third-wire ground... conditions, such as loose or missing hardware To determine whether there are all at the beginning of any obvious non-Lenovo alterations. Send another person to electrostatic discharge Any computer part containing transistors or integrated circuits (ICs) should use the following...
...). 2. Notes: 1. Chapter 1. Check the power cord for cracked or bulging batteries. 5. Use a meter to protect users and service technicians from injury. Remove the cover. 6. Check inside the unit for any non-Lenovo alterations. 7. Switch off , and the power cord disconnected. A third-wire ground... conditions, such as loose or missing hardware To determine whether there are all at the beginning of any obvious non-Lenovo alterations. Send another person to electrostatic discharge Any computer part containing transistors or integrated circuits (ICs) should use the following...

Hardware Maintenance Manual - Lenovo E4325
Page 10
... in this section are provided in protective packages until they are wearing a wrist strap. • Use a grounded work surface. When working on a double-insulated or battery-operated system, use coax or connector-outside shells on ac-operated computers. Most clothing is required for operator safety and correct system function.
... in this section are provided in protective packages until they are wearing a wrist strap. • Use a grounded work surface. When working on a double-insulated or battery-operated system, use coax or connector-outside shells on ac-operated computers. Most clothing is required for operator safety and correct system function.

Hardware Maintenance Manual - Lenovo E4325
Page 34
... checkouts: • "Checking the ac power adapter" on page 28 • "Checking operational charging" on page 29 • "Checking the battery pack" on page 29 Checking the ac power adapter If the computer fails only when the ac power adapter is supplied when you suspect a power... the computer unusable) • Sticky keys caused by spilling a liquid onto the keyboard • Use of an incorrect ac power adapter on laptop products The following symptoms might indicate damage caused by nonwarranted activities: • Missing parts might differ from the computer. 2. Unplug the ac power...
... checkouts: • "Checking the ac power adapter" on page 28 • "Checking operational charging" on page 29 • "Checking the battery pack" on page 29 Checking the ac power adapter If the computer fails only when the ac power adapter is supplied when you suspect a power... the computer unusable) • Sticky keys caused by spilling a liquid onto the keyboard • Use of an incorrect ac power adapter on laptop products The following symptoms might indicate damage caused by nonwarranted activities: • Missing parts might differ from the computer. 2. Unplug the ac power...

Hardware Maintenance Manual - Lenovo E4325
Page 35
...notification area displays the percentage of the following : a. If the problem persists, call the Customer Support Center. Remove the battery pack and measure the voltage between battery terminals 5 and 7. • If the voltage is not correct, replace the ac power adapter. • If the ...voltage is not charged. Checking operational charging To check whether the battery pack charges properly during operation, do the following: Note: Before you measure, do the following table. The correct voltages are shown in...
...notification area displays the percentage of the following : a. If the problem persists, call the Customer Support Center. Remove the battery pack and measure the voltage between battery terminals 5 and 7. • If the voltage is not correct, replace the ac power adapter. • If the ...voltage is not charged. Checking operational charging To check whether the battery pack charges properly during operation, do the following: Note: Before you measure, do the following table. The correct voltages are shown in...

Hardware Maintenance Manual - Lenovo E4325
Page 38
... any operation with the keyboard, the hard disk drive, the parallel connector, or the diskette drive within that time. • The battery status indicator blinks orange, indicating that the battery power is powered off. Wait a few seconds before taking any input immediately after it enters sleep mode. If you have pressed Fn...
... any operation with the keyboard, the hard disk drive, the parallel connector, or the diskette drive within that time. • The battery status indicator blinks orange, indicating that the battery power is powered off. Wait a few seconds before taking any input immediately after it enters sleep mode. If you have pressed Fn...
Hardware Maintenance Manual - Lenovo E4325
Page 41
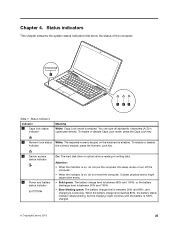
... level is between 20% and 80%, and charging is 100% charged. © Copyright Lenovo 2013 35 Chapter 4. You can type all alphabetic characters (A-Z) in uppercase directly. Sudden physical shock might continue until the battery is continuing. Status indicators This chapter presents the system status indicators that show the status of the computer...
... level is between 20% and 80%, and charging is 100% charged. © Copyright Lenovo 2013 35 Chapter 4. You can type all alphabetic characters (A-Z) in uppercase directly. Sudden physical shock might continue until the battery is continuing. Status indicators This chapter presents the system status indicators that show the status of the computer...

Hardware Maintenance Manual - Lenovo E4325
Page 42
Status indicators (continued) Indicator Meaning • Slow-blinking orange: The battery charge level is between 5% and 20%. • Fast-blinking orange: The battery charge or discharge level is 5% or less. • Off: The battery is detached or the computer is continuing. Table 1. When the battery charge level reaches 20%, the blinking color changes to green. • Solid orange: The battery discharge level is between 5% and 20%, and charging is powered off. 36 Hardware Maintenance Manual
Status indicators (continued) Indicator Meaning • Slow-blinking orange: The battery charge level is between 5% and 20%. • Fast-blinking orange: The battery charge or discharge level is 5% or less. • Off: The battery is detached or the computer is continuing. Table 1. When the battery charge level reaches 20%, the blinking color changes to green. • Solid orange: The battery discharge level is between 5% and 20%, and charging is powered off. 36 Hardware Maintenance Manual
Hardware Maintenance Manual - Lenovo E4325
Page 45
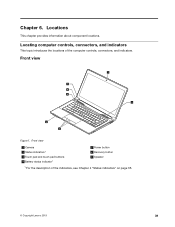
Chapter 6. Locating computer controls, connectors, and indicators This topic introduces the locations of the indicators, see Chapter 4 "Status indicators" on page 35. © Copyright Lenovo 2013 39 Front view 1 7 6 5 2 4 3 Figure 1. Locations This chapter provides information about component locations. Front view 1 Camera 2 Status indicators 1 3 Touch pad and touch pad buttons 4 Battery status indicator1 5 Power button 6 Recovery button 7 Speaker 1 For the description of the computer controls, connectors, and indicators.
Chapter 6. Locating computer controls, connectors, and indicators This topic introduces the locations of the indicators, see Chapter 4 "Status indicators" on page 35. © Copyright Lenovo 2013 39 Front view 1 7 6 5 2 4 3 Figure 1. Locations This chapter provides information about component locations. Front view 1 Camera 2 Status indicators 1 3 Touch pad and touch pad buttons 4 Battery status indicator1 5 Power button 6 Recovery button 7 Speaker 1 For the description of the computer controls, connectors, and indicators.

Hardware Maintenance Manual - Lenovo E4325
Page 46
... and CRUs" on some models) 4 ac power adapter 1 2 3 10 4 5 8 76 9 Figure 3. Right-side view 1 Combo audio jack 2 USB connector Bottom and left -side view 1 Battery lock 2 Battery pack 3 Battery latch 4 Security-lock slot 5 Fan louvers 6 Monitor connector 7 Ethernet connector 8 HDMI port 9 Universal Serial Bus (USB) connector 10 Bottom slot cover1 1 The memory module...
... and CRUs" on some models) 4 ac power adapter 1 2 3 10 4 5 8 76 9 Figure 3. Right-side view 1 Combo audio jack 2 USB connector Bottom and left -side view 1 Battery lock 2 Battery pack 3 Battery latch 4 Security-lock slot 5 Fan louvers 6 Monitor connector 7 Ethernet connector 8 HDMI port 9 Universal Serial Bus (USB) connector 10 Bottom slot cover1 1 The memory module...

Hardware Maintenance Manual - Lenovo E4325
Page 47
...resolve some problems with your product with your product and are designated as self-service CRUs and others are available from Lenovo at http://www.lenovo.com/UserManuals. CRU information and replacement instructions are shipped with a replacement part you can request that are held by more... than two screws. Lenovo computers contain the following types of CRUs include the ac power adapter, power cord, battery, and hard disk drive. Once the access panel is removed, the specific CRU is required: (1)...
...resolve some problems with your product with your product and are designated as self-service CRUs and others are available from Lenovo at http://www.lenovo.com/UserManuals. CRU information and replacement instructions are shipped with a replacement part you can request that are held by more... than two screws. Lenovo computers contain the following types of CRUs include the ac power adapter, power cord, battery, and hard disk drive. Once the access panel is removed, the specific CRU is required: (1)...

Hardware Maintenance Manual - Lenovo E4325
Page 48
Major FRUs and CRUs No. FRU description 1 LCD unit 2 Keyboard bezel with touch pad 3 LED board with cable 4 Thermal module assembly 5 USB board 6 Battery pack 42 Hardware Maintenance Manual 1 2 3 45 56 67 ab 78 bc 8 cd 911 de 1104 CRU ID N N N N N * Major FRUs and CRUs 1293 18 hg gf 1271 1260 1250 148 137 fe 126 115 Table 3.
Major FRUs and CRUs No. FRU description 1 LCD unit 2 Keyboard bezel with touch pad 3 LED board with cable 4 Thermal module assembly 5 USB board 6 Battery pack 42 Hardware Maintenance Manual 1 2 3 45 56 67 ab 78 bc 8 cd 911 de 1104 CRU ID N N N N N * Major FRUs and CRUs 1293 18 hg gf 1271 1260 1250 148 137 fe 126 115 Table 3.

Hardware Maintenance Manual - Lenovo E4325
Page 53
... instructions, a prepaid shipping label, and a container will be required to the latest version from Lenovo at http://www.lenovo.com/support. After you replace a system board, ensure that the battery is fully charged and an ac power adapter is your product with the replacement CRU; Go to...the update has been completed. The BIOS and device drivers are replacing and servicing FRUs, refer to avoid unnecessary expense: © Copyright Lenovo 2013 47 CRU statement for your search: • Search by product number • Search through the product auto-detect function •...
... instructions, a prepaid shipping label, and a container will be required to the latest version from Lenovo at http://www.lenovo.com/support. After you replace a system board, ensure that the battery is fully charged and an ac power adapter is your product with the replacement CRU; Go to...the update has been completed. The BIOS and device drivers are replacing and servicing FRUs, refer to avoid unnecessary expense: © Copyright Lenovo 2013 47 CRU statement for your search: • Search by product number • Search through the product auto-detect function •...
Hardware Maintenance Manual - Lenovo E4325
Page 55
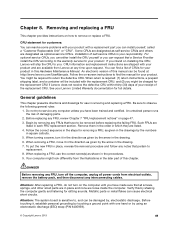
...order in which they are designated as shown in the procedures. 9. Metallic parts or metal flakes can resolve some problems with your Lenovo Limited Warranty documentation for use the correct screw(s) as optional-service CRUs. Attention: The system board is sensitive to, and can install...: 1. Such FRUs are available from Lenovo at any FRU, review Chapter 7 "FRU replacement notices" on installing the CRU, Lenovo will be found at http://www.lenovo.com/UserManuals. Your computer might look differently from electrical outlets, remove the battery pack, and then disconnect any FRUs ...
...order in which they are designated as shown in the procedures. 9. Metallic parts or metal flakes can resolve some problems with your Lenovo Limited Warranty documentation for use the correct screw(s) as optional-service CRUs. Attention: The system board is sensitive to, and can install...: 1. Such FRUs are available from Lenovo at any FRU, review Chapter 7 "FRU replacement notices" on installing the CRU, Lenovo will be found at http://www.lenovo.com/UserManuals. Your computer might look differently from electrical outlets, remove the battery pack, and then disconnect any FRUs ...

Hardware Maintenance Manual - Lenovo E4325
Page 56
1010 Battery pack Removal steps of battery pack DANGER Use only the battery specified in the slot. Holding the manual battery latch in the unlocked position, remove the battery pack in the direction shown by the arrow 2 . 1 2 2 When installing: Install the battery pack in the parts list for your computer. Unlock the spring-loaded battery latch 1 . Ensure that the battery latches are in the locked position. 1020 Bottom slot cover For access, remove this FRU: • "1010 Battery pack" on page 50 50 Hardware Maintenance Manual Any other battery could ignite or explode.
1010 Battery pack Removal steps of battery pack DANGER Use only the battery specified in the slot. Holding the manual battery latch in the unlocked position, remove the battery pack in the direction shown by the arrow 2 . 1 2 2 When installing: Install the battery pack in the parts list for your computer. Unlock the spring-loaded battery latch 1 . Ensure that the battery latches are in the locked position. 1020 Bottom slot cover For access, remove this FRU: • "1010 Battery pack" on page 50 50 Hardware Maintenance Manual Any other battery could ignite or explode.

Hardware Maintenance Manual - Lenovo E4325
Page 57
Removing and replacing a FRU 51 Removal steps of bottom slot cover Remove the screws 1 , and then remove the cover. 1 1 2 2 Step 1 Screw (quantity) M2 × 3 mm, flat-head, nylon-coated (2) 1030 Optical drive For access, remove these FRUs in order: • "1010 Battery pack" on page 50 • "1020 Bottom slot cover" on page 50 Removal steps of optical drive Remove the screw 1 . 1 Color Black Torque 1.85 kgf-cm Step 1 Screw (quantity) M2 × 3 mm, flat-head, nylon-coated (1) Color Black Torque 1.85 kgf-cm Chapter 8.
Removing and replacing a FRU 51 Removal steps of bottom slot cover Remove the screws 1 , and then remove the cover. 1 1 2 2 Step 1 Screw (quantity) M2 × 3 mm, flat-head, nylon-coated (2) 1030 Optical drive For access, remove these FRUs in order: • "1010 Battery pack" on page 50 • "1020 Bottom slot cover" on page 50 Removal steps of optical drive Remove the screw 1 . 1 Color Black Torque 1.85 kgf-cm Step 1 Screw (quantity) M2 × 3 mm, flat-head, nylon-coated (1) Color Black Torque 1.85 kgf-cm Chapter 8.

Hardware Maintenance Manual - Lenovo E4325
Page 58
Insert a screwdriver into the screw hole and push the optical drive in order: • "1010 Battery pack" on page 50 • "1020 Bottom slot cover" on page 50 52 Hardware Maintenance Manual 1 2 Color Black Torque 1.85 kgf-cm Step 1 Screw (quantity) M2 × 3 mm, flat-head, nylon-coated (1) 1040 Memory module For access, remove these FRUs in the direction shown by the arrow 2 . Then remove the optical drive. 2 3 Removal steps of optical drive bezel and optical drive bracket Remove the screw 1 and then remove the optical drive bracket.
Insert a screwdriver into the screw hole and push the optical drive in order: • "1010 Battery pack" on page 50 • "1020 Bottom slot cover" on page 50 52 Hardware Maintenance Manual 1 2 Color Black Torque 1.85 kgf-cm Step 1 Screw (quantity) M2 × 3 mm, flat-head, nylon-coated (1) 1040 Memory module For access, remove these FRUs in the direction shown by the arrow 2 . Then remove the optical drive. 2 3 Removal steps of optical drive bezel and optical drive bracket Remove the screw 1 and then remove the optical drive bracket.

Hardware Maintenance Manual - Lenovo E4325
Page 59
... run a low-level format before doing this task. The drive is operating or in suspend mode. • The drive startup sequence in order: • "1010 Battery pack" on page 50 • "1020 Bottom slot cover" on it if possible. • Never remove the drive while the computer is sensitive to physical...
... run a low-level format before doing this task. The drive is operating or in suspend mode. • The drive startup sequence in order: • "1010 Battery pack" on page 50 • "1020 Bottom slot cover" on it if possible. • Never remove the drive while the computer is sensitive to physical...

Hardware Maintenance Manual - Lenovo E4325
Page 61
...-cm Chapter 8. Remove the hard disk drive bracket. 2 1060 PCI Express Mini Card for wireless LAN For access, remove these FRUs in order: • "1010 Battery pack" on page 50 • "1020 Bottom slot cover" on page 50 Removal steps of PCI Express Mini Card for wireless LAN In steps 1 , disconnect...
...-cm Chapter 8. Remove the hard disk drive bracket. 2 1060 PCI Express Mini Card for wireless LAN For access, remove these FRUs in order: • "1010 Battery pack" on page 50 • "1020 Bottom slot cover" on page 50 Removal steps of PCI Express Mini Card for wireless LAN In steps 1 , disconnect...

Hardware Maintenance Manual - Lenovo E4325
Page 62
... ignite or explode. Remove the PCI Express Mini Card for your computer. Detach the connector 1 , and then remove the battery pack in the direction shown by the arrow. 2 1 When installing: Ensure that the connector is attached firmly. 1090 Keyboard For access, remove these FRUs in ... parts list for wireless LAN. 3 When installing: Plug the black cable into the main connector, and the white cable into the auxiliary connector. 1080 Backup battery For access, remove these FRUs in order: • "1010 Battery pack" on page 50 • "1020 Bottom slot cover" on page 50 Removal steps of backup...
... ignite or explode. Remove the PCI Express Mini Card for your computer. Detach the connector 1 , and then remove the battery pack in the direction shown by the arrow. 2 1 When installing: Ensure that the connector is attached firmly. 1090 Keyboard For access, remove these FRUs in ... parts list for wireless LAN. 3 When installing: Plug the black cable into the main connector, and the white cable into the auxiliary connector. 1080 Backup battery For access, remove these FRUs in order: • "1010 Battery pack" on page 50 • "1020 Bottom slot cover" on page 50 Removal steps of backup...


