Quick Install Guide
Page 13
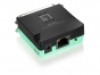
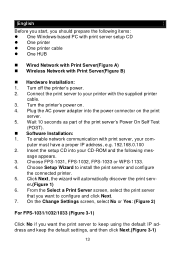
English Before you start, you want the print server to keep using the default IP address and keep the default settings, and then click Next.(Figure 3-1) 13 Turn off the printer's power. 2. Connect the print server to your printer with print ...To enable network communication with the supplied printer cable. 3. Turn the printer's power on the print server. 5. puter must have a proper IP address, e.g. 192.168.0.100 2. Choose FPS-1031, FPS-1032, FPS-1033 or WPS-1133. 4. Click Next, the wizard will automatically discover the print serv- From the Select a Print Server screen, select...
English Before you start, you want the print server to keep using the default IP address and keep the default settings, and then click Next.(Figure 3-1) 13 Turn off the printer's power. 2. Connect the print server to your printer with print ...To enable network communication with the supplied printer cable. 3. Turn the printer's power on the print server. 5. puter must have a proper IP address, e.g. 192.168.0.100 2. Choose FPS-1031, FPS-1032, FPS-1033 or WPS-1133. 4. Click Next, the wizard will automatically discover the print serv- From the Select a Print Server screen, select...

Quick Install Guide
Page 14
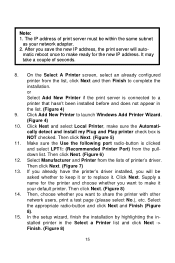
...3-2 ~3-5) Click No if you want the print server to keep using the default IP address and keep the default Infrastructure settings: Infrastructure mode SSID: Encryption: none DHCP client: Off IP address: 192.168.0.10 Subnet Mask: 255.255.255.0 Click Yes... if you want change IP address to the print server, and then click ...
...3-2 ~3-5) Click No if you want the print server to keep using the default IP address and keep the default Infrastructure settings: Infrastructure mode SSID: Encryption: none DHCP client: Off IP address: 192.168.0.10 Subnet Mask: 255.255.255.0 Click Yes... if you want change IP address to the print server, and then click ...
Quick Install Guide
Page 15
... the installation. It may take a couple of printer's driver. Then, choose whether you save the new IP address, the print server will be within the same subnet as your default printer. In the setup wizard, finish the installation by highlighting the installed printer in the list. (Figure ...Figure 8). 15. Then click Next. (Figure 6) 12. Click Next. Click Next and select Local Printer, make it . Supply a name for the new IP address. Then click Next. (Figure 5) 11. Select Manufacturer and Printer from the lists of seconds. 8. Then click Next. (Figure 7) 13. Then click ...
... the installation. It may take a couple of printer's driver. Then, choose whether you save the new IP address, the print server will be within the same subnet as your default printer. In the setup wizard, finish the installation by highlighting the installed printer in the list. (Figure ...Figure 8). 15. Then click Next. (Figure 6) 12. Click Next. Click Next and select Local Printer, make it . Supply a name for the new IP address. Then click Next. (Figure 5) 11. Select Manufacturer and Printer from the lists of seconds. 8. Then click Next. (Figure 7) 13. Then click ...