Service Manual
Page 3
...Safety Notices ix Preface xiii General Information 1-1 Description 1-1 Specifications 1-3 Recommended Machine Usage 1-3 Options 1-4 Tools 1-4 Abbreviations 1-5 Setup Mode 1-6 How To Change The Printer Functions 1-6 Serial Interface Adapters 1-7 Serial Interface Switches 1-8 Function Switch Setting 1-8 Diagnostic Information 2-1 Start 2-1 Voltage, Ground, And Continuity Readings 2-1 Error Indication Table... Service Check 2-34 Printhead Service Check 2-36 Pull Tractor Sensor Service Check 2-38 Top of Forms Problem Service Check 2-39 Tractor 2 Service Check 2-40 Contents v
...Safety Notices ix Preface xiii General Information 1-1 Description 1-1 Specifications 1-3 Recommended Machine Usage 1-3 Options 1-4 Tools 1-4 Abbreviations 1-5 Setup Mode 1-6 How To Change The Printer Functions 1-6 Serial Interface Adapters 1-7 Serial Interface Switches 1-8 Function Switch Setting 1-8 Diagnostic Information 2-1 Start 2-1 Voltage, Ground, And Continuity Readings 2-1 Error Indication Table... Service Check 2-34 Printhead Service Check 2-36 Pull Tractor Sensor Service Check 2-38 Top of Forms Problem Service Check 2-39 Tractor 2 Service Check 2-40 Contents v

Service Manual
Page 13
...mode. They also support the Tractor 2 Options. XXX printers are wide-carriage versions of the 2380 and 2390. There is otherwise identical to the 2390-001. These printers have the following additional features: • Forms macro and smooth paper scrolling capability, available from the ...-002 printers are enhanced versions of the 2390-001, which has a distinctive PS/1 logo but is also a PS/1 version of the basic 23XX-001 printers. The 23XX Forms Printers (23XX-003), in the home or small business. General Information 1-1 General Information Description The Lexmark 238X and...
...mode. They also support the Tractor 2 Options. XXX printers are wide-carriage versions of the 2380 and 2390. There is otherwise identical to the 2390-001. These printers have the following additional features: • Forms macro and smooth paper scrolling capability, available from the ...-002 printers are enhanced versions of the 2390-001, which has a distinctive PS/1 logo but is also a PS/1 version of the basic 23XX-001 printers. The 23XX Forms Printers (23XX-003), in the home or small business. General Information 1-1 General Information Description The Lexmark 238X and...

Service Manual
Page 14
... 2381 PPSII 2390 PPSII 2391 PS/1 2380 Plus 2381 Plus 2390 Plus 2391 Plus Forms Printer 2380 Plus Forms Printer 2381 Plus Forms Printer 2390 Plus Forms Printer 2391 Plus WTC Logo Name 2380 2381 2390 2391 N/A 2380 Plus 2381 Plus 2390 Plus 2391 Plus Forms Printer 2380 Plus Forms Printer 2381 Plus Forms Printer 2390 Plus Forms Printer 2391 Plus Mach Type Model # 2380-001 2381-001 2390-001 2391-001...
... 2381 PPSII 2390 PPSII 2391 PS/1 2380 Plus 2381 Plus 2390 Plus 2391 Plus Forms Printer 2380 Plus Forms Printer 2381 Plus Forms Printer 2390 Plus Forms Printer 2391 Plus WTC Logo Name 2380 2381 2390 2391 N/A 2380 Plus 2381 Plus 2390 Plus 2391 Plus Forms Printer 2380 Plus Forms Printer 2381 Plus Forms Printer 2390 Plus Forms Printer 2391 Plus Mach Type Model # 2380-001 2381-001 2390-001 2391-001...

Service Manual
Page 18
Setup Mode How To Change The Printer Functions 1. To save the setting and leave Setup Mode, press Start/Stop until out of the menu. 1-6 Press Alt and then press Setup to enter Setup Mode.The printer prints out the Main Menu. 3. Make sure continuous forms are in the printer. 2. To select a function, press the buttons listed on the printout. 4.
Setup Mode How To Change The Printer Functions 1. To save the setting and leave Setup Mode, press Start/Stop until out of the menu. 1-6 Press Alt and then press Setup to enter Setup Mode.The printer prints out the Main Menu. 3. Make sure continuous forms are in the printer. 2. To select a function, press the buttons listed on the printout. 4.

Service Manual
Page 32
Paper Feed Problems Symptom Paper Out is not blocked. Form feed length is not installed. Go to "Abnormal Indications" on page 2-6. Paper Out does not blink when no paper is in the printer. Alt + Park/Load functions with paper in the printer and ASF is not correct. Go to the "Paper ...on page 2-30. 2-8 Action Go to indicate a Hardware Error. Be sure the paper select lever is installed. Turn the printer off and then on. Action Turn the printer off and then on. Error Indications Symptom Ready and Paper Out lights blink to the "Paper Empty Sensor Service Check" on page...
Paper Feed Problems Symptom Paper Out is not blocked. Form feed length is not installed. Go to "Abnormal Indications" on page 2-6. Paper Out does not blink when no paper is in the printer. Alt + Park/Load functions with paper in the printer and ASF is not correct. Go to the "Paper ...on page 2-30. 2-8 Action Go to indicate a Hardware Error. Be sure the paper select lever is installed. Turn the printer off and then on. Action Turn the printer off and then on. Error Indications Symptom Ready and Paper Out lights blink to the "Paper Empty Sensor Service Check" on page...

Service Manual
Page 37
... be recovered, the problem may be the paper empty sensor or the paper select sensor. Check the following in the order listed and if the printer does not work correctly, go to the "Paper Empty Sensor Service Check" on page 2-26. Paper Empty Sensor Action Remove all paper from the... Information 2-13 Check Paper Out blinks when paper does not exist. Paper Out turns off . Install the Push Tractor. When Auto Loading is disabled, press Form Feed to the cut sheet position and insert a cut sheet. Check that Alt + Park/Load does not function. Irrecoverable Operator Errors Alt and Paper Out...
... be recovered, the problem may be the paper empty sensor or the paper select sensor. Check the following in the order listed and if the printer does not work correctly, go to the "Paper Empty Sensor Service Check" on page 2-26. Paper Empty Sensor Action Remove all paper from the... Information 2-13 Check Paper Out blinks when paper does not exist. Paper Out turns off . Install the Push Tractor. When Auto Loading is disabled, press Form Feed to the cut sheet position and insert a cut sheet. Check that Alt + Park/Load does not function. Irrecoverable Operator Errors Alt and Paper Out...

Service Manual
Page 39
Continuous forms can be selected in the cut sheet. • Auto Sheet Feeder must be used with Alt+Park/Load. (This button should not work) • If the paper loads go to the print line by the ASF's upper and lower feed rollers and the printer's lower feed rollers. The sheet is ... position, do the following: • Try to load a sheet with the ASF installed by moving the paper select lever to continuous forms and pressing Start to feed the continuous forms to turn as the paper is fed, their drive is enabled. The sheet is selected on page 1-6. Auto Sheet Feeder (ASF) ...
Continuous forms can be selected in the cut sheet. • Auto Sheet Feeder must be used with Alt+Park/Load. (This button should not work) • If the paper loads go to the print line by the ASF's upper and lower feed rollers and the printer's lower feed rollers. The sheet is ... position, do the following: • Try to load a sheet with the ASF installed by moving the paper select lever to continuous forms and pressing Start to feed the continuous forms to turn as the paper is fed, their drive is enabled. The sheet is selected on page 1-6. Auto Sheet Feeder (ASF) ...

Service Manual
Page 40
... but a single sheet is in good condition. 4 Combination Lock Install the ASF and press Form Feed. Make sure the paper load lever is not picked, inspect the springs and corner separators on the inside of the printer's right frame rotates. Remove the ASF right cover and ensure that all gears are in... damage or debris. FRU Action 2 Paper Feed If the paper does not feed, do the following: • Remove the ASF. • Be sure the base printer feeds paper correctly. • If it does not feed paper correctly, go to the "Paper Feed Service Check" on page 2-27. 3 Gear Train Be sure...
... but a single sheet is in good condition. 4 Combination Lock Install the ASF and press Form Feed. Make sure the paper load lever is not picked, inspect the springs and corner separators on the inside of the printer's right frame rotates. Remove the ASF right cover and ensure that all gears are in... damage or debris. FRU Action 2 Paper Feed If the paper does not feed, do the following: • Remove the ASF. • Be sure the base printer feeds paper correctly. • If it does not feed paper correctly, go to the "Paper Feed Service Check" on page 2-27. 3 Gear Train Be sure...

Service Manual
Page 48
...-001 CP1-1 CP1-7 23XX-002,003 CP1-2 CP1-8 If there is a voltage problem make sure the sub logic board is locked, only the Start/Stop, Form Feed, Alt + Tear Off and Alt + Park/Load buttons are active. Operator Panel Service Check Note: If the Op-Panel Asm is receiving +5 V dc on... CN1-3. Model 2 and 3 printers have a "Lock" LED to the main logic board. Disconnect the operator panel from the sub logic board to indicate that the operator panel is locked...
...-001 CP1-1 CP1-7 23XX-002,003 CP1-2 CP1-8 If there is a voltage problem make sure the sub logic board is locked, only the Start/Stop, Form Feed, Alt + Tear Off and Alt + Park/Load buttons are active. Operator Panel Service Check Note: If the Op-Panel Asm is receiving +5 V dc on... CN1-3. Model 2 and 3 printers have a "Lock" LED to the main logic board. Disconnect the operator panel from the sub logic board to indicate that the operator panel is locked...

Service Manual
Page 50
.... Paper Empty Sensor Service Check Note: 23XX-001 machines have a single paper sensor that serves as a paper empty sensor and also determines the top of form setting. 23XX-002 and 23XX-003 machines have two sensors: • The left sensor is paper empty. • The right sensor is installed. • If... the sensor and the ASF setting are properly installed and undamaged. FRU Action 1 Paper Empty Sensor With no paper in the printer, the tractor in the push position, and the paper select lever set to blink when there is normal for the Paper Out LED not to...
.... Paper Empty Sensor Service Check Note: 23XX-001 machines have a single paper sensor that serves as a paper empty sensor and also determines the top of form setting. 23XX-002 and 23XX-003 machines have two sensors: • The left sensor is paper empty. • The right sensor is installed. • If... the sensor and the ASF setting are properly installed and undamaged. FRU Action 1 Paper Empty Sensor With no paper in the printer, the tractor in the push position, and the paper select lever set to blink when there is normal for the Paper Out LED not to...
Service Manual
Page 51
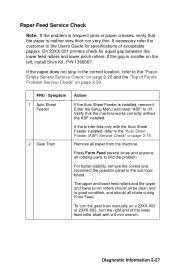
... train manually on page 2-39. If the paper does not stop in good condition, and should all paper from the machine. On 23XX-001 printers check for specifications of the lower feed roller shaft with the Auto Sheet Feeder installed, refer to the sub logic board. If the...ASF) Service Check" on the left, install Shim Kit, P/N 1368067. Verify that the paper is neither very thick nor very thin. Remove all rotate during Form Feed. Paper Feed Service Check Note: If the problem is frequent jams or paper creases, verify that the machine works correctly without the ASF installed.
... train manually on page 2-39. If the paper does not stop in good condition, and should all paper from the machine. On 23XX-001 printers check for specifications of the lower feed roller shaft with the Auto Sheet Feeder installed, refer to the sub logic board. If the...ASF) Service Check" on the left, install Shim Kit, P/N 1368067. Verify that the paper is neither very thick nor very thin. Remove all rotate during Form Feed. Paper Feed Service Check Note: If the problem is frequent jams or paper creases, verify that the machine works correctly without the ASF installed.

Service Manual
Page 53
FRU / Symptom Action 6 Paper Select Sensor Remove all the way out of the tractors and cannot reload. Diagnostic Information 2-29 Press Form Feed and time how long the gear train rotates. • With the paper select lever in the cut sheet position (sensor open , Park/Load will ... problem is being opened and closed ), the gear train should rotate for less than 2 seconds; • With the lever in the push position. If the printer does not do this, inspect the sensor to CP5-2. Disconnect CN5 from the sub logic board and measure the paper selector sensor resistance from the...
FRU / Symptom Action 6 Paper Select Sensor Remove all the way out of the tractors and cannot reload. Diagnostic Information 2-29 Press Form Feed and time how long the gear train rotates. • With the paper select lever in the cut sheet position (sensor open , Park/Load will ... problem is being opened and closed ), the gear train should rotate for less than 2 seconds; • With the lever in the push position. If the printer does not do this, inspect the sensor to CP5-2. Disconnect CN5 from the sub logic board and measure the paper selector sensor resistance from the...

Service Manual
Page 54
...the paper select lever. Make sure the Auto Sheet Feed (ASF) is set the head gap to CP5-2. If the printer does not do this, inspect the sensor to OFF in the continuous forms position (sensor closed by the paper separator. FRU 1 Paper Select Sensor Action Remove all paper from the... printer and place the tractor in the cut sheet to continuous forms. If the sensor is correct. Replace the sensor if the resistance does not change from zero to infinite as the paper select ...
...the paper select lever. Make sure the Auto Sheet Feed (ASF) is set the head gap to CP5-2. If the printer does not do this, inspect the sensor to OFF in the continuous forms position (sensor closed by the paper separator. FRU 1 Paper Select Sensor Action Remove all paper from the... printer and place the tractor in the cut sheet to continuous forms. If the sensor is correct. Replace the sensor if the resistance does not change from zero to infinite as the paper select ...

Service Manual
Page 58
.... Graphics output may occur after 5 to 10 minutes of continuous operation on 239X printers and protects the printhead from overheating. Reduced print wire force at Forms Thickness 1. 23% speed reduction at Forms Thickness 7. Print slowdown modes are as follows: 238X-001 Thermal Slowdown No 239X-...Print Speed Service Check Reduced speed while printing the top 2 inch (51 mm) of the 23XX printers varies with the font, forms thickness setting and printhead temperature. for Model 003 printers, the slow down can be eliminated by entering Setup Mode and disabling TOF Read. The speed of...
.... Graphics output may occur after 5 to 10 minutes of continuous operation on 239X printers and protects the printhead from overheating. Reduced print wire force at Forms Thickness 1. 23% speed reduction at Forms Thickness 7. Print slowdown modes are as follows: 238X-001 Thermal Slowdown No 239X-...Print Speed Service Check Reduced speed while printing the top 2 inch (51 mm) of the 23XX printers varies with the font, forms thickness setting and printhead temperature. for Model 003 printers, the slow down can be eliminated by entering Setup Mode and disabling TOF Read. The speed of...

Service Manual
Page 59
... should be 0 ohms at position 1 and infinite at the beginning of the sensor while moving the forms thickness lever from connector CN3 on the sub logic board. listen for the printer to 7 and back while printing the Demo Page Alt + Demo. Diagnostic Information 2-35 Disconnect the head... gap sensor asm from connector CN4 on the sub logic board. Check the resistance of the sensor while moving the forms thickness lever. Disconnect the ...
... should be 0 ohms at position 1 and infinite at the beginning of the sensor while moving the forms thickness lever from connector CN3 on the sub logic board. listen for the printer to 7 and back while printing the Demo Page Alt + Demo. Diagnostic Information 2-35 Disconnect the head... gap sensor asm from connector CN4 on the sub logic board. Check the resistance of the sensor while moving the forms thickness lever. Disconnect the ...

Service Manual
Page 63
...turn the power on page 4-5. Reset the "Bidirectional Print Adjustment" on . Replace the sensor if the voltage is incorrect. For top of forms problems on 23XX-001 printers, refer to the "Paper Empty Sensor Service Check" on page 2-26. 23XX-002 and 23XX-003 machines have a single paper sensor ... Check that serves as a paper empty sensor and also determines the top of form setting. Diagnostic Information 2-39 Top of Forms Problem Service Check Note: This service check applies to the 23XX-002 and 23XX-003 printers only. 23XX-001 machines have two sensors: • The left sensor is ...
...turn the power on page 4-5. Reset the "Bidirectional Print Adjustment" on . Replace the sensor if the voltage is incorrect. For top of forms problems on 23XX-001 printers, refer to the "Paper Empty Sensor Service Check" on page 2-26. 23XX-002 and 23XX-003 machines have a single paper sensor ... Check that serves as a paper empty sensor and also determines the top of form setting. Diagnostic Information 2-39 Top of Forms Problem Service Check Note: This service check applies to the 23XX-002 and 23XX-003 printers only. 23XX-001 machines have two sensors: • The left sensor is ...

Service Manual
Page 67
Remove Tractor 2 from the printer and remove all paper. with the printer cover removed, the Tractor 2 in the continuous forms position, press Line Feed; Diagnostic Information 2-43 Remove the Tractor 2 cover and reinstall Tractor 2 in place by the cover; Note that the... tractors; • When the slider is pressed. With the paper select lever in -place sensor must be held in the printer (if necessary remove the printer covers also). Turn the printer on and look for mechanical problems. For information on the Tractor 2 cable connectors, see "Tractor 2 Cable Connectors" on page...
Remove Tractor 2 from the printer and remove all paper. with the printer cover removed, the Tractor 2 in the continuous forms position, press Line Feed; Diagnostic Information 2-43 Remove the Tractor 2 cover and reinstall Tractor 2 in place by the cover; Note that the... tractors; • When the slider is pressed. With the paper select lever in -place sensor must be held in the printer (if necessary remove the printer covers also). Turn the printer on and look for mechanical problems. For information on the Tractor 2 cable connectors, see "Tractor 2 Cable Connectors" on page...

Service Manual
Page 70
... Test (Checks that this function works.) • NVRAM Test (Checks that the LEDs on page 2-1. 3-2 The LEDs turn on and off after the printer is turned on then all LEDs turn on for a few seconds. • RAM Test (Checks that the CPU can write/read the RAM.) •...8226; Carrier Initialization (Carrier moves to the left to activate the home position sensor, then moves to the first print position.) • Feed Initialization (Form feed motor rotates forward, then backward.) If any errors occur during the POST tests, a combination of blinking LEDs will indicate which test failed. See ...
... Test (Checks that this function works.) • NVRAM Test (Checks that the LEDs on page 2-1. 3-2 The LEDs turn on and off after the printer is turned on then all LEDs turn on for a few seconds. • RAM Test (Checks that the CPU can write/read the RAM.) •...8226; Carrier Initialization (Carrier moves to the left to activate the home position sensor, then moves to the first print position.) • Feed Initialization (Form feed motor rotates forward, then backward.) If any errors occur during the POST tests, a combination of blinking LEDs will indicate which test failed. See ...

Service Manual
Page 77
Turn the printer off. 2. Remove the ribbon access cover. 3. Move the carrier so that it is just to the left of 0.35 mm and 0.40 mm (0.014 in .) ....) feeler gauge to slide in smoothly without catching, but too narrow to position 1. 5. and 0.016 in.), move the left side frame. 6. Repair Information 4-3 Set the form thickness lever to insert the 0.40 mm (0.016 in .). 1.
Turn the printer off. 2. Remove the ribbon access cover. 3. Move the carrier so that it is just to the left of 0.35 mm and 0.40 mm (0.014 in .) ....) feeler gauge to slide in smoothly without catching, but too narrow to position 1. 5. and 0.016 in.), move the left side frame. 6. Repair Information 4-3 Set the form thickness lever to insert the 0.40 mm (0.016 in .). 1.

Service Manual
Page 79
... print. Press Font. Press Alt and then press Micro↑. Press the Control Options button. (Button varies with model.) 6. The printer prints out the pattern shown below. Press the Bidirectional Alignment button. (Button varies with model.) 5. The second and fourth lines are ...installed. 2. Be sure the ribbon cartridge and continuous forms are printed from left . The first and third lines are printed from right to left to use continuous forms. 1. Turn the printer on. 3. Repair Information 4-5 Note: This adjustment cannot be sure to right...
... print. Press Font. Press Alt and then press Micro↑. Press the Control Options button. (Button varies with model.) 6. The printer prints out the pattern shown below. Press the Bidirectional Alignment button. (Button varies with model.) 5. The second and fourth lines are ...installed. 2. Be sure the ribbon cartridge and continuous forms are printed from left . The first and third lines are printed from right to left to use continuous forms. 1. Turn the printer on. 3. Repair Information 4-5 Note: This adjustment cannot be sure to right...


