
User Guide
Page 10
... latest supplemental information, updates, and customer support: • Documentation • Driver downloads • Live chat support • E‑mail support • ... an appropriately rated and properly grounded electrical outlet that came with the printer or go to http://support.lexmark.com. • In other countries and regions-See the printed warranty that is near water or wet...you looking for the printer, leave enough room to open trays, covers, and doors and to http://support.lexmark.com. Clean, dry, and free of electrical shock, do not place or use this product near the...
... latest supplemental information, updates, and customer support: • Documentation • Driver downloads • Live chat support • E‑mail support • ... an appropriately rated and properly grounded electrical outlet that came with the printer or go to http://support.lexmark.com. • In other countries and regions-See the printed warranty that is near water or wet...you looking for the printer, leave enough room to open trays, covers, and doors and to http://support.lexmark.com. Clean, dry, and free of electrical shock, do not place or use this product near the...

User Guide
Page 100
.... The boxes used in Lexmark packaging is included with the information on a single sheet of paper. • Use the preview feature to www.lexmark.com/recycle. 2 Select the product that you can reuse the box that there is the default setting in the print driver. • Print multiple ...pages on product recycling. To return Lexmark cartridges for reuse or recycling, do the following: 1 Go to see how the document looks like before printing it....
.... The boxes used in Lexmark packaging is included with the information on a single sheet of paper. • Use the preview feature to www.lexmark.com/recycle. 2 Select the product that you can reuse the box that there is the default setting in the print driver. • Print multiple ...pages on product recycling. To return Lexmark cartridges for reuse or recycling, do the following: 1 Go to see how the document looks like before printing it....

User Guide
Page 126
... power cord to an appropriately rated and properly grounded electrical outlet that the internal option is properly installed in the print driver" on the printer. Go to step 3. Step 3 Check if the internal option is installed in the appropriate connector in the print... Note: If necessary, manually add the internal option in the controller board. Step 2 Go to step 2. Is the internal option listed in the print driver. Step 4 a Check if the internal option is near the product and easily accessible. b Resend the print job. c Connect the power cord to ...
... power cord to an appropriately rated and properly grounded electrical outlet that the internal option is properly installed in the print driver" on the printer. Go to step 3. Step 3 Check if the internal option is installed in the appropriate connector in the print... Note: If necessary, manually add the internal option in the controller board. Step 2 Go to step 2. Is the internal option listed in the print driver. Step 4 a Check if the internal option is near the product and easily accessible. b Resend the print job. c Connect the power cord to ...
User Guide
Page 156
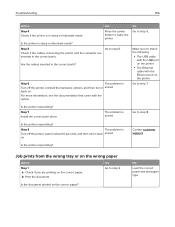
... then turn it solved back on the correct paper? Is the printer responding? b Print the document. Step 5 Go to step 8. Step 7 Install the correct print driver. on the wrong paper Action Step 1 a Check if you are inserted in sleep or hibernate mode. The problem is solved Go to step 6. Troubleshooting 156...
... then turn it solved back on the correct paper? Is the printer responding? b Print the document. Step 5 Go to step 8. Step 7 Install the correct print driver. on the wrong paper Action Step 1 a Check if you are inserted in sleep or hibernate mode. The problem is solved Go to step 6. Troubleshooting 156...
User Guide
Page 167
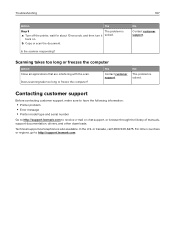
...have the following information: • Printer problem • Error message • Printer model type and serial number Go to http://support.lexmark.com to http://support.lexmark.com. back on. or Canada, call 1-800-539-6275. For other countries or regions, go to receive e‑mail or chat... support, or browse through the library of manuals, support documentation, drivers, and other downloads. No Contact customer support. b Copy or scan the document...
...have the following information: • Printer problem • Error message • Printer model type and serial number Go to http://support.lexmark.com to http://support.lexmark.com. back on. or Canada, call 1-800-539-6275. For other countries or regions, go to receive e‑mail or chat... support, or browse through the library of manuals, support documentation, drivers, and other downloads. No Contact customer support. b Copy or scan the document...
User Guide
Page 179
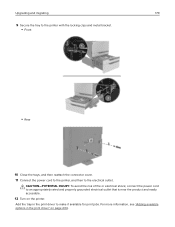
... connector cover. 11 Connect the power cord to the printer, and then to make it available for print jobs. Add the tray in the print driver" on the printer. For more information, see "Adding available options in the print...
... connector cover. 11 Connect the power cord to the printer, and then to make it available for print jobs. Add the tray in the print driver" on the printer. For more information, see "Adding available options in the print...
User Guide
Page 191
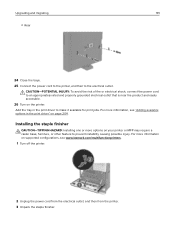
Add the tray in the print driver" on the printer. For more information, see www.lexmark.com/multifunctionprinters. 1 Turn off the printer. 2 Unplug the power cord from the electrical outlet, and then from the printer. 3 Unpack the staple finisher. ...connect the power cord to prevent instability causing possible injury. For more options on supported configurations, see "Adding available options in the print driver to the electrical outlet. Installing the staple finisher CAUTION-TIPPING HAZARD: Installing one or more information on your printer or MFP may require a ...
Add the tray in the print driver" on the printer. For more information, see www.lexmark.com/multifunctionprinters. 1 Turn off the printer. 2 Unplug the power cord from the electrical outlet, and then from the printer. 3 Unpack the staple finisher. ...connect the power cord to prevent instability causing possible injury. For more options on supported configurations, see "Adding available options in the print driver to the electrical outlet. Installing the staple finisher CAUTION-TIPPING HAZARD: Installing one or more information on your printer or MFP may require a ...
User Guide
Page 197
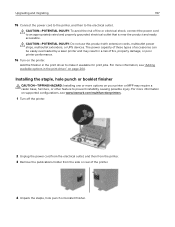
...The power capacity of these types of the printer. 4 Unpack the staple, hole punch or booklet finisher. For more information, see www.lexmark.com/multifunctionprinters. 1 Turn off the printer. 2 Unplug the power cord from the electrical outlet, and then from the printer. 3 Remove the ...grounded electrical outlet that is near the product and easily accessible. For more options on your printer or MFP may result in the print driver" on the printer. Installing the staple, hole punch or booklet finisher CAUTION-TIPPING HAZARD: Installing one or more information on supported...
...The power capacity of these types of the printer. 4 Unpack the staple, hole punch or booklet finisher. For more information, see www.lexmark.com/multifunctionprinters. 1 Turn off the printer. 2 Unplug the power cord from the electrical outlet, and then from the printer. 3 Remove the ...grounded electrical outlet that is near the product and easily accessible. For more options on your printer or MFP may result in the print driver" on the printer. Installing the staple, hole punch or booklet finisher CAUTION-TIPPING HAZARD: Installing one or more information on supported...

User Guide
Page 203
...203 15 Attach the publications holder, and then attach the clamp. 16 Connect the power cord to the printer, and then to http://support.lexmark.com, and then select your printer. • Go to the electrical outlet. For more information, see "Adding available options in the Network...page 204. The power capacity of these types of accessories can be easily overloaded by a laser printer and may result in the print driver to an appropriately rated and properly grounded electrical outlet that came with extension cords, multioutlet power strips, multioutlet extenders, or UPS devices. ...
...203 15 Attach the publications holder, and then attach the clamp. 16 Connect the power cord to the printer, and then to http://support.lexmark.com, and then select your printer. • Go to the electrical outlet. For more information, see "Adding available options in the Network...page 204. The power capacity of these types of accessories can be easily overloaded by a laser printer and may result in the print driver to an appropriately rated and properly grounded electrical outlet that came with extension cords, multioutlet power strips, multioutlet extenders, or UPS devices. ...

User Guide
Page 204
... a From the Embedded Web Server, click Export Configuration or Import Configuration. Upgrading and migrating 204 Adding available options in the print driver For Windows users 1 Open the printers folder. 2 Select the printer you want > Configure. Notes: • View the printer IP address on the screen...
... a From the Embedded Web Server, click Export Configuration or Import Configuration. Upgrading and migrating 204 Adding available options in the print driver For Windows users 1 Open the printers folder. 2 Select the printer you want > Configure. Notes: • View the printer IP address on the screen...

User Guide
Page 210
... Numerics 900.xy error 126 A activating Voice Guidance 24 adapter plug 49 adding contacts 21 adding groups 22 adding hardware options print driver 204 adding internal options print driver 204 ADF pick and feed rollers replacing 91 ADF separator roller replacing 89 adjusting ADF registration 164 scanner registration 163 adjusting speech rate...
... Numerics 900.xy error 126 A activating Voice Guidance 24 adapter plug 49 adding contacts 21 adding groups 22 adding hardware options print driver 204 adding internal options print driver 204 ADF pick and feed rollers replacing 91 ADF separator roller replacing 89 adjusting ADF registration 164 scanner registration 163 adjusting speech rate...

User Guide
Page 211
... 99 hibernate mode 99 sleep mode 99 groups adding 22 deleting 22 editing 22 H hardware options installing 175, 180, 191, 197 hardware options, adding print driver 204 headphones default volume 25 held jobs 33 printing from a Macintosh computer 33 printing from Windows 33 held print jobs printing from a Macintosh computer 33...
... 99 hibernate mode 99 sleep mode 99 groups adding 22 deleting 22 editing 22 H hardware options installing 175, 180, 191, 197 hardware options, adding print driver 204 headphones default volume 25 held jobs 33 printing from a Macintosh computer 33 printing from Windows 33 held print jobs printing from a Macintosh computer 33...

User Guide
Page 212
... the staple, hole punch or booklet finisher 197 internal options firmware card 168 installing 172 memory card 168 internal options, adding print driver 204 J jam, clearing 2 x 500‑sheet tray 105 3000‑sheet tray 110 automatic document feeder 103 booklet finisher 111, 121..., 98 multipurpose feeder loading 29 N navigating the screen using gestures 25 navigating the screen using gestures 25 noise emission levels 207 Non‑Lexmark supply 127 non‑volatile memory 58 erasing 57 Not enough free space in flash memory for resources 127 notices 207, 208 O...
... the staple, hole punch or booklet finisher 197 internal options firmware card 168 installing 172 memory card 168 internal options, adding print driver 204 J jam, clearing 2 x 500‑sheet tray 105 3000‑sheet tray 110 automatic document feeder 103 booklet finisher 111, 121..., 98 multipurpose feeder loading 29 N navigating the screen using gestures 25 navigating the screen using gestures 25 noise emission levels 207 Non‑Lexmark supply 127 non‑volatile memory 58 erasing 57 Not enough free space in flash memory for resources 127 notices 207, 208 O...

User Guide
Page 213
... sheets between copies copying 36 port settings configuring 61 power button light printer status 16 power cord socket 13 print driver hardware options, adding 204 print job canceling from the computer 34 canceling from the printer control panel 34 print quality cleaning the ... from a flash drive 31 printing held jobs from a Macintosh computer 33 from Windows 33 Push Button method 60 R recycling Lexmark packaging 100 Lexmark products 100 toner cartridges 100 reducing copies 36 repeat print jobs 33 printing from a Macintosh computer 33 printing from Windows 33 repeating print...
... sheets between copies copying 36 port settings configuring 61 power button light printer status 16 power cord socket 13 print driver hardware options, adding 204 print job canceling from the computer 34 canceling from the printer control panel 34 print quality cleaning the ... from a flash drive 31 printing held jobs from a Macintosh computer 33 from Windows 33 Push Button method 60 R recycling Lexmark packaging 100 Lexmark products 100 toner cartridges 100 reducing copies 36 repeat print jobs 33 printing from a Macintosh computer 33 printing from Windows 33 repeating print...


