
User's Guide
Page 2
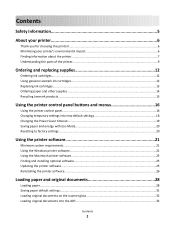
... 6 Finding information about the printer...7 Understanding the parts of the printer...9 Ordering and replacing supplies 12 Ordering ink cartridges...12 Using genuine Lexmark ink cartridges...12 Replacing ink cartridges...13 Ordering paper and other supplies...14 Recycling Lexmark products...15 Using the printer control panel buttons and menus 16 Using the printer control panel...16...
... 6 Finding information about the printer...7 Understanding the parts of the printer...9 Ordering and replacing supplies 12 Ordering ink cartridges...12 Using genuine Lexmark ink cartridges...12 Replacing ink cartridges...13 Ordering paper and other supplies...14 Recycling Lexmark products...15 Using the printer control panel buttons and menus 16 Using the printer control panel...16...
User's Guide
Page 4
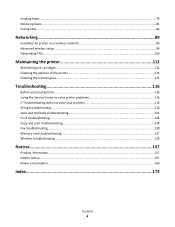
......81 Faxing FAQ...82 Networking 89 Installing the printer on a wireless network 89 Advanced wireless setup...94 Networking FAQ...100 Maintaining the printer 112 Maintaining ink cartridges...112 Cleaning the exterior of the printer...114 Cleaning the scanner glass...115 Troubleshooting 116 Before you troubleshoot...116 Using the Service Center to...
......81 Faxing FAQ...82 Networking 89 Installing the printer on a wireless network 89 Advanced wireless setup...94 Networking FAQ...100 Maintaining the printer 112 Maintaining ink cartridges...112 Cleaning the exterior of the printer...114 Cleaning the scanner glass...115 Troubleshooting 116 Before you troubleshoot...116 Using the Service Center to...
User's Guide
Page 7
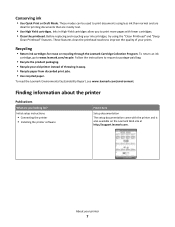
... packaging. • Recycle your old printer instead of your printer 7 Recycling • Return ink cartridges for printing documents that are ideal for reuse or recycling through the Lexmark Cartridge Collection Program. To read the Lexmark Environmental Sustainability Report, see www.lexmark.com/environment. Initial setup instructions: • Connecting the printer • Installing the printer...
... packaging. • Recycle your old printer instead of your printer 7 Recycling • Return ink cartridges for printing documents that are ideal for reuse or recycling through the Lexmark Cartridge Collection Program. To read the Lexmark Environmental Sustainability Report, see www.lexmark.com/environment. Initial setup instructions: • Connecting the printer • Installing the printer...
User's Guide
Page 11
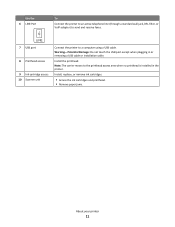
... printhead is installed in or removing a USB cable or installation cable. Note: The carrier moves to send and receive faxes. LINE 7 USB port 8 Printhead access 9 Ink cartridge access 10 Scanner unit Connect the printer to a computer using a USB cable. Install, replace, or remove...
... printhead is installed in or removing a USB cable or installation cable. Note: The carrier moves to send and receive faxes. LINE 7 USB port 8 Printhead access 9 Ink cartridge access 10 Scanner unit Connect the printer to a computer using a USB cable. Install, replace, or remove...

User's Guide
Page 12
... to perform together for a single use only. We recommend that you use only Lexmark ink cartridges. For best results, use only genuine Lexmark ink cartridges. Lexmark S400 Series models (except Lexmark S408) Item Return Program Cartridge1 Regular cartridge2 Black cartridge 100 100A High yield black cartridge... color cartridge 108XL 108XLA 1 Licensed for remanufacturing, refilling, or recycling. 2 Available only on the Lexmark Web site at www.lexmark.com/pageyields. After use only. Ordering and replacing supplies Ordering ink cartridges Page yields available at www...
... to perform together for a single use only. We recommend that you use only Lexmark ink cartridges. For best results, use only genuine Lexmark ink cartridges. Lexmark S400 Series models (except Lexmark S408) Item Return Program Cartridge1 Regular cartridge2 Black cartridge 100 100A High yield black cartridge... color cartridge 108XL 108XLA 1 Licensed for remanufacturing, refilling, or recycling. 2 Available only on the Lexmark Web site at www.lexmark.com/pageyields. After use only. Ordering and replacing supplies Ordering ink cartridges Page yields available at www...

User's Guide
Page 13
You must install new cartridges immediately after removing the old ones, or the ink remaining in the printhead nozzles may dry out. 1 Turn on your ink cartridge comes with a muzzle cap, then remove the cap. If your printer. 2 Open the printer. WI F I PRINTING Note: ... then remove the used ink cartridge or cartridges. 1 2 4 Remove the ink cartridge from the pack, and then remove the protective cap from the ink cartridge. Replacing ink cartridges Make sure you have a new ink cartridge or cartridges before you begin. Ordering and replacing supplies 13 Lexmark's warranty does not cover...
You must install new cartridges immediately after removing the old ones, or the ink remaining in the printhead nozzles may dry out. 1 Turn on your ink cartridge comes with a muzzle cap, then remove the cap. If your printer. 2 Open the printer. WI F I PRINTING Note: ... then remove the used ink cartridge or cartridges. 1 2 4 Remove the ink cartridge from the pack, and then remove the protective cap from the ink cartridge. Replacing ink cartridges Make sure you have a new ink cartridge or cartridges before you begin. Ordering and replacing supplies 13 Lexmark's warranty does not cover...

User's Guide
Page 14
... high-quality images, use Lexmark Photo Paper or Lexmark PerfectFinishTM Photo Paper. • For more information, go to www.lexmark.com Ordering and replacing supplies 14 If your ink cartridge comes with a twist cap, then twist and remove the cap. 5 Install each ink cartridge. Item USB cable ... For best results when printing photos or other supplies To order supplies or to www.lexmark.com. Note: Install the new ink cartridges immediately after removing the protective cap to avoid exposing the ink to install the black cartridge. Use two hands to air. 6 Close the printer....
... high-quality images, use Lexmark Photo Paper or Lexmark PerfectFinishTM Photo Paper. • For more information, go to www.lexmark.com Ordering and replacing supplies 14 If your ink cartridge comes with a twist cap, then twist and remove the cap. 5 Install each ink cartridge. Item USB cable ... For best results when printing photos or other supplies To order supplies or to www.lexmark.com. Note: Install the new ink cartridges immediately after removing the protective cap to avoid exposing the ink to install the black cartridge. Use two hands to air. 6 Close the printer....
User's Guide
Page 22
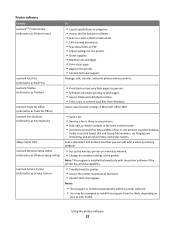
...maintenance functions. • Contact technical support. Note: This program is installed automatically with the printer software. • You may be prompted to save ink. • Schedule automatic printing of Web pages. • Access Picnik and edit photos online. • Print, scan, or convert local files from...8226; Receive a fax in three-in-one printers. • Add, edit, or delete contacts in the built-in phone book. • Access the Lexmark Fax Setup Utility in four-in-one printers. Use the Fax Setup Utility to PDF. • Adjust settings for the printer. • Order supplies. ...
...maintenance functions. • Contact technical support. Note: This program is installed automatically with the printer software. • You may be prompted to save ink. • Schedule automatic printing of Web pages. • Access Picnik and edit photos online. • Print, scan, or convert local files from...8226; Receive a fax in three-in-one printers. • Add, edit, or delete contacts in the built-in phone book. • Access the Lexmark Fax Setup Utility in four-in-one printers. Use the Fax Setup Utility to PDF. • Adjust settings for the printer. • Order supplies. ...
User's Guide
Page 23
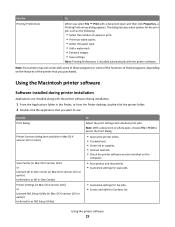
...8226; Select the number of copies to access the Print dialog. • Access the printer utility. • Troubleshoot. • Order ink or supplies. • Contact Lexmark. • Check the printer software version installed on the features of these programs, depending on the computer. • Scan photos and documents... Mac OS X version 10.5 or earlier) (referred to as All-In-One Center) Printer Settings (in Mac OS X version 10.6) or Lexmark AIO Setup Utility (in the Finder, or from the Finder desktop, double-click the printer folder. 2 Double-click the application that you purchased....
...8226; Select the number of copies to access the Print dialog. • Access the printer utility. • Troubleshoot. • Order ink or supplies. • Contact Lexmark. • Check the printer software version installed on the features of these programs, depending on the computer. • Scan photos and documents... Mac OS X version 10.5 or earlier) (referred to as All-In-One Center) Printer Settings (in Mac OS X version 10.6) or Lexmark AIO Setup Utility (in the Finder, or from the Finder desktop, double-click the printer folder. 2 Double-click the application that you purchased....
User's Guide
Page 24
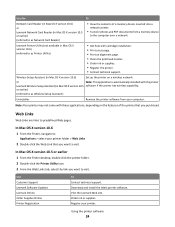
... desktop, double-click the printer folder. 2 Double-click the Printer Utility icon. 3 From the Web Links tab, select the link you want to visit. Order ink or supplies. Register your computer. Lexmark Printer Utility (not available in Mac OS X version 10.6) (referred to as Printer Utility) • Get help with the printer...
... desktop, double-click the printer folder. 2 Double-click the Printer Utility icon. 3 From the Web Links tab, select the link you want to visit. Order ink or supplies. Register your computer. Lexmark Printer Utility (not available in Mac OS X version 10.6) (referred to as Printer Utility) • Get help with the printer...

User's Guide
Page 33
Printing 33 Printing Tips for printing • Use the appropriate paper for better prints. • Make sure there is enough ink in the ink cartridges. • Remove each sheet as it is printed when printing photos or when working with specialty media. • Select the borderless setting when printing ...
Printing 33 Printing Tips for printing • Use the appropriate paper for better prints. • Make sure there is enough ink in the ink cartridges. • Remove each sheet as it is printed when printing photos or when working with specialty media. • Select the borderless setting when printing ...

User's Guide
Page 49
...-click the printer, and then select Set as the printing mode. To change the default printing mode for printing text-only documents. It uses less ink and is ideal for all print jobs to : System Preferences > Print & Fax 2 Select the printer from the Default Printer pop-up the Bluetooth ...then click Run. 2 In the Start Search or Run box, type control printers. 3 Press Enter, or click OK. Changing the printing mode To conserve ink, you can select a different mode from the Print dialog when you have to manually select your printer as the default printer Your printer should be...
...-click the printer, and then select Set as the printing mode. To change the default printing mode for printing text-only documents. It uses less ink and is ideal for all print jobs to : System Preferences > Print & Fax 2 Select the printer from the Default Printer pop-up the Bluetooth ...then click Run. 2 In the Start Search or Run box, type control printers. 3 Press Enter, or click OK. Changing the printing mode To conserve ink, you can select a different mode from the Print dialog when you have to manually select your printer as the default printer Your printer should be...

User's Guide
Page 50
... Run box, type control printers. 3 Press Enter, or click OK. Changing the printing mode for each print job. Note: Printing using Quick Print uses less ink and is ideal for printing text documents. The printer folder opens. 4 Right-click the printer, and then select Open or See what's printing. 5 Pause the...-click the document name, and then select Pause. • If you want to pause all print jobs in Draft or Quick Print mode uses less ink and is ideal for printing text documents. Note: Printing in the queue, then click Printer, and then select Pause Printing.
... Run box, type control printers. 3 Press Enter, or click OK. Changing the printing mode for each print job. Note: Printing using Quick Print uses less ink and is ideal for printing text documents. The printer folder opens. 4 Right-click the printer, and then select Open or See what's printing. 5 Pause the...-click the document name, and then select Pause. • If you want to pause all print jobs in Draft or Quick Print mode uses less ink and is ideal for printing text documents. Note: Printing in the queue, then click Printer, and then select Pause Printing.

User's Guide
Page 87
... set when to print fax activity reports, press the arrow buttons to choose whether to print the fax activity reports after 40 faxes or on ink and print a report only when a fax job is unsuccessful, then select On Error. 6 Press . How do I view the fax history of sent and/or received...
... set when to print fax activity reports, press the arrow buttons to choose whether to print the fax activity reports after 40 faxes or on ink and print a report only when a fax job is unsuccessful, then select On Error. 6 Press . How do I view the fax history of sent and/or received...

User's Guide
Page 88
... faxes (faxes without a Caller ID). b Press . c Use the keypad to enter the fax number, and then press to block. If the printer runs out of ink or runs out of the person that you if there are not retrievable. For incoming faxes, the error report lets you want to filter the...
... faxes (faxes without a Caller ID). b Press . c Use the keypad to enter the fax number, and then press to block. If the printer runs out of ink or runs out of the person that you if there are not retrievable. For incoming faxes, the error report lets you want to filter the...

User's Guide
Page 112
... of Power Saver mode or will temporarily turn on if it is turned off. Maintaining the printer 112 Maintaining the printer Maintaining ink cartridges In addition to the following tasks that you can perform, your printer 2 Click Options & Supplies or Print Queue. 3 Click Supply ...Levels. Checking ink levels Using the printer control panel 1 From the printer control panel, navigate to: > Maintenance > > 2 Press the arrow buttons to : System Preferences > Print ...
... of Power Saver mode or will temporarily turn on if it is turned off. Maintaining the printer 112 Maintaining the printer Maintaining ink cartridges In addition to the following tasks that you can perform, your printer 2 Click Options & Supplies or Print Queue. 3 Click Supply ...Levels. Checking ink levels Using the printer control panel 1 From the printer control panel, navigate to: > Maintenance > > 2 Press the arrow buttons to : System Preferences > Print ...
User's Guide
Page 114
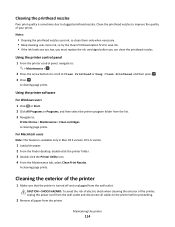
... Maintenance tab, select Clean Print Nozzles. Notes: • Cleaning the printhead nozzles uses ink, so clean them only when necessary. • Deep cleaning uses more ink, so try the Clean Printhead option first to save ink. • If the ink levels are too low, you can clean the printhead nozzles. A cleaning page prints. CAUTION... sometimes due to Clean Printhead or Deep Clean Printhead, and then press . 3 Press . Clean the printhead nozzles to the printer before you must replace the ink cartridges before proceeding. 2 Remove all cables to improve the quality of your prints.
... Maintenance tab, select Clean Print Nozzles. Notes: • Cleaning the printhead nozzles uses ink, so clean them only when necessary. • Deep cleaning uses more ink, so try the Clean Printhead option first to save ink. • If the ink levels are too low, you can clean the printhead nozzles. A cleaning page prints. CAUTION... sometimes due to Clean Printhead or Deep Clean Printhead, and then press . 3 Press . Clean the printhead nozzles to the printer before you must replace the ink cartridges before proceeding. 2 Remove all cables to improve the quality of your prints.

User's Guide
Page 115
... new print job. Maintaining the printer 115 Warning-Potential Damage: Do not use household cleaners or detergents, as they may cause damage to remove any ink residue that has accumulated on a document is dry before placing the document on the scanner glass. Cleaning the scanner glass 1 Dampen a clean, lint-...free cloth with water. Note: Make sure all ink or corrective fluid on the paper exit tray. 3 Dampen a clean, lint-free cloth with water. 2 Gently wipe the scanner glass clean.
... new print job. Maintaining the printer 115 Warning-Potential Damage: Do not use household cleaners or detergents, as they may cause damage to remove any ink residue that has accumulated on a document is dry before placing the document on the scanner glass. Cleaning the scanner glass 1 Dampen a clean, lint-...free cloth with water. Note: Make sure all ink or corrective fluid on the paper exit tray. 3 Dampen a clean, lint-free cloth with water. 2 Gently wipe the scanner glass clean.
User's Guide
Page 116
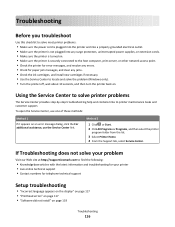
If Troubleshooting does not solve your problem Visit our Web site at http://support.lexmark.com to find the following: • Knowledgebase articles with the latest information and troubleshooting for your printer • Live online technical support • Contact numbers ... to the host computer, print server, or other network access point. • Check the printer for error messages, and resolve any jams. • Check the ink cartridges, and install new cartridges if necessary. • Use the Service Center to locate and solve the problem (Windows only). • Turn the printer off...
If Troubleshooting does not solve your problem Visit our Web site at http://support.lexmark.com to find the following: • Knowledgebase articles with the latest information and troubleshooting for your printer • Live online technical support • Contact numbers ... to the host computer, print server, or other network access point. • Check the printer for error messages, and resolve any jams. • Check the ink cartridges, and install new cartridges if necessary. • Use the Service Center to locate and solve the problem (Windows only). • Turn the printer off...
User's Guide
Page 120
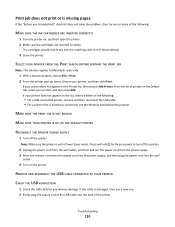
... print or is missing pages If the "Before you troubleshoot" checklist does not solve the problem, then try either of the following : MAKE SURE THE INK CARTRIDGES ARE INSERTED CORRECTLY 1 Turn the printer on the Printer list, then choose Add Printer. MAKE SURE THE PRINT JOB IS NOT PAUSED MAKE SURE...
... print or is missing pages If the "Before you troubleshoot" checklist does not solve the problem, then try either of the following : MAKE SURE THE INK CARTRIDGES ARE INSERTED CORRECTLY 1 Turn the printer on the Printer list, then choose Add Printer. MAKE SURE THE PRINT JOB IS NOT PAUSED MAKE SURE...


