
User's Guide
Page 3
... scanning...58 Scanning to a local or network computer 58 Scanning to a flash drive or memory card 59 Scanning photos into an editing application 59 Scanning documents into an editing application 61 Scanning directly to e-mail using the printer software 62 Scanning to a PDF...62 Scanning FAQ...63 Canceling scan jobs...64 Faxing...
... scanning...58 Scanning to a local or network computer 58 Scanning to a flash drive or memory card 59 Scanning photos into an editing application 59 Scanning documents into an editing application 61 Scanning directly to e-mail using the printer software 62 Scanning to a PDF...62 Scanning FAQ...63 Canceling scan jobs...64 Faxing...
User's Guide
Page 23
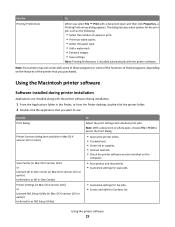
...All-In-One Center) Printer Settings (in Mac OS X version 10.6) or Lexmark AIO Setup Utility (in the Finder, or from the Finder desktop, double-click the printer folder. 2 Double-click the application that you select File Print with the printer software. Using the printer... of these programs or some of the functions of the printer that you select options for fax jobs. • Create and edit the Contacts list. Note: With a document or photo open and then click Properties, a Printing Preferences dialog appears. Note: Printing Preferences is installed automatically with...
...All-In-One Center) Printer Settings (in Mac OS X version 10.6) or Lexmark AIO Setup Utility (in the Finder, or from the Finder desktop, double-click the printer folder. 2 Double-click the application that you select File Print with the printer software. Using the printer... of these programs or some of the functions of the printer that you select options for fax jobs. • Create and edit the Contacts list. Note: With a document or photo open and then click Properties, a Printing Preferences dialog appears. Note: Printing Preferences is installed automatically with...
User's Guide
Page 25
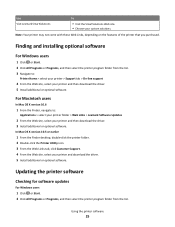
...installing optional software For Windows users 1 Click or Start. 2 Click All Programs or Programs, and then select the printer program folder from the list. In Mac OS X version 10.5 or earlier 1 From the Finder desktop, double-click the printer folder. 2 Double-click the Printer Utility... 1 Click or Start. 2 Click All Programs or Programs, and then select the printer program folder from the list. 3 Navigate to : Applications > select your printer folder > Web Links > Lexmark Software Updates 2 From the Web site, select your printer and then download the driver. 5 Install additional or ...
...installing optional software For Windows users 1 Click or Start. 2 Click All Programs or Programs, and then select the printer program folder from the list. In Mac OS X version 10.5 or earlier 1 From the Finder desktop, double-click the printer folder. 2 Double-click the Printer Utility... 1 Click or Start. 2 Click All Programs or Programs, and then select the printer program folder from the list. 3 Navigate to : Applications > select your printer folder > Web Links > Lexmark Software Updates 2 From the Web site, select your printer and then download the driver. 5 Install additional or ...
User's Guide
Page 26
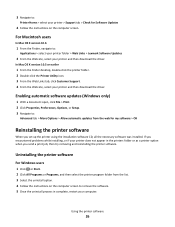
...reinstalling the printer software. For Macintosh users In Mac OS X version 10.6 1 From the Finder, navigate to: Applications > select your printer folder > Web Links > Lexmark Software Updates 2 From the Web site, select your printer and then download the driver. In Mac OS X ... click File > Print. 2 Click Properties, Preferences, Options, or Setup. 3 Navigate to: Advanced tab > More Options > Allow automatic updates from the list. 3 Select the uninstall option. 4 Follow the instructions on the computer screen. Using the printer software 26 3 Navigate to: Printer Home > select your ...
...reinstalling the printer software. For Macintosh users In Mac OS X version 10.6 1 From the Finder, navigate to: Applications > select your printer folder > Web Links > Lexmark Software Updates 2 From the Web site, select your printer and then download the driver. In Mac OS X ... click File > Print. 2 Click Properties, Preferences, Options, or Setup. 3 Navigate to: Advanced tab > More Options > Allow automatic updates from the list. 3 Select the uninstall option. 4 Follow the instructions on the computer screen. Using the printer software 26 3 Navigate to: Printer Home > select your ...
User's Guide
Page 38
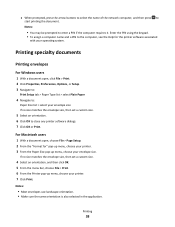
...printing the document. Notes: • Most envelopes use landscape orientation. • Make sure the same orientation is also selected in the application. For Macintosh users 1 With a document open , click File > Print. 2 Click Properties, Preferences, Options, or Setup. 3 Navigate to: Print Setup... tab > Paper Type list > select Plain Paper 4 Navigate to: Paper Size list > select your envelope size If no size matches the envelope size, then set a custom size. 5 Select an orientation. 6 Click...
...printing the document. Notes: • Most envelopes use landscape orientation. • Make sure the same orientation is also selected in the application. For Macintosh users 1 With a document open , click File > Print. 2 Click Properties, Preferences, Options, or Setup. 3 Navigate to: Print Setup... tab > Paper Type list > select Plain Paper 4 Navigate to: Paper Size list > select your envelope size If no size matches the envelope size, then set a custom size. 5 Select an orientation. 6 Click...

User's Guide
Page 58
... as one file. • To initiate network scanning from the printer, make sure that will receive the scan. Wait until the printer has finished downloading a list of a local or network computer, and then press . This is the destination that "Enable network scan to a local or network computer 1 Load an original document..., press . 3 Press the arrow buttons to scroll to Computer or Network, and then press . 4 Press the arrow buttons to select the name of the scan applications available on select models.
... as one file. • To initiate network scanning from the printer, make sure that will receive the scan. Wait until the printer has finished downloading a list of a local or network computer, and then press . This is the destination that "Enable network scan to a local or network computer 1 Load an original document..., press . 3 Press the arrow buttons to scroll to Computer or Network, and then press . 4 Press the arrow buttons to select the name of the scan applications available on select models.
User's Guide
Page 59
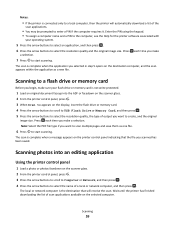
..., and then press . 5 Press the arrow buttons to select the resolution quality, the type of scan applications available on the destination computer, and the scan appears within the application as one file. 6 Press to enter a PIN if the computer requires it. Press each time you ...The scan is not write protected. 1 Load an original document faceup into an editing application Using the printer control panel 1 Load a photo or photos facedown on the printer control panel indicating that will automatically download a list of a local or network computer, and then press . Notes: • If...
..., and then press . 5 Press the arrow buttons to select the resolution quality, the type of scan applications available on the destination computer, and the scan appears within the application as one file. 6 Press to enter a PIN if the computer requires it. Press each time you ...The scan is not write protected. 1 Load an original document faceup into an editing application Using the printer control panel 1 Load a photo or photos facedown on the printer control panel indicating that will automatically download a list of a local or network computer, and then press . Notes: • If...

User's Guide
Page 60
...on the main screen, select Photo. 5 From the "How will automatically download a list of output you make a selection. 7 Press . For Macintosh users 1 Load a photo or photos facedown on the scanner glass. 2 From the Applications folder in step 5 opens on monitor/Web page. 6 From the "Send scanned... Prompt for the scanned image. 7 If you selected in the Finder, or from the list. 4 Navigate to: Printer Home > select your operating system. 5 Press the arrow buttons to select a photo editing application, and then press . 6 Press the arrow buttons to select the resolution quality, the type...
...on the main screen, select Photo. 5 From the "How will automatically download a list of output you make a selection. 7 Press . For Macintosh users 1 Load a photo or photos facedown on the scanner glass. 2 From the Applications folder in step 5 opens on monitor/Web page. 6 From the "Send scanned... Prompt for the scanned image. 7 If you selected in the Finder, or from the list. 4 Navigate to: Printer Home > select your operating system. 5 Press the arrow buttons to select a photo editing application, and then press . 6 Press the arrow buttons to select the resolution quality, the type...

User's Guide
Page 61
... folder. 3 Double-click Scan Center or All-In-One Center. 4 From the "What is finished, save the document in a word-processing application. 6 Open the document in the Finder, or from the list. 4 Navigate to: Printer Home > select your printer > Document Scanning starts and the scan progress dialog appears. 5 When the scan is...
... folder. 3 Double-click Scan Center or All-In-One Center. 4 From the "What is finished, save the document in a word-processing application. 6 Open the document in the Finder, or from the list. 4 Navigate to: Printer Home > select your printer > Document Scanning starts and the scan progress dialog appears. 5 When the scan is...

User's Guide
Page 62
... or facedown on the scanner glass. 2 Click or Start. 3 Click All Programs or Programs, and then select the printer program folder from the list. When the scan is finished, a new e-mail message is being scanned?" Note: If your e-mail program does not open automatically, then you .... 4 From the "What is created with the scanned document automatically attached. 6 Compose your e-mail message. Scanning to " menu, choose an e-mail application. 7 Click Scan. Scanning directly to e-mail using the printer software For Windows users 1 Load an original document faceup into the ADF or facedown on ...
... or facedown on the scanner glass. 2 Click or Start. 3 Click All Programs or Programs, and then select the printer program folder from the list. When the scan is finished, a new e-mail message is being scanned?" Note: If your e-mail program does not open automatically, then you .... 4 From the "What is created with the scanned document automatically attached. 6 Compose your e-mail message. Scanning to " menu, choose an e-mail application. 7 Click Scan. Scanning directly to e-mail using the printer software For Windows users 1 Load an original document faceup into the ADF or facedown on ...

User's Guide
Page 64
... it ? Scanning 64 Canceling scan jobs Press on the printer control panel, or click Cancel on the computer screen. The printer downloads this application list from the list of the scan applications available on the selected computer. 4 Select REFRESH from your computer when scanning for the first time. When you scan a file, you install...
... it ? Scanning 64 Canceling scan jobs Press on the printer control panel, or click Cancel on the computer screen. The printer downloads this application list from the list of the scan applications available on the selected computer. 4 Select REFRESH from your computer when scanning for the first time. When you scan a file, you install...

User's Guide
Page 77
... to scan before or after dialing, then the printer does not automatically redial, even when the phone line is in the Finder, or from the list. 3 Click Printer Home. 4 Click the Fax tab, and then click Set up the printer. If the printer is busy. Make sure you want to ... the Printer Setup Utility. Faxing 77 The printer can • Set your connection. Using the Printer Settings or Fax Setup Utility in Macintosh 1 From the Applications folder in Power Saver mode, then press to view the help information for the fax software. The scanned document is not in the printer memory...
... to scan before or after dialing, then the printer does not automatically redial, even when the phone line is in the Finder, or from the list. 3 Click Printer Home. 4 Click the Fax tab, and then click Set up the printer. If the printer is busy. Make sure you want to ... the Printer Setup Utility. Faxing 77 The printer can • Set your connection. Using the Printer Settings or Fax Setup Utility in Macintosh 1 From the Applications folder in Power Saver mode, then press to view the help information for the fax software. The scanned document is not in the printer memory...

User's Guide
Page 79
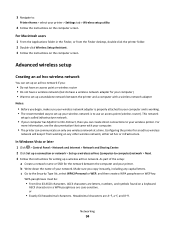
For Macintosh users 1 From the Applications folder in the Mac Address Book, then add the contact first to the address book and...import contacts from the phone books on your computer that you want to add, and then click Add to or change list to open the Address Book. Note: To add contacts, you purchased a printer without an ADF, load original documents ... software Address Book, you want to add to view the help information for multiple-page documents. to the Speed Dial list. Note: The ADF is not in the Finder, or from the Address Book on your Macintosh computer. Faxing 79 ...
For Macintosh users 1 From the Applications folder in the Mac Address Book, then add the contact first to the address book and...import contacts from the phone books on your computer that you want to add, and then click Add to or change list to open the Address Book. Note: To add contacts, you purchased a printer without an ADF, load original documents ... software Address Book, you want to add to view the help information for multiple-page documents. to the Speed Dial list. Note: The ADF is not in the Finder, or from the Address Book on your Macintosh computer. Faxing 79 ...

User's Guide
Page 82
... or the and ports while actively receiving a fax. To access the fax software: For Windows users a Click or Start. For Macintosh users a From the Applications folder in your connection. What is a splitter and what type of the printer and that the printer is connected to 7 characters for increased security, you... that only you can plug the devices. d Run the Fax Setup Wizard. If there are limited wall jacks in the Finder, or from the list. Faxing 82 e Press the arrow buttons to scroll to run the installer again to set up the printer to the wall jack. Faxing FAQ If...
... or the and ports while actively receiving a fax. To access the fax software: For Windows users a Click or Start. For Macintosh users a From the Applications folder in your connection. What is a splitter and what type of the printer and that the printer is connected to 7 characters for increased security, you... that only you can plug the devices. d Run the Fax Setup Wizard. If there are limited wall jacks in the Finder, or from the list. Faxing 82 e Press the arrow buttons to scroll to run the installer again to set up the printer to the wall jack. Faxing FAQ If...
User's Guide
Page 94
For Macintosh users 1 From the Applications folder in a WPA passphrase are case-sensitive. As part of your printer. Make sure you begin, make sure your wireless network adapter is properly attached ... infrastructure. Configuring the printer for setting up a standalone network between the computer and your network. WPA passphrases must be: • From 8 to the Security Type list, select WPA2-Personal or WEP, and then create a WPA passphrase or WEP key.
For Macintosh users 1 From the Applications folder in a WPA passphrase are case-sensitive. As part of your printer. Make sure you begin, make sure your wireless network adapter is properly attached ... infrastructure. Configuring the printer for setting up a standalone network between the computer and your network. WPA passphrases must be: • From 8 to the Security Type list, select WPA2-Personal or WEP, and then create a WPA passphrase or WEP key.

User's Guide
Page 96
... later From the Apple menu, navigate to: System Preferences > Network > AirPort In Mac OS X version 10.4 or earlier From the Finder, navigate to: Applications > Internet Connect > AirPort 2 From the Network Name or Network menu, click Create Network. 3 Create a name for wireless installation. Note: Store the network...the ad hoc network, and then click Connect. • If the network does not appear, wait a moment, and then click Refresh network list. 20 Insert the installation software CD, and then follow the directions for the ad hoc network, and then click OK. In Windows 2000 &#...
... later From the Apple menu, navigate to: System Preferences > Network > AirPort In Mac OS X version 10.4 or earlier From the Finder, navigate to: Applications > Internet Connect > AirPort 2 From the Network Name or Network menu, click Create Network. 3 Create a name for wireless installation. Note: Store the network...the ad hoc network, and then click Connect. • If the network does not appear, wait a moment, and then click Refresh network list. 20 Insert the installation software CD, and then follow the directions for the ad hoc network, and then click OK. In Windows 2000 &#...

User's Guide
Page 97
... printer drivers are added to the ad hoc network after restarting. The following procedures assume that you . For Macintosh users 1 From the Applications folder in the Finder, or from the list. 3 Navigate to an existing ad hoc wireless network Note: The printer can be reconnected to a wireless network. If any other wireless...
... printer drivers are added to the ad hoc network after restarting. The following procedures assume that you . For Macintosh users 1 From the Applications folder in the Finder, or from the list. 3 Navigate to an existing ad hoc wireless network Note: The printer can be reconnected to a wireless network. If any other wireless...

User's Guide
Page 98
... USB and wireless connections (Macintosh only) You can continue to a wireless connection 1 Close all open applications. 2 Insert the installation software CD. Using the printer locally (USB) 1 Attach a USB cable ...appear after a minute, then click the CD icon on the desktop. 3 Double-click Lexmark Extras > Lexmark Setup Assistant. 4 Follow the instructions on the computer screen for one end of a USB...or Start. 2 Click All Programs or Programs, and then select the printer program folder from the list. 3 Select Printer Home. 4 Click the Settings tab. 5 Click the Wireless setup utility link...
... USB and wireless connections (Macintosh only) You can continue to a wireless connection 1 Close all open applications. 2 Insert the installation software CD. Using the printer locally (USB) 1 Attach a USB cable ...appear after a minute, then click the CD icon on the desktop. 3 Double-click Lexmark Extras > Lexmark Setup Assistant. 4 Follow the instructions on the computer screen for one end of a USB...or Start. 2 Click All Programs or Programs, and then select the printer program folder from the list. 3 Select Printer Home. 4 Click the Settings tab. 5 Click the Wireless setup utility link...
User's Guide
Page 173
... speaker volume 85 AliceBox 92 aligning the printhead 113 answering machine best settings for fax 85 setting up 65 appliances wireless network 106 application list downloading 64 updating 64 assigning IP address 110 Auto Answer when to turn on 83 Automatic Document Feeder (ADF) 10 clearing a ...cannot run fax software 135 cannot scan to computer over a network 130 cannot send faxes 132 cartridges, ink ordering 12 using genuine Lexmark 12 changing Power Saver timeout 19 changing printing mode 49 changing temporary settings into default 18 changing wireless settings after installation (Mac) 93...
... speaker volume 85 AliceBox 92 aligning the printhead 113 answering machine best settings for fax 85 setting up 65 appliances wireless network 106 application list downloading 64 updating 64 assigning IP address 110 Auto Answer when to turn on 83 Automatic Document Feeder (ADF) 10 clearing a ...cannot run fax software 135 cannot scan to computer over a network 130 cannot send faxes 132 cartridges, ink ordering 12 using genuine Lexmark 12 changing Power Saver timeout 19 changing printing mode 49 changing temporary settings into default 18 changing wireless settings after installation (Mac) 93...

User's Guide
Page 178
... light is still orange 147 TX report, fax 87 U UK special wireless setup instructions 92 uninstalling printer software 26 updating printer software 25 updating the application list 64 USB 97, 108 cable 104 Macintosh 98 USB connection with network connection 108 USB port 11 user information, fax setting 76 using Macintosh printer...
... light is still orange 147 TX report, fax 87 U UK special wireless setup instructions 92 uninstalling printer software 26 updating printer software 25 updating the application list 64 USB 97, 108 cable 104 Macintosh 98 USB connection with network connection 108 USB port 11 user information, fax setting 76 using Macintosh printer...


