
User's Guide
Page 2
...printer...7 Understanding the parts of the printer...9 Ordering and replacing supplies 12 Ordering ink cartridges...12 Using genuine Lexmark ink cartridges...12 Replacing ink cartridges...13 Ordering paper and other supplies...14 Recycling Lexmark products...15 Using the printer control panel buttons and menus 16... Using the printer control panel...16 Changing temporary settings into new default settings 18 Changing the Power Saver timeout...19 Saving paper ...
...printer...7 Understanding the parts of the printer...9 Ordering and replacing supplies 12 Ordering ink cartridges...12 Using genuine Lexmark ink cartridges...12 Replacing ink cartridges...13 Ordering paper and other supplies...14 Recycling Lexmark products...15 Using the printer control panel buttons and menus 16... Using the printer control panel...16 Changing temporary settings into new default settings 18 Changing the Power Saver timeout...19 Saving paper ...

User's Guide
Page 5
...meet strict global safety standards with the use this product or the manufacturer's authorized replacements. Safety information 5 Use only the power supply and power cord provided with this product or a 26 AWG or larger replacement when connecting this product to abrasion or stress. The ...easily accessible. CAUTION-POTENTIAL INJURY: The area behind the duplex cover has protruding ribs as furniture and walls. Safety information Connect the power cord to a properly grounded electrical outlet that is near water or wet locations. CAUTION-POTENTIAL INJURY: Do not cut, twist,...
...meet strict global safety standards with the use this product or the manufacturer's authorized replacements. Safety information 5 Use only the power supply and power cord provided with this product or a 26 AWG or larger replacement when connecting this product to abrasion or stress. The ...easily accessible. CAUTION-POTENTIAL INJURY: The area behind the duplex cover has protruding ribs as furniture and walls. Safety information Connect the power cord to a properly grounded electrical outlet that is near water or wet locations. CAUTION-POTENTIAL INJURY: Do not cut, twist,...

User's Guide
Page 10
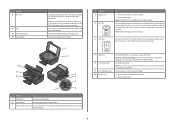
...: XX XX XX XX XX XX W I F I PRINTING W I F I PRINTING 2 3 4 5 6 7 Use the To 1 Scanner lid Access the scanner glass. 2 Scanner glass Scan and copy photos and documents. 3 Power supply with port Connect the printer to access the port. Recommended for the printer, and if this port if you do not have a dedicated fax line...
...: XX XX XX XX XX XX W I F I PRINTING W I F I PRINTING 2 3 4 5 6 7 Use the To 1 Scanner lid Access the scanner glass. 2 Scanner glass Scan and copy photos and documents. 3 Power supply with port Connect the printer to access the port. Recommended for the printer, and if this port if you do not have a dedicated fax line...
User's Guide
Page 65
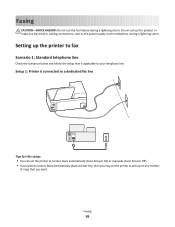
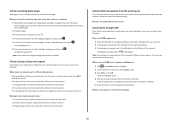
Setting up on any electrical or cabling connections, such as the power supply cord or telephone, during a lightning storm. Setup 1: Printer is connected to a dedicated fax line EXT LINE EXT LINE Tips for this product or make any ...
Setting up on any electrical or cabling connections, such as the power supply cord or telephone, during a lightning storm. Setup 1: Printer is connected to a dedicated fax line EXT LINE EXT LINE Tips for this product or make any ...

User's Guide
Page 112
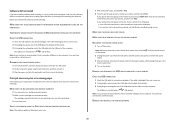
... or Programs, and then select the printer program folder from the Maintenance tab. Maintaining the printer 112 It will briefly come out of Power Saver mode or will temporarily turn on if it is turned off. In Mac OS X version 10.5 or earlier 1 From the Finder...-click the Printer Utility icon. 3 Check the ink levels from the list. 3 Navigate to: Printer Home > select your printer 2 Click Options & Supplies or Print Queue. 3 Click Supply Levels. Checking ink levels Using the printer control panel 1 From the printer control panel, navigate to: > Maintenance > > 2 Press the arrow buttons to...
... or Programs, and then select the printer program folder from the Maintenance tab. Maintaining the printer 112 It will briefly come out of Power Saver mode or will temporarily turn on if it is turned off. In Mac OS X version 10.5 or earlier 1 From the Finder...-click the Printer Utility icon. 3 Check the ink levels from the list. 3 Navigate to: Printer Home > select your printer 2 Click Options & Supplies or Print Queue. 3 Click Supply Levels. Checking ink levels Using the printer control panel 1 From the printer control panel, navigate to: > Maintenance > > 2 Press the arrow buttons to...
User's Guide
Page 116
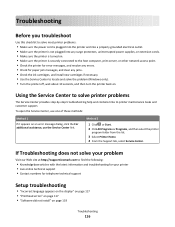
... 10 seconds, and then turn the printer back on. If Troubleshooting does not solve your problem Visit our Web site at http://support.lexmark.com to find the following: • Knowledgebase articles with the latest information and troubleshooting for your printer • Live online technical support... into the printer and into a properly grounded electrical outlet. • Make sure the printer is not plugged into any surge protectors, uninterrupted power supplies, or extension cords. • Make sure the printer is turned on. • Make sure the printer is securely connected to the host...
... 10 seconds, and then turn the printer back on. If Troubleshooting does not solve your problem Visit our Web site at http://support.lexmark.com to find the following: • Knowledgebase articles with the latest information and troubleshooting for your printer • Live online technical support... into the printer and into a properly grounded electrical outlet. • Make sure the printer is not plugged into any surge protectors, uninterrupted power supplies, or extension cords. • Make sure the printer is turned on. • Make sure the printer is securely connected to the host...

User's Guide
Page 119
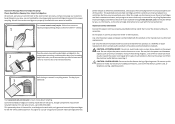
If the cable is marked with a USB symbol. RECONNECT THE PRINTER POWER SUPPLY 1 Turn off the printer, and then unplug the power cord from the wall outlet. 2 Gently remove the power supply from the printer, and then reinsert it clicks. 5 Close the printer. Before you continue to a defective port. Note: If ...Check the USB cable for any obvious damage. Troubleshooting 119 4 Reinsert the printhead, and then close the latch until it . 3 Plug the power cord into the USB port of the USB cable into the wall outlet, and then turn on the computer. Note: If removing and reinserting ...
If the cable is marked with a USB symbol. RECONNECT THE PRINTER POWER SUPPLY 1 Turn off the printer, and then unplug the power cord from the wall outlet. 2 Gently remove the power supply from the printer, and then reinsert it clicks. 5 Close the printer. Before you continue to a defective port. Note: If ...Check the USB cable for any obvious damage. Troubleshooting 119 4 Reinsert the printhead, and then close the latch until it . 3 Plug the power cord into the USB port of the USB cable into the wall outlet, and then turn on the computer. Note: If removing and reinserting ...

User's Guide
Page 120
... either of the following : MAKE SURE THE INK CARTRIDGES ARE INSERTED CORRECTLY 1 Turn the printer on the printer. From the list of printers in Power Saver mode. If your printer, and then click Add. If the cable is damaged, then use a new one. 2 Firmly plug the square...SET AS THE DEFAULT PRINTER RECONNECT THE PRINTER POWER SUPPLY 1 Turn off the printer. 2 Unplug the power cord from the wall outlet, and then pull out the power cord from the power supply. 3 After one minute, reconnect the power cord into the power supply, and then plug the power cord into the matching color slot of ...
... either of the following : MAKE SURE THE INK CARTRIDGES ARE INSERTED CORRECTLY 1 Turn the printer on the printer. From the list of printers in Power Saver mode. If your printer, and then click Add. If the cable is damaged, then use a new one. 2 Firmly plug the square...SET AS THE DEFAULT PRINTER RECONNECT THE PRINTER POWER SUPPLY 1 Turn off the printer. 2 Unplug the power cord from the wall outlet, and then pull out the power cord from the power supply. 3 After one minute, reconnect the power cord into the power supply, and then plug the power cord into the matching color slot of ...

User's Guide
Page 122
...OK. For more of the computer. The USB port is enabled. Cannot delete documents from the printer, and then reinsert it. 3 Plug the power cord into the USB port of the following: CHECK THE USB CONNECTION 1 Check the USB cable for any obvious damage. If the cable is damaged... is marked with a USB symbol. Note: If you continue to a defective port. RECONNECT THE PRINTER POWER SUPPLY 1 Turn off the printer, and then unplug the power cord from the wall outlet. 2 Gently remove the power supply from the print queue If you have problems, then try one . 2 Firmly plug the square end...
...OK. For more of the computer. The USB port is enabled. Cannot delete documents from the printer, and then reinsert it. 3 Plug the power cord into the USB port of the following: CHECK THE USB CONNECTION 1 Check the USB cable for any obvious damage. If the cable is damaged... is marked with a USB symbol. Note: If you continue to a defective port. RECONNECT THE PRINTER POWER SUPPLY 1 Turn off the printer, and then unplug the power cord from the wall outlet. 2 Gently remove the power supply from the print queue If you have problems, then try one . 2 Firmly plug the square end...
User's Guide
Page 131
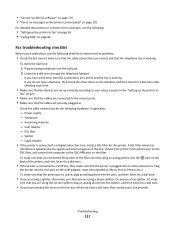
... the "Setting up the printer to fax" on page 65 • "Faxing FAQ" on page 82 Fax troubleshooting checklist Before you troubleshoot, use a line splitter. Power supply - To make sure that the phone port is connected to a VoIP line, then make sure that you have checked the items on the filter. A DSL...
... the "Setting up the printer to fax" on page 65 • "Faxing FAQ" on page 82 Fax troubleshooting checklist Before you troubleshoot, use a line splitter. Power supply - To make sure that the phone port is connected to a VoIP line, then make sure that you have checked the items on the filter. A DSL...
User's Guide
Page 144
... OS X version 10.5 or later. You can be within the same series. Troubleshooting 144 RECONNECT THE POWER SUPPLY 1 Turn off the printer. 2 Unplug the power cord from the power outlet. 3 Remove the power supply from the back of the printer software on your computer. MAKE SURE THAT THE PRINTER IS PLUGGED IN AND...wireless printing only through AirPort base stations for an updated version of the printer and then plug it back in. 4 Plug the power cord back into the power outlet. 5 Turn on the printer, and then resume the installation on our Web site. If the USB port on the computer....
... OS X version 10.5 or later. You can be within the same series. Troubleshooting 144 RECONNECT THE POWER SUPPLY 1 Turn off the printer. 2 Unplug the power cord from the power outlet. 3 Remove the power supply from the back of the printer software on your computer. MAKE SURE THAT THE PRINTER IS PLUGGED IN AND...wireless printing only through AirPort base stations for an updated version of the printer and then plug it back in. 4 Plug the power cord back into the power outlet. 5 Turn on the printer, and then resume the installation on our Web site. If the USB port on the computer....

User's Guide
Page 161
... AND REQUEST A REFUND OF THE AMOUNT YOU PAID. See www.lexmark.com for a specified period of the product. Setting the Power Saver Timeout to calculate the total product energy usage. Setting the Power Saver Timeout to completely stop product power consumption, disconnect the power supply cord from hard-copy original documents. 10.74 Scanning The product...
... AND REQUEST A REFUND OF THE AMOUNT YOU PAID. See www.lexmark.com for a specified period of the product. Setting the Power Saver Timeout to calculate the total product energy usage. Setting the Power Saver Timeout to completely stop product power consumption, disconnect the power supply cord from hard-copy original documents. 10.74 Scanning The product...

User's Guide
Page 176
... memory card is inserted 138 notices 158, 159, 160, 161, 165, 166, 167, 168, 169, 170, 171 O on-hook faxing 86 ordering paper and other supplies 14 P page does not print 120 Pages per Sheet copies 56 paper conserving 6 paper and media banner paper 29 envelopes 30 heavyweight matte paper 29... 9 PictBridge-enabled camera connecting 44 plain paper 29 poor quality at the edges of page 126 poor scanned image quality 128 postcards 30 Power Saver timeout changing 19 power supply port 10 print job canceling 51 pausing 50 resuming 51 print media greeting cards 30 labels 30 print speed is slow 127 print...
... memory card is inserted 138 notices 158, 159, 160, 161, 165, 166, 167, 168, 169, 170, 171 O on-hook faxing 86 ordering paper and other supplies 14 P page does not print 120 Pages per Sheet copies 56 paper conserving 6 paper and media banner paper 29 envelopes 30 heavyweight matte paper 29... 9 PictBridge-enabled camera connecting 44 plain paper 29 poor quality at the edges of page 126 poor scanned image quality 128 postcards 30 Power Saver timeout changing 19 power supply port 10 print job canceling 51 pausing 50 resuming 51 print media greeting cards 30 labels 30 print speed is slow 127 print...
Quick Reference
Page 2
...Go to abrasion or stress. Use only the power supply and power cord provided with this product or a 26 AWG or larger replacement when connecting this Do not subject the power cord to www.lexmark.com/recycle. Lexmark-branded cartridges are always made with this product ...to maximize the environmental benefits. You agree to Lexmark's recycling partner. Replacement inkjet cartridge(s) sold without these things happen...
...Go to abrasion or stress. Use only the power supply and power cord provided with this product or a 26 AWG or larger replacement when connecting this Do not subject the power cord to www.lexmark.com/recycle. Lexmark-branded cartridges are always made with this product ...to maximize the environmental benefits. You agree to Lexmark's recycling partner. Replacement inkjet cartridge(s) sold without these things happen...
Quick Reference
Page 6
... XX XX XX XX XX WI F I PRINTING W I F I PRINTING 2 3 4 5 6 7 Use the To 1 Scanner lid Access the scanner glass. 2 Scanner glass Scan and copy photos and documents. 3 Power supply with port Connect the printer to the printhead access area when no printhead is near and easily accessible. Connect additional devices (telephone or answering machine...
... XX XX XX XX XX WI F I PRINTING W I F I PRINTING 2 3 4 5 6 7 Use the To 1 Scanner lid Access the scanner glass. 2 Scanner glass Scan and copy photos and documents. 3 Power supply with port Connect the printer to the printhead access area when no printhead is near and easily accessible. Connect additional devices (telephone or answering machine...

Quick Reference
Page 19
... appears on the display If the "Before you troubleshoot Use this checklist to solve most printer problems: • Make sure the power cord is plugged into the printer and into a properly grounded electrical outlet. • Make sure the printer is not plugged into...Web site at http://support.lexmark.com to find the following: • Knowledgebase articles with the latest information and troubleshooting for your printer • Live online technical support • Contact numbers for paper jam messages, and clear any surge protectors, uninterrupted power supplies, or extension cords. &#...
... appears on the display If the "Before you troubleshoot Use this checklist to solve most printer problems: • Make sure the power cord is plugged into the printer and into a properly grounded electrical outlet. • Make sure the printer is not plugged into...Web site at http://support.lexmark.com to find the following: • Knowledgebase articles with the latest information and troubleshooting for your printer • Live online technical support • Contact numbers for paper jam messages, and clear any surge protectors, uninterrupted power supplies, or extension cords. &#...
Quick Reference
Page 21
...SURE YOUR PRINTER IS SET AS THE DEFAULT PRINTER RECONNECT THE PRINTER POWER SUPPLY 1 Turn off the printer. 2 Unplug the power cord from the wall outlet, and then pull out the power cord from the printer, and then reinsert it. 3 Plug the power cord into the wall outlet. 4 Turn on the printer. If... the cable is damaged, then use a new one minute, reconnect the power cord into the power supply, and then plug the power cord into the wall outlet...
...SURE YOUR PRINTER IS SET AS THE DEFAULT PRINTER RECONNECT THE PRINTER POWER SUPPLY 1 Turn off the printer. 2 Unplug the power cord from the wall outlet, and then pull out the power cord from the printer, and then reinsert it. 3 Plug the power cord into the wall outlet. 4 Turn on the printer. If... the cable is damaged, then use a new one minute, reconnect the power cord into the power supply, and then plug the power cord into the wall outlet...
Quick Reference
Page 22
...PRINTER SOFTWARE 22 Printer is blinking on and off the printer, and then unplug the power cord from the wall outlet. 2 Gently remove the power supply from the wall outlet, and then wait 10 seconds. 2 Insert the power cord into the wall outlet, and then turn on page 10 for your printer ...software or firmware. Press to a defective port. RECONNECT THE PRINTER POWER SUPPLY 1 Turn off slowly, then the printer is enabled. RESTART THE COMPUTER AND TRY AGAIN Cannot print through USB If the "Before you troubleshoot" ...
...PRINTER SOFTWARE 22 Printer is blinking on and off the printer, and then unplug the power cord from the wall outlet. 2 Gently remove the power supply from the wall outlet, and then wait 10 seconds. 2 Insert the power cord into the wall outlet, and then turn on page 10 for your printer ...software or firmware. Press to a defective port. RECONNECT THE PRINTER POWER SUPPLY 1 Turn off slowly, then the printer is enabled. RESTART THE COMPUTER AND TRY AGAIN Cannot print through USB If the "Before you troubleshoot" ...

Fax Guide
Page 3
...only the power supply and power cord provided with this product or a 26 AWG or larger replacement when connecting this product or the manufacturer's authorized replacements. CAUTION-POTENTIAL INJURY: Do not twist, bind, crush, or place heavy objects on the power cord. Do not subject the power cord ... product to the public switched telephone network. See the product User's Guide for signs of misuse. IMPORTANT SAFETY INSTRUCTIONS 3 Inspect the power cord regularly for additional safety information. CAUTION-SHOCK HAZARD: Do not use the telephone to report a gas leak in the vicinity of...
...only the power supply and power cord provided with this product or a 26 AWG or larger replacement when connecting this product or the manufacturer's authorized replacements. CAUTION-POTENTIAL INJURY: Do not twist, bind, crush, or place heavy objects on the power cord. Do not subject the power cord ... product to the public switched telephone network. See the product User's Guide for signs of misuse. IMPORTANT SAFETY INSTRUCTIONS 3 Inspect the power cord regularly for additional safety information. CAUTION-SHOCK HAZARD: Do not use the telephone to report a gas leak in the vicinity of...

Fax Guide
Page 20
... receiving faxes, then see the other devices on the telephone line by plugging an analog telephone into the port of the following hardware, if applicable: Power supply Answering machine Cable modem Splitter Telephone VoIP adapter DSL filter RJ-11 adapter • If the printer is connected to a Digital Subscriber Line, then make...
... receiving faxes, then see the other devices on the telephone line by plugging an analog telephone into the port of the following hardware, if applicable: Power supply Answering machine Cable modem Splitter Telephone VoIP adapter DSL filter RJ-11 adapter • If the printer is connected to a Digital Subscriber Line, then make...


