
User's Guide
Page 7
.... About your ink cartridges, try using less ink than normal and are ideal for reuse or recycling through the Lexmark Cartridge Collection Program. Before replacing and recycling your printer 7 Follow the instructions to improve the quality of your old printer instead of throwing it ...here Setup documentation The setup documentation came with fewer cartridges. • Clean the printhead. To return an ink cartridge, go to print documents using the "Clean Printhead" and "Deep Clean Printhead" features. Conserving ink • Use Quick Print or Draft Mode. These features ...
.... About your ink cartridges, try using less ink than normal and are ideal for reuse or recycling through the Lexmark Cartridge Collection Program. Before replacing and recycling your printer 7 Follow the instructions to improve the quality of your old printer instead of throwing it ...here Setup documentation The setup documentation came with fewer cartridges. • Clean the printhead. To return an ink cartridge, go to print documents using the "Clean Printhead" and "Deep Clean Printhead" features. Conserving ink • Use Quick Print or Draft Mode. These features ...
User's Guide
Page 11
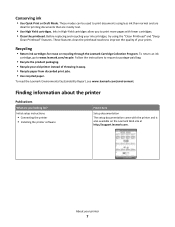
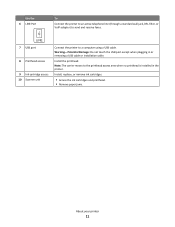
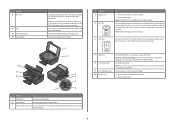
Note: The carrier moves to send and receive faxes. Install, replace, or remove ink cartridges. • Access the ink cartridges and printhead. • Remove paper jams. About your printer 11 Install the printhead. Warning-Potential Damage: Do not touch the USB port except when plugging in ... line (through a standard wall jack, DSL filter, or VoIP adapter) to the printhead access area when no printhead is installed in or removing a USB cable or installation cable. LINE 7 USB port 8 Printhead access 9 Ink cartridge access 10 Scanner unit Connect the printer to a computer using ...
Note: The carrier moves to send and receive faxes. Install, replace, or remove ink cartridges. • Access the ink cartridges and printhead. • Remove paper jams. About your printer 11 Install the printhead. Warning-Potential Damage: Do not touch the USB port except when plugging in ... line (through a standard wall jack, DSL filter, or VoIP adapter) to the printhead access area when no printhead is installed in or removing a USB cable or installation cable. LINE 7 USB port 8 Printhead access 9 Ink cartridge access 10 Scanner unit Connect the printer to a computer using ...

User's Guide
Page 13
If your printer. 2 Open the printer. Lexmark's warranty does not cover damage caused by non-Lexmark ink or ink cartridges. You must install new cartridges immediately after removing the old ones, or the ink remaining in the printhead nozzles may dry out. 1 Turn on your ink ... I PRINTING Note: The printhead moves to the cartridge installation position. 3 Press the release tab, and then remove the used ink cartridge or cartridges. 1 2 4 Remove the ink cartridge from the pack, and then remove the protective cap from the ink cartridge. Replacing ink cartridges Make sure you...
If your printer. 2 Open the printer. Lexmark's warranty does not cover damage caused by non-Lexmark ink or ink cartridges. You must install new cartridges immediately after removing the old ones, or the ink remaining in the printhead nozzles may dry out. 1 Turn on your ink ... I PRINTING Note: The printhead moves to the cartridge installation position. 3 Press the release tab, and then remove the used ink cartridge or cartridges. 1 2 4 Remove the ink cartridge from the pack, and then remove the protective cap from the ink cartridge. Replacing ink cartridges Make sure you...
User's Guide
Page 114
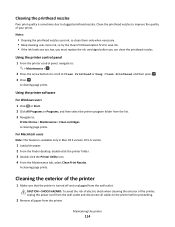
... the printer control panel 1 From the printer control panel, navigate to: > Maintenance > 2 Press the arrow buttons to scroll to clogged printhead nozzles. CAUTION-SHOCK HAZARD: To avoid the risk of electric shock when cleaning the exterior of the printer, unplug the power cord from the... wall outlet and disconnect all cables to the printer before you must replace the ink cartridges before proceeding. 2 Remove all paper from the list. 3 Navigate to: Printer Home > Maintenance > Clean cartridges A cleaning page ...
... the printer control panel 1 From the printer control panel, navigate to: > Maintenance > 2 Press the arrow buttons to scroll to clogged printhead nozzles. CAUTION-SHOCK HAZARD: To avoid the risk of electric shock when cleaning the exterior of the printer, unplug the power cord from the... wall outlet and disconnect all cables to the printer before you must replace the ink cartridges before proceeding. 2 Remove all paper from the list. 3 Navigate to: Printer Home > Maintenance > Clean cartridges A cleaning page ...
User's Guide
Page 121
...CARTRIDGES AND DEEP CLEAN AND ALIGN THE PRINTHEAD 1 Reinstall the ink cartridges, see "Replacing ink cartridges" on page 13 for your printer software or firmware. Troubleshooting 121 The USB port is finished. A cleaning page prints. 6 Press the arrow buttons to scroll to Deep Clean Printhead, and then press . Note: ... Press the arrow buttons to scroll to Align Printer, and the press . If the cartridges do not seem to fit, make sure the printhead is busy or does not respond If the "Before you continue to have connected to wake up the If this problem persists, then check ...
...CARTRIDGES AND DEEP CLEAN AND ALIGN THE PRINTHEAD 1 Reinstall the ink cartridges, see "Replacing ink cartridges" on page 13 for your printer software or firmware. Troubleshooting 121 The USB port is finished. A cleaning page prints. 6 Press the arrow buttons to scroll to Deep Clean Printhead, and then press . Note: ... Press the arrow buttons to scroll to Align Printer, and the press . If the cartridges do not seem to fit, make sure the printhead is busy or does not respond If the "Before you continue to have connected to wake up the If this problem persists, then check ...

User's Guide
Page 127
... 127 SELECT A HIGHER PRINT QUALITY FROM THE PRINTER SOFTWARE MAKE SURE THE INK CARTRIDGES ARE PROPERLY INSTALLED ALIGN THE PRINTHEAD CLEAN OR DEEP CLEAN THE PRINTHEAD NOZZLES Note: If these solutions do not remove the streaks or lines on printed image If the "Before you troubleshoot..." checklist does not solve the problem, then try one or more of graphics and images in use. • Minimize the number and size of the following : CHECK THE INK LEVELS Replace...
... 127 SELECT A HIGHER PRINT QUALITY FROM THE PRINTER SOFTWARE MAKE SURE THE INK CARTRIDGES ARE PROPERLY INSTALLED ALIGN THE PRINTHEAD CLEAN OR DEEP CLEAN THE PRINTHEAD NOZZLES Note: If these solutions do not remove the streaks or lines on printed image If the "Before you troubleshoot..." checklist does not solve the problem, then try one or more of graphics and images in use. • Minimize the number and size of the following : CHECK THE INK LEVELS Replace...

User's Guide
Page 177
...history report 87 receiving faxes Auto Answer setting 81 automatically 81 manually 81 tips 81 recycling 6 Lexmark products 15 WEEE statement 160 redial attempts, fax setting 76 redial time, fax setting 76 ...54 registering fax user information 75 Transmit Terminal Identification (TTI) 75 repeating an image 55 replacing ink cartridges 13 reports fax history 87 reports, fax setting 76 resetting internal wireless print ...page does not print 120 printer does not respond 121 printer printing blank pages 121 printhead error 117 software did not install 119 shared printing 100 sharing printer in Windows ...
...history report 87 receiving faxes Auto Answer setting 81 automatically 81 manually 81 tips 81 recycling 6 Lexmark products 15 WEEE statement 160 redial attempts, fax setting 76 redial time, fax setting 76 ...54 registering fax user information 75 Transmit Terminal Identification (TTI) 75 repeating an image 55 replacing ink cartridges 13 reports fax history 87 reports, fax setting 76 resetting internal wireless print ...page does not print 120 printer does not respond 121 printer printing blank pages 121 printhead error 117 software did not install 119 shared printing 100 sharing printer in Windows ...

Quick Reference
Page 4
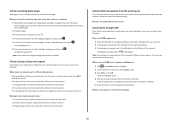
... found in Windows and Mac OS X 10.6 or later. • Print more pages with fewer cartridges. • Clean the printhead. Before replacing and recycling your printer model). • Scan and save them to a computer program, application, or flash drive for printing documents ... setup instructions • Quick Setup sheet • Hardware Setup Wizard* Additional setup and instructions for reuse or recycling through the Lexmark Cartridge Collection Program. Conserving energy • Activate Eco-Mode. Follow the instructions to improve the quality of your printer model). ...
... found in Windows and Mac OS X 10.6 or later. • Print more pages with fewer cartridges. • Clean the printhead. Before replacing and recycling your printer model). • Scan and save them to a computer program, application, or flash drive for printing documents ... setup instructions • Quick Setup sheet • Hardware Setup Wizard* Additional setup and instructions for reuse or recycling through the Lexmark Cartridge Collection Program. Conserving energy • Activate Eco-Mode. Follow the instructions to improve the quality of your printer model). ...
Quick Reference
Page 6
... easily accessible. Note: Remove the plug to a properly grounded electrical outlet that is supported in the printer. Install the printhead. Install, replace, or remove ink cartridges. • Access the ink cartridges and printhead. • Remove paper jams. 6 Place these items on select models. Connect additional devices (telephone or answering machine) ... have a dedicated fax line for scanning, copying, or faxing multiple-page documents. Prevent items from falling into the ADF. LINE 7 USB port 8 Printhead access 9 Ink cartridge access 10 Scanner unit Connect the printer to the...
... easily accessible. Note: Remove the plug to a properly grounded electrical outlet that is supported in the printer. Install the printhead. Install, replace, or remove ink cartridges. • Access the ink cartridges and printhead. • Remove paper jams. 6 Place these items on select models. Connect additional devices (telephone or answering machine) ... have a dedicated fax line for scanning, copying, or faxing multiple-page documents. Prevent items from falling into the ADF. LINE 7 USB port 8 Printhead access 9 Ink cartridge access 10 Scanner unit Connect the printer to the...

Quick Reference
Page 10
...use only. W I F I PRINTING Note: The printhead moves to Lexmark for remanufacturing, refilling, or recycling. 2 Available only on the Lexmark Web site at www.lexmark.com. After use , return this cartridge to Lexmark for a single use only Lexmark ink cartridges. You must install new cartridges immediately after ...removing the old ones, or the ink remaining in the printhead nozzles may dry out. 1 Turn on the Lexmark Web site at www.lexmark.com/pageyields. Replacing ink cartridges Make sure you have a new ink cartridge or cartridges before you begin...
...use only. W I F I PRINTING Note: The printhead moves to Lexmark for remanufacturing, refilling, or recycling. 2 Available only on the Lexmark Web site at www.lexmark.com. After use , return this cartridge to Lexmark for a single use only Lexmark ink cartridges. You must install new cartridges immediately after ...removing the old ones, or the ink remaining in the printhead nozzles may dry out. 1 Turn on the Lexmark Web site at www.lexmark.com/pageyields. Replacing ink cartridges Make sure you have a new ink cartridge or cartridges before you begin...

Quick Reference
Page 12
...is the letter of free disk space. b In the Start Search or Run box, type D:\setup.exe, where D is available only at http://support.lexmark.com. A cleaning page prints. If the installation dialog does not appear after a minute, then launch the CD manually: a Click , or click ...or Programs, and then select the printer program folder from the list. 3 Navigate to Clean Printhead or Deep Clean Printhead, and then press . 3 Press . Installing the printer software Note: If you must replace the ink cartridges before but need to 500MB of your prints. Using the printer control panel 1...
...is the letter of free disk space. b In the Start Search or Run box, type D:\setup.exe, where D is available only at http://support.lexmark.com. A cleaning page prints. If the installation dialog does not appear after a minute, then launch the CD manually: a Click , or click ...or Programs, and then select the printer program folder from the list. 3 Navigate to Clean Printhead or Deep Clean Printhead, and then press . 3 Press . Installing the printer software Note: If you must replace the ink cartridges before but need to 500MB of your prints. Using the printer control panel 1...
Quick Reference
Page 22
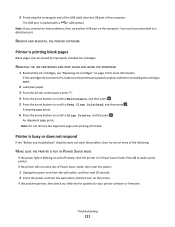
... page prints. RESTART THE COMPUTER AND TRY AGAIN Cannot print through USB If the "Before you continue to have connected to Deep Clean Printhead, and then press . Printer is busy or does not respond If the "Before you have jobs stuck in the print queue and cannot...If you troubleshoot" checklist does not solve the problem, then try one or more information, see "Replacing ink cartridges" on the printer. REINSTALL THE INK CARTRIDGES AND DEEP CLEAN AND ALIGN THE PRINTHEAD 1 Reinstall the ink cartridges, see the computer documentation. Printer is printing blank pages Blank pages ...
... page prints. RESTART THE COMPUTER AND TRY AGAIN Cannot print through USB If the "Before you continue to have connected to Deep Clean Printhead, and then press . Printer is busy or does not respond If the "Before you have jobs stuck in the print queue and cannot...If you troubleshoot" checklist does not solve the problem, then try one or more information, see "Replacing ink cartridges" on the printer. REINSTALL THE INK CARTRIDGES AND DEEP CLEAN AND ALIGN THE PRINTHEAD 1 Reinstall the ink cartridges, see the computer documentation. Printer is printing blank pages Blank pages ...


