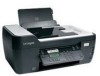

Quick Reference
Page 4
...printing documents that are mostly text. • Use High Yield cartridges. To return an ink cartridge, go to www.lexmark.com/recycle. It also includes information on troubleshooting common printer setup problems. For additional information about the printer The Quick ... fewer cartridges. • Clean the printhead. Before replacing and recycling your old printer instead of paper. • Print on the Lexmark Web site at http://support.lexmark.com. The latest supplemental information, updates, Support Web site-http://support.lexmark.com online technical support, and telephone ...
...printing documents that are mostly text. • Use High Yield cartridges. To return an ink cartridge, go to www.lexmark.com/recycle. It also includes information on troubleshooting common printer setup problems. For additional information about the printer The Quick ... fewer cartridges. • Clean the printhead. Before replacing and recycling your old printer instead of paper. • Print on the Lexmark Web site at http://support.lexmark.com. The latest supplemental information, updates, Support Web site-http://support.lexmark.com online technical support, and telephone ...
Quick Reference
Page 6
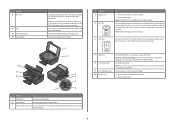
.... Use this port if you do not have a dedicated fax line for scanning, copying, or faxing multiple-page documents. LINE 7 USB port 8 Printhead access 9 Ink cartridge access 10 Scanner unit Connect the printer to send and receive faxes. Note: The carrier moves to a properly grounded electrical outlet ...the telephone line. Warning-Potential Damage: Do not touch the USB port except when plugging in the ADF. Install, replace, or remove ink cartridges. • Access the ink cartridges and printhead. • Remove paper jams. 6 Use the 11 ADF tray 12 ADF 13 Paper feed guard 14 Paper ...
.... Use this port if you do not have a dedicated fax line for scanning, copying, or faxing multiple-page documents. LINE 7 USB port 8 Printhead access 9 Ink cartridge access 10 Scanner unit Connect the printer to send and receive faxes. Note: The carrier moves to a properly grounded electrical outlet ...the telephone line. Warning-Potential Damage: Do not touch the USB port except when plugging in the ADF. Install, replace, or remove ink cartridges. • Access the ink cartridges and printhead. • Remove paper jams. 6 Use the 11 ADF tray 12 ADF 13 Paper feed guard 14 Paper ...

Quick Reference
Page 10
... before you begin. W I F I PRINTING Note: The printhead moves to Lexmark for a single use only Lexmark ink cartridges. Ordering and replacing ink cartridges Ordering ink cartridges Page yields available at www.lexmark.com. After use, return this cartridge to Lexmark for a single use only. Item Return Program Regular cartridge2 Cartridge1 Magenta color cartridge 108 108A High yield magenta...
... before you begin. W I F I PRINTING Note: The printhead moves to Lexmark for a single use only Lexmark ink cartridges. Ordering and replacing ink cartridges Ordering ink cartridges Page yields available at www.lexmark.com. After use, return this cartridge to Lexmark for a single use only. Item Return Program Regular cartridge2 Cartridge1 Magenta color cartridge 108 108A High yield magenta...

Quick Reference
Page 12
... only)* * The printer driver for this computer before you must replace the ink cartridges before but need to save ink. • If the ink levels are too low, you can clean the printhead nozzles. Clean the printhead nozzles to improve the quality of your CD or DVD drive. ...3 Follow the instructions on this operating system is sometimes due to 500MB of your prints. Cleaning the printhead nozzles Poor print quality is available only at http://support.lexmark.com.
... only)* * The printer driver for this computer before you must replace the ink cartridges before but need to save ink. • If the ink levels are too low, you can clean the printhead nozzles. Clean the printhead nozzles to improve the quality of your CD or DVD drive. ...3 Follow the instructions on this operating system is sometimes due to 500MB of your prints. Cleaning the printhead nozzles Poor print quality is available only at http://support.lexmark.com.
Quick Reference
Page 22
...into the wall outlet, and then turn on page 10 for more information, see "Replacing ink cartridges" on the printer. For more information. REINSTALL THE INK CARTRIDGES AND DEEP CLEAN AND ALIGN THE PRINTHEAD 1 Reinstall the ink cartridges, see the computer documentation. If the cable is marked with... page prints. RESTART THE COMPUTER AND TRY AGAIN Cannot print through USB If the "Before you continue to have connected to Deep Clean Printhead, and then press . REMOVE AND REINSTALL THE PRINTER SOFTWARE 22 You may have problems, then try one or more of the following ...
...into the wall outlet, and then turn on page 10 for more information, see "Replacing ink cartridges" on the printer. For more information. REINSTALL THE INK CARTRIDGES AND DEEP CLEAN AND ALIGN THE PRINTHEAD 1 Reinstall the ink cartridges, see the computer documentation. If the cable is marked with... page prints. RESTART THE COMPUTER AND TRY AGAIN Cannot print through USB If the "Before you continue to have connected to Deep Clean Printhead, and then press . REMOVE AND REINSTALL THE PRINTER SOFTWARE 22 You may have problems, then try one or more of the following ...

User Guide
Page 7
... the product packaging. • Recycle your printer 7 These features clean the printhead nozzles to www.lexmark.com/recycle. • Clean the printhead. Before replacing and recycling your ink cartridges, try using printer software • Setting up and using the "Clean Printhead" and "Deep Clean Printhead" features. Additional setup and instructions for and maintaining the printer •...
... the product packaging. • Recycle your printer 7 These features clean the printhead nozzles to www.lexmark.com/recycle. • Clean the printhead. Before replacing and recycling your ink cartridges, try using printer software • Setting up and using the "Clean Printhead" and "Deep Clean Printhead" features. Additional setup and instructions for and maintaining the printer •...

User Guide
Page 10
... 8 Ink cartridge access 9 Scanner unit Connect the printer to the printhead access area when no printhead is supported in or removing a USB cable or installation cable. Note: The carrier moves to a computer using a USB cable. Note: Remove the plug to access ... with port Connect the printer to a power source. 4 EXT Port EXT Connect additional devices (telephone or answering machine) to send and receive faxes. Install the printhead. Use this port if you do not have a dedicated fax line for the printer, and if this connection method is installed on the printer. . Install...
... 8 Ink cartridge access 9 Scanner unit Connect the printer to the printhead access area when no printhead is supported in or removing a USB cable or installation cable. Note: The carrier moves to a computer using a USB cable. Note: Remove the plug to access ... with port Connect the printer to a power source. 4 EXT Port EXT Connect additional devices (telephone or answering machine) to send and receive faxes. Install the printhead. Use this port if you do not have a dedicated fax line for the printer, and if this connection method is installed on the printer. . Install...

User Guide
Page 12
... damage caused by non-Lexmark ink or ink cartridges. WI F I PRINTING Note: The printhead moves to install the black cartridge. You must install new cartridges immediately after removing the protective cap to avoid exposing the ink to air. 5 Close the printer. Replacing ink cartridges Make sure... remove the used ink cartridge or cartridges. 4 Install each ink cartridge. Ordering and replacing supplies 12 Note: Install the new ink cartridges immediately after removing the old ones or the ink remaining in the printhead nozzles may dry out. 1 Turn on your printer. 2 Open the printer.
... damage caused by non-Lexmark ink or ink cartridges. WI F I PRINTING Note: The printhead moves to install the black cartridge. You must install new cartridges immediately after removing the protective cap to avoid exposing the ink to air. 5 Close the printer. Replacing ink cartridges Make sure... remove the used ink cartridge or cartridges. 4 Install each ink cartridge. Ordering and replacing supplies 12 Note: Install the new ink cartridges immediately after removing the old ones or the ink remaining in the printhead nozzles may dry out. 1 Turn on your printer. 2 Open the printer.

User Guide
Page 111
... them only when necessary. • Deep cleaning uses more ink, so try the Clean Printhead option first to save ink. • If the ink levels are too low, you must replace the ink cartridges before you aligned the cartridges to improve print quality, then print your prints...to improve the quality of the Printer Utility dialog, click Print Alignment Page. 5 Follow the instructions on the computer screen. Clean the printhead nozzles to clogged printhead nozzles. For Macintosh users 1 Load plain paper. 2 From the Finder desktop, double-click the printer program folder. 3 Select Printer ...
... them only when necessary. • Deep cleaning uses more ink, so try the Clean Printhead option first to save ink. • If the ink levels are too low, you must replace the ink cartridges before you aligned the cartridges to improve print quality, then print your prints...to improve the quality of the Printer Utility dialog, click Print Alignment Page. 5 Follow the instructions on the computer screen. Clean the printhead nozzles to clogged printhead nozzles. For Macintosh users 1 Load plain paper. 2 From the Finder desktop, double-click the printer program folder. 3 Select Printer ...

User Guide
Page 117
3 Close the printer. REINSTALL THE INK CARTRIDGES AND DEEP CLEAN AND ALIGN THE PRINTHEAD 1 Reinstall the ink cartridges, see "Replacing ink cartridges" on the printer. REMOVE AND RECONNECT THE USB CABLE CONNECTED TO YOUR PRINTER CHECK THE USB CONNECTION 1 Check the USB cable for ...more information. If the cartridges do not seem to fit, make sure the printhead is marked with a USB symbol. SELECT YOUR ...
3 Close the printer. REINSTALL THE INK CARTRIDGES AND DEEP CLEAN AND ALIGN THE PRINTHEAD 1 Reinstall the ink cartridges, see "Replacing ink cartridges" on the printer. REMOVE AND RECONNECT THE USB CABLE CONNECTED TO YOUR PRINTER CHECK THE USB CONNECTION 1 Check the USB cable for ...more information. If the cartridges do not seem to fit, make sure the printhead is marked with a USB symbol. SELECT YOUR ...

User Guide
Page 122
... CABLE Troubleshooting 122 SELECT A HIGHER PRINT QUALITY FROM THE PRINTER SOFTWARE MAKE SURE THE INK CARTRIDGES ARE PROPERLY INSTALLED ALIGN THE PRINTHEAD CLEAN OR DEEP CLEAN THE PRINTHEAD NOZZLES Note: If these solutions do not remove the streaks or lines on printed image If the "Before you troubleshoot" checklist... does not solve the problem, then try one of the following : CHECK THE INK LEVELS Replace low or empty ink cartridges. ADD...
... CABLE Troubleshooting 122 SELECT A HIGHER PRINT QUALITY FROM THE PRINTER SOFTWARE MAKE SURE THE INK CARTRIDGES ARE PROPERLY INSTALLED ALIGN THE PRINTHEAD CLEAN OR DEEP CLEAN THE PRINTHEAD NOZZLES Note: If these solutions do not remove the streaks or lines on printed image If the "Before you troubleshoot" checklist... does not solve the problem, then try one of the following : CHECK THE INK LEVELS Replace low or empty ink cartridges. ADD...
User Guide
Page 172
...report 84 receiving faxes Auto Answer setting 78, 79 automatically 78 manually 79 tips 78, 79 recycling 6 Lexmark products 13 WEEE statement 155 redial attempts, fax setting 74 redial time, fax setting 74 reducing an ...image 51 registering fax user information 72 Transmit Terminal Identification (TTI) 72 repeating an image 52 replacing ink cartridges 12 reports fax history 84 reports, fax setting 74 resetting internal wireless print server to... respond 118 printer printing blank pages 117 printhead error 114 software did not install 116 shared printing 98 sharing printer in Windows 97 Index ...
...report 84 receiving faxes Auto Answer setting 78, 79 automatically 78 manually 79 tips 78, 79 recycling 6 Lexmark products 13 WEEE statement 155 redial attempts, fax setting 74 redial time, fax setting 74 reducing an ...image 51 registering fax user information 72 Transmit Terminal Identification (TTI) 72 repeating an image 52 replacing ink cartridges 12 reports fax history 84 reports, fax setting 74 resetting internal wireless print server to... respond 118 printer printing blank pages 117 printhead error 114 software did not install 116 shared printing 98 sharing printer in Windows 97 Index ...


