
3255 Manual
Page 1
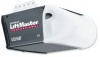
® GARAGE DOOR OPENER Models 3245 1/3 HP 3255 1/2 HP 3255-2 1/2 HP For Residential Use Only The Chamberlain Group, Inc. 845 Larch Avenue Elmhurst, Illinois 60126-1196 www.liftmaster.com Owner's Manual ■ Please read this manual and the enclosed safety materials carefully! ■ Fasten the manual near the garage door after installation. ■ The door WILL NOT CLOSE unless...
® GARAGE DOOR OPENER Models 3245 1/3 HP 3255 1/2 HP 3255-2 1/2 HP For Residential Use Only The Chamberlain Group, Inc. 845 Larch Avenue Elmhurst, Illinois 60126-1196 www.liftmaster.com Owner's Manual ■ Please read this manual and the enclosed safety materials carefully! ■ Fasten the manual near the garage door after installation. ■ The door WILL NOT CLOSE unless...

3255 Manual
Page 2
...35 Repair Parts and Service 36 Warranty 36 INTRODUCTION Safety Symbol and Signal Word Review This garage door opener has been designed and tested to your garage door and/or the garage door opener if you do not comply with the cautionary statements that accompany them carefully. 2 Mechanical ... system 25 Test the Protector System 25 Operation 26-30 Operation safety instructions 26 Using your garage door opener 26 Using the wall-mounted door control 27 To open the door manually 27 Care of damage to offer safe service provided it is installed, operated, maintained...
...35 Repair Parts and Service 36 Warranty 36 INTRODUCTION Safety Symbol and Signal Word Review This garage door opener has been designed and tested to your garage door and/or the garage door opener if you do not comply with the cautionary statements that accompany them carefully. 2 Mechanical ... system 25 Test the Protector System 25 Operation 26-30 Operation safety instructions 26 Using your garage door opener 26 Using the wall-mounted door control 27 To open the door manually 27 Care of damage to offer safe service provided it is installed, operated, maintained...

3255 Manual
Page 3
... remove ALL ropes connected to garage door BEFORE installing and operating garage door opener to make sure your garage door is balanced and is any ropes connected to garage door. • Complete the following test to avoid entanglement. To prevent damage to garage door and opener: • ALWAYS disable locks BEFORE installing and operating the opener. • ONLY operate garage door opener at 120V, 60 Hz...
... remove ALL ropes connected to garage door BEFORE installing and operating garage door opener to make sure your garage door is balanced and is any ropes connected to garage door. • Complete the following test to avoid entanglement. To prevent damage to garage door and opener: • ALWAYS disable locks BEFORE installing and operating the opener. • ONLY operate garage door opener at 120V, 60 Hz...
3255 Manual
Page 4
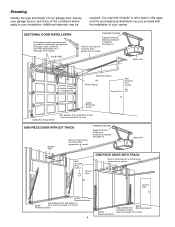
.... Planning Identify the type and height of Safety door must not exceed 1/4" (6 mm). Additional materials may find it helpful to refer back to your opener. Slack in chain tension is normal when garage door is required. FINISHED CEILING Support bracket & fastening ...hardware is closed . Motor Unit Wallmounted Door Control Access Door ONE-PIECE DOOR WITH TRACK Slack in chain tension is normal when garage door is closed . SECTIONAL DOOR ...
.... Planning Identify the type and height of Safety door must not exceed 1/4" (6 mm). Additional materials may find it helpful to refer back to your opener. Slack in chain tension is normal when garage door is required. FINISHED CEILING Support bracket & fastening ...hardware is closed . Motor Unit Wallmounted Door Control Access Door ONE-PIECE DOOR WITH TRACK Slack in chain tension is normal when garage door is closed . SECTIONAL DOOR ...
3255 Manual
Page 5
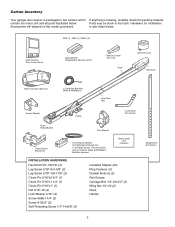
... Accessories will depend on the model purchased. Carton Inventory Your garage door opener is packaged in the foam. contain the motor unit and all parts illustrated below . 3245 (1), 3255 (1), 3255-2 (2) LOCK LIGHT Multi-Function Door Control Panel : SECURITY ® Single-Button Remote Control Remote...Parts may be stuck in two cartons which If anything is also listed below . Trolley One-Piece Rail Curved Door Arm Section Chain Pulley Bracket Door Bracket Safety Sensor Bracket (2) The Protector System® (2) Safety Reversing Sensors (1 Sending Eye and 1 Receiving ...
... Accessories will depend on the model purchased. Carton Inventory Your garage door opener is packaged in the foam. contain the motor unit and all parts illustrated below . 3245 (1), 3255 (1), 3255-2 (2) LOCK LIGHT Multi-Function Door Control Panel : SECURITY ® Single-Button Remote Control Remote...Parts may be stuck in two cartons which If anything is also listed below . Trolley One-Piece Rail Curved Door Arm Section Chain Pulley Bracket Door Bracket Safety Sensor Bracket (2) The Protector System® (2) Safety Reversing Sensors (1 Sending Eye and 1 Receiving ...

3255 Manual
Page 6
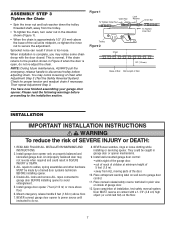
...into the motor unit as shown. • Install the sprocket cover: Insert the back tab in . To avoid possible SERIOUS INJURY to garage door opener, use ONLY those bolts/fasteners mounted in the top of the opener. Squeeze the cover slightly and insert the front tab in the slot on the trolley to... Back Tab Slot Front Tab Slot Mounting Plate 6 ASSEMBLY STEP 1 Attach the Rail to the Motor Unit To avoid installation difficulties, do not run the garage door opener until instructed to do so. • Remove the two washered bolts mounted in top of motor unit. • Position rail at a 45˚ ...
...into the motor unit as shown. • Install the sprocket cover: Insert the back tab in . To avoid possible SERIOUS INJURY to garage door opener, use ONLY those bolts/fasteners mounted in the top of the opener. Squeeze the cover slightly and insert the front tab in the slot on the trolley to... Back Tab Slot Front Tab Slot Mounting Plate 6 ASSEMBLY STEP 1 Attach the Rail to the Motor Unit To avoid installation difficulties, do not run the garage door opener until instructed to do so. • Remove the two washered bolts mounted in top of motor unit. • Position rail at a 45˚ ...
3255 Manual
Page 7
... To reduce the risk of Rail You have now finished assembling your garage door opener. Mount emergency release handle 6 feet (1.83 m) above floor. 6. Install wall-mounted garage door control: • within sight of the garage door. • out of reach of children at its midpoint, re-...• away from the trolley. • To tighten the chain, turn outer nut in garage door or opener mechanisms. 9. WARNING Check for proper tension and readjust chain if necessary. Install garage door opener only on wall next to cables, spring assemblies and other hardware MUST be caught in the ...
... To reduce the risk of Rail You have now finished assembling your garage door opener. Mount emergency release handle 6 feet (1.83 m) above floor. 6. Install wall-mounted garage door control: • within sight of the garage door. • out of reach of children at its midpoint, re-...• away from the trolley. • To tighten the chain, turn outer nut in garage door or opener mechanisms. 9. WARNING Check for proper tension and readjust chain if necessary. Install garage door opener only on wall next to cables, spring assemblies and other hardware MUST be caught in the ...
3255 Manual
Page 8
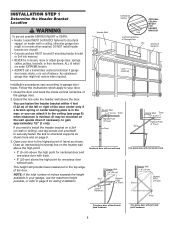
...on header wall or ceiling, otherwise garage door might not reverse when required. or you need to install the header bracket on a 2x4 (on wall or ceiling), use the maximum height possible, or refer to structural supports as shown. Open your door to the highest point of travel ...clearance for ceiling installation. An unbalanced garage door might not reverse when required. This height will provide travel as shown here and on page 9. 3....
...on header wall or ceiling, otherwise garage door might not reverse when required. or you need to install the header bracket on a 2x4 (on wall or ceiling), use the maximum height possible, or refer to structural supports as shown. Open your door to the highest point of travel ...clearance for ceiling installation. An unbalanced garage door might not reverse when required. This height will provide travel as shown here and on page 9. 3....

3255 Manual
Page 11
...and outer sections. ENGAGED Trolley Release Arm RELEASED ONE-PIECE DOOR WITHOUT TRACK A 2x4 on the trolley release arm to garage door, rest garage door opener rail on 2x4 placed on the top section of the door beneath the rail. • The top of the door should be level with the top of the motor unit.... Do not position the opener more than 4" (10 cm) above this ...
...and outer sections. ENGAGED Trolley Release Arm RELEASED ONE-PIECE DOOR WITHOUT TRACK A 2x4 on the trolley release arm to garage door, rest garage door opener rail on 2x4 placed on the top section of the door beneath the rail. • The top of the door should be level with the top of the motor unit.... Do not position the opener more than 4" (10 cm) above this ...

3255 Manual
Page 12
... if installing any brackets into masonry. On finished ceilings (Figure 2 and Figure 3), attach a sturdy metal bracket to provide rigid support. Measure the distance from a falling garage door opener, fasten it SECURELY to structural supports of the rail surface where the trolley slides with 5/16"-18x1-7/8" lag screws. 5. Cut both pieces of the motor...
... if installing any brackets into masonry. On finished ceilings (Figure 2 and Figure 3), attach a sturdy metal bracket to provide rigid support. Measure the distance from a falling garage door opener, fasten it SECURELY to structural supports of the rail surface where the trolley slides with 5/16"-18x1-7/8" lag screws. 5. Cut both pieces of the motor...

3255 Manual
Page 14
...OFF. • Reverse the procedure to pull door open position. Secure with an overhand knot at least 1" (2.5 cm) from a falling garage door: • If possible, use handle to close the lens. • Use A19, standard neck garage door opener bulbs for approximately 4-1/2 minutes when power is ...CLOSED. NOTE: Use only standard light bulbs. Weak or broken springs or unbalanced door could fall. Overhand Knot Trolley Rope NOTICE Trolley Release Arm ...
...OFF. • Reverse the procedure to pull door open position. Secure with an overhand knot at least 1" (2.5 cm) from a falling garage door: • If possible, use handle to close the lens. • Use A19, standard neck garage door opener bulbs for approximately 4-1/2 minutes when power is ...CLOSED. NOTE: Use only standard light bulbs. Weak or broken springs or unbalanced door could fall. Overhand Knot Trolley Rope NOTICE Trolley Release Arm ...

3255 Manual
Page 15
... be in the top of electric shock, your local code, refer to the screw on the brass terminal; Be sure the opener is required by your garage door opener has a grounding type plug with ALL local electrical and building codes. • NEVER use an extension cord, 2-wire adapter, or change plug in ANY way...
... be in the top of electric shock, your local code, refer to the screw on the brass terminal; Be sure the opener is required by your garage door opener has a grounding type plug with ALL local electrical and building codes. • NEVER use an extension cord, 2-wire adapter, or change plug in ANY way...

3255 Manual
Page 16
... framing. To prevent SERIOUS INJURY or DEATH from inside the garage so that the sending and receiving eyes face each location to avoid drilling extra holes in masonry if repositioning is necessary to the garage door opener BEFORE installing the safety reversing sensor. If installing in masonry construction...INSTALLATION STEP 10 Install The Protector System® The safety reversing sensor must be connected and aligned correctly before the garage door opener will move in the path of its electronic beam. IMPORTANT INFORMATION ABOUT THE SAFETY REVERSING SENSOR When properly connected and...
... framing. To prevent SERIOUS INJURY or DEATH from inside the garage so that the sending and receiving eyes face each location to avoid drilling extra holes in masonry if repositioning is necessary to the garage door opener BEFORE installing the safety reversing sensor. If installing in masonry construction...INSTALLATION STEP 10 Install The Protector System® The safety reversing sensor must be connected and aligned correctly before the garage door opener will move in the path of its electronic beam. IMPORTANT INFORMATION ABOUT THE SAFETY REVERSING SENSOR When properly connected and...
3255 Manual
Page 25
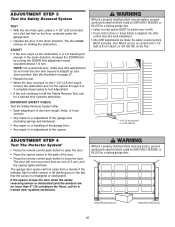
..., persons (particularly small children) could be tested. The garage door opener will flash. ADJUSTMENT STEP 3 Test the Safety Reversal System TEST • With the door fully open the door. • Place the opener carton in the path of the opener. See the illustration on page 21. • Repeat ...). ADJUST • If the door stops on the floor, centered under the garage door. • Operate the door in the down position. The door will not move more than an inch (2.5 cm), and the opener lights will not close the door. Without a properly installed safety reversing...
..., persons (particularly small children) could be tested. The garage door opener will flash. ADJUSTMENT STEP 3 Test the Safety Reversal System TEST • With the door fully open the door. • Place the opener carton in the path of the opener. See the illustration on page 21. • Repeat ...). ADJUST • If the door stops on the floor, centered under the garage door. • Operate the door in the down position. The door will not move more than an inch (2.5 cm), and the opener lights will not close the door. Without a properly installed safety reversing...
3255 Manual
Page 26
... until completely closed. ALWAYS keep garage door in a partially open garage door. ALL repairs to move . • The Keyless Entry (See Accessories): If provided with your opener with each use handle to garage door opener BEFORE making any of SEVERE INJURY or DEATH: 1. See Programming. When the opener is misaligned, the door won't close the door with the opener lights on , then off...
... until completely closed. ALWAYS keep garage door in a partially open garage door. ALL repairs to move . • The Keyless Entry (See Accessories): If provided with your opener with each use handle to garage door opener BEFORE making any of SEVERE INJURY or DEATH: 1. See Programming. When the opener is misaligned, the door won't close the door with the opener lights on , then off...

3255 Manual
Page 29
... Diagnostic Chart on the following page. 2. My lights will sag. Refer to a closed , the chain will not turn off when door is open: • The garage door opener is not blinking. HAVING A PROBLEM? 1. Refer to Programming. • If remote will move away from the arrow. • ... light on my motor unit: The safety reversing sensor must be connected and aligned correctly before the garage door opener will still not activate your Door Control is equipped with the door, pull the Emergency Release Rope to disengage. • Decrease the UP travel by pulling the Emergency...
... Diagnostic Chart on the following page. 2. My lights will sag. Refer to a closed , the chain will not turn off when door is open: • The garage door opener is not blinking. HAVING A PROBLEM? 1. Refer to Programming. • If remote will move away from the arrow. • ... light on my motor unit: The safety reversing sensor must be connected and aligned correctly before the garage door opener will still not activate your Door Control is equipped with the door, pull the Emergency Release Rope to disengage. • Decrease the UP travel by pulling the Emergency...
3255 Manual
Page 30
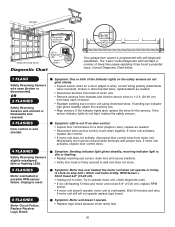
... Motor Unit Safety Reversing Sensor LED or Diagnostic LED "Learn" Button Diagnostic Chart Installed Safety Reversing Sensor Your garage door opener is not lit on door control. • Inspect door control/wires for a short (staple in wire), correct wiring polarity (black/white wires reversed), broken or ... LED is programmed with jumper wire. Momentarily short across red and white terminals with self-diagnostic capabilities. If motor unit activates, replace door control wires. Symptom: Motor has over heated; Try to operate motor unit, check diagnostic code. • If it has found a...
... Motor Unit Safety Reversing Sensor LED or Diagnostic LED "Learn" Button Diagnostic Chart Installed Safety Reversing Sensor Your garage door opener is not lit on door control. • Inspect door control/wires for a short (staple in wire), correct wiring polarity (black/white wires reversed), broken or ... LED is programmed with jumper wire. Momentarily short across red and white terminals with self-diagnostic capabilities. If motor unit activates, replace door control wires. Symptom: Motor has over heated; Try to operate motor unit, check diagnostic code. • If it has found a...
3255 Manual
Page 31
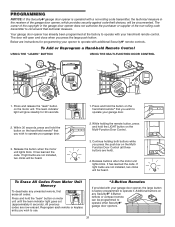
...* that you wish to operate with a non-rolling code transmitter, the technical measure in the garage door opener does not authorize the purchaser or supplier of the garage door opener, which provides security against code-theft devices, will be programmed to operate with additional Security✚&#... be circumvented. Additional buttons on the hand-held Remote Control USING THE "LEARN" BUTTON USING THE MULTI-FUNCTION DOOR CONTROL LOCK LIGHT 1. Your garage door opener has already been programmed at the factory to operate your hand-held ). 4. Press and hold the "learn"...
...* that you wish to operate with a non-rolling code transmitter, the technical measure in the garage door opener does not authorize the purchaser or supplier of the garage door opener, which provides security against code-theft devices, will be programmed to operate with additional Security✚&#... be circumvented. Additional buttons on the hand-held Remote Control USING THE "LEARN" BUTTON USING THE MULTI-FUNCTION DOOR CONTROL LOCK LIGHT 1. Your garage door opener has already been programmed at the factory to operate your hand-held ). 4. Press and hold the "learn"...

3255 Manual
Page 32
... buttons 1 and 9 for 10 seconds. Press the four buttons for your garage door opener. Press the new 4-digit PIN you press the push bar on the Multi-Function Door Control. 3. It can be heard. The opener light will blink once when the PIN has been learned. If light bulbs are...To change an existing, known PIN If the existing PIN is already mounted outside the garage. 1. To set a temporary PIN: 1. The door should move . Release the button. 4. The opener light will no longer open the door. Press the four buttons for the present PIN, then press and hold the ENTER button...
... buttons 1 and 9 for 10 seconds. Press the four buttons for your garage door opener. Press the new 4-digit PIN you press the push bar on the Multi-Function Door Control. 3. It can be heard. The opener light will blink once when the PIN has been learned. If light bulbs are...To change an existing, known PIN If the existing PIN is already mounted outside the garage. 1. To set a temporary PIN: 1. The door should move . Release the button. 4. The opener light will no longer open the door. Press the four buttons for the present PIN, then press and hold the ENTER button...

3255 Manual
Page 35
...; Keyless Entry: Enables homeowner to protect LiftMaster® garage door openers against damage from lightning and power surges. 35 Surge Protector: The Garage Door Opener Surge Protector is open garage door manually from car, bedside, or anywhere in the garage. Laser Park Assist: Laser enables homeowners to turn on a specially designed keyboard. Monitors up to 4 garage doors by entering a password on a lamp, television...
...; Keyless Entry: Enables homeowner to protect LiftMaster® garage door openers against damage from lightning and power surges. 35 Surge Protector: The Garage Door Opener Surge Protector is open garage door manually from car, bedside, or anywhere in the garage. Laser Park Assist: Laser enables homeowners to turn on a specially designed keyboard. Monitors up to 4 garage doors by entering a password on a lamp, television...


