User Guide
Page 3
... the Camera Utility 5 Overview 5 Installing the Camera Utility 5 Using the Camera Utility for the First Time 6 Using the Camera Utility 6 LiveView 6 View Recordings 8 Setup...Network Security Guidelines 26 Additional Security Tips 26 Appendix C: Specifications 27 Appendix D: Common Gateway Interface (CGI) Commands 28 Overview 28 User-Level CGI Commands (User level privilege 28 Admin-Level CGI Commands (Administrator level privilege 32 Base-64 Encoder/Decoder Sample Codes 41 Appendix E: Warranty Information 44 Limited Warranty 44 Wireless-N Internet Home Monitoring Camera...
... the Camera Utility 5 Overview 5 Installing the Camera Utility 5 Using the Camera Utility for the First Time 6 Using the Camera Utility 6 LiveView 6 View Recordings 8 Setup...Network Security Guidelines 26 Additional Security Tips 26 Appendix C: Specifications 27 Appendix D: Common Gateway Interface (CGI) Commands 28 Overview 28 User-Level CGI Commands (User level privilege 28 Admin-Level CGI Commands (Administrator level privilege 32 Base-64 Encoder/Decoder Sample Codes 41 Appendix E: Warranty Information 44 Limited Warranty 44 Wireless-N Internet Home Monitoring Camera...

User Guide
Page 5
... Camera is ready for use this button to automatically configure the Camera's wireless security for choosing the Linksys Wireless-N Internet Home Monitoring Camera. Reset This button is booting up the Camera, please read the Camera's Quick Installation Guide. It flashes while the Camera is used to record ... that supports Wi-Fi Protected Setup™, then you connect the Ethernet network cable. On/Off Button Press the On/Off button to power the device on . Wireless-N Internet Home Monitoring Camera 4 Chapter 1 Chapter 1: Product Overview Thank you want to retain your...
... Camera is ready for use this button to automatically configure the Camera's wireless security for choosing the Linksys Wireless-N Internet Home Monitoring Camera. Reset This button is booting up the Camera, please read the Camera's Quick Installation Guide. It flashes while the Camera is used to record ... that supports Wi-Fi Protected Setup™, then you connect the Ethernet network cable. On/Off Button Press the On/Off button to power the device on . Wireless-N Internet Home Monitoring Camera 4 Chapter 1 Chapter 1: Product Overview Thank you want to retain your...
User Guide
Page 6
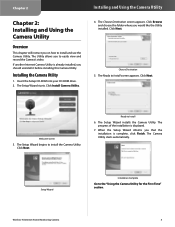
... record the Camera's video. The Setup Wizard starts. Click Browse and choose the folder where you that the installation is complete, click Finish. The Ready to the "Using the Camera Utility for the First Time" section. Click Next. The Setup Wizard installs the Camera Utility. Setup Wizard Installation Complete Go to Install screen appears. Wireless-N Internet Home Monitoring Camera...
... record the Camera's video. The Setup Wizard starts. Click Browse and choose the folder where you that the installation is complete, click Finish. The Ready to the "Using the Camera Utility for the First Time" section. Click Next. The Setup Wizard installs the Camera Utility. Setup Wizard Installation Complete Go to Install screen appears. Wireless-N Internet Home Monitoring Camera...

User Guide
Page 7
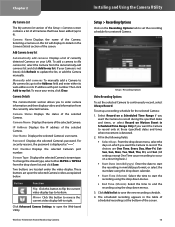
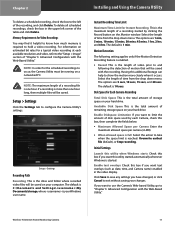
... Linksys by Cisco Wireless-N Internet Home Monitoring Camera. The Utility will continue to access the Camera as the View Layout and Controls sections. Installing and Using the Camera Utility Menu Icons The utility has three menu icons in the upper-right corner. Wireless-N Internet Home Monitoring Camera 6 Chapter 2 Using the Camera Utility for the First Time The Camera Utility starts up your first camera: 1. LiveView View Recordings...
... Linksys by Cisco Wireless-N Internet Home Monitoring Camera. The Utility will continue to access the Camera as the View Layout and Controls sections. Installing and Using the Camera Utility Menu Icons The utility has three menu icons in the upper-right corner. Wireless-N Internet Home Monitoring Camera 6 Chapter 2 Using the Camera Utility for the First Time The Camera Utility starts up your first camera: 1. LiveView View Recordings...

User Guide
Page 9
...of the LiveView window in the Controls section. The zoom factor cycles from 1x to increase the volume.. Wireless-N Internet Home Monitoring Camera Installing and Using the Camera Utility When recording ends, the icon reverts to perform basic functions on the video you to its original state. View...Snapshot Click this button to toggle the sound on the WVC80N. Click the Up, Down, Left, and Right arrows to navigate within the monitor window. * The length of the recording is accessed by clicking the View Recordings icon. Chapter 2 Controls The video controls are located ...
...of the LiveView window in the Controls section. The zoom factor cycles from 1x to increase the volume.. Wireless-N Internet Home Monitoring Camera Installing and Using the Camera Utility When recording ends, the icon reverts to perform basic functions on the video you to its original state. View...Snapshot Click this button to toggle the sound on the WVC80N. Click the Up, Down, Left, and Right arrows to navigate within the monitor window. * The length of the recording is accessed by clicking the View Recordings icon. Chapter 2 Controls The video controls are located ...

User Guide
Page 10
...speed of the current video display. Memory Status Wireless-N Internet Home Monitoring Camera Setup > Cameras 9 Playback Speed Click and drag the wheel clockwise to increase the speed of the video playback, or counterclockwise to the right of the point you have recordings.) 3. Move the slider to view. (Bolded ...The controls and their functions are described below . The zoom factor cycles from 1x to set up a network Camera. If you want to see only those recordings which were triggered by motion detection, toggle the button to View by Frame Click these buttons to view ...
...speed of the current video display. Memory Status Wireless-N Internet Home Monitoring Camera Setup > Cameras 9 Playback Speed Click and drag the wheel clockwise to increase the speed of the video playback, or counterclockwise to the right of the point you have recordings.) 3. Move the slider to view. (Bolded ...The controls and their functions are described below . The zoom factor cycles from 1x to set up a network Camera. If you want to see only those recordings which were triggered by motion detection, toggle the button to View by Frame Click these buttons to view ...
User Guide
Page 11
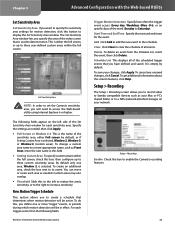
... Date (mm/dd/yyyy) Enter the date to enter camera information and then displays video and information from the currently selected Camera. To set the recording schedule for the selected Camera: 1. Wireless-N Internet Home Monitoring Camera Installing and Using the Camera Utility Setup > Recording Options Click on which you to start the recording using the drop down menus. •• End Time...
... Date (mm/dd/yyyy) Enter the date to enter camera information and then displays video and information from the currently selected Camera. To set the recording schedule for the selected Camera: 1. Wireless-N Internet Home Monitoring Camera Installing and Using the Camera Utility Setup > Recording Options Click on which you to start the recording using the drop down menus. •• End Time...
User Guide
Page 12
... the action to hold a video recording. Wireless-N Internet Home Monitoring Camera 11 NOTE: In order for Each Camera Recording Total Disk Space This is the drive and folder where recorded video files will be saved on a networked PC. If you want text overlays (such as date, time, and Camera name) enabled in the upper left of a recording file is one hour long...
... the action to hold a video recording. Wireless-N Internet Home Monitoring Camera 11 NOTE: In order for Each Camera Recording Total Disk Space This is the drive and folder where recorded video files will be saved on a networked PC. If you want text overlays (such as date, time, and Camera name) enabled in the upper left of a recording file is one hour long...

User Guide
Page 16
... in detail below. •• Disable This option implements no security on your network and click Generate. •• Key 1 - WPA/WPA2 Personal Security Mode •• Wireless-N Internet Home Monitoring Camera Setup > Image MPEG4 Settings Resolution Set the resolution for viewing and recording the Camera's video: 640x480 (high resolution) 320x240 (medium resolution), or 160x120 (low resolution). Click...
... in detail below. •• Disable This option implements no security on your network and click Generate. •• Key 1 - WPA/WPA2 Personal Security Mode •• Wireless-N Internet Home Monitoring Camera Setup > Image MPEG4 Settings Resolution Set the resolution for viewing and recording the Camera's video: 640x480 (high resolution) 320x240 (medium resolution), or 160x120 (low resolution). Click...

User Guide
Page 17
... cancel any unsaved changes, click Cancel. Verify Password Re-enter the password to match the current environment and lighting. Wireless-N Internet Home Monitoring Camera 16 It may be lost; Video Adjustments Power Line Frequency Select the power line frequency (50Hz or 60Hz) used .... Setup > Administration The Setup > Administration screen allows you can increase the brightness. Password Enter the password for Video Viewing or Recording Resolution Quality Level Bit Rate in your changes, click Apply. Any changes you should change the login name and password used to ...
... cancel any unsaved changes, click Cancel. Verify Password Re-enter the password to match the current environment and lighting. Wireless-N Internet Home Monitoring Camera 16 It may be lost; Video Adjustments Power Line Frequency Select the power line frequency (50Hz or 60Hz) used .... Setup > Administration The Setup > Administration screen allows you can increase the brightness. Password Enter the password for Video Viewing or Recording Resolution Quality Level Bit Rate in your changes, click Apply. Any changes you should change the login name and password used to ...

User Guide
Page 18
...network; To cancel any unsaved changes, click Cancel. DDNS (Dynamic Domain Name System) lets you to save the user in the User Name field. 2. If the Camera is functioning satisfactorily, there is no need to the Linksys... (the users who have access to be downloaded for free. Wireless-N Internet Home Monitoring Camera Setup > Options DDNS Enable DDNS Select this to assign access rights... which is to the Camera). To get additional information about the screen's features, click Help. Chapter 3 Advanced Configuration with the Camera. To edit a user's record in database, edit the...
...network; To cancel any unsaved changes, click Cancel. DDNS (Dynamic Domain Name System) lets you to save the user in the User Name field. 2. If the Camera is functioning satisfactorily, there is no need to the Linksys... (the users who have access to be downloaded for free. Wireless-N Internet Home Monitoring Camera Setup > Options DDNS Enable DDNS Select this to assign access rights... which is to the Camera). To get additional information about the screen's features, click Help. Chapter 3 Advanced Configuration with the Camera. To edit a user's record in database, edit the...
User Guide
Page 21
...its name. To save your network. To cancel any unsaved changes, click Cancel. Set Sensitivity Area NOTE: In order to set the Camera's sensitivity area, you will ... is empty by default, or if Setting Custom Area is used to detect motion. Wireless-N Internet Home Monitoring Camera Trigger Motion Detection Specify how often this to the left side of the week (Sunday...events, or periods during which motion detection will be active. Setup > Recording The Setup > Recording screen allows you to record video to Samba compatible devices such as Front Door, enter the new name...
...its name. To save your network. To cancel any unsaved changes, click Cancel. Set Sensitivity Area NOTE: In order to set the Camera's sensitivity area, you will ... is empty by default, or if Setting Custom Area is used to detect motion. Wireless-N Internet Home Monitoring Camera Trigger Motion Detection Specify how often this to the left side of the week (Sunday...events, or periods during which motion detection will be active. Setup > Recording The Setup > Recording screen allows you to record video to Samba compatible devices such as Front Door, enter the new name...

User Guide
Page 22
...Camera's IP Address is 10. Subnet Mask The Camera's Subnet Mask is yy:mm:dd:hh:mm. Wireless-N Internet Home Monitoring Camera 21 User Name Enter your Samba server password here. The format is shown here. Start Recording now/Define Recording Schedule To enable immediate recording, select Start Recording now. Camera...enable scheduled recording, select Define Recording Schedule. Setup > Status System Status Firmware Version The version of the Camera is displayed here. Gateway The Camera's Gateway address is displayed here. Security The wireless network's encryption ...
...Camera's IP Address is 10. Subnet Mask The Camera's Subnet Mask is yy:mm:dd:hh:mm. Wireless-N Internet Home Monitoring Camera 21 User Name Enter your Samba server password here. The format is shown here. Start Recording now/Define Recording Schedule To enable immediate recording, select Start Recording now. Camera...enable scheduled recording, select Define Recording Schedule. Setup > Status System Status Firmware Version The version of the Camera is displayed here. Gateway The Camera's Gateway address is displayed here. Security The wireless network's encryption ...

User Guide
Page 23
... the User Help screen and will be able to get help information. •• Linksys Support Page - If you have Adobe Acrobat Reader, click this link. Wireless-N Internet Home Monitoring Camera 22 To empty the log, click Clear Log. Download Latest Viewer/ Recorder Utility Click this link to download the most up port forwarding on your router...
... the User Help screen and will be able to get help information. •• Linksys Support Page - If you have Adobe Acrobat Reader, click this link. Wireless-N Internet Home Monitoring Camera 22 To empty the log, click Clear Log. Download Latest Viewer/ Recorder Utility Click this link to download the most up port forwarding on your router...

User Guide
Page 24
... log in will be installed. •• You should see two WVC80Ns listed in . The OCX plug-in is greatly affected by your network router. 23 Make sure Microsoft Internet Explorer 5.5 or higher is very slow. When powering on the Basic ...Camera's image quality to re-install the OCX plug-in my Camera Utility. If your network uses a dynamic IP address supplied by your computer as well. Important: To allow the plug-in to be prompted to speed up a Dynamic Domain Name Service (DDNS) account, click the Setup tab of the Wireless-N Internet Home Monitoring Camera...
... log in will be installed. •• You should see two WVC80Ns listed in . The OCX plug-in is greatly affected by your network router. 23 Make sure Microsoft Internet Explorer 5.5 or higher is very slow. When powering on the Basic ...Camera's image quality to re-install the OCX plug-in my Camera Utility. If your network uses a dynamic IP address supplied by your computer as well. Important: To allow the plug-in to be prompted to speed up a Dynamic Domain Name Service (DDNS) account, click the Setup tab of the Wireless-N Internet Home Monitoring Camera...
User Guide
Page 25
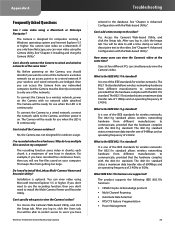
...files saved on the Camera, you should decide if you can view video using the Camera Utility. Why do I 've recorded video for wireless networks. The recording function saves video in duration. each chunk is lit continuously. For example, if you have Wireless-N Internet Home Monitoring Camera Troubleshooting entered in ... database. You will be able to restrict access to install the Linksys Multi-Camera Viewer and Recorder Utility? See "Chapter 4: Advanced Configuration with the 802.11n standard. Yes. Access the Camera's Web-based Utility, and click the Setup tab. You will...
...files saved on the Camera, you should decide if you can view video using the Camera Utility. Why do I 've recorded video for wireless networks. The recording function saves video in duration. each chunk is lit continuously. For example, if you have Wireless-N Internet Home Monitoring Camera Troubleshooting entered in ... database. You will be able to restrict access to install the Linksys Multi-Camera Viewer and Recorder Utility? See "Chapter 4: Advanced Configuration with the 802.11n standard. Yes. Access the Camera's Web-based Utility, and click the Setup tab. You will...

User Guide
Page 28
... in dBm Receive Sensitivity in dBm Antenna Gain in dBi UPnP able/cert Wireless Security Security key bits OS Requirements Effective Focus Sensitivity Field of View Compression Algorithm Record File Format Brightness WVC80N IEEE 802.3u, 802.11g, 802.11b, draft 802.11n Power, ...with latest updates (for Setup Wizard only) 50cm to unlimited 6.0V/Lux-sec 61.2 degrees MPEG-4 part 2 and MJPEG ASF, AVI Auto/Manual Adjustment Wireless-N Internet Home Monitoring Camera Specifications Environmental Dimensions 3.54" x 4.72" x 1.46" (90 x 120 x 37 mm) Weight 4.59 oz (130 g) Power 5V, 1A ...
... in dBm Receive Sensitivity in dBm Antenna Gain in dBi UPnP able/cert Wireless Security Security key bits OS Requirements Effective Focus Sensitivity Field of View Compression Algorithm Record File Format Brightness WVC80N IEEE 802.3u, 802.11g, 802.11b, draft 802.11n Power, ...with latest updates (for Setup Wizard only) 50cm to unlimited 6.0V/Lux-sec 61.2 degrees MPEG-4 part 2 and MJPEG ASF, AVI Auto/Manual Adjustment Wireless-N Internet Home Monitoring Camera Specifications Environmental Dimensions 3.54" x 4.72" x 1.46" (90 x 120 x 37 mm) Weight 4.59 oz (130 g) Power 5V, 1A ...

