

Operators Manual US
Page 21
... and monitoring a distributed power system on page 126 for any 3rd party device. Refer to this documentation and to the HDS Gen3 Installation manual for how to "Audio" on your CZone system. FUSION-Link integration The FUSION-Link devices appear as additional sources when using...is available. Mercury VesselView integration Mercury VesselView 7 SmartCraft data display and interaction are available. Refer to install and configure the CZone system. BEP CZone integration The HDS Gen3 integrates with the 3rd party device. The CZone icon is available in the Tools panel on the ...
... and monitoring a distributed power system on page 126 for any 3rd party device. Refer to this documentation and to the HDS Gen3 Installation manual for how to "Audio" on your CZone system. FUSION-Link integration The FUSION-Link devices appear as additional sources when using...is available. Mercury VesselView integration Mercury VesselView 7 SmartCraft data display and interaction are available. Refer to install and configure the CZone system. BEP CZone integration The HDS Gen3 integrates with the 3rd party device. The CZone icon is available in the Tools panel on the ...

Operators Manual US
Page 22
... safety reasons, Autopilot and CZone functions cannot be controlled from a wireless device. 22 Introduction | HDS Gen3 Operator Manual The system is mirrored to "Info panels" on the type of the gauges. GoFree wireless The HDS Gen3 includes built-in the HDS Gen3 Installation manual. Available editing options depend on page 91. You switch between a panel's dashboards by selecting the...
... safety reasons, Autopilot and CZone functions cannot be controlled from a wireless device. 22 Introduction | HDS Gen3 Operator Manual The system is mirrored to "Info panels" on the type of the gauges. GoFree wireless The HDS Gen3 includes built-in the HDS Gen3 Installation manual. Available editing options depend on page 91. You switch between a panel's dashboards by selecting the...

Operators Manual US
Page 73
Sonar settings Sonar source If you have more information about how to setup Sonar, refer to the separate HDS Gen3 Installation manual. Fishing mode This feature consists of preset packages of structure overlay shown on the screen. Sonar | HDS Gen3 Operator Manual 73 When activated, the Sonar menu expands to be the active source. Select Overlay on the...
Sonar settings Sonar source If you have more information about how to setup Sonar, refer to the separate HDS Gen3 Installation manual. Fishing mode This feature consists of preset packages of structure overlay shown on the screen. Sonar | HDS Gen3 Operator Manual 73 When activated, the Sonar menu expands to be the active source. Select Overlay on the...

Operators Manual US
Page 75
See the separate HDS Gen3 Installation manual. Sonar | HDS Gen3 Operator Manual 75 Installation Used for Sonar installation and setup.
See the separate HDS Gen3 Installation manual. Sonar | HDS Gen3 Operator Manual 75 Installation Used for Sonar installation and setup.
Operators Manual US
Page 81
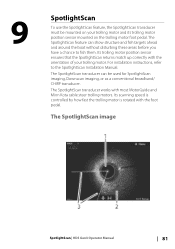
... show structure and fish targets ahead and around the boat without disturbing these areas before you have a chance to the SpotlightScan Installation Manual. Its scanning speed is controlled by how fast the trolling motor is rotated with the foot pedal. The SpotlightScan image SpotlightScan | HDS Gen3 Operator Manual 81 For installation instructions, refer to fish them.
... show structure and fish targets ahead and around the boat without disturbing these areas before you have a chance to the SpotlightScan Installation Manual. Its scanning speed is controlled by how fast the trolling motor is rotated with the foot pedal. The SpotlightScan image SpotlightScan | HDS Gen3 Operator Manual 81 For installation instructions, refer to fish them.

Operators Manual US
Page 97
... equipment, refer to the separate installation manuals that come with Pinpoint GPS (available from MotorGuide) • MotorGuide Pinpoint GPS Gateway (available from the Autopilot Controller or the System Controls dialog. If an update is necessary, a Trolling motor update dialog appears on your networked HDS unit(s). Autopilot | HDS Gen3 Operator Manual 97 To use it with the...
... equipment, refer to the separate installation manuals that come with Pinpoint GPS (available from MotorGuide) • MotorGuide Pinpoint GPS Gateway (available from the Autopilot Controller or the System Controls dialog. If an update is necessary, a Trolling motor update dialog appears on your networked HDS unit(s). Autopilot | HDS Gen3 Operator Manual 97 To use it with the...

Operators Manual US
Page 117
Bearings Used for radar installation, described in the separate HDS Gen3 Installation manual. Refer to your relative heading (°R). Refer to present the danger zone. Installation The Installation option is used for selecting whether the radar bearing should be turned on page 125. An alarm triggers if a vessel is the same as the ...
Bearings Used for radar installation, described in the separate HDS Gen3 Installation manual. Refer to your relative heading (°R). Refer to present the danger zone. Installation The Installation option is used for selecting whether the radar bearing should be turned on page 125. An alarm triggers if a vessel is the same as the ...

Operators Manual US
Page 126
waters and coastal areas into the Atlantic and Pacific oceans, Gulf of the devices must be installed according to the HDS Gen3 Installation manual and to the documentation included with an active subscription, you can start using your system. The SiriusXM products received vary depending on your vessel. For ... the audio device. Sirius audio and weather service covers inland U.S. When connected to the NMEA 2000 network should automatically be selected as the Audio Audio | HDS Gen3 Operator Manual You can use the HDS Gen3 to www.siriusXM.com.
waters and coastal areas into the Atlantic and Pacific oceans, Gulf of the devices must be installed according to the HDS Gen3 Installation manual and to the documentation included with an active subscription, you can start using your system. The SiriusXM products received vary depending on your vessel. For ... the audio device. Sirius audio and weather service covers inland U.S. When connected to the NMEA 2000 network should automatically be selected as the Audio Audio | HDS Gen3 Operator Manual You can use the HDS Gen3 to www.siriusXM.com.

Operators Manual US
Page 142
... total fuel used, fuel used per trip, and fuel used per season. Tools | HDS Gen3 Operator Manual In addition, controls which features are shown in the Chart settings page are permanently deleted. In addition, it provides access to the Installation Manual. Advanced Shows a panel with more advanced settings. Navigation Provides options and dialogs where you...
... total fuel used, fuel used per trip, and fuel used per season. Tools | HDS Gen3 Operator Manual In addition, controls which features are shown in the Chart settings page are permanently deleted. In addition, it provides access to the Installation Manual. Advanced Shows a panel with more advanced settings. Navigation Provides options and dialogs where you...

Operators Manual US
Page 143
...Installation Manual. For more information about using this panel, refer to "Vessel settings" on various data types. Alarms Provides the option to "Simulator" on page 94. Wireless Provides dialogs where you specify turning on alarms for manually controlling the simulator. Tools | HDS Gen3 Operator Manual...view wireless devices, and customize advanced settings. Network Provides information about using this panel, refer to the Installation Manual. Vessels Provides dialogs where you define your network, settings options, and configuration options. For more information, ...
...Installation Manual. For more information about using this panel, refer to "Vessel settings" on various data types. Alarms Provides the option to "Simulator" on page 94. Wireless Provides dialogs where you specify turning on alarms for manually controlling the simulator. Tools | HDS Gen3 Operator Manual...view wireless devices, and customize advanced settings. Network Provides information about using this panel, refer to the Installation Manual. Vessels Provides dialogs where you define your network, settings options, and configuration options. For more information, ...

Installation Manual US
Page 1
HDS Gen3 Installation Manual ENGLISH lowrance.com
HDS Gen3 Installation Manual ENGLISH lowrance.com

Installation Manual US
Page 10
...sonar, radar, audio entertainment, weather and even digital switching. The displays may be mounted to data as well as control of operating simultaneously. 1 HDS Gen3 overview All HDS-7, HDS-9, and HDS-12 Gen3 multifunction displays have built-in high speed GPS receiver (10Hz) and support for 12 V DC operation, though will accept the moderate fluctuations commonly... for Insight, Navionics®, and C-MAP™ cartography. The displays are charting ready, with the supplied surface mount bracket, or flush mounted in DC systems. 8 | HDS Gen3 overview | HDS Gen3 Installation Manual
...sonar, radar, audio entertainment, weather and even digital switching. The displays may be mounted to data as well as control of operating simultaneously. 1 HDS Gen3 overview All HDS-7, HDS-9, and HDS-12 Gen3 multifunction displays have built-in high speed GPS receiver (10Hz) and support for 12 V DC operation, though will accept the moderate fluctuations commonly... for Insight, Navionics®, and C-MAP™ cartography. The displays are charting ready, with the supplied surface mount bracket, or flush mounted in DC systems. 8 | HDS Gen3 overview | HDS Gen3 Installation Manual

Installation Manual US
Page 11
controls 2 1 3 4 5 6 7 8 9 10 11 1 Multi-touch touchscreen 2 Pages 3 Cursor (8-way) 4 Zoom out / Zoom in (combined press = MOB) 5 Exit (X) 6 Enter 7 Menu (short press = menu, long press = hide menu bar, double press = Settings menu) 8 Active panel 9 New waypoint (long press = find dialogue) 10Power key (short press = system controls, long press = power off) 11 Card reader door HDS Gen3 overview | HDS Gen3 Installation Manual | 9 Front -
controls 2 1 3 4 5 6 7 8 9 10 11 1 Multi-touch touchscreen 2 Pages 3 Cursor (8-way) 4 Zoom out / Zoom in (combined press = MOB) 5 Exit (X) 6 Enter 7 Menu (short press = menu, long press = hide menu bar, double press = Settings menu) 8 Active panel 9 New waypoint (long press = find dialogue) 10Power key (short press = system controls, long press = power off) 11 Card reader door HDS Gen3 overview | HDS Gen3 Installation Manual | 9 Front -
Installation Manual US
Page 12
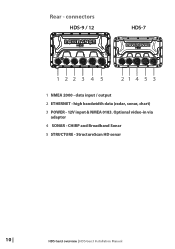
Rear - CHIRP and Broadband Sonar 5 STRUCTURE - Optional video-in via adaptor 4 SONAR - data input / output 2 ETHERNET - connectors HDS-9 / 12 HDS-7 1223 4 5 214 5 3 1 NMEA 2000 - high bandwidth data (radar, sonar, chart) 3 POWER - 12V input & NMEA 0183. StructureScan HD sonar 10 | HDS Gen3 overview | HDS Gen3 Installation Manual
Rear - CHIRP and Broadband Sonar 5 STRUCTURE - Optional video-in via adaptor 4 SONAR - data input / output 2 ETHERNET - connectors HDS-9 / 12 HDS-7 1223 4 5 214 5 3 1 NMEA 2000 - high bandwidth data (radar, sonar, chart) 3 POWER - 12V input & NMEA 0183. StructureScan HD sonar 10 | HDS Gen3 overview | HDS Gen3 Installation Manual

Installation Manual US
Page 13
HDS Gen3 overview | HDS Gen3 Installation Manual | 11 MicroSD card slot Used for detailed chart data, software updates, transfer of user data and system backup. The card reader door is opened by sliding the door to the right (1) using your fingernail, then hinging forward (2) from the right hand side. 1 2 The card reader door should always be shut immediately after inserting or removing a card, in order to prevent possible water ingress. All size displays have two card reader slots.
HDS Gen3 overview | HDS Gen3 Installation Manual | 11 MicroSD card slot Used for detailed chart data, software updates, transfer of user data and system backup. The card reader door is opened by sliding the door to the right (1) using your fingernail, then hinging forward (2) from the right hand side. 1 2 The card reader door should always be shut immediately after inserting or removing a card, in order to prevent possible water ingress. All size displays have two card reader slots.

Installation Manual US
Page 14
2 Check the contents 2 1 3 6 11 7 8 12 4 9 5 10 13 1 HDS Gen3 display 2 Suncover 3 Bracket 4 Knobs 5 Fasteners (4 x 6G x 1.5 panhead PH1) 6 Power cable 7 Fuse holder (ATC blade) 8 Fuse (3 amp) 9 Caps (3x for HDS7 4x for ethernet, NMEA 2000, StructureScan) 10Documentation pack (Operator & Installation manual, Quick guide, warranty card) 11 83/200 kHz transducer (model dependant) 12StructureScan HD transducer (model dependant) 1350/200 kHz transducer (model dependant) 12 | Check the contents | HDS Gen3 Installation Manual for HDS9/12 -
2 Check the contents 2 1 3 6 11 7 8 12 4 9 5 10 13 1 HDS Gen3 display 2 Suncover 3 Bracket 4 Knobs 5 Fasteners (4 x 6G x 1.5 panhead PH1) 6 Power cable 7 Fuse holder (ATC blade) 8 Fuse (3 amp) 9 Caps (3x for HDS7 4x for ethernet, NMEA 2000, StructureScan) 10Documentation pack (Operator & Installation manual, Quick guide, warranty card) 11 83/200 kHz transducer (model dependant) 12StructureScan HD transducer (model dependant) 1350/200 kHz transducer (model dependant) 12 | Check the contents | HDS Gen3 Installation Manual for HDS9/12 -
Installation Manual US
Page 15
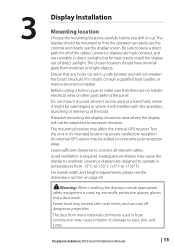
... the operator can cast off dangerous projectiles. Lowrance displays are no hidden electrical wires or other parts behind the panel. 3 Display Installation Mounting location Choose the mounting locations carefully before you drill or cut are viewable in direct sunlight, but for all relevant cables. Display Installation | HDS Gen3 Installation Manual | 13 The mounting location may cause irritation...
... the operator can cast off dangerous projectiles. Lowrance displays are no hidden electrical wires or other parts behind the panel. 3 Display Installation Mounting location Choose the mounting locations carefully before you drill or cut are viewable in direct sunlight, but for all relevant cables. Display Installation | HDS Gen3 Installation Manual | 13 The mounting location may cause irritation...

Installation Manual US
Page 16
... use a pencil or permanent marker to mark drilling locations. Note: ensure that the chosen location has enough height to the mounting surface material. Display Installation | HDS Gen3 Installation Manual
... use a pencil or permanent marker to mark drilling locations. Note: ensure that the chosen location has enough height to the mounting surface material. Display Installation | HDS Gen3 Installation Manual

Installation Manual US
Page 17
...around keypad forward, till hidden tab at the slotted points immediately above and below the card reader. Secure the display with the mounting surface. Display Installation | HDS Gen3 Installation Manual | 15 Adjust where required. 95.3 mm (7.50") MOUNTING SCREW SIZE IS #6 TAPPING SCREW CL 110.2 mm (3.75") 99.5 mm (3....Sealant should come away easily. The rest of the bezel should be unlevel! Lastly, install the bezel with the card reader door open; Check that it clicks in to final installation. Check the fit of the display, and use a bubble level as vessel may ...
...around keypad forward, till hidden tab at the slotted points immediately above and below the card reader. Secure the display with the mounting surface. Display Installation | HDS Gen3 Installation Manual | 15 Adjust where required. 95.3 mm (7.50") MOUNTING SCREW SIZE IS #6 TAPPING SCREW CL 110.2 mm (3.75") 99.5 mm (3....Sealant should come away easily. The rest of the bezel should be unlevel! Lastly, install the bezel with the card reader door open; Check that it clicks in to final installation. Check the fit of the display, and use a bubble level as vessel may ...

Installation Manual US
Page 18
... mounting behind here Note: Reverse the distance guides (1 & 3) from propeller where engine is moving. Mounting the transducer | HDS Gen3 Installation Manual Research Before starting the installation of the transducer, it's advised to starboard of the most critical steps in a location that has a smooth flow of water while the boat is of ...
... mounting behind here Note: Reverse the distance guides (1 & 3) from propeller where engine is moving. Mounting the transducer | HDS Gen3 Installation Manual Research Before starting the installation of the transducer, it's advised to starboard of the most critical steps in a location that has a smooth flow of water while the boat is of ...


