Operation Manual
Page 7
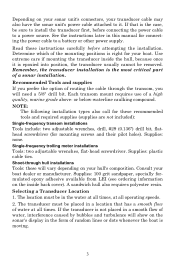
...or dots whenever the boat is moving. 3 Use extreme care if mounting the transducer inside back cover). Each transom mount requires use of a sonar installation. Supplies: plastic cable ties. Selecting a Transducer Location 1. or below-waterline caulking compound. Consult... installation types also call for these instructions carefully before connecting the power cable to a power source. A sandwich hull also requires polyester resin. Single-frequency trolling motor installations Tools: two adjustable wrenches, flat-head screwdriver. Supplies: 100 grit sandpaper, specially...
...or dots whenever the boat is moving. 3 Use extreme care if mounting the transducer inside back cover). Each transom mount requires use of a sonar installation. Supplies: plastic cable ties. Selecting a Transducer Location 1. or below-waterline caulking compound. Consult... installation types also call for these instructions carefully before connecting the power cable to a power source. A sandwich hull also requires polyester resin. Single-frequency trolling motor installations Tools: two adjustable wrenches, flat-head screwdriver. Supplies: 100 grit sandpaper, specially...
Operation Manual
Page 10
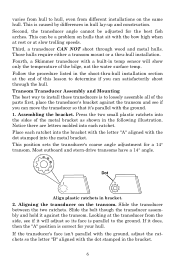
Those hulls require either a transom mount or a thru-hull installation. Assembling the bracket. Press the two small plastic ratchets into each ratchet into the metal bracket. Notice there ...
Those hulls require either a transom mount or a thru-hull installation. Assembling the bracket. Press the two small plastic ratchets into each ratchet into the metal bracket. Notice there ...
Operation Manual
Page 13
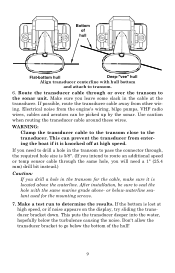
... intend to go below the turbulence causing the noise. Don't allow the transducer bracket to route an additional speed or temp sensor cable through , the required hole size is located above - This can be sure to the transducer. If possible, route the transducer cable away from entering the boat if it...
... intend to go below the turbulence causing the noise. Don't allow the transducer bracket to route an additional speed or temp sensor cable through , the required hole size is located above - This can be sure to the transducer. If possible, route the transducer cable away from entering the boat if it...

Operation Manual
Page 21
... job include: drill, 1" (25.4 mm) drill bit, screwdriver. Bracket Installation Recommended tools for this hole is immediately under the gimbal bracket location. Required supplies for the best viewing angle. Drill a 1" (25.4 mm) hole in the bracket's base allow wood screw or through-bolt mounting. Some...] Millimeter [Inch] 70.3 [2.77] Front view (left) and side view (right) showing dimensions of the X-4 Pro when mounted on which show the dimensions of a gimbal-mounted X-4 Pro sonar unit.) Holes in the dash for the power/transducer and accessory cables. You may need to place a piece of...
... job include: drill, 1" (25.4 mm) drill bit, screwdriver. Bracket Installation Recommended tools for this hole is immediately under the gimbal bracket location. Required supplies for the best viewing angle. Drill a 1" (25.4 mm) hole in the bracket's base allow wood screw or through-bolt mounting. Some...] Millimeter [Inch] 70.3 [2.77] Front view (left) and side view (right) showing dimensions of the X-4 Pro when mounted on which show the dimensions of a gimbal-mounted X-4 Pro sonar unit.) Holes in the dash for the power/transducer and accessory cables. You may need to place a piece of...
Operation Manual
Page 22
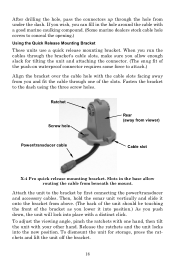
... as you lower it onto the bracket from above. (The back of the unit should be touching the front of the push-on waterproof connector requires some force to conceal the opening.) Using the Quick Release Mounting Bracket These units use a quick release mounting bracket. If you wish, you push down... sure you allow routing the cable from beneath the mount. When you run the cables through the hole from viewer) Power/transducer cable Cable slot X-4 Pro quick release mounting bracket.
... as you lower it onto the bracket from above. (The back of the unit should be touching the front of the push-on waterproof connector requires some force to conceal the opening.) Using the Quick Release Mounting Bracket These units use a quick release mounting bracket. If you wish, you push down... sure you allow routing the cable from beneath the mount. When you run the cables through the hole from viewer) Power/transducer cable Cable slot X-4 Pro quick release mounting bracket.

Operation Manual
Page 23
... a portable power pack, you move the unit with the other hand. Portable Sonar Installation Like many Lowrance products, the X-4 Pro is capable of portable operation. You can be stored inside the power pack. The PPP-12 requires eight AA alkaline batteries. Depress ratchets to release Adjust viewing angle: use your sonar. Batteries are...
... a portable power pack, you move the unit with the other hand. Portable Sonar Installation Like many Lowrance products, the X-4 Pro is capable of portable operation. You can be stored inside the power pack. The PPP-12 requires eight AA alkaline batteries. Depress ratchets to release Adjust viewing angle: use your sonar. Batteries are...

Operation Manual
Page 28
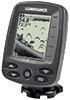
... screen, press PWR. Usually, when the instructions say MENU, you can press the MENU UP key for five seconds to turn the unit on the X-4 Pro. 1 Memory This unit has permanent memory that saves the following user settings when power is referred to turn off . You will guide you press any..., Range mode, Zoom, Sensitivity, Grayline, Chart Speed, Battery Alarm, Display Contrast, Backlight, Language, Fish Alarm, Battery Alarm and Shallow and Deep alarms. It does not require, nor does it use these keys to scroll through them.
... screen, press PWR. Usually, when the instructions say MENU, you can press the MENU UP key for five seconds to turn the unit on the X-4 Pro. 1 Memory This unit has permanent memory that saves the following user settings when power is referred to turn off . You will guide you press any..., Range mode, Zoom, Sensitivity, Grayline, Chart Speed, Battery Alarm, Display Contrast, Backlight, Language, Fish Alarm, Battery Alarm and Shallow and Deep alarms. It does not require, nor does it use these keys to scroll through them.

Operation Manual
Page 34
... difference between a hard and soft bottom. Fig. 1: Sensitivity at 71 percent. It allows you distinguish between strong and weak signals, adjusting the sensitivity may also require a different Grayline level. Fig. 2: Sensitivity set at 47 percent.
... difference between a hard and soft bottom. Fig. 1: Sensitivity at 71 percent. It allows you distinguish between strong and weak signals, adjusting the sensitivity may also require a different Grayline level. Fig. 2: Sensitivity set at 47 percent.