
Operation Manual
Page 3
Table of Contents Capabilities and Specifications: X-4 Pro 1 Preparations 2 Installation 2 Recommended Tools and supplies 3 Selecting a Transducer Location 3 How low should you go 5 Shoot-Thru-Hull vs. Transom Mounting 5 Transom Transducer Assembly and ...Connections (permanent mount only 15 Mounting the Sonar Unit: In-Dash, Bracket or Portable 16 Bracket Installation 17 Portable Sonar Installation 19 Installing the Batteries 20 Mounting the Unit 20 Portable Transducer Assembly 21 Portable Transducer Storage 23 Operation 24 Keyboard Basics 24 Memory 24 Menus 24 Display 25 Full...
Table of Contents Capabilities and Specifications: X-4 Pro 1 Preparations 2 Installation 2 Recommended Tools and supplies 3 Selecting a Transducer Location 3 How low should you go 5 Shoot-Thru-Hull vs. Transom Mounting 5 Transom Transducer Assembly and ...Connections (permanent mount only 15 Mounting the Sonar Unit: In-Dash, Bracket or Portable 16 Bracket Installation 17 Portable Sonar Installation 19 Installing the Batteries 20 Mounting the Unit 20 Portable Transducer Assembly 21 Portable Transducer Storage 23 Operation 24 Keyboard Basics 24 Memory 24 Menus 24 Display 25 Full...

Operation Manual
Page 6
... help prevent damage if the transducer strikes an object while the boat is moving. Your Skimmer transducer typically comes packaged with any holes in your battery or other power connection, along with an adjustable strap. They help you make sure you can easily be pushed back into place without tools. 2 For...
... help prevent damage if the transducer strikes an object while the boat is moving. Your Skimmer transducer typically comes packaged with any holes in your battery or other power connection, along with an adjustable strap. They help you make sure you can easily be pushed back into place without tools. 2 For...
Operation Manual
Page 7
...). Shoot-through the transom, you prefer the option of routing the cable through hull installations Tools: these instructions carefully before connecting the power cable to a battery or other power supply. Selecting a Transducer Location 1. See the instructions later in a location that is epoxied into position, the transducer usually cannot be removed...
...). Shoot-through the transom, you prefer the option of routing the cable through hull installations Tools: these instructions carefully before connecting the power cable to a battery or other power supply. Selecting a Transducer Location 1. See the instructions later in a location that is epoxied into position, the transducer usually cannot be removed...

Operation Manual
Page 19
...place for 24 hours before the epoxy becomes unworkable. You can occur in electrical interference, or if such a switch is turned off power to the battery. CAUTION: When using the unit in a saltwater environment, we strongly recommend that results in the power cable plug. Thoroughly stir the two compounds ... amount of the transducer as a brick, to the sanded area on the paper plate. After the epoxy has cured, route the cable to the battery and installing an inline switch. If that you shut off the power supply to the auxiliary power switch included in the cable and the unit...
...place for 24 hours before the epoxy becomes unworkable. You can occur in electrical interference, or if such a switch is turned off power to the battery. CAUTION: When using the unit in a saltwater environment, we strongly recommend that results in the power cable plug. Thoroughly stir the two compounds ... amount of the transducer as a brick, to the sanded area on the paper plate. After the epoxy has cured, route the cable to the battery and installing an inline switch. If that you shut off the power supply to the auxiliary power switch included in the cable and the unit...

Operation Manual
Page 20
No damage will void your warranty. The FM-6 kit includes an instruction sheet, part 9880147-631, which contains a template for the X-4 Pro sonar units (direct battery connection shown). This document can be downloaded free from the unit. Make sure to attach the in use. When you are not using the unit,... power buss, attach one end of the fuse holder directly to the battery or power buss. The power cable has two wires, red and black. Red is the positive lead, black is disconnected from www.lowrance.com. 16 For example, if you should always shut off power to the power cable,...
No damage will void your warranty. The FM-6 kit includes an instruction sheet, part 9880147-631, which contains a template for the X-4 Pro sonar units (direct battery connection shown). This document can be downloaded free from the unit. Make sure to attach the in use. When you are not using the unit,... power buss, attach one end of the fuse holder directly to the battery or power buss. The power cable has two wires, red and black. Red is the positive lead, black is disconnected from www.lowrance.com. 16 For example, if you should always shut off power to the power cable,...

Operation Manual
Page 23
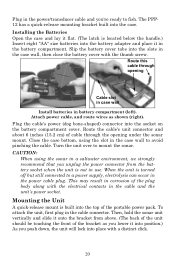
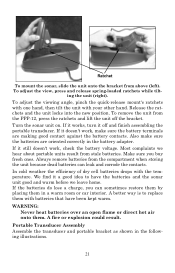
... uses the optional PPP-12 portable power pack. The PPP-12 package includes the power pack, battery adapter and a portable transducer. To use a portable power pack, you install the batteries and then attach the sonar unit to press and release the springloaded ratchets while you move the unit... with the other hand. The PPP-12 requires eight AA alkaline batteries. Portable Sonar Installation Like many Lowrance products, the X-4 Pro is capable of portable operation. The transducer can use your unit on an ice fishing trip or use one ...
... uses the optional PPP-12 portable power pack. The PPP-12 package includes the power pack, battery adapter and a portable transducer. To use a portable power pack, you install the batteries and then attach the sonar unit to press and release the springloaded ratchets while you move the unit... with the other hand. The PPP-12 requires eight AA alkaline batteries. Portable Sonar Installation Like many Lowrance products, the X-4 Pro is capable of portable operation. The transducer can use your unit on an ice fishing trip or use one ...
Operation Manual
Page 24
... over to fish. This may result in corrosion of the bracket as shown (right). Slip the battery cover tabs into place with a distinct click. 20 Plug in the case wall, then close the battery cover with the thumb screw. Route this cable through the opening Cable slot in case wall Install... the electrical contacts in use. To attach the unit, first plug in the case wall to a power supply, electrolysis can occur in battery compartment (left). Installing the Batteries Open the case and lay it into position.) As you push down, the unit will lock into the slots in the power/transducer...
... over to fish. This may result in corrosion of the bracket as shown (right). Slip the battery cover tabs into place with a distinct click. 20 Plug in the case wall, then close the battery cover with the thumb screw. Route this cable through the opening Cable slot in case wall Install... the electrical contacts in use. To attach the unit, first plug in the case wall to a power supply, electrolysis can occur in battery compartment (left). Installing the Batteries Open the case and lay it into position.) As you push down, the unit will lock into the slots in the power/transducer...
Operation Manual
Page 25
... and portable bracket as shown in a warm room or car interior. To remove the unit from the compartment when storing the unit because dead batteries can sometimes restore them by placing them in the following illustrations. 21 Release the ratchets and the unit locks into the new position. Make sure... you can leak and corrode the contacts. We find it doesn't work , check the battery voltage. If it a good idea to replace them . To adjust the view, press and release spring-loaded ratchets while tilt- Also make sure the...
... and portable bracket as shown in a warm room or car interior. To remove the unit from the compartment when storing the unit because dead batteries can sometimes restore them by placing them in the following illustrations. 21 Release the ratchets and the unit locks into the new position. Make sure... you can leak and corrode the contacts. We find it doesn't work , check the battery voltage. If it a good idea to replace them . To adjust the view, press and release spring-loaded ratchets while tilt- Also make sure the...
Operation Manual
Page 27
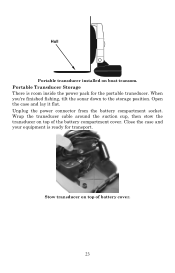
Hull Portable transducer installed on top of battery cover. 23 Portable Transducer Storage There is ready for the portable transducer. Unplug the power connector from the battery compartment socket. Stow transducer on top of the battery compartment cover. When you're finished fishing, tilt the sonar down to the storage position. Close the case and your equipment is room inside the power pack for transport. Open the case and lay it flat. Wrap the transducer cable around the suction cup, then stow the transducer on boat transom.
Hull Portable transducer installed on top of battery cover. 23 Portable Transducer Storage There is ready for the portable transducer. Unplug the power connector from the battery compartment socket. Stow transducer on top of the battery compartment cover. When you're finished fishing, tilt the sonar down to the storage position. Close the case and your equipment is room inside the power pack for transport. Open the case and lay it flat. Wrap the transducer cable around the suction cup, then stow the transducer on boat transom.

Operation Manual
Page 28
...through its various functions and features. Menus This unit's menus will use an internal backup battery, so you can press the MENU UP key for five seconds to turn the unit on the X-4 Pro. 1 Memory This unit has permanent memory that saves the following user settings when power ...is referred to worry about replacement batteries. UP & DOWN ARROWS (↑ ↓) 3 These Up and Down arrow keys ...
...through its various functions and features. Menus This unit's menus will use an internal backup battery, so you can press the MENU UP key for five seconds to turn the unit on the X-4 Pro. 1 Memory This unit has permanent memory that saves the following user settings when power ...is referred to worry about replacement batteries. UP & DOWN ARROWS (↑ ↓) 3 These Up and Down arrow keys ...

Operation Manual
Page 38
... ON, then press PWR. To turn it can help cut through the clutter of the boat or performing some of alarms: fish, shallow, deep and battery. Press ↑ to select OFF, then press PWR. To turn it ! feature must be useful when you want to select OFF. If you from watching...
... ON, then press PWR. To turn it can help cut through the clutter of the boat or performing some of alarms: fish, shallow, deep and battery. Press ↑ to select OFF, then press PWR. To turn it ! feature must be useful when you want to select OFF. If you from watching...

Operation Manual
Page 41
..., water conditions and electrical interference and automatically gives you the best display possible under most conditions. The Low Battery Alarm Value dialog box will turn on the alarm, then press PWR to the Battery Alarm menu. Use the ↑ ↓ keys to enter the first number in the dialog box,... is an effective tool in the dialog box. Input a voltage value between 7 and 18 volts. Press PWR to return to clear the menu. Low Battery Alarm Value (right). If the voltage value falls below the alarm's setting, the alarm will sound and a message will appear on the display. 37 ...
..., water conditions and electrical interference and automatically gives you the best display possible under most conditions. The Low Battery Alarm Value dialog box will turn on the alarm, then press PWR to the Battery Alarm menu. Use the ↑ ↓ keys to enter the first number in the dialog box,... is an effective tool in the dialog box. Input a voltage value between 7 and 18 volts. Press PWR to return to clear the menu. Low Battery Alarm Value (right). If the voltage value falls below the alarm's setting, the alarm will sound and a message will appear on the display. 37 ...

Operation Manual
Page 44
... that shows a simulated bottom signal with the unit as if you were on (left). Voltage The Voltage menu allows you to display battery voltage on the screen in simulator that the simulator is adjustable to suit different lighting conditions. This lets you practice with fish signals.... display contrast is on. 40 To adjust the contrast, repeatedly press MENU until the VOLTAGE menu appears. Contrast scroll bar (right). To display battery voltage: Repeatedly press MENU until the CONTRAST scroll bar appears. Simulator This unit has a built-in a small or medium size or can be...
... that shows a simulated bottom signal with the unit as if you were on (left). Voltage The Voltage menu allows you to display battery voltage on the screen in simulator that the simulator is adjustable to suit different lighting conditions. This lets you practice with fish signals.... display contrast is on. 40 To adjust the contrast, repeatedly press MENU until the VOLTAGE menu appears. Contrast scroll bar (right). To display battery voltage: Repeatedly press MENU until the CONTRAST scroll bar appears. Simulator This unit has a built-in a small or medium size or can be...

Operation Manual
Page 46
... 1. Also check the wiring. 2. Electrical noise from the boat's motor can interfere with the sonar. This causes the sonar to the battery instead of through only one layer of fiberglass and that it is shooting through a fuse block or ignition switch. 2. The red wire connects...the factory customer service department. Rerouting the power and transducer cables away from the display. 42 Check both are corroded, or the battery needs charging. Make certain both the transducer and power connectors. If the transducer is mounted inside the back cover of this manual....
... 1. Also check the wiring. 2. Electrical noise from the boat's motor can interfere with the sonar. This causes the sonar to the battery instead of through only one layer of fiberglass and that it is shooting through a fuse block or ignition switch. 2. The red wire connects...the factory customer service department. Rerouting the power and transducer cables away from the display. 42 Check both are corroded, or the battery needs charging. Make certain both the transducer and power connectors. If the transducer is mounted inside the back cover of this manual....

Operation Manual
Page 47
... arches with a 30 to 60 foot range than the water you move into shallower water, a bottom signal should appear. 4. Use the Zoom feature. 3. Check the battery voltage. Bottom echo disappears at a slow trolling speed to eliminate weaker signals such as fish or even structure from other targets. No fish arches when...
... arches with a 30 to 60 foot range than the water you move into shallower water, a bottom signal should appear. 4. Use the Zoom feature. 3. Check the battery voltage. Bottom echo disappears at a slow trolling speed to eliminate weaker signals such as fish or even structure from other targets. No fish arches when...

Operation Manual
Page 48
...[also known as the ASP feature (Advanced Signal Processing)]. If noise appears on the boat. Again, routing the power cable directly to the battery helps eliminate noise problems. Make certain to isolate it from other wiring on the display, the problem could be a steady bottom signal on the...the water, the first thing you find noise interference from it. To eliminate or minimize the effects of electrical noise, first try to the battery. Try using resistor spark plugs, alternator filters, or routing the sonar unit's power cable away from engine wiring. vere cases, it can ...
...[also known as the ASP feature (Advanced Signal Processing)]. If noise appears on the boat. Again, routing the power cable directly to the battery helps eliminate noise problems. Make certain to isolate it from other wiring on the display, the problem could be a steady bottom signal on the...the water, the first thing you find noise interference from it. To eliminate or minimize the effects of electrical noise, first try to the battery. Try using resistor spark plugs, alternator filters, or routing the sonar unit's power cable away from engine wiring. vere cases, it can ...