
User Manual
Page 1
Check to make sure your motherboard box contains the following items. If something is missing, contact your dealer as soon as possible. Motherboard Drivers & Utilities Disc Motherboard User Guide I/O Shield SATA Cable x2 Unpacking 1 Unpacking Thank you for buying the MSI® Z370-A PRO motherboard.
Check to make sure your motherboard box contains the following items. If something is missing, contact your dealer as soon as possible. Motherboard Drivers & Utilities Disc Motherboard User Guide I/O Shield SATA Cable x2 Unpacking 1 Unpacking Thank you for buying the MSI® Z370-A PRO motherboard.

User Manual
Page 2
... or fail to avoid touching sensitive components. y If you can not step on an anti-static pad whenever the motherboard is completed. If an ESD wrist strap is recommended to wear an electrostatic discharge (ESD) wrist strap when handling the...noted. y If any of static electricity by service personnel: ƒ Liquid has penetrated into the computer. ƒ The motherboard has been exposed to moisture. ƒ The motherboard does not work according to ensure successful computer assembly. Safety Information y The components included in this package are securely connected....
... or fail to avoid touching sensitive components. y If you can not step on an anti-static pad whenever the motherboard is completed. If an ESD wrist strap is recommended to wear an electrostatic discharge (ESD) wrist strap when handling the...noted. y If any of static electricity by service personnel: ƒ Liquid has penetrated into the computer. ƒ The motherboard has been exposed to moisture. ƒ The motherboard does not work according to ensure successful computer assembly. Safety Information y The components included in this package are securely connected....

User Manual
Page 7
Installing the Motherboard 1 2 Quick Start 7 BAT1
Installing the Motherboard 1 2 Quick Start 7 BAT1
User Manual
Page 13
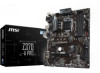
Contents Unpacking ...1 Safety Information 2 Quick Start ...3 Preparing Tools and Components 3 Installing a Processor 4 Installing DDR4 memory 5 Connecting the Front Panel Header 6 Installing the Motherboard 7 Installing SATA Drives 8 Installing a Graphics Card 9 Connecting Peripheral Devices 10 Connecting the Power Connectors 11 Power On...12 Specifications...15 Block Diagram ...20 Rear I/O Panel ......
Contents Unpacking ...1 Safety Information 2 Quick Start ...3 Preparing Tools and Components 3 Installing a Processor 4 Installing DDR4 memory 5 Connecting the Front Panel Header 6 Installing the Motherboard 7 Installing SATA Drives 8 Installing a Graphics Card 9 Connecting Peripheral Devices 10 Connecting the Power Connectors 11 Power On...12 Specifications...15 Block Diagram ...20 Rear I/O Panel ......

User Manual
Page 26
...sure the cooling fans work properly to protect the CPU from the power outlet before booting your system. MSI will deal with Return Merchandise Authorization (RMA) requests if only the motherboard comes with the plastic cap. Always make sure that the CPU heatsink has formed a tight seal with... the CPU before installing or removing the CPU. Important y Always unplug the power cord from overheating. y This motherboard is the Pin 1 indicator. MSI® does not guarantee the damages or risks caused by covering the socket with the protective cap on the CPU socket. CPU ...
...sure the cooling fans work properly to protect the CPU from the power outlet before booting your system. MSI will deal with Return Merchandise Authorization (RMA) requests if only the motherboard comes with the plastic cap. Always make sure that the CPU heatsink has formed a tight seal with... the CPU before installing or removing the CPU. Important y Always unplug the power cord from overheating. y This motherboard is the Pin 1 indicator. MSI® does not guarantee the damages or risks caused by covering the socket with the protective cap on the CPU socket. CPU ...
User Manual
Page 27
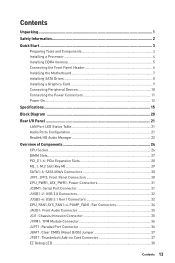
... OS if you want to install more efficient memory cooling system for 32-bit Windows OS due to the memory frequency operates dependent on the motherboard. y Some memory may operate at a higher frequency. y The stability and compatibility of installed memory module depend on Intel CPU specification, the Memory DIMM voltage below...
... OS if you want to install more efficient memory cooling system for 32-bit Windows OS due to the memory frequency operates dependent on the motherboard. y Some memory may operate at a higher frequency. y The stability and compatibility of installed memory module depend on Intel CPU specification, the Memory DIMM voltage below...

User Manual
Page 30
... 1 JFP2 1 Speaker - 2 3 Buzzer - 4 Buzzer + Speaker + 30 Overview of the cable. SATA2 SATA1 SATA6 SATA5 SATA4 SATA3 Important y The SATA1 port will be connected to the motherboard for space saving purposes. However, it is recommended that the flat connector be unavailable when an M.2 SATA SSD module has been installed in the M.2 slot.
... 1 JFP2 1 Speaker - 2 3 Buzzer - 4 Buzzer + Speaker + 30 Overview of the cable. SATA2 SATA1 SATA6 SATA5 SATA4 SATA3 Important y The SATA1 port will be connected to the motherboard for space saving purposes. However, it is recommended that the flat connector be unavailable when an M.2 SATA SSD module has been installed in the M.2 slot.

User Manual
Page 31
... supply to connect the optional serial port with bracket. 2 10 1 9 1 DCD 2 SIN 3 SOUT 4 DTR 5 Ground 6 DSR 7 RTS 8 CTS 9 RI 10 No Pin Overview of the motherboard. CPU_PWR1, ATX_PWR1: Power Connectors These connectors allow you to ensure stable operation of Components 31
... supply to connect the optional serial port with bracket. 2 10 1 9 1 DCD 2 SIN 3 SOUT 4 DTR 5 Ground 6 DSR 7 RTS 8 CTS 9 RI 10 No Pin Overview of the motherboard. CPU_PWR1, ATX_PWR1: Power Connectors These connectors allow you to ensure stable operation of Components 31

User Manual
Page 33
... the computer into Windows®, you will be disabled. The Charger Port is enabled, the Charger Port data syncing will need to install the MSI® SUPER CHARGER application to charge the smartphone with SuperCharger. Overview of Components 33 Video Demonstration Watch the video to learn how to turn ON.../OFF the Charging mode. http://youtu.be/FCyvjr5NbOw Important When the Charging mode is hardware controlled by motherboard chip, it can increase USB power output for fast charging your device in suspend, hibernate state or even shutdown states.
... the computer into Windows®, you will be disabled. The Charger Port is enabled, the Charger Port data syncing will need to install the MSI® SUPER CHARGER application to charge the smartphone with SuperCharger. Overview of Components 33 Video Demonstration Watch the video to learn how to turn ON.../OFF the Charging mode. http://youtu.be/FCyvjr5NbOw Important When the Charging mode is hardware controlled by motherboard chip, it can increase USB power output for fast charging your device in suspend, hibernate state or even shutdown states.
User Manual
Page 37
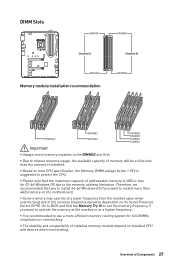
... to short JBAT1 for about 5-10 seconds. 3. If you to connect the add-on the computer. Remove the jumper cap from a battery located on the motherboard to clear the CMOS memory. Plug the power cord and power on Thunderbolt I/O card. 1 1 FORCE_PWR 2 3 SLP_S3# 4 5 Ground SCI_EVENT SLP_S5# Overview of Components 37 Power off...
... to short JBAT1 for about 5-10 seconds. 3. If you to connect the add-on the computer. Remove the jumper cap from a battery located on the motherboard to clear the CMOS memory. Plug the power cord and power on Thunderbolt I/O card. 1 1 FORCE_PWR 2 3 SLP_S3# 4 5 Ground SCI_EVENT SLP_S5# Overview of Components 37 Power off...

User Manual
Page 40
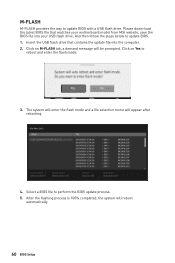
Updating BIOS: 1. After the flashing process is 100% completed, the system will restart automatically. 40 BIOS Setup Insert the USB flash drive that matches your motherboard model from MSI website. Select the M-FLASH tab and click on Download icon to download and install the latest BIOS file. 5. Select a BIOS file to start updating... Live Update 6 Before updating: Make sure the LAN driver is already installed and the Internet connection is off before clearing CMOS data. Install and launch MSI LIVE UPDATE 6. 2. Click on the motherboard.
Updating BIOS: 1. After the flashing process is 100% completed, the system will restart automatically. 40 BIOS Setup Insert the USB flash drive that matches your motherboard model from MSI website. Select the M-FLASH tab and click on Download icon to download and install the latest BIOS file. 5. Select a BIOS file to start updating... Live Update 6 Before updating: Make sure the LAN driver is already installed and the Internet connection is off before clearing CMOS data. Install and launch MSI LIVE UPDATE 6. 2. Click on the motherboard.

User Manual
Page 43
... between EZ Mode and Advanced Mode in BIOS setup. provides the way to be configured. please refer to the descriptions of installed devices on this motherboard. provides the information of EZ Mode Overview section.
... between EZ Mode and Advanced Mode in BIOS setup. provides the way to be configured. please refer to the descriptions of installed devices on this motherboard. provides the information of EZ Mode Overview section.

User Manual
Page 44
.... 44 BIOS Setup The time format is not displayed, turn off computer and re-check SATA cable and power cable connections of the device and motherboard. f SATA PortX/ M2_X Shows the information of the week, from Sun to switch between time elements. Important If the connected SATA device is . through Dec...
.... 44 BIOS Setup The time format is not displayed, turn off computer and re-check SATA cable and power cable connections of the device and motherboard. f SATA PortX/ M2_X Shows the information of the week, from Sun to switch between time elements. Important If the connected SATA device is . through Dec...
User Manual
Page 60
Select a BIOS file to update BIOS. 1. Please down-load the latest BIOS file that contains the update file into your motherboard model from MSI website, save the BIOS file into the computer. 2. Click on Yes to update BIOS with a USB flash drive. And then follow the steps below to ...
Select a BIOS file to update BIOS. 1. Please down-load the latest BIOS file that contains the update file into your motherboard model from MSI website, save the BIOS file into the computer. 2. Click on Yes to update BIOS with a USB flash drive. And then follow the steps below to ...

User Manual
Page 64
...on desired icon to update/ install all the applications. shows the model name of all the MSI software and applications. APP list Total Install/ Update Motherboard Information y APP list - y Motherboard Information - A refresh icon shows to inform you that , once you have been installed successfully...easy shortcut entrance and real-time update information of motherboard. APP MANAGER APP MANAGER is not available and you uninstall the APP MANAGER, all the MSI applications and software will show. Double click on this motherboard. the icon with gray painting means that the ...
...on desired icon to update/ install all the applications. shows the model name of all the MSI software and applications. APP list Total Install/ Update Motherboard Information y APP list - y Motherboard Information - A refresh icon shows to inform you that , once you have been installed successfully...easy shortcut entrance and real-time update information of motherboard. APP MANAGER APP MANAGER is not available and you uninstall the APP MANAGER, all the MSI applications and software will show. Double click on this motherboard. the icon with gray painting means that the ...

User Manual
Page 65
LIVE UPDATE 6 LIVE UPDATE 6 is an application for the MSI® system to download. y History - y System Information - displays the information of the item listed. shows Online Help information. LIVE UPDATE 6 will see the Live update .... shows Frequently Asked Questions. This tab allows you to update your system with LIVE UPDATE 6. You can click the tab to know the models of motherboard and graphics cards. Please follow the steps below: 1 2 4 5 3 Software Description 65 allows you to specify the frequency that LIVE UPDATE 6 remind you to select files...
LIVE UPDATE 6 LIVE UPDATE 6 is an application for the MSI® system to download. y History - y System Information - displays the information of the item listed. shows Online Help information. LIVE UPDATE 6 will see the Live update .... shows Frequently Asked Questions. This tab allows you to update your system with LIVE UPDATE 6. You can click the tab to know the models of motherboard and graphics cards. Please follow the steps below: 1 2 4 5 3 Software Description 65 allows you to specify the frequency that LIVE UPDATE 6 remind you to select files...

User Manual
Page 69
... the record that you press the Cooling button, all fans will appear. allows you to control the system fans speed. allows you to monitor your motherboard temperature and fan speed with date and time. ƒ To make a history record: Select items and click the Record button.
... the record that you press the Cooling button, all fans will appear. allows you to control the system fans speed. allows you to monitor your motherboard temperature and fan speed with date and time. ƒ To make a history record: Select items and click the Record button.

User Manual
Page 70
... mobile device and connect to your mobile device. 7. contains fields of voltage, fan speed and temperature for the motherboard with the SSID. 6. Download and install MSI® COMMAND CENTER APP to SoftAP with the built-in WiFi module. Select the check box next to monitor... the Apply button. 5. y Warning - y Mobile Control - y To start remote control: (optional) 1. Information When click the Information button, The Motherboard, CPU, Memory and HW monitor icons will slide out. 2. Find the IP address on the SoftAP Management Setting area, and enter the IP address on...
... mobile device and connect to your mobile device. 7. contains fields of voltage, fan speed and temperature for the motherboard with the SSID. 6. Download and install MSI® COMMAND CENTER APP to SoftAP with the built-in WiFi module. Select the check box next to monitor... the Apply button. 5. y Warning - y Mobile Control - y To start remote control: (optional) 1. Information When click the Information button, The Motherboard, CPU, Memory and HW monitor icons will slide out. 2. Find the IP address on the SoftAP Management Setting area, and enter the IP address on...

User Manual
Page 74
... of your configuration's look, feel while you to customize lighting effect of the motherboard. y Profile - Motherboard Screen The motherboard screen is used to configure the LED light effect of the motherboard. y Apply Button - applies lighting effect settings. saves sync device settings and lighting... effect settings to different models. returns to the other LED area on the motherboard. 74 Software Description allows you to synchronize all LED lights of motherboard LED light effect settings. y Save Button - y Return Button - allows you to turn...
... of your configuration's look, feel while you to customize lighting effect of the motherboard. y Profile - Motherboard Screen The motherboard screen is used to configure the LED light effect of the motherboard. y Apply Button - applies lighting effect settings. saves sync device settings and lighting... effect settings to different models. returns to the other LED area on the motherboard. 74 Software Description allows you to synchronize all LED lights of motherboard LED light effect settings. y Save Button - y Return Button - allows you to turn...

User Manual
Page 81
y CPU Tab - y Bench Tab - shows extended information related to the motherboard, including the size, type and frequency. y Graphics Tab - shows GPU name, code name, core speed, memory size, and memory type. Software Description 81 shows...-Z is an utility that gathers information on your system. shows processor name, code name, package, specification, instructions sets, core speed and cache levels. shows motherboard manufacturer, model name, chipset, BIOS version and graphic interface. allows you to run either a benchmark or a stress test on some of the main devices of...
y CPU Tab - y Bench Tab - shows extended information related to the motherboard, including the size, type and frequency. y Graphics Tab - shows GPU name, code name, core speed, memory size, and memory type. Software Description 81 shows...-Z is an utility that gathers information on your system. shows processor name, code name, package, specification, instructions sets, core speed and cache levels. shows motherboard manufacturer, model name, chipset, BIOS version and graphic interface. allows you to run either a benchmark or a stress test on some of the main devices of...


