
Owners Manual
Page 2
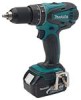
...equipment. Power tool plugs must match the outlet. Do not abuse the cord. Personal Safety 10. ENGLISH (Original instructions) SPECIFICATIONS Model LXPH01 LXPH02 Concrete 13 mm (1/2") 13 mm (1/2") Steel 13 mm (1/2") 13 mm (1/2") Capacities Wood 38 mm (1-1/2") 38 mm (1-1/2") Wood ... 206 mm (8-1/8") Net weight 1.6kg (3.4 lbs) 1.8kg (4.0 lbs) 1.7kg (3.8 lbs) Rated voltage D.C. 18 V D.C. 14.4 V Standard battery cartridge BL1815 BL1830 BL1430 • Due to our continuing programme of electric shock. 5. The term "power tool" in the warnings refers to change ...
...equipment. Power tool plugs must match the outlet. Do not abuse the cord. Personal Safety 10. ENGLISH (Original instructions) SPECIFICATIONS Model LXPH01 LXPH02 Concrete 13 mm (1/2") 13 mm (1/2") Steel 13 mm (1/2") 13 mm (1/2") Capacities Wood 38 mm (1-1/2") 38 mm (1-1/2") Wood ... 206 mm (8-1/8") Net weight 1.6kg (3.4 lbs) 1.8kg (4.0 lbs) 1.7kg (3.8 lbs) Rated voltage D.C. 18 V D.C. 14.4 V Standard battery cartridge BL1815 BL1830 BL1430 • Due to our continuing programme of electric shock. 5. The term "power tool" in the warnings refers to change ...
Owners Manual
Page 3
... 22. Many accidents are connected and properly used with another . Keep cutting tools sharp and clean. in accordance with specifically designated battery packs. Recharge only with the switch is maintained. 29. Use power tools only with these instructions, taking into account the working ...20. Ensure the switch is below when using only identical replacement parts. Carrying power tools with sharp cutting edges are less likely to another battery pack. 25. Remove any adjustments, changing accessories, or storing power tools. A wrench or a key left attached to noise can make...
... 22. Many accidents are connected and properly used with another . Keep cutting tools sharp and clean. in accordance with specifically designated battery packs. Recharge only with the switch is maintained. 29. Use power tools only with these instructions, taking into account the working ...20. Ensure the switch is below when using only identical replacement parts. Carrying power tools with sharp cutting edges are less likely to another battery pack. 25. Remove any adjustments, changing accessories, or storing power tools. A wrench or a key left attached to noise can make...
Owners Manual
Page 4
... eyes, rinse them out with product (gained from rotating parts. 8. USD302-1 Symbols The followings show the symbols used for maintaining maximum battery life 1. Do not use ) replace strict adherence to water or rain. Always stop operating immediately. 6. MISUSE or failure to prevent ... in loss of overheating, possible burns and even an explosion. 4. Do not incinerate the battery cartridge even if it . 4. Charge the battery cartridge once in a fire. 8. Do not disassemble battery cartridge. 3. Hold the tool firmly. 7. Do not leave the tool running. Some material...
... eyes, rinse them out with product (gained from rotating parts. 8. USD302-1 Symbols The followings show the symbols used for maintaining maximum battery life 1. Do not use ) replace strict adherence to water or rain. Always stop operating immediately. 6. MISUSE or failure to prevent ... in loss of overheating, possible burns and even an explosion. 4. Do not incinerate the battery cartridge even if it . 4. Charge the battery cartridge once in a fire. 8. Do not disassemble battery cartridge. 3. Hold the tool firmly. 7. Do not leave the tool running. Some material...

Owners Manual
Page 5
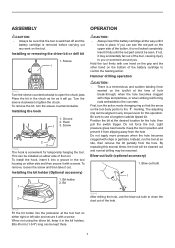
...red indicator cannot be sure that causes it to draw an abnormally high current. Switch trigger 1 011493 CAUTION: • Before inserting the battery cartridge into place. Red indicator 1 2. Star marking • Overloaded: The tool is operated in easily, it is not locked completely..... Lighting up the front lamp 1. This system automatically cuts off and the battery cartridge is removed before pulling the trigger switch again. • Low battery voltage: The remaining battery capacity is released, have the tool serviced at a Makita service center. The tool will not operate.
...red indicator cannot be sure that causes it to draw an abnormally high current. Switch trigger 1 011493 CAUTION: • Before inserting the battery cartridge into place. Red indicator 1 2. Star marking • Overloaded: The tool is operated in easily, it is not locked completely..... Lighting up the front lamp 1. This system automatically cuts off and the battery cartridge is removed before pulling the trigger switch again. • Low battery voltage: The remaining battery capacity is released, have the tool serviced at a Makita service center. The tool will not operate.
Owners Manual
Page 7
...for temporarily hanging the tool. By repeating this operation. If not, it will be cleaned out and normal drilling may accidentally fall out of the battery cartridge to tighten the chuck. Position the bit at an idle, then remove the bit partially from the hole. Blow-out bulb (optional accessory... CAUTION: • Always be sure that the arrow on the tool body points to the marking. Bit 1 CAUTION: • Always insert the battery cartridge all the way until the red part cannot be installed on either right or left side and secure it out. Sleeve 1 011497 Turn the...
...for temporarily hanging the tool. By repeating this operation. If not, it will be cleaned out and normal drilling may accidentally fall out of the battery cartridge to tighten the chuck. Position the bit at an idle, then remove the bit partially from the hole. Blow-out bulb (optional accessory... CAUTION: • Always be sure that the arrow on the tool body points to the marking. Bit 1 CAUTION: • Always insert the battery cartridge all the way until the red part cannot be installed on either right or left side and secure it out. Sleeve 1 011497 Turn the...
Owners Manual
Page 8
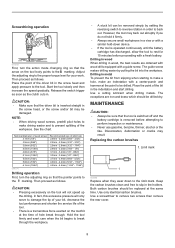
...care when the bit begins to the tool. Both carbon brushes should be sure that the driver bit is removed before proceeding with a fresh battery. Use a screwdriver to rest for your bit, decrease the tool performance and shorten the service life of the tool. • There ...is operated continuously until the battery cartridge has discharged, allow the tool to remove two screws then remove the rear cover. 8 See the chart. Replacing the carbon brushes 1. ...
...care when the bit begins to the tool. Both carbon brushes should be sure that the driver bit is removed before proceeding with a fresh battery. Use a screwdriver to rest for your bit, decrease the tool performance and shorten the service life of the tool. • There ...is operated continuously until the battery cartridge has discharged, allow the tool to remove two screws then remove the rear cover. 8 See the chart. Replacing the carbon brushes 1. ...

Owners Manual
Page 9
... to remove the carbon brush caps of the housing with a slotted bit screwdriver with your Makita tool specified in the recessed part of the carbon brushes. After replacing brushes, insert the battery cartridge into the holes in brush holders securely. 1 1. Hole 2. Carbon brush cap CAUTION... and electric brake operation when releasing the switch trigger. Only use of any other accessories or attachments might present a risk of Makita genuine batteries and chargers • Hook • Bit holder NOTE: • Some items in the tool package as standard accessories. Recessed...
... to remove the carbon brush caps of the housing with a slotted bit screwdriver with your Makita tool specified in the recessed part of the carbon brushes. After replacing brushes, insert the battery cartridge into the holes in brush holders securely. 1 1. Hole 2. Carbon brush cap CAUTION... and electric brake operation when releasing the switch trigger. Only use of any other accessories or attachments might present a risk of Makita genuine batteries and chargers • Hook • Bit holder NOTE: • Some items in the tool package as standard accessories. Recessed...
Parts Breakdown
Page 2
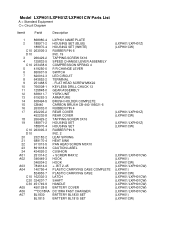
... HANDLE BATTERY COVER DC18RA FAST CHARGER BATTERY BL1830 SET BATTERY BL1815 SET (LXPH01/LXPH01Z) (LXPH01CW) (LXPH01/LXPH01Z) (LXPH01CW) (LXPH01/LXPH01Z) (LXPH01CW) (LXPH01/LXPH01CW) (LXPH01) (LXPH01CW) (LXPH01/LXPH01CW) (LXPH01) (LXPH01CW) (LXPH01/LXPH01CW) (LXPH01/LXPH01CW) (LXPH01/LXPH01CW) (LXPH01/LXPH01CW) (LXPH01/LXPH01CW) (LXPH01) ... PIN 6 INC. 2 LEAF SPRING HEAT SINK PAN HEAD SCREW M3X10 CAUTION LABEL CUSHION + SCREW M4X12 HOOK HOOK +- Model LXPH01/LXPH01Z/LXPH01CW Parts List A = Standard Equipment 〇= Circuit Diagram Item# Part# Description 1 868980-4 2 188971-2 2 188970...
... HANDLE BATTERY COVER DC18RA FAST CHARGER BATTERY BL1830 SET BATTERY BL1815 SET (LXPH01/LXPH01Z) (LXPH01CW) (LXPH01/LXPH01Z) (LXPH01CW) (LXPH01/LXPH01Z) (LXPH01CW) (LXPH01/LXPH01CW) (LXPH01) (LXPH01CW) (LXPH01/LXPH01CW) (LXPH01) (LXPH01CW) (LXPH01/LXPH01CW) (LXPH01/LXPH01CW) (LXPH01/LXPH01CW) (LXPH01/LXPH01CW) (LXPH01/LXPH01CW) (LXPH01) ... PIN 6 INC. 2 LEAF SPRING HEAT SINK PAN HEAD SCREW M3X10 CAUTION LABEL CUSHION + SCREW M4X12 HOOK HOOK +- Model LXPH01/LXPH01Z/LXPH01CW Parts List A = Standard Equipment 〇= Circuit Diagram Item# Part# Description 1 868980-4 2 188971-2 2 188970...

