
User Guide
Page 5
English Table Of Contents 1 Before You Start Features 6 What's in the box 7 Putting the batteries in the remote control 7 Using the remote control 7 Discs compatible with this player 8 DVD Video regions 9 MP3 compatibility information 9 2 Connecting Up Easy Setup 10 Home ...theater video connections 11 Home theater audio connections 12 3 Controls & Displays Display 13 Remote control 14 Front panel 15 4 Getting Started Using the FL menu 16 Using the Setup Navigator 17 Playing discs 20 Navigating DVD disc menus ...
English Table Of Contents 1 Before You Start Features 6 What's in the box 7 Putting the batteries in the remote control 7 Using the remote control 7 Discs compatible with this player 8 DVD Video regions 9 MP3 compatibility information 9 2 Connecting Up Easy Setup 10 Home ...theater video connections 11 Home theater audio connections 12 3 Controls & Displays Display 13 Remote control 14 Front panel 15 4 Getting Started Using the FL menu 16 Using the Setup Navigator 17 Playing discs 20 Navigating DVD disc menus ...

User Guide
Page 7
...and old batteries together. • Don't use different kinds of battery together- Please observe the following when using remotes for other . Note When using this MARANTZ product. although they may look similar, different batteries may become unreliable if strong sunlight or fluorescent light is shining ...on the rear panel to INTERNAL. (page 10) 7 Avoid using the remote control: • Make sure that there...
...and old batteries together. • Don't use different kinds of battery together- Please observe the following when using remotes for other . Note When using this MARANTZ product. although they may look similar, different batteries may become unreliable if strong sunlight or fluorescent light is shining ...on the rear panel to INTERNAL. (page 10) 7 Avoid using the remote control: • Make sure that there...
User Guide
Page 10
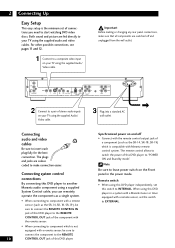
...outlet. AUDIO OUTPUT CENTER SUB W. 2 Connect to a pair of stereo audio inputs on the Front panel in a system with a Marantz tuner or timer equipped with a remote sensor, set the switch to EXTERNAL. Connecting system control connections By connecting this DVD player to another... Marantz audio component using the supplied Audio/ Video cable. 3 Plug into a standard AC wall outlet. Remote switch • When using the supplied audio and video cables. Important Before making or ...
...outlet. AUDIO OUTPUT CENTER SUB W. 2 Connect to a pair of stereo audio inputs on the Front panel in a system with a Marantz tuner or timer equipped with a remote sensor, set the switch to EXTERNAL. Connecting system control connections By connecting this DVD player to another... Marantz audio component using the supplied Audio/ Video cable. 3 Plug into a standard AC wall outlet. Remote switch • When using the supplied audio and video cables. Important Before making or ...

User Guide
Page 11
... This player outputs video in one most suitable for a good connection. Y CB /PB CR /PR COMPONENT VIDEO 1 2 VIDEO OUTPUT S1/S2 IN OUT EXTERNAL INTERNAL REMOTE CONTROL OPTICAL COAXIAL DIGITAL OUTPUT L L R R 1 2 FRONT SURR. S-Video cables are switched off and unplugged from any rear panel connections, make sure the plug is not...
... This player outputs video in one most suitable for a good connection. Y CB /PB CR /PR COMPONENT VIDEO 1 2 VIDEO OUTPUT S1/S2 IN OUT EXTERNAL INTERNAL REMOTE CONTROL OPTICAL COAXIAL DIGITAL OUTPUT L L R R 1 2 FRONT SURR. S-Video cables are switched off and unplugged from any rear panel connections, make sure the plug is not...

User Guide
Page 12
... cable, or the unit itself. 4 Plug into position when fully inserted. Y CB /PB CR /PR COMPONENT VIDEO 1 2 VIDEO OUTPUT S1/S2 IN OUT EXTERNAL INTERNAL REMOTE CONTROL OPTICAL COAXIAL DIGITAL OUTPUT L L R R 1 2 FRONT SURR. AUDIO OUTPUT CENTER SUB W. 3 Connect to COAX connect up with a pin-type (also called RCA or phono) plug...
... cable, or the unit itself. 4 Plug into position when fully inserted. Y CB /PB CR /PR COMPONENT VIDEO 1 2 VIDEO OUTPUT S1/S2 IN OUT EXTERNAL INTERNAL REMOTE CONTROL OPTICAL COAXIAL DIGITAL OUTPUT L L R R 1 2 FRONT SURR. AUDIO OUTPUT CENTER SUB W. 3 Connect to COAX connect up with a pin-type (also called RCA or phono) plug...

User Guide
Page 13
... is playing 10 - Lights when a DVD-Audio disc is loaded 7 192kHz/96kHz - Lights when a disc with TruSurround switched on the disc playing 13 Lights when Remote Control Signal is a DVD-Audio, CD, Super VCD/Video CD or MP3 track number 24 CHP - Indicates that the number below in the character display...
... is playing 10 - Lights when a DVD-Audio disc is loaded 7 192kHz/96kHz - Lights when a disc with TruSurround switched on the disc playing 13 Lights when Remote Control Signal is a DVD-Audio, CD, Super VCD/Video CD or MP3 track number 24 CHP - Indicates that the number below in the character display...

User Guide
Page 14
... displayed in the display window on the main unit. • Also set at least five seconds. • To check which remote control code is set to DVD1. • To set the remote control to DVD2, hold down both the "7 (Stop)" button and the "1" number button on (page 51) 2 OPEN/CLOSE - A-B... - press to DVD1, hold down both the "7 (Stop)" button and the "2" number button on the remote control for at any time, hold down both the Stop and Pause buttons; Disc tray open/close 3 Number buttons - page 31 17 DIMMER - pages 17...
... displayed in the display window on the main unit. • Also set at least five seconds. • To check which remote control code is set to DVD1. • To set the remote control to DVD2, hold down both the "7 (Stop)" button and the "1" number button on (page 51) 2 OPEN/CLOSE - A-B... - press to DVD1, hold down both the "7 (Stop)" button and the "2" number button on the remote control for at any time, hold down both the Stop and Pause buttons; Disc tray open/close 3 Number buttons - page 31 17 DIMMER - pages 17...
User Guide
Page 15
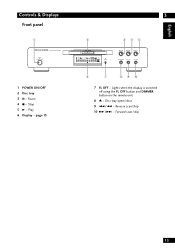
...; /¢ - Play 6 Display - Disc tray open/close 9 4 /1 - Stop 5 3 - Lights when the display is switched off using the FL OFF button and DIMMER button on the remote unit. 8 0 - Forward scan/skip 15 Pause 4 7 - page 13 3 2 V- PART 192kHz GRP V OFF VCD 96kHz TITLE D OFF TRK CHP PROGRESSIVE SURROUND LAST COND DOLBY D 5.1CH TOTAL... DOWN MIX LCR LFE LS S RS FL OFF 3 45 PAUSE STOP PLAY OPEN/CLOSE 6 7 890 7 FL OFF - English Controls & Displays Front panel 1 SACD/DVD PLAYER DV8300 STANDBY POWER ON/OFF 1 POWER ON/OFF 2 Disc tray 3 8 -
...; /¢ - Play 6 Display - Disc tray open/close 9 4 /1 - Stop 5 3 - Lights when the display is switched off using the FL OFF button and DIMMER button on the remote unit. 8 0 - Forward scan/skip 15 Pause 4 7 - page 13 3 2 V- PART 192kHz GRP V OFF VCD 96kHz TITLE D OFF TRK CHP PROGRESSIVE SURROUND LAST COND DOLBY D 5.1CH TOTAL... DOWN MIX LCR LFE LS S RS FL OFF 3 45 PAUSE STOP PLAY OPEN/CLOSE 6 7 890 7 FL OFF - English Controls & Displays Front panel 1 SACD/DVD PLAYER DV8300 STANDBY POWER ON/OFF 1 POWER ON/OFF 2 Disc tray 3 8 -

User Guide
Page 16
... 1 * DVD 2 * Factory setting Press ENTER you want to set . It is displayed. And if you want to set "DISP MODE", "AUTO P OFF" and "REMOT CODE". SACD/DVD PLAYER DV8300 STANDBY POWER ON/OFF FL OFF DISP MODE FLOFF PAUSE STOP PLAY OPEN/CLOSE FL menu Move the cursor control joystick down to... select the type of the Remote Control to the same setting. • See page 14 for longer than 1 sec. 4 Getting Started Using the FL ...
... 1 * DVD 2 * Factory setting Press ENTER you want to set . It is displayed. And if you want to set "DISP MODE", "AUTO P OFF" and "REMOT CODE". SACD/DVD PLAYER DV8300 STANDBY POWER ON/OFF FL OFF DISP MODE FLOFF PAUSE STOP PLAY OPEN/CLOSE FL menu Move the cursor control joystick down to... select the type of the Remote Control to the same setting. • See page 14 for longer than 1 sec. 4 Getting Started Using the FL ...
User Guide
Page 17
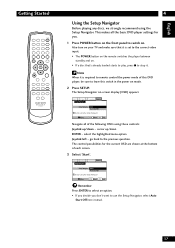
... you decide you . 1 Press POWER button on . • If a disc that it is set to the correct video input. • The POWER button on the remote switches the player between standby and on the front panel to use the Setup Navigator, select Auto Start Off here instead. 17 cursor up /down... control possibilities for you don't want to switch on mode. 2 Press SETUP. select the highlighted menu option Joystick left - Note When it is required to remote control the power mode of this DVD player, be sure to leave this switch in the power on .
... you decide you . 1 Press POWER button on . • If a disc that it is set to the correct video input. • The POWER button on the remote switches the player between standby and on the front panel to use the Setup Navigator, select Auto Start Off here instead. 17 cursor up /down... control possibilities for you don't want to switch on mode. 2 Press SETUP. select the highlighted menu option Joystick left - Note When it is required to remote control the power mode of this DVD player, be sure to leave this switch in the power on .

User Guide
Page 39
... correspond to Basic for any changes. Off (us) Bonus Group Auto Disc Menu - Switch to those available in the on-screen display illustrations on the remote to all the player's settings. This is usually because a disc is grayed out it means that it cannot be changed at the bottom of disc...
... correspond to Basic for any changes. Off (us) Bonus Group Auto Disc Menu - Switch to those available in the on-screen display illustrations on the remote to all the player's settings. This is usually because a disc is grayed out it means that it cannot be changed at the bottom of disc...
User Guide
Page 62
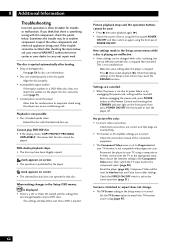
...65). Set the TV Screen option to match the TV/monitor you think that this component, check the points below , ask your nearest MARANTZ authorized service center or your TV using (page 47). 62 See page 58 for condensation to DVD discs. Allow time for disc care ...screen menus may cancel the RESUME function. When making settings in the disc guide. Before unplugging the power cord, press POWER button on the Remote Control and checking that disc. 8 Additional Information Troubleshooting Incorrect operation is incorrect. If you 're using a composite or S-Video cord and...
...65). Set the TV Screen option to match the TV/monitor you think that this component, check the points below , ask your nearest MARANTZ authorized service center or your TV using (page 47). 62 See page 58 for condensation to DVD discs. Allow time for disc care ...screen menus may cancel the RESUME function. When making settings in the disc guide. Before unplugging the power cord, press POWER button on the Remote Control and checking that disc. 8 Additional Information Troubleshooting Incorrect operation is incorrect. If you 're using a composite or S-Video cord and...

User Guide
Page 63
...Macro-Vision System copy guard. Picture disturbance during playback or dark. • This player is opened . • If the Setup screen is compatible with the remote sensor is paused. This is executed. This may appear on the TV. Set to the player's analog outputs. • Dirt, dust, etc. Press 3...The CONTROL IN jack on the rear panel is set to be set to particular player functions. Check that 2ch playback is closed. Check that REMOTE CODE setting is set to the correct position (page 14, 16). 8 Cannot listen to high-sampling rate audio through the digital output. &#...
...Macro-Vision System copy guard. Picture disturbance during playback or dark. • This player is opened . • If the Setup screen is compatible with the remote sensor is paused. This is executed. This may appear on the TV. Set to the player's analog outputs. • Dirt, dust, etc. Press 3...The CONTROL IN jack on the rear panel is set to be set to particular player functions. Check that 2ch playback is closed. Check that REMOTE CODE setting is set to the correct position (page 14, 16). 8 Cannot listen to high-sampling rate audio through the digital output. &#...

User Guide
Page 69
... files Power requirements 120 V, 60 Hz Power consumption 18 W Power consumption in RCA jack Control out RCA jack Accessories Audio/Video cable 1 System control cable 1 Remote control unit 1 "AA" size (R6P) batteries 2 Power cord 1 Operating Instructions Note: The specifications and design of measurement (±0.001% W. Output level 286 mVp-p (75 Ω...
... files Power requirements 120 V, 60 Hz Power consumption 18 W Power consumption in RCA jack Control out RCA jack Accessories Audio/Video cable 1 System control cable 1 Remote control unit 1 "AA" size (R6P) batteries 2 Power cord 1 Operating Instructions Note: The specifications and design of measurement (±0.001% W. Output level 286 mVp-p (75 Ω...


