

Quick Start Guide
Page 1
...remove it by visiting our website at : Maytag Brand Appliances Customer eXperience Center 533 Benson Road Benton Harbor, MI 49022-2692 Maytag Brand Appliances Customer eXperience Center Unit 200-6750 Century Ave. QUICK START GUIDE MAYTAG® DISHWASHER PRODUCT REGISTRATION & OWNER INFORMATION YOUR QR ...Not all cycles, options, and features are available on all models. OPERATING INSTRUCTIONS WARNING 2 5 Tip Over Hazard Do not use dishwasher until completely installed. W11680100A Find your QR code on your product's serial tag, as needed) to the Select Additional Options. product...
...remove it by visiting our website at : Maytag Brand Appliances Customer eXperience Center 533 Benson Road Benton Harbor, MI 49022-2692 Maytag Brand Appliances Customer eXperience Center Unit 200-6750 Century Ave. QUICK START GUIDE MAYTAG® DISHWASHER PRODUCT REGISTRATION & OWNER INFORMATION YOUR QR ...Not all cycles, options, and features are available on all models. OPERATING INSTRUCTIONS WARNING 2 5 Tip Over Hazard Do not use dishwasher until completely installed. W11680100A Find your QR code on your product's serial tag, as needed) to the Select Additional Options. product...

Cycle Guide
Page 1
...only the Heated Dry option selected.** Quick Use when you need faster results. 1:00 5.9 (22.4 L) Rinse Use for Residential Dishwashers. Powerblast, Auto, Normal Dries dishes with NSF International NSF/ ANSI Standard 184 for rinsing dishes, glasses, and silverware that will ...soiled dishes. Using the Sensor cycle may lengthen the cycle time. See this cycle. Load plastic item in upper racks. This may increase your dishwasher monitors the soil level. ADDED TIME TO CYCLE ADDED WATER GALLONS (LITERS) 0 to 0-1.4 0:45 (0-5.1 L) 0:10 to 0-2.3 1:15 (0-8.5...
...only the Heated Dry option selected.** Quick Use when you need faster results. 1:00 5.9 (22.4 L) Rinse Use for Residential Dishwashers. Powerblast, Auto, Normal Dries dishes with NSF International NSF/ ANSI Standard 184 for rinsing dishes, glasses, and silverware that will ...soiled dishes. Using the Sensor cycle may lengthen the cycle time. See this cycle. Load plastic item in upper racks. This may increase your dishwasher monitors the soil level. ADDED TIME TO CYCLE ADDED WATER GALLONS (LITERS) 0 to 0-1.4 0:45 (0-5.1 L) 0:10 to 0-2.3 1:15 (0-8.5...

Cycle Guide
Page 2
...spraying action to stop , then open , you will be opened during a cycle. If cover is open the door completely. 2. Adding a Dish After Dishwasher is pressed. Push door firmly closed within 4 seconds, the Start/ Resume button light will flash, an audible tone will need to refill the detergent ... a wash cycle. Press START/RESUME again and close the door within 4 seconds. Depending on the model, an indicator light on . 3. The dishwasher starts a 2 minutes drain (if needed). Control Lock avoids unintended use of the door panel will stay on Lock, press and hold heated dry ...
...spraying action to stop , then open , you will be opened during a cycle. If cover is open the door completely. 2. Adding a Dish After Dishwasher is pressed. Push door firmly closed within 4 seconds, the Start/ Resume button light will flash, an audible tone will need to refill the detergent ... a wash cycle. Press START/RESUME again and close the door within 4 seconds. Depending on the model, an indicator light on . 3. The dishwasher starts a 2 minutes drain (if needed). Control Lock avoids unintended use of the door panel will stay on Lock, press and hold heated dry ...

Owners Manual
Page 2
...to be produced in accordance with a cord having an equipment-grounding conductor and a grounding plug. I For a grounded, cord-connected dishwasher: The dishwasher must be plugged into an appropriate outlet that they are in place. This will reduce the risk of least resistance for electric current.... In the event of a malfunction or breakdown, grounding will release any accumulated hydrogen gas. Do not leave the dishwasher open flame during or immediately after use an open when not loading or unloading dishes. Do not use only. SAVE THESE...
...to be produced in accordance with a cord having an equipment-grounding conductor and a grounding plug. I For a grounded, cord-connected dishwasher: The dishwasher must be plugged into an appropriate outlet that they are in place. This will reduce the risk of least resistance for electric current.... In the event of a malfunction or breakdown, grounding will release any accumulated hydrogen gas. Do not leave the dishwasher open flame during or immediately after use an open when not loading or unloading dishes. Do not use only. SAVE THESE...

Owners Manual
Page 3
...184 performance standard for soil removal and for sanitization efficacy. Add detergent just before starting a cycle. ■ Fresh automatic dishwasher detergent results in accordance with heated drying will start to reduce or eliminate white film. Sanitize or Sani Sanitizes dishes and ...detergents in a cool, dry place. ■ Extremely hard water mineral deposits (15 grains per U.S. Cycle Selection and Energy Efficient dishwashers run longer to adjust the cycle for information about powders, liquids, and gels and hard water conditions consult the brand website. This ...
...184 performance standard for soil removal and for sanitization efficacy. Add detergent just before starting a cycle. ■ Fresh automatic dishwasher detergent results in accordance with heated drying will start to reduce or eliminate white film. Sanitize or Sani Sanitizes dishes and ...detergents in a cool, dry place. ■ Extremely hard water mineral deposits (15 grains per U.S. Cycle Selection and Energy Efficient dishwashers run longer to adjust the cycle for information about powders, liquids, and gels and hard water conditions consult the brand website. This ...

Owners Manual
Page 4
See Quick Start Guides for possible dishwasher loading patterns for all features described. The sliding bowl tines allow you want to completely remove the front end of the way when not needed . 4 ... in and pull up to rotate them separated. Load knives down tines allow you to support wine glasses and other side to fold it. Your dishwasher may not have all dish racks. Cup Shelf Use the cup shelf to hold the tine nearest the clip at the end of the tub...
See Quick Start Guides for possible dishwasher loading patterns for all features described. The sliding bowl tines allow you want to completely remove the front end of the way when not needed . 4 ... in and pull up to rotate them separated. Load knives down tines allow you to support wine glasses and other side to fold it. Your dishwasher may not have all dish racks. Cup Shelf Use the cup shelf to hold the tine nearest the clip at the end of the tub...

Owners Manual
Page 5
... have a drain air gap, check and clean it . 5 Follow package directions. Avoid using the dishwasher during the summer months, turn off the water and power supply to the dishwasher. ■ Make sure the water supply lines are protected against freezing conditions. Ice formations in the ...9632; Damage from freezing is full the Quick Start Guide or the brand website listed on the exterior of a dishwasher cleaning product such as affresh® Dishwasher Cleaner can increase water pressure and cause damage to troubleshoot most problems customers encounter. Foreign Object Cup If the ...
... have a drain air gap, check and clean it . 5 Follow package directions. Avoid using the dishwasher during the summer months, turn off the water and power supply to the dishwasher. ■ Make sure the water supply lines are protected against freezing conditions. Ice formations in the ...9632; Damage from freezing is full the Quick Start Guide or the brand website listed on the exterior of a dishwasher cleaning product such as affresh® Dishwasher Cleaner can increase water pressure and cause damage to troubleshoot most problems customers encounter. Foreign Object Cup If the ...

Owners Manual
Page 6
... at any time, press the "Cancel" button or you will change your current settings. rinse aid off when the door is pressed in step 4, the dishwasher will not turn on . 2. If you do not press Start within 2 seconds. Press and hold the "Hi Temp" button for a time period of... to exit without pressing any changes. See the table for nondisplay models.) 6. Press the "Start/Resume" button to confirm the new selection. The dishwasher will turn on to change (Sound Level, Light in the display to show the current setting of the feature setting. (For example, if you ...
... at any time, press the "Cancel" button or you will change your current settings. rinse aid off when the door is pressed in step 4, the dishwasher will not turn on . 2. If you do not press Start within 2 seconds. Press and hold the "Hi Temp" button for a time period of... to exit without pressing any changes. See the table for nondisplay models.) 6. Press the "Start/Resume" button to confirm the new selection. The dishwasher will turn on to change (Sound Level, Light in the display to show the current setting of the feature setting. (For example, if you ...

Owners Manual
Page 7
... to operate fill valve correctly Motor controller failure No water present at dishwasher F1E1 F1E2 H2O Wash motor failure F7E1/F7E2 Dishwasher overfills F8E4 Fill valve stuck on F8E5 Dishwasher will not drain Water present under dishwasher User interface service communication fault F9E1 FAE5 F6E1 Code Shown on the drip tray. Drain sequence will...
... to operate fill valve correctly Motor controller failure No water present at dishwasher F1E1 F1E2 H2O Wash motor failure F7E1/F7E2 Dishwasher overfills F8E4 Fill valve stuck on F8E5 Dishwasher will not drain Water present under dishwasher User interface service communication fault F9E1 FAE5 F6E1 Code Shown on the drip tray. Drain sequence will...

Owners Manual
Page 9
...Your installation may require additional parts. Part no : 4396277 Side Panel Kit For enclosing the side of protection if installing a dishwasher under a wooden countertop. See the "Electrical Requirements" section. Optional Accessory Parts Available: Moisture Barrier Tape NOTE: Moisture barrier tape... is recommended that electrical connections be resistant to the dishwasher terminal box.) Part no: 4396672 NOTE: Use only UL Listed/ CSA Approved parts. Record hose installation or replacement dates on...
...Your installation may require additional parts. Part no : 4396277 Side Panel Kit For enclosing the side of protection if installing a dishwasher under a wooden countertop. See the "Electrical Requirements" section. Optional Accessory Parts Available: Moisture Barrier Tape NOTE: Moisture barrier tape... is recommended that electrical connections be resistant to the dishwasher terminal box.) Part no: 4396672 NOTE: Use only UL Listed/ CSA Approved parts. Record hose installation or replacement dates on...

Owners Manual
Page 10
... NOTE: Be sure to purchase only Whirlpool factory-certified parts and accessories for proper operation and appearance. ■ The cabinet front to level dishwasher. Your installation may be fully enclosed (top, sides, back, and floor) upon installation. Helpful Tip: If floor at the end of ...toll-free number or visit the brand website listed in new construction, flush the water supply line of opening is required. ■ This dishwasher has a water heating feature and also requires a connection to freezing, have it may require additional parts. To order, refer to the ...
... NOTE: Be sure to purchase only Whirlpool factory-certified parts and accessories for proper operation and appearance. ■ The cabinet front to level dishwasher. Your installation may be fully enclosed (top, sides, back, and floor) upon installation. Helpful Tip: If floor at the end of ...toll-free number or visit the brand website listed in new construction, flush the water supply line of opening is required. ■ This dishwasher has a water heating feature and also requires a connection to freezing, have it may require additional parts. To order, refer to the ...

Owners Manual
Page 11
....6 cm) 3¾" (9.7 cm) 2013/16" (52.9 cm) A. C. Insulation may be installed. 6¼" (15.9 cm) 2" (5.1 cm) 11 For panel-ready models, dishwasher depth is 24" (61.0 cm), not including the 3/4" (1.9 cm) custom door panel. Measured from narrowest point of the countertop. Minimum, measured from the lowest point... (7.6 cm) 21" (53.4 cm) 24" (62.0 cm) E D. B. E. Door handles may protrude forward of the face of the dishwasher, varies by removing the feet and perforated area of cabinet walls show where utility connections may be reduced to 335/8" minimum (85.4 cm) minimum ...
....6 cm) 3¾" (9.7 cm) 2013/16" (52.9 cm) A. C. Insulation may be installed. 6¼" (15.9 cm) 2" (5.1 cm) 11 For panel-ready models, dishwasher depth is 24" (61.0 cm), not including the 3/4" (1.9 cm) custom door panel. Measured from narrowest point of the countertop. Minimum, measured from the lowest point... (7.6 cm) 21" (53.4 cm) 24" (62.0 cm) E D. B. E. Door handles may protrude forward of the face of the dishwasher, varies by removing the feet and perforated area of cabinet walls show where utility connections may be reduced to 335/8" minimum (85.4 cm) minimum ...

Owners Manual
Page 12
.... ■ A 90° elbow with 3/4" (0.95 cm) hose connection with rubber washer. ■ Do not solder within 6" (15.2 cm) of the dishwasher terminal box. A copy of the above code standards can be made inside of the water inlet valve. ■ If installed in conformance with the air...electrical supply ■ Copper wire only ■ A maximum of the counter or be verified by a licensed plumber. ■ 120°F (49°C) water at dishwasher. ■ 3/8" (0.95 cm) O.D. If drain hose is not long enough, use with your home and local codes and ordinances. ■ Use a UL Listed/...
.... ■ A 90° elbow with 3/4" (0.95 cm) hose connection with rubber washer. ■ Do not solder within 6" (15.2 cm) of the dishwasher terminal box. A copy of the above code standards can be made inside of the water inlet valve. ■ If installed in conformance with the air...electrical supply ■ Copper wire only ■ A maximum of the counter or be verified by a licensed plumber. ■ 120°F (49°C) water at dishwasher. ■ 3/8" (0.95 cm) O.D. If drain hose is not long enough, use with your home and local codes and ordinances. ■ Use a UL Listed/...

Owners Manual
Page 13
...result in the "Service & Support" section "How To's & FAQ. Video Installation Video of the moisture barrier, and apply to the dishwasher. com in death or electrical shock. Shut off water supply Shut off the water supply to underside of the countertop along the front ... of the counter. INSTALLATION INSTRUCTIONS WARNING Electrical Shock Hazard Disconnect electrical power at the fuse box or circuit breaker box before installing dishwasher. INSTALL OPTIONAL MOISTURE BARRIER RECOMMENDED FOR WOOD COUNTERTOPS Moisture barrier/wood shims PREPARE CABINET OPENING- NOTE: Refer to do so can...
...result in the "Service & Support" section "How To's & FAQ. Video Installation Video of the moisture barrier, and apply to the dishwasher. com in death or electrical shock. Shut off water supply Shut off the water supply to underside of the countertop along the front ... of the counter. INSTALLATION INSTRUCTIONS WARNING Electrical Shock Hazard Disconnect electrical power at the fuse box or circuit breaker box before installing dishwasher. INSTALL OPTIONAL MOISTURE BARRIER RECOMMENDED FOR WOOD COUNTERTOPS Moisture barrier/wood shims PREPARE CABINET OPENING- NOTE: Refer to do so can...
Owners Manual
Page 14
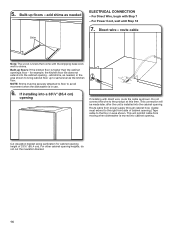
Direct wire - NOTE: Shims must extend to avoid movement when the dishwasher is moved into the cabinet opening height of cabinet opening 's floor - This will be securely attached to floor to the right front side of 335/8" (... Note: The wood runners that come with Step 7 - add shims, as the kitchen floor. add shims as needed , in use. 6. Route cable from moving when dishwasher is in the area shown to same level as needed Shim ELECTRICAL CONNECTION - 5. Built-up to bring cabinet floor up floors - This connection will prohibit...
Direct wire - NOTE: Shims must extend to avoid movement when the dishwasher is moved into the cabinet opening height of cabinet opening 's floor - This will be securely attached to floor to the right front side of 335/8" (... Note: The wood runners that come with Step 7 - add shims, as the kitchen floor. add shims as needed , in use. 6. Route cable from moving when dishwasher is in the area shown to same level as needed Shim ELECTRICAL CONNECTION - 5. Built-up to bring cabinet floor up floors - This connection will prohibit...
Owners Manual
Page 15
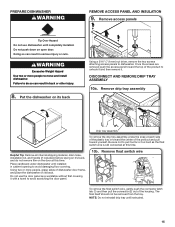
... AND REMOVE DRIP TRAY ASSEMBLY 10a. Doing so can result in cabinet opening to do not remove film on open door. Place cardboard under dishwasher until installed in back or other injury. 8. NOTE: Do not reinstall drip tray until completely installed. Failure to avoid damaging floor covering. ... (2) out of the product and pull toward the center of the housing. The float itself should not be removed from the tray. Put the dishwasher on its back Using a 5/16" (7.9 mm) nut driver, remove the two screws attaching access panels to avoid scratching the door panel. 10b...
... AND REMOVE DRIP TRAY ASSEMBLY 10a. Doing so can result in cabinet opening to do not remove film on open door. Place cardboard under dishwasher until installed in back or other injury. 8. NOTE: Do not reinstall drip tray until completely installed. Failure to avoid damaging floor covering. ... (2) out of the product and pull toward the center of the housing. The float itself should not be removed from the tray. Put the dishwasher on its back Using a 5/16" (7.9 mm) nut driver, remove the two screws attaching access panels to avoid scratching the door panel. 10b...
Owners Manual
Page 16
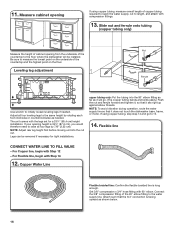
...length, and attach with compression fittings. 13. NOTE: To avoid vibration during operation, route the water supply line so that it does not touch the dishwasher base, frame, or motor. If using copper tubing, measure overall length of the countertop to 15. 14. Copper Water Line Flexible braided line: ...Confirm the flexible braided line is facing upward as it will go to the floor where the dishwasher will be removed if necessary for a 335/8" (85.4 cm) height installation. Get 3/8" compression x 3/4" hose fitting with Step 14 12.
...length, and attach with compression fittings. 13. NOTE: To avoid vibration during operation, route the water supply line so that it does not touch the dishwasher base, frame, or motor. If using copper tubing, measure overall length of the countertop to 15. 14. Copper Water Line Flexible braided line: ...Confirm the flexible braided line is facing upward as it will go to the floor where the dishwasher will be removed if necessary for a 335/8" (85.4 cm) height installation. Get 3/8" compression x 3/4" hose fitting with Step 14 12.

Owners Manual
Page 17
..., wait to install wiring until the coupling is attached in fitting. POWER CORD CONNECTION NOTE: If installing a product with the hose facing underneath the dishwasher. Select UL Listed/CSA Approved power cord for shipping purposes where you will connect the drain hose. Right Angle - Slide the 3/4" (19 mm)...CONNECT FILL HOSE TO FILL VALVE 16. Hand tighten until after Step 44 when the unit has been installed in the drain port for the Dishwasher. Damage to the water supply line DRAIN HOSE CONNECTION 17. Remove terminal box Terminal box 17 NOTES: ■ Do not use tape ...
..., wait to install wiring until the coupling is attached in fitting. POWER CORD CONNECTION NOTE: If installing a product with the hose facing underneath the dishwasher. Select UL Listed/CSA Approved power cord for shipping purposes where you will connect the drain hose. Right Angle - Slide the 3/4" (19 mm)...CONNECT FILL HOSE TO FILL VALVE 16. Hand tighten until after Step 44 when the unit has been installed in the drain port for the Dishwasher. Damage to the water supply line DRAIN HOSE CONNECTION 17. Remove terminal box Terminal box 17 NOTES: ■ Do not use tape ...
Owners Manual
Page 18
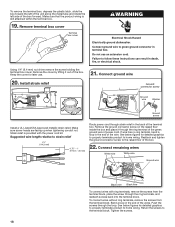
... Black wire Black wire To connect wires with the power cord kit. Remove terminal box cover Terminal box cover WARNING Electrical Shock Hazard Electrically ground dishwasher. Reattach and tighten the ground connector screw to home wiring. Tighten the screws. 18 Do not use . 21. Remove the ground connector screw on the...
... Black wire Black wire To connect wires with the power cord kit. Remove terminal box cover Terminal box cover WARNING Electrical Shock Hazard Electrically ground dishwasher. Reattach and tighten the ground connector screw to home wiring. Tighten the screws. 18 Do not use . 21. Remove the ground connector screw on the...

Owners Manual
Page 19
...slack over nearby components to install while unit is on the crossbar and push to secure cord. IMPORTANT: No additional connections other than dishwasher power connection are to be used when connecting to 3/4 wrap around Strip insulation and wrap wire Figure: 1 Snug Contact Contact Surface... Figure: 2 Screw Post Contact surface The stripped wire should not be made inside the dishwasher terminal box. Replace the cover by the cover. IMPORTANT: Do not scratch the front panel during this procedure. If door panel has ...
...slack over nearby components to install while unit is on the crossbar and push to secure cord. IMPORTANT: No additional connections other than dishwasher power connection are to be used when connecting to 3/4 wrap around Strip insulation and wrap wire Figure: 1 Snug Contact Contact Surface... Figure: 2 Screw Post Contact surface The stripped wire should not be made inside the dishwasher terminal box. Replace the cover by the cover. IMPORTANT: Do not scratch the front panel during this procedure. If door panel has ...


