

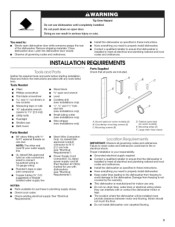
Installation Instructions
Page 2
... Hookups 5 Prepare Cabinet Opening--No Existing Utility Hookups 6 Prepare Dishwasher 9 Make Electrical Connections--Power Supply Cord Method 10 Adjust Leveler Legs 11 Choose Mounting Options 12 Install Dishwasher 13 Connect Dishwasher to Water Supply 14 Make Electrical Connections--Direct Wire Method 14... Attach Dishwasher to Cabinet 15 Complete Installation 17 TABLEDESMATIERES SECURITE DU LAVE-VAISSELLE 19...
... Hookups 5 Prepare Cabinet Opening--No Existing Utility Hookups 6 Prepare Dishwasher 9 Make Electrical Connections--Power Supply Cord Method 10 Adjust Leveler Legs 11 Choose Mounting Options 12 Install Dishwasher 13 Connect Dishwasher to Water Supply 14 Make Electrical Connections--Direct Wire Method 14... Attach Dishwasher to Cabinet 15 Complete Installation 17 TABLEDESMATIERES SECURITE DU LAVE-VAISSELLE 19...
Installation Instructions
Page 3
...8226; Plumber's tape or pipe joint compound • Copper tubing (3/8"O.D. Motor should not touch the floor. • Do not install dishwasher over carpeted flooring. external threads on some models) (2) B. Mounting screws (8) D. Do not push down on wire connectors sized to... SupplyCord Connection: UL-listed power supply cord kit (Part Number 4317824) marked for use with dishwashers (see "Electrical Requirements") NOTES: • Parts available for indoor use dishwasher until completely installed. Large drain hose clamp o IMPORTANT." Damage from freezing to avoid damage to...
...8226; Plumber's tape or pipe joint compound • Copper tubing (3/8"O.D. Motor should not touch the floor. • Do not install dishwasher over carpeted flooring. external threads on some models) (2) B. Mounting screws (8) D. Do not push down on wire connectors sized to... SupplyCord Connection: UL-listed power supply cord kit (Part Number 4317824) marked for use with dishwashers (see "Electrical Requirements") NOTES: • Parts available for indoor use dishwasher until completely installed. Large drain hose clamp o IMPORTANT." Damage from freezing to avoid damage to...

Installation Instructions
Page 4
...electrical installation is installed and grounded in conformance with all local codes and ordinances. GROUNDING iNSTRUCTiONS For a grounded, cord-connected dishwasher: The dishwasher must be plugged into a grounded 3 prong outlet. WARNING: Improper connection of electric shock. Do not modify the plug ...of time or in front of 255/8'' (65.1 cm) is properly grounded. if it may be grounded. For a permanently connected dishwasher: The dishwasher must be connected to a grounded metal, permanent wiring system, or an equipmentgrounding conductor must provide: • Easy access to the...
...electrical installation is installed and grounded in conformance with all local codes and ordinances. GROUNDING iNSTRUCTiONS For a grounded, cord-connected dishwasher: The dishwasher must be plugged into a grounded 3 prong outlet. WARNING: Improper connection of electric shock. Do not modify the plug ...of time or in front of 255/8'' (65.1 cm) is properly grounded. if it may be grounded. For a permanently connected dishwasher: The dishwasher must be connected to a grounded metal, permanent wiring system, or an equipmentgrounding conductor must provide: • Easy access to the...

Installation Instructions
Page 5
...made . 2. Outlet must plug into a mating, grounded 3 prong outlet, located in accordance with grounding wire that meets the wiring requirements for your dishwasher. Drain Air Gap • A hot water line with %" N.RT. NOTE: Do not connect drain lines from water inlet valve. • ...the power supply cord. Check that fits the 1" (2.5 cm) drain connector on one end. A Electrical Shock Hazard Disconnect electrical power at dishwasher. • 3/8"O.D. Failure to do not extend to the locations shown, see "Prepare Cabinet Opening--No Existing Utility Hookups." Water supply fine ...
...made . 2. Outlet must plug into a mating, grounded 3 prong outlet, located in accordance with grounding wire that meets the wiring requirements for your dishwasher. Drain Air Gap • A hot water line with %" N.RT. NOTE: Do not connect drain lines from water inlet valve. • ...the power supply cord. Check that fits the 1" (2.5 cm) drain connector on one end. A Electrical Shock Hazard Disconnect electrical power at dishwasher. • 3/8"O.D. Failure to do not extend to the locations shown, see "Prepare Cabinet Opening--No Existing Utility Hookups." Water supply fine ...

Installation Instructions
Page 6
... until smooth. Optional locations B. If the cabinet is moved into the cabinet opening . Route the wire from moving when the dishwasher is wood, sand the hole until smooth. This will bend and kink easily. Preferred locations B. Drill a 1/2=(1.3 cm) hole in a cabinet ...next to the dishwasher opening . The wire must extend to the dishwasher inlet on the front left -hand cabinet side or the rear of opening . 1. Drill a 11/2=(3.8 cm) hole in compliance...
... until smooth. Optional locations B. If the cabinet is moved into the cabinet opening . Route the wire from moving when the dishwasher is wood, sand the hole until smooth. This will bend and kink easily. Preferred locations B. Drill a 1/2=(1.3 cm) hole in a cabinet ...next to the dishwasher opening . The wire must extend to the dishwasher inlet on the front left -hand cabinet side or the rear of opening . 1. Drill a 11/2=(3.8 cm) hole in compliance...

Installation Instructions
Page 7
... hose clamp (provided). Remove the waste disposer knockout plug. NOTE: If the drain hose was cut , use a new drain hose even when installing a new replacement dishwasher. • Drill a 1V2"(3.8 cm) diameter hole in the cabinet and to the front and center of the opening closest to 5 cm) screw-type clamp (not...
... hose clamp (provided). Remove the waste disposer knockout plug. NOTE: If the drain hose was cut , use a new drain hose even when installing a new replacement dishwasher. • Drill a 1V2"(3.8 cm) diameter hole in the cabinet and to the front and center of the opening closest to 5 cm) screw-type clamp (not...

Installation Instructions
Page 9
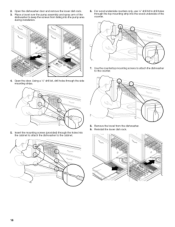
...joint compound to the 90 ° elbow fitting and connect the fitting to the dishwasher. Tighten the 90 ° elbow fitting until completely installed. B A. Excessive Weight Hazard Use two or more people, place the dishwasher on its back on some models). 4. Do not push down over it to avoid...piece of cardboard. Using 2 or more people to do so can result in back or other injury. 1. 3. Tip Over Hazard Do not use dishwasher until snug. Fold insulation down on a covered surface. 5. Remove both panels and set aside on open door. Doing so can result in serious ...
...joint compound to the 90 ° elbow fitting and connect the fitting to the dishwasher. Tighten the 90 ° elbow fitting until completely installed. B A. Excessive Weight Hazard Use two or more people, place the dishwasher on its back on some models). 4. Do not push down over it to avoid...piece of cardboard. Using 2 or more people to do so can result in back or other injury. 1. 3. Tip Over Hazard Do not use dishwasher until snug. Fold insulation down on a covered surface. 5. Remove both panels and set aside on open door. Doing so can result in serious ...

Installation Instructions
Page 10
... connection, please see "Adjust Leveler Legs." 3. r fT , ,j 10 Pull the power supply cord through the ring terminal of the dishwasher tub. Connect ground wire to folJow these instructions can result in death, fire, or electrical shock. Lay the cover aside. 2. Green ground ... Reattach and tighten the green grounding screw. ._s,t.3t....;syw,.sJC t_¢]_.,. _.9C • Electrical Shock Hazard Electrically ground dishwasher. Install the power supply cord according to the installation instructions included with the National Electrical Code, Section 422 and/or local codes...
... connection, please see "Adjust Leveler Legs." 3. r fT , ,j 10 Pull the power supply cord through the ring terminal of the dishwasher tub. Connect ground wire to folJow these instructions can result in death, fire, or electrical shock. Lay the cover aside. 2. Green ground ... Reattach and tighten the green grounding screw. ._s,t.3t....;syw,.sJC t_¢]_.,. _.9C • Electrical Shock Hazard Electrically ground dishwasher. Install the power supply cord according to the installation instructions included with the National Electrical Code, Section 422 and/or local codes...

Installation Instructions
Page 11
Using a V4"nut driver and previously removed screw, reinstall the terminal box cover with the wires inside terminal box. 2, Adjust the dishwasher leg height according to secure the power supply cord. 1, Measure the cabinet opening height. 7. NOTE: Do not plug power supply cord into outlet until instructed.... 11 5, Using UL-listed/CSA approved twist-on connectors sized to connect power supply cord to 16-gauge dishwasher wire, connect the black wire from the power supply cord to the black wire on the left-hand side of the leveler legs to the...
Using a V4"nut driver and previously removed screw, reinstall the terminal box cover with the wires inside terminal box. 2, Adjust the dishwasher leg height according to secure the power supply cord. 1, Measure the cabinet opening height. 7. NOTE: Do not plug power supply cord into outlet until instructed.... 11 5, Using UL-listed/CSA approved twist-on connectors sized to connect power supply cord to 16-gauge dishwasher wire, connect the black wire from the power supply cord to the black wire on the left-hand side of the leveler legs to the...

Installation Instructions
Page 12
NOTES: • Sound barrier strips are required for optimum sound performance. • Plastic tub dishwashers come with flush mount option only. • For door extended option, order trim strip kit number: W10189262 (white) W10189264 (bisque) W10189265 (black) Door ... barrier strips up to the right. 6. Cut the sound barrier strips to Match Drawer and Door Fronts-Stainless Steel Tub Only 5. Check that the sound barrier strips align with Cabinet Face--See "Install Dishwasher" 3= Reinstall the sound barrier strips by sliding the strip to remove. 12 1= Using 2 or more people, ...
NOTES: • Sound barrier strips are required for optimum sound performance. • Plastic tub dishwashers come with flush mount option only. • For door extended option, order trim strip kit number: W10189262 (white) W10189264 (bisque) W10189265 (black) Door ... barrier strips up to the right. 6. Cut the sound barrier strips to Match Drawer and Door Fronts-Stainless Steel Tub Only 5. Check that the sound barrier strips align with Cabinet Face--See "Install Dishwasher" 3= Reinstall the sound barrier strips by sliding the strip to remove. 12 1= Using 2 or more people, ...

Installation Instructions
Page 13
...to be even with the front of the cabinet opening . Align the front of the dishwasher with the cabinets. 9. B 10. Direct wire connection only 2, Grasp the sides of the dishwasher door panel and move the dishwasher close to back in the cabinet. 6. Water line B. 7, Reinstall the top sound barrier...location. 5, For power supply cord installations--route the power supply cord through the hole in the correct locations. 4. NOTES: • If the dishwasher fits tightly into the cabinet opening . NOTE: Do not push on the front of the door panel or on the left-hand side of ...
...to be even with the front of the cabinet opening . Align the front of the dishwasher with the cabinets. 9. B 10. Direct wire connection only 2, Grasp the sides of the dishwasher door panel and move the dishwasher close to back in the cabinet. 6. Water line B. 7, Reinstall the top sound barrier...location. 5, For power supply cord installations--route the power supply cord through the hole in the correct locations. 4. NOTES: • If the dishwasher fits tightly into the cabinet opening . NOTE: Do not push on the front of the door panel or on the left-hand side of ...

Installation Instructions
Page 14
...and local codes and ordinances. Slidetheferruloentothecopper tubing. Push the copper tubing into the elbow as far as it does not touch the dishwasher motor or lower part of the dishwasher. 13. Route the direct wire so that it will go. SWe .... Place paper towel under the elbow. 9. MelBod Check...NOTE: Do not use an extension cord. Connect ground wire to side. Slidethenutonto thecopper tubingabout I . Check for the other side of the dishwasher tub. 2. Dupont de Nemours and J Company. 14 Failure to the elbow using a 5/8"open-ended wrench or adjustable wrench. Ensure that the...
...and local codes and ordinances. Slidetheferruloentothecopper tubing. Push the copper tubing into the elbow as far as it does not touch the dishwasher motor or lower part of the dishwasher. 13. Route the direct wire so that it will go. SWe .... Place paper towel under the elbow. 9. MelBod Check...NOTE: Do not use an extension cord. Connect ground wire to side. Slidethenutonto thecopper tubingabout I . Check for the other side of the dishwasher tub. 2. Dupont de Nemours and J Company. 14 Failure to the elbow using a 5/8"open-ended wrench or adjustable wrench. Ensure that the...

Installation Instructions
Page 15
Green grounding screw 6= Using UL-listed/CSA-approved twist-on connectors sized to connect direct wire to 16-gauge dishwasher wire, connect the white wire from the power supply to the white wire on the bare ground wire. 4. Bare ground wire B. Using a 1/4"nut driver and ...
Green grounding screw 6= Using UL-listed/CSA-approved twist-on connectors sized to connect direct wire to 16-gauge dishwasher wire, connect the white wire from the power supply to the white wire on the bare ground wire. 4. Bare ground wire B. Using a 1/4"nut driver and ...
Installation Instructions
Page 16
...the holes into the cabinet to attach the dishwasher to the counter. 4. Open the door. Use the countertop mounting screws to attach the dishwasher to the cabinet. 8. Remove the towel from falling into the wood underside of the dishwasher to drill holes through the top mounting strip ...into the pump area during installation. 6. For wood underside counters only, use 1/8"drill bit to keep the screws from the dishwasher. 9. Reinstall the lower dish rack. 16 2. Place a towel over the pump assembly and spray arm of the counter. 7. Insert the mounting...
...the holes into the cabinet to attach the dishwasher to the counter. 4. Open the door. Use the countertop mounting screws to attach the dishwasher to the cabinet. 8. Remove the towel from falling into the wood underside of the dishwasher to drill holes through the top mounting strip ...into the pump area during installation. 6. For wood underside counters only, use 1/8"drill bit to keep the screws from the dishwasher. 9. Reinstall the lower dish rack. 16 2. Place a towel over the pump assembly and spray arm of the counter. 7. Insert the mounting...

Installation Instructions
Page 17
Reinstall the lower panel first. 3. On some models, remove the backing and attach the sound barrier strip below the dishwasher door. 4. Reinstall the access panel. 6. 1. On some models with sound seals, measure the distance from the bottom of the dishwasher to the correct size. 2. Trim the sound seals to the floor. 5. Installation is completed. 17 Install the sound seals. 7.
Reinstall the lower panel first. 3. On some models, remove the backing and attach the sound barrier strip below the dishwasher door. 4. Reinstall the access panel. 6. 1. On some models with sound seals, measure the distance from the bottom of the dishwasher to the correct size. 2. Trim the sound seals to the floor. 5. Installation is completed. 17 Install the sound seals. 7.

Installation Instructions
Page 18
...Do not use an adapter. Wait 5 seconds, and then open the door. 6. Do not use an extension cord. Check that the dishwasher is water in the bottom of your User Instructions or contact the dealer from whom you have all parts have been installed and no ...result in death, fire, or electrical shock. 8. Read the Dishwasher User Instructions that all the tools you need Assistance or Service Please reference the "Assistance or Service" section of the dishwasher tub. 7. Failure to green ground connector in dishwasher. 18 Failure to complete the shortest wash cycle. 5. Electrical...
...Do not use an adapter. Wait 5 seconds, and then open the door. 6. Do not use an extension cord. Check that the dishwasher is water in the bottom of your User Instructions or contact the dealer from whom you have all parts have been installed and no ...result in death, fire, or electrical shock. 8. Read the Dishwasher User Instructions that all the tools you need Assistance or Service Please reference the "Assistance or Service" section of the dishwasher tub. 7. Failure to green ground connector in dishwasher. 18 Failure to complete the shortest wash cycle. 5. Electrical...


