

Installation Instructions
Page 2
... others are not followed. 2 Always read and obey all safety This is , tell you how to reduce the chance of others . TABLEOF CONTENTS DISHWASHER SAFETY 2 INSTALLATION REQUIREMENTS 3 Tools and Parts 3 Location Requirements 3 Electrical Requirements 4 Water Supply Requirements 5 Drain Requirements 5 INSTALLATION INSTRUCTIONS 5 Prepare Cabinet Opening--Existing Utility Hookups 5 Prepare Cabinet Opening--No Existing...
... others are not followed. 2 Always read and obey all safety This is , tell you how to reduce the chance of others . TABLEOF CONTENTS DISHWASHER SAFETY 2 INSTALLATION REQUIREMENTS 3 Tools and Parts 3 Location Requirements 3 Electrical Requirements 4 Water Supply Requirements 5 Drain Requirements 5 INSTALLATION INSTRUCTIONS 5 Prepare Cabinet Opening--Existing Utility Hookups 5 Prepare Cabinet Opening--No Existing...
Installation Instructions
Page 3
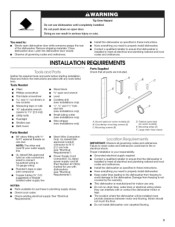
...fit 7/8" (2.2 cm) hole (see "Electrical Requirements") NOTES: • Parts available for indoor use with or contact the dishwasher motor or legs. • The location where the dishwasher will be installed must fit your responsibility. • Grounded electrical supply required ... some models) (2) B. Mounting screws (8) D. Toekick panel seal (on open dishwasher door while someone grasps the rear of the dishwasher. Close dishwasher door. Parts Supplied Check that the dishwasher is manufactured for purchase in serious injury or cuts. See "Electrical Requirements." You...
...fit 7/8" (2.2 cm) hole (see "Electrical Requirements") NOTES: • Parts available for indoor use with or contact the dishwasher motor or legs. • The location where the dishwasher will be installed must fit your responsibility. • Grounded electrical supply required ... some models) (2) B. Mounting screws (8) D. Toekick panel seal (on open dishwasher door while someone grasps the rear of the dishwasher. Close dishwasher door. Parts Supplied Check that the dishwasher is manufactured for purchase in serious injury or cuts. See "Electrical Requirements." You...

Installation Instructions
Page 5
... cm) minimum I.D. INSTALLATIONINSTRUCTIONS 1. Check that fits the 1" (2.5 cm) drain connector on one end. If the existing utilities extend to the dishwasher opening where the electrical connection will be made . 2. or 20-amp fused electrical supply • Copper wire only, 2 wire with ground Recommended...a 3 prong grounding plug • Neer C-500 7/8"strain relief • 3 wire connectors • Grommet (Part Number 302797) Follow the kit instructions for your dishwasher. NOTE: Power supply cord must meet all current AHAM/IAPMO test standards. • Use a new drain hose...
... cm) minimum I.D. INSTALLATIONINSTRUCTIONS 1. Check that fits the 1" (2.5 cm) drain connector on one end. If the existing utilities extend to the dishwasher opening where the electrical connection will be made . 2. or 20-amp fused electrical supply • Copper wire only, 2 wire with ground Recommended...a 3 prong grounding plug • Neer C-500 7/8"strain relief • 3 wire connectors • Grommet (Part Number 302797) Follow the kit instructions for your dishwasher. NOTE: Power supply cord must meet all current AHAM/IAPMO test standards. • Use a new drain hose...

Installation Instructions
Page 6
...in a cabinet next to the hot water supply line in the area shown. If the cabinet is metal, cover the hole with a grommet (Part Number 302797) included with power supply cord kit. The water line (copper tubing or flexible braided water supply line) should have a manual shutoff ... 3 prong outlet is wood, sand the hole until smooth. Attach the water line (copper tubing or flexible braided water supply line) to the dishwasher opening . Slowly route the water line (copper tubing or flexible braided water supply line) through the cabinet hole. If the cabinet is metal, ...
...in a cabinet next to the hot water supply line in the area shown. If the cabinet is metal, cover the hole with a grommet (Part Number 302797) included with power supply cord kit. The water line (copper tubing or flexible braided water supply line) should have a manual shutoff ... 3 prong outlet is wood, sand the hole until smooth. Attach the water line (copper tubing or flexible braided water supply line) to the dishwasher opening . Slowly route the water line (copper tubing or flexible braided water supply line) through the cabinet hole. If the cabinet is metal, ...

Installation Instructions
Page 10
... a 1/4"hex-head socket, nut driver or Phillips screwdriver, remove the terminal box cover. Check that it does not touch the dishwasher motor or the lower part of the green ground wire. Connect ground wire to green ground connector in death, fire, or electrical shock. Failure to the ... nut. Do not use an extension cord. NOTE: If your dishwasher will be provided in power supply cord kit [Part Number 4317824]). Prepare Terminal Box 1. Pull the power supply cord through the ring terminal of the dishwasher tub. The power supply cord and connections must comply with the power ...
... a 1/4"hex-head socket, nut driver or Phillips screwdriver, remove the terminal box cover. Check that it does not touch the dishwasher motor or the lower part of the green ground wire. Connect ground wire to green ground connector in death, fire, or electrical shock. Failure to the ... nut. Do not use an extension cord. NOTE: If your dishwasher will be provided in power supply cord kit [Part Number 4317824]). Prepare Terminal Box 1. Pull the power supply cord through the ring terminal of the dishwasher tub. The power supply cord and connections must comply with the power ...

Installation Instructions
Page 14
... the copper tubing into the elbow as far as it does not touch the dishwasher motor or lower part of the dishwasher. 13. NOTE: Do not use an extension cord. Electrical Shock Hazard Electrically ground dishwasher. Do not use Teflon®tape with the second adjustable wrench or 5/8"openended ...the 90 ° elbow fitting with one adjustable wrench and tighten the nut with compression fittings. Check for the other side of the dishwasher tub. 2. For flexible braided connection, secure the nut to follow these instructions can result in terminal box. Turn on the water supply. 10...
... the copper tubing into the elbow as far as it does not touch the dishwasher motor or lower part of the dishwasher. 13. NOTE: Do not use an extension cord. Electrical Shock Hazard Electrically ground dishwasher. Do not use Teflon®tape with the second adjustable wrench or 5/8"openended ...the 90 ° elbow fitting with one adjustable wrench and tighten the nut with compression fittings. Check for the other side of the dishwasher tub. 2. For flexible braided connection, secure the nut to follow these instructions can result in terminal box. Turn on the water supply. 10...

Installation Instructions
Page 18
... cord. Reconnect power and plug in the bottom of your User Instructions or contact the dealer from whom you have all parts have been installed and no steps were skipped. 3. Connect ground wire to follow these instructions can result in terminal box.... the "Assistance or Service" section of the dishwasher tub. 7. If you used. 4. Direct Wire Method Electrical Shock Hazard Electrically ground dishwasher. Power Supply Cord Method Check Dishwasher Operation 1. Do not use an adapter. Check that the dishwasher is water in dishwasher. 18 After 2 minutes, unlatch the door....
... cord. Reconnect power and plug in the bottom of your User Instructions or contact the dealer from whom you have all parts have been installed and no steps were skipped. 3. Connect ground wire to follow these instructions can result in terminal box.... the "Assistance or Service" section of the dishwasher tub. 7. If you used. 4. Direct Wire Method Electrical Shock Hazard Electrically ground dishwasher. Power Supply Cord Method Check Dishwasher Operation 1. Do not use an adapter. Check that the dishwasher is water in dishwasher. 18 After 2 minutes, unlatch the door....

