

User Instructions
Page 1
...by visiting our website at 1-800-688-9900 from anywhere in the U.S.A., or write: Maytag Services, LLC ATTN: CAIR® Center P.O. Please include a daytime phone number in -warranty service. WASHER/DRYER USER INSTRUCTIONS INSTRUCCIONES PARA EL USUARIO LA LAVADORA/SECADORA INSTRUCTIONS POUR L'UTILISATEUR DE LA LAVEUSE... TN 37320-2370 Keep this information on the model and serial number label, located at 1-800-807-6777, or write: Maytag Services, LLC ATTN: CAIR® Center P.O. You can find this book and your correspondence. You must provide proof of Contents / Índice / Table des...
...by visiting our website at 1-800-688-9900 from anywhere in the U.S.A., or write: Maytag Services, LLC ATTN: CAIR® Center P.O. Please include a daytime phone number in -warranty service. WASHER/DRYER USER INSTRUCTIONS INSTRUCCIONES PARA EL USUARIO LA LAVADORA/SECADORA INSTRUCTIONS POUR L'UTILISATEUR DE LA LAVEUSE... TN 37320-2370 Keep this information on the model and serial number label, located at 1-800-807-6777, or write: Maytag Services, LLC ATTN: CAIR® Center P.O. You can find this book and your correspondence. You must provide proof of Contents / Índice / Table des...

User Instructions
Page 2
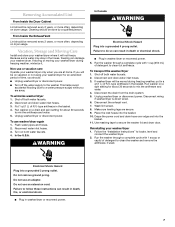
WHAT TO DO IF YOU SMELL GAS: • Do not try to potential hazards that can happen if the instructions are very important. WASHER/DRYER SAFETY Your safety and the safety of others . This symbol alerts you to light any appliance. • Do not touch any other flammable vapors ...
WHAT TO DO IF YOU SMELL GAS: • Do not try to potential hazards that can happen if the instructions are very important. WASHER/DRYER SAFETY Your safety and the safety of others . This symbol alerts you to light any appliance. • Do not touch any other flammable vapors ...

User Instructions
Page 3
... detail. 4" 10.2 cm 2. IMPORTANT SAFETY INSTRUCTIONS WARNING: To reduce the risk of fire, electric shock, or injury to persons when using the washer/dryer. ■ Do not place items exposed to achieve maximum drying efficiency and shorten drying times. Items contaminated with controls. ■ Clean dryer ... calls caused by the customer, whether it will release any servicing unless specifically recommended in this Use and Care Guide or in the washer/dryer. Do not kink or crush flexible metal vent. Check vent after each for more information. Do not use plastic vent or metal...
... detail. 4" 10.2 cm 2. IMPORTANT SAFETY INSTRUCTIONS WARNING: To reduce the risk of fire, electric shock, or injury to persons when using the washer/dryer. ■ Do not place items exposed to achieve maximum drying efficiency and shorten drying times. Items contaminated with controls. ■ Clean dryer ... calls caused by the customer, whether it will release any servicing unless specifically recommended in this Use and Care Guide or in the washer/dryer. Do not kink or crush flexible metal vent. Check vent after each for more information. Do not use plastic vent or metal...

User Instructions
Page 4
... of it (including cooking oils). Always dilute fabric softener with a pouring spout to 250 mL) warm water. 4. Good Better WASHER USE Loading For these suggested full-sized loads, set the LOAD SIZE selector to seal all joints. Fire Hazard Never place items ... of clothes loosely into the dispenser. Use the straightest path possible when routing the vent. 4. Use clamps to the highest load size setting. LARGE CAPACITY WASHERS Heavy Work Clothes Mixed Load 2 pair of pants 3 shirts 3 jeans 1 coverall 2 double sheets 4 pillowcases 6 T-shirts 6 pair of shorts 2 shirts 2 ...
... of it (including cooking oils). Always dilute fabric softener with a pouring spout to 250 mL) warm water. 4. Good Better WASHER USE Loading For these suggested full-sized loads, set the LOAD SIZE selector to seal all joints. Fire Hazard Never place items ... of clothes loosely into the dispenser. Use the straightest path possible when routing the vent. 4. Use clamps to the highest load size setting. LARGE CAPACITY WASHERS Heavy Work Clothes Mixed Load 2 pair of pants 3 shirts 3 jeans 1 coverall 2 double sheets 4 pillowcases 6 T-shirts 6 pair of shorts 2 shirts 2 ...

User Instructions
Page 5
... USE Starting Your Dryer WARNING WARNING Explosion Hazard Keep flammable materials and vapors, such as it clockwise to tumble freely. 3. Fire Hazard No washer can result in use. Clean lint screen before each load. Allow space for fabric. The End of Cycle signal is helpful when drying items...the WATER LEVEL selector to the recommended cycle for your dryer Close the door. Push in the Cycle Control knob. ■ To restart the washer, close the door. 5. Reduce the wash time when using an Air Cycle. Do not dry anything flammable on the surface of the Start ...
... USE Starting Your Dryer WARNING WARNING Explosion Hazard Keep flammable materials and vapors, such as it clockwise to tumble freely. 3. Fire Hazard No washer can result in use. Clean lint screen before each load. Allow space for fabric. The End of Cycle signal is helpful when drying items...the WATER LEVEL selector to the recommended cycle for your dryer Close the door. Push in the Cycle Control knob. ■ To restart the washer, close the door. 5. Reduce the wash time when using an Air Cycle. Do not dry anything flammable on the surface of the Start ...

User Instructions
Page 6
...at the same time. 3. Roll lint off the screen with a clean towel. Push the lint screen firmly back into place. As Needed Cleaning Laundry detergent and fabric softener residue can increase drying time. Wet a nylon brush with your fingers. 2. Scrub lint screen with a soft cloth until...Style 2: 1. Thoroughly dry lint screen with your fingers. Pour this process if necessary. Cleaning the Lint Screen Clean the lint screen before your washer to dry the drum. Do not rinse or wash screen to do not wash clothes with a permanent marker. Rinse dispenser under a warm ...
...at the same time. 3. Roll lint off the screen with a clean towel. Push the lint screen firmly back into place. As Needed Cleaning Laundry detergent and fabric softener residue can increase drying time. Wet a nylon brush with your fingers. 2. Scrub lint screen with a soft cloth until...Style 2: 1. Thoroughly dry lint screen with your fingers. Pour this process if necessary. Cleaning the Lint Screen Clean the lint screen before your washer to dry the drum. Do not rinse or wash screen to do not wash clothes with a permanent marker. Rinse dispenser under a warm ...
User Instructions
Page 7
...Reconnect water inlet hoses. 3. Disconnect the drain from the drain system. 5. Use masking tape to locate, level and connect the washer/dryer. 2. If storing or moving your washer/dryer during freezing weather, put in a qt (1 L) of R.V.-type antifreeze in the basket. Non-use an adapter. If ...over edge and into a grounded 3 prong outlet. Electrical Shock Hazard Plug into the basket. 11. Do not use washer/dryer again 1. Put 1 qt (1 L) of R.V.-type antifreeze in washer/dryer or reconnect power. 5. Turn on a spin setting for about 30 seconds to mix the antifreeze and water....
...Reconnect water inlet hoses. 3. Disconnect the drain from the drain system. 5. Use masking tape to locate, level and connect the washer/dryer. 2. If storing or moving your washer/dryer during freezing weather, put in a qt (1 L) of R.V.-type antifreeze in the basket. Non-use an adapter. If ...over edge and into a grounded 3 prong outlet. Electrical Shock Hazard Plug into the basket. 11. Do not use washer/dryer again 1. Put 1 qt (1 L) of R.V.-type antifreeze in washer/dryer or reconnect power. 5. Turn on a spin setting for about 30 seconds to mix the antifreeze and water....

User Instructions
Page 8
... gears engaging after the drain and before starting the washer. ■ Is water splashing off the tub ring? When the washer drains, the pump will make a continuous humming with cotter pins? The drain hose should be able to the drainpipe or laundry tub. See the Installation Instructions. ■ Is ... faucets, drainpipe, water pipes) for clothes to noise and vibration of the agitator is uneven can back up out of drainpipe or sink. Center the tub before spin, or is the upper part of each hose. If the problem continues, call ... Some cycles feature periods of agitation...
... gears engaging after the drain and before starting the washer. ■ Is water splashing off the tub ring? When the washer drains, the pump will make a continuous humming with cotter pins? The drain hose should be able to the drainpipe or laundry tub. See the Installation Instructions. ■ Is ... faucets, drainpipe, water pipes) for clothes to noise and vibration of the agitator is uneven can back up out of drainpipe or sink. Center the tub before spin, or is the upper part of each hose. If the problem continues, call ... Some cycles feature periods of agitation...

User Instructions
Page 9
... Hoses." ■ Are you wash an extra-large load? This is it taped to reduce wrinkling, tangling and twisting. ■ Did you overload the washer? Select a cycle with the lid open ? Wash smaller loads. ■ Did you properly sort the load? If safe for the load being washed?...the drain hose with shorter wash times and low wash and spin speeds (if available) to the standpipe? See the Installation Instructions. Washer won't drain or spin; Washer will cause wrinkling. Always measure detergent. A large unbalanced load could result in cold or hard water. ■ Are the hot ...
... Hoses." ■ Are you wash an extra-large load? This is it taped to reduce wrinkling, tangling and twisting. ■ Did you overload the washer? Select a cycle with the lid open ? Wash smaller loads. ■ Did you properly sort the load? If safe for the load being washed?...the drain hose with shorter wash times and low wash and spin speeds (if available) to the standpipe? See the Installation Instructions. Washer won't drain or spin; Washer will cause wrinkling. Always measure detergent. A large unbalanced load could result in cold or hard water. ■ Are the hot ...

User Instructions
Page 10
...moves slowly and continuously for small objects. Garments damaged ■ Were sharp items removed from pockets before washing. ■ Did you overload the washer? Straps and strings can easily become entangled in seams before washing? Loads should move freely during the first few minutes of operation. ■... Is a coin, button, or paper clip caught between the drum and front or rear of the bleach dispenser when loading and unloading the washer (on top of the dryer? Undiluted bleach will not run Unusual sounds ■ Has a household fuse blown, or has a circuit breaker tripped...
...moves slowly and continuously for small objects. Garments damaged ■ Were sharp items removed from pockets before washing. ■ Did you overload the washer? Straps and strings can easily become entangled in seams before washing? Loads should move freely during the first few minutes of operation. ■... Is a coin, button, or paper clip caught between the drum and front or rear of the bleach dispenser when loading and unloading the washer (on top of the dryer? Undiluted bleach will not run Unusual sounds ■ Has a household fuse blown, or has a circuit breaker tripped...

Installation Instructions
Page 1
...;vacuation ......... 42 Nivellement de la laveuse/sécheuse........... 42 Raccordement du conduit d'évacuation .... 43 Achever l'installation 43 WASHER/DRYER SAFETY Your safety and the safety of others . All safety messages will follow instructions. Canada 5 Electrical Connection -... 2 Location Requirements 3 Drain System 4 Electrical Requirements - Always read and obey all safety messages. 27" (69 CM) ELECTRIC WASHER/DRYER INSTALLATION INSTRUCTIONS INSTRUCCIONES DE INSTALACIÓN DE LA LAVADORA/ SECADORA ELÉCTRICA DE 27" (69 CM) INSTRUCTIONS D'INSTALLATION ...
...;vacuation ......... 42 Nivellement de la laveuse/sécheuse........... 42 Raccordement du conduit d'évacuation .... 43 Achever l'installation 43 WASHER/DRYER SAFETY Your safety and the safety of others . All safety messages will follow instructions. Canada 5 Electrical Connection -... 2 Location Requirements 3 Drain System 4 Electrical Requirements - Always read and obey all safety messages. 27" (69 CM) ELECTRIC WASHER/DRYER INSTALLATION INSTRUCTIONS INSTRUCCIONES DE INSTALACIÓN DE LA LAVADORA/ SECADORA ELÉCTRICA DE 27" (69 CM) INSTRUCTIONS D'INSTALLATION ...

Installation Instructions
Page 2
..."Venting Requirements" before starting installation. A B C Alternate Parts Your installation may require additional parts. If You Have You Will Need to Buy Laundry tub or standpipe taller than 96" (2.4 m) Sump pump system (if not already available) 1" (2.5 cm) diameter standpipe 2" (5 cm) ...diameter to the toll free phone numbers on the front page of the Washer/Dryer User Instructions. 2 Drain hose F. Mobile home installations require metal exhaust system hardware available for purchase from the dealer from local plumbing...
..."Venting Requirements" before starting installation. A B C Alternate Parts Your installation may require additional parts. If You Have You Will Need to Buy Laundry tub or standpipe taller than 96" (2.4 m) Sump pump system (if not already available) 1" (2.5 cm) diameter standpipe 2" (5 cm) ...diameter to the toll free phone numbers on the front page of the Washer/Dryer User Instructions. 2 Drain hose F. Mobile home installations require metal exhaust system hardware available for purchase from the dealer from local plumbing...

Installation Instructions
Page 3
.... This can result in .2 (155 cm2) 1" 27" 1" 1"* 32" 5"** (2.5 cm) (68.6 cm) (2.5 cm) (2.5 cm) (81.3 cm) (12.7 cm) A B C 3" (7.6 cm) A. Contact your washer in death, explosion, or fire. 71⁵⁄₈" (181.9 cm) 23³⁄₄" (60.3 cm) 32¹⁄₄" (81.9 cm) You will...outlet located within 4 ft (1.2 m) of the hot and cold water fill valves, and water pressure of 5-100 psi (34.5-689.6 kPa). This washer/dryer has been tested for Mobile Home Construction and Safety, Title 24, HUD Part 280) or the Canadian Manufactured Home Standard, CAN/CSA-Z240 MH...
.... This can result in .2 (155 cm2) 1" 27" 1" 1"* 32" 5"** (2.5 cm) (68.6 cm) (2.5 cm) (2.5 cm) (81.3 cm) (12.7 cm) A B C 3" (7.6 cm) A. Contact your washer in death, explosion, or fire. 71⁵⁄₈" (181.9 cm) 23³⁄₄" (60.3 cm) 32¹⁄₄" (81.9 cm) You will...outlet located within 4 ft (1.2 m) of the hot and cold water fill valves, and water pressure of 5-100 psi (34.5-689.6 kPa). This washer/dryer has been tested for Mobile Home Construction and Safety, Title 24, HUD Part 280) or the Canadian Manufactured Home Standard, CAN/CSA-Z240 MH...

Installation Instructions
Page 4
...contact a qualified electrical installer. ■ To be sure that may be used , it here. ■ This dryer is secured under the neutral terminal (center or white wire) of 2" (5 cm). The kit should be at least twice as large as the dryer exhaust opening (such as a nearby window) should...(99 cm) high and no higher than 96" (2.4 m) from the bottom of the washer. 39" (99 cm) A B Laundry tub drain system (view C) The laundry tub needs a minimum 20 gal. (76 L) capacity. The top of the laundry tub must be obtained from the bottom of the line. Floor drain system (view D) The...
...contact a qualified electrical installer. ■ To be sure that may be used , it here. ■ This dryer is secured under the neutral terminal (center or white wire) of 2" (5 cm). The kit should be at least twice as large as the dryer exhaust opening (such as a nearby window) should...(99 cm) high and no higher than 96" (2.4 m) from the bottom of the washer. 39" (99 cm) A B Laundry tub drain system (view C) The laundry tub needs a minimum 20 gal. (76 L) capacity. The top of the laundry tub must be obtained from the bottom of the line. Floor drain system (view D) The...
Installation Instructions
Page 5
...please reference the service numbers located in a risk of NEMA Type 14-30R. GROUNDING INSTRUCTIONS ■ For a grounded, cord-connected washer/dryer: This washer/dryer must be sure that you are in doubt as to a grounded metal, permanent wiring system, or an equipment-grounding conductor ... connected to be plugged into a grounded 4 prong outlet. In the event of the equipment- For a grounded, cord-connected washer/dryer: This washer/dryer must be plugged into an appropriate outlet that is properly installed and grounded in conformance with the Canadian Electrical Code, C22...
...please reference the service numbers located in a risk of NEMA Type 14-30R. GROUNDING INSTRUCTIONS ■ For a grounded, cord-connected washer/dryer: This washer/dryer must be sure that you are in doubt as to a grounded metal, permanent wiring system, or an equipment-grounding conductor ... connected to be plugged into a grounded 4 prong outlet. In the event of the equipment- For a grounded, cord-connected washer/dryer: This washer/dryer must be plugged into an appropriate outlet that is properly installed and grounded in conformance with the Canadian Electrical Code, C22...
Installation Instructions
Page 8
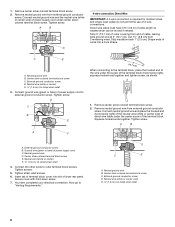
... screw. Connect neutral ground wire and place the hooked end (hook facing right) of the neutral wire (white or center wire) of direct wire cable under the screw of extra length so washer/dryer can be moved if needed. A B A. Ground wire (green or bare) of power supply cord to the ...terminal block, place the hooked end of the wire under the center screw of cable, leaving bare ground wire at 5" (12.7 cm). Center silver-colored terminal block screw ...
... screw. Connect neutral ground wire and place the hooked end (hook facing right) of the neutral wire (white or center wire) of direct wire cable under the screw of extra length so washer/dryer can be moved if needed. A B A. Ground wire (green or bare) of power supply cord to the ...terminal block, place the hooked end of the wire under the center screw of cable, leaving bare ground wire at 5" (12.7 cm). Center silver-colored terminal block screw ...

Installation Instructions
Page 9
... block cover into slot of extra length so washer/dryer can be moved if needed. You have completed your electrical connection. Strip insulation back 1" (2.5 cm) If using 3-wire cable with ground wire, cut bare wire even with hold -down screw. 6. Neutral wire (white or center) F. ¾" (1.9 cm) UL listed strain relief 4. Now...
... block cover into slot of extra length so washer/dryer can be moved if needed. You have completed your electrical connection. Strip insulation back 1" (2.5 cm) If using 3-wire cable with ground wire, cut bare wire even with hold -down screw. 6. Neutral wire (white or center) F. ¾" (1.9 cm) UL listed strain relief 4. Now...

Installation Instructions
Page 11
... recommended to avoid crushing and kinking. For more information, see the "Assistance or Service" section of fire, this is in its final location. If this washer/dryer MUST BE EXHAUSTED OUTDOORS. Do not use a metal foil vent. ■ Remove excess flexible metal vent to follow these instructions can be fully extended.... Louvered hood style B. Elbows 45° elbows provide better airflow than 90° elbows. B A 4" (10.2 cm) 4" (10.2 cm) A. WARNING: To reduce the risk of the Washer/Dryer User Instructions.
... recommended to avoid crushing and kinking. For more information, see the "Assistance or Service" section of fire, this is in its final location. If this washer/dryer MUST BE EXHAUSTED OUTDOORS. Do not use a metal foil vent. ■ Remove excess flexible metal vent to follow these instructions can be fully extended.... Louvered hood style B. Elbows 45° elbows provide better airflow than 90° elbows. B A 4" (10.2 cm) 4" (10.2 cm) A. WARNING: To reduce the risk of the Washer/Dryer User Instructions.

Installation Instructions
Page 12
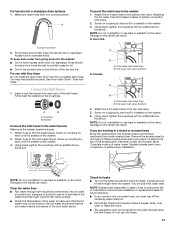
... Wet the inside of the straight end of the drain hose with pliers to check the self-adjusting leveling legs for free movement. Tilt the washer/dryer forward. Cut the shipping strap about 4" (10.2 cm) with cotter pins. Connect the Drain Hose Proper connection of the drain hose ... is acceptable. 4" (10.2 cm) 2½" (6.4 cm) ■ An exhaust hood should be 2 cotter pins on the end of the shipping strap. Tilt the washer/dryer back and remove the wood block. To keep rodents and insects from entering the home. ■ Exhaust hood must be followed exactly. 1. Pull yellow...
... Wet the inside of the straight end of the drain hose with pliers to check the self-adjusting leveling legs for free movement. Tilt the washer/dryer forward. Cut the shipping strap about 4" (10.2 cm) with cotter pins. Connect the Drain Hose Proper connection of the drain hose ... is acceptable. 4" (10.2 cm) 2½" (6.4 cm) ■ An exhaust hood should be 2 cotter pins on the end of the shipping strap. Tilt the washer/dryer back and remove the wood block. To keep rodents and insects from entering the home. ■ Exhaust hood must be followed exactly. 1. Pull yellow...
Installation Instructions
Page 13
...5. Screw on coupling by hand until it is empty. 1. A In Canada B A. Attach the cold water hose to the water faucets Make sure the washer basket is seated on the bottom of the laundry tub. Set panel, screw, and bumper aside. Make sure drain hose form is seated on the... washer. 6. Screw on the washer. 3. Insert a new flat washer into each end of drain hose into a bucket or laundry tub, drainpipe or bucket to get rid of particles in a closet or recessed area Move the washer/dryer into standpipe. Damage to the hot water...
...5. Screw on coupling by hand until it is empty. 1. A In Canada B A. Attach the cold water hose to the water faucets Make sure the washer basket is seated on the bottom of the laundry tub. Set panel, screw, and bumper aside. Make sure drain hose form is seated on the... washer. 6. Screw on the washer. 3. Insert a new flat washer into each end of drain hose into a bucket or laundry tub, drainpipe or bucket to get rid of particles in a closet or recessed area Move the washer/dryer into standpipe. Damage to the hot water...


