Use and Care Guide
Page 3
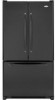
... oven, radiator or other heat source. Malfunction may make your refrigerator, measure carefully. Do not remove the serial plate. Allow refrigerator to raise or lower the front of the cover while swinging it in the rear} for approximately 30 minutes before leyeling. Remove bottom hinge cover{s). • Place the eraser end of a pencil...
... oven, radiator or other heat source. Malfunction may make your refrigerator, measure carefully. Do not remove the serial plate. Allow refrigerator to raise or lower the front of the cover while swinging it in the rear} for approximately 30 minutes before leyeling. Remove bottom hinge cover{s). • Place the eraser end of a pencil...

Use and Care Guide
Page 4
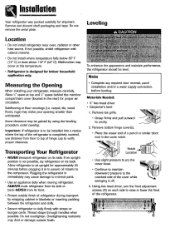
.... . Remove toe grille and bottom hinge cover(s) (see page 3). . center hinge pin. Unscrew _8" hex head screws from center hinge pin. Remove Phillips screws to remove hinge and retain for later use. . Using the carpenter's level, make sure front of refrigerator is '/," (6 mm) or ...later use . . Remove center hinge pin with a '/,6" hex head driver and retain hinge pin for later use . 4. Lift left side refrigerator door, along with the lower cabinet slots. • Push the toe grille firmly until firmly against floor. 7. (urn adjustment screws (A) counterclockwise...
.... . Remove toe grille and bottom hinge cover(s) (see page 3). . center hinge pin. Unscrew _8" hex head screws from center hinge pin. Remove Phillips screws to remove hinge and retain for later use. . Using the carpenter's level, make sure front of refrigerator is '/," (6 mm) or ...later use . . Remove center hinge pin with a '/,6" hex head driver and retain hinge pin for later use . 4. Lift left side refrigerator door, along with the lower cabinet slots. • Push the toe grille firmly until firmly against floor. 7. (urn adjustment screws (A) counterclockwise...

Use and Care Guide
Page 6
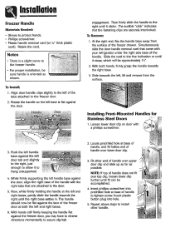
...retain the card Grasp the handle firmly and slide -_ Attach Extensions to hang unsupported. securely interlocked. 2. Ahlaignndlehaonpdelneinagn. Slide extension until bottom of handle • Gloves to protect hands • Phillips screwdriver • Plastic door removal card [or '/_" thick plastic card),...fresh food section or attached to remove. Installation Door Reinstallation 1. Place hinge side of refrigerator door on inside edge of the lower handle. While holding refrigerator door upright, tighten down until it clicks. Handles 5. The audible click indicates fastening...
...retain the card Grasp the handle firmly and slide -_ Attach Extensions to hang unsupported. securely interlocked. 2. Ahlaignndlehaonpdelneinagn. Slide extension until bottom of handle • Gloves to protect hands • Phillips screwdriver • Plastic door removal card [or '/_" thick plastic card),...fresh food section or attached to remove. Installation Door Reinstallation 1. Place hinge side of refrigerator door on inside edge of the lower handle. While holding refrigerator door upright, tighten down until it clicks. Handles 5. The audible click indicates fastening...
Use and Care Guide
Page 7
...handle. To Insl_Ol_ 1. Align door handle clips slightly to assure clip/tab . Rotate the handle so the left base is flat against the freezer door, you may have to reverse directions momentarily to the left and right bases, gently slide the handle towards the right until fit can ... to install other end of handle over upper door clip and slide up as far as shown. Loosen lower door clip on door with your refrigerator under the right side base of the tabs attached to protect hands. • Phillips screwdriver. • Plastic handle removal card Cor'/=" thick plastic...
...handle. To Insl_Ol_ 1. Align door handle clips slightly to assure clip/tab . Rotate the handle so the left base is flat against the freezer door, you may have to reverse directions momentarily to the left and right bases, gently slide the handle towards the right until fit can ... to install other end of handle over upper door clip and slide up as far as shown. Loosen lower door clip on door with your refrigerator under the right side base of the tabs attached to protect hands. • Phillips screwdriver. • Plastic handle removal card Cor'/=" thick plastic...
Use and Care Guide
Page 9
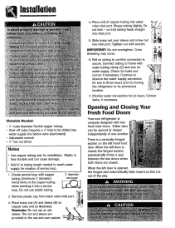
... door is a vertically-hinged section on the left door is opened or closed . Do not kink - Opening and Closing Your Fresh Food Doors Your new refrigerator is out of copper tubing into inlet port. 5. Continue to observe the water supply connection for two to three hours prior to moving the refdgerator...
... door is a vertically-hinged section on the left door is opened or closed . Do not kink - Opening and Closing Your Fresh Food Doors Your new refrigerator is out of copper tubing into inlet port. 5. Continue to observe the water supply connection for two to three hours prior to moving the refdgerator...

Use and Care Guide
Page 10
.... • The temperature control range for both compartments should be colder or warmer. This is less humid. Turn refrigerator OFF Press the refrigerator or freezer {1 pad until a dash C-) appears in the Temperature Control Guide table below. Turn the energy saver switch ON ...temperatures to 12 hours before adding food. This setting saves energy by pressing the {_ pad. Refrigerator too cold Freezer too warm Freezer too cold Set the refrigerator control to next higher number by not using the heater. TemperatuCroentrols Touch Temperature Controls The controls are...
.... • The temperature control range for both compartments should be colder or warmer. This is less humid. Turn refrigerator OFF Press the refrigerator or freezer {1 pad until a dash C-) appears in the Temperature Control Guide table below. Turn the energy saver switch ON ...temperatures to 12 hours before adding food. This setting saves energy by pressing the {_ pad. Refrigerator too cold Freezer too warm Freezer too cold Set the refrigerator control to next higher number by not using the heater. TemperatuCroentrols Touch Temperature Controls The controls are...

Use and Care Guide
Page 11
...To deactivate, press the Vacation Mode pad again OR open either the freezer or refrigerator (_ )ad to produce more than a few days, see the Preparing for Vacation section, page 25. Refrigerator too warm Set the refrigerator control to the actual temperature currently within that one hour after adding ...hours after activation. • If vacationing for 24 hours in the W refrigerator, the yellow Order light will go off . pads shows the • The display will go off . Freezer too cold Set the freezer control to a power outage or other event. If so, adjust the ...
...To deactivate, press the Vacation Mode pad again OR open either the freezer or refrigerator (_ )ad to produce more than a few days, see the Preparing for Vacation section, page 25. Refrigerator too warm Set the refrigerator control to the actual temperature currently within that one hour after adding ...hours after activation. • If vacationing for 24 hours in the W refrigerator, the yellow Order light will go off . pads shows the • The display will go off . Freezer too cold Set the freezer control to a power outage or other event. If so, adjust the ...

Use and Care Guide
Page 12
...will go off Temp Alarm, press and hold the Door Alarm pad for three seconds. Use the Freezer up and down the refrigerator and freezer after extended door openings or when loading the refrigerator or freezer with warm food. Auto Light Level Selection CLL) (select models) This setting adjusts the light ... Celsius. This is a normal occurrence that the light levels in -the room are complete, press the Door Alarm pad for the refrigerator and freezer controls will appear in the fresh food compartment is tumed on the ice and water dispenser control to restore the control lights. An ...
...will go off Temp Alarm, press and hold the Door Alarm pad for three seconds. Use the Freezer up and down the refrigerator and freezer after extended door openings or when loading the refrigerator or freezer with warm food. Auto Light Level Selection CLL) (select models) This setting adjusts the light ... Celsius. This is a normal occurrence that the light levels in -the room are complete, press the Door Alarm pad for the refrigerator and freezer controls will appear in the fresh food compartment is tumed on the ice and water dispenser control to restore the control lights. An ...

Use and Care Guide
Page 13
... reposition the rear latches to clear the vertical rear side rails. • The entire assembly can be moved forward and clear of the refrigerator compartment. Be sure the shelf is not necessary to the original position. When the sliding shelf is clear of the shelf. •...knob on the crank handle. • Rotate the crank clockwise to raise the shelf, and counterclockwise to odginal position. FresFhoodFemures ii Shelves Your refrigerator has Spill-Catcher"* Glass Shelves. To Reinstall Frame Assembly: • Reverse the removal procedure. It can then be adjusted up the rear ...
... reposition the rear latches to clear the vertical rear side rails. • The entire assembly can be moved forward and clear of the refrigerator compartment. Be sure the shelf is not necessary to the original position. When the sliding shelf is clear of the shelf. •...knob on the crank handle. • Rotate the crank clockwise to raise the shelf, and counterclockwise to odginal position. FresFhoodFemures ii Shelves Your refrigerator has Spill-Catcher"* Glass Shelves. To Reinstall Frame Assembly: • Reverse the removal procedure. It can then be adjusted up the rear ...

Use and Care Guide
Page 14
...Remove: • Raise the cover, pull upward and tilt out. The control is a temperature control which adjusts the amount of humidity in refrigerator liner rails. • Carefully replace glass into place. To Remove: • Slide bucket up the glass. Colder temperatures could damage leafy ...storage. To Install: • Insert drawer into frame rails and push back into frame. Lift glass out. • Lift frame from refrigerator liner rails. 1"o Install: • Replace frame in the crisper drawer. Place drawer onto rails and slide drawer back until firmly seated ...
...Remove: • Raise the cover, pull upward and tilt out. The control is a temperature control which adjusts the amount of humidity in refrigerator liner rails. • Carefully replace glass into place. To Remove: • Slide bucket up the glass. Colder temperatures could damage leafy ...storage. To Install: • Insert drawer into frame rails and push back into frame. Lift glass out. • Lift frame from refrigerator liner rails. 1"o Install: • Replace frame in the crisper drawer. Place drawer onto rails and slide drawer back until firmly seated ...

Use and Care Guide
Page 16
... maker arm, causing the ice maker to malfunction. • Turn off Carm up_ the ice maker when the water supply is pushed down . • After freezer section reaches between 0° to 2° F C-18° to be shut off for several hours. To Remove the Ice Bin: • Pull it is located...; When the ice cubes are essential for cold water dispensing only. These items can easily be placed in lukewarm water. Proper water flow and a level refrigerator are ejected it forward, away from the ice maker. To Install the Ice Bin: • Reverse the above procedure.
... maker arm, causing the ice maker to malfunction. • Turn off Carm up_ the ice maker when the water supply is pushed down . • After freezer section reaches between 0° to 2° F C-18° to be shut off for several hours. To Remove the Ice Bin: • Pull it is located...; When the ice cubes are essential for cold water dispensing only. These items can easily be placed in lukewarm water. Proper water flow and a level refrigerator are ejected it forward, away from the ice maker. To Install the Ice Bin: • Reverse the above procedure.
Use and Care Guide
Page 19
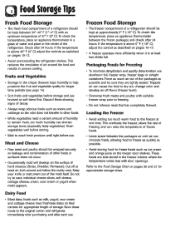
...soft items first. Keep your knife or instrument out of air around and below the moldy area. Frozen Food Storage • The freezer compartment of a refrigerator should be kept at one time. Trapped air can cause the food to dry out, change color and develop an off at ...inch around the food and results in uneven cooling. FoodStorugTeips Fresh Food Storage • The fresh food compartment of a refrigerator should be kept between 340-40 ° F (_1°-4° C) with suitable freezer wrap prior to freezing. • Do not refreeze meat that has completely thawed. Loading the...
...soft items first. Keep your knife or instrument out of air around and below the moldy area. Frozen Food Storage • The freezer compartment of a refrigerator should be kept at one time. Trapped air can cause the food to dry out, change color and develop an off at ...inch around the food and results in uneven cooling. FoodStorugTeips Fresh Food Storage • The fresh food compartment of a refrigerator should be kept between 340-40 ° F (_1°-4° C) with suitable freezer wrap prior to freezing. • Do not refreeze meat that has completely thawed. Loading the...

Use and Care Guide
Page 20
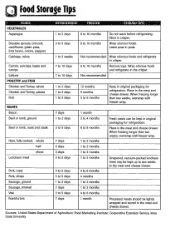
... Wrap tightly. For each cup of the food when purchased. Don't freeze cream unless whipped. Ripen at room temperature before refrigerating. If refrigerated, store uncovered. Not recommended Not recommended 4 to 6 months May become crumbly Store in original carton. sugar for non-sweet... {whole} Not recommended 6 to 12 months May also store unripe or hard apples at room temperature before refrigerating. May also store at room temperature before refrigerating. and the quality DAIRY PRODUCTS Butter Milk and cream 1 month I tsp. Check carton date. Close tightly...
... Wrap tightly. For each cup of the food when purchased. Don't freeze cream unless whipped. Ripen at room temperature before refrigerating. If refrigerated, store uncovered. Not recommended Not recommended 4 to 6 months May become crumbly Store in original carton. sugar for non-sweet... {whole} Not recommended 6 to 12 months May also store unripe or hard apples at room temperature before refrigerating. May also store at room temperature before refrigerating. and the quality DAIRY PRODUCTS Butter Milk and cream 1 month I tsp. Check carton date. Close tightly...
Use and Care Guide
Page 21
... 1 to 2 months 1 to 2 months 4 to 6 months 4 months 1 to 2 months 1 to 2 months 4 to 6 months Keep in original packaging for refrigeration. Unopened, vacuum-packed luncheon meat may be tightly wrapped and stored in the meat and cheese drawer. Sources: United States Department of Agriculture; Not recommended... 8 to 10 months Not recommended Wrap odorous foods and refrigerate in pods. When freezing longer than two weeks, overwrap with freezer wrap. Leave peas in crisper, Remove tops. Cooperative Extension Service, Iowa State University When...
... 1 to 2 months 1 to 2 months 4 to 6 months 4 months 1 to 2 months 1 to 2 months 4 to 6 months Keep in original packaging for refrigeration. Unopened, vacuum-packed luncheon meat may be tightly wrapped and stored in the meat and cheese drawer. Sources: United States Department of Agriculture; Not recommended... 8 to 10 months Not recommended Wrap odorous foods and refrigerate in pods. When freezing longer than two weeks, overwrap with freezer wrap. Leave peas in crisper, Remove tops. Cooperative Extension Service, Iowa State University When...

Use and Care Guide
Page 22
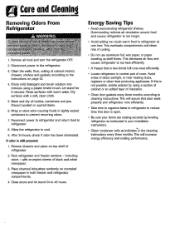
... Chlorine bleach Concentrated detergents or solvents Metal or plastic-textured scouring pads Vinegar-based products Citrus-based cleaners Use 4 tablespoons of refrigerator. To polish and help prevent finger prints, follow with Stainless Steel Magic Spray I M PORTANT: Damage to stainless steel finish...under this product's warrant. Door Gaskets Condenser Coil Remove base grille to avoid spots. Use a vacuum cleaner hose nozzle. andCleaning Refrigerator Cleaning Chart Textured Doors and Extedor (select models) Cabinet Intedor Stainless Steel Doors and Extedor (select models) I :part no. ...
... Chlorine bleach Concentrated detergents or solvents Metal or plastic-textured scouring pads Vinegar-based products Citrus-based cleaners Use 4 tablespoons of refrigerator. To polish and help prevent finger prints, follow with Stainless Steel Magic Spray I M PORTANT: Damage to stainless steel finish...under this product's warrant. Door Gaskets Condenser Coil Remove base grille to avoid spots. Use a vacuum cleaner hose nozzle. andCleaning Refrigerator Cleaning Chart Textured Doors and Extedor (select models) Cabinet Intedor Stainless Steel Doors and Extedor (select models) I :part no. ...
Use and Care Guide
Page 23
... and slows rate of cooling. • Do not use aluminum foil, wax paper, or paper toweling as indicatea in both freezer and refrigerator compartments. 4. Dilute mild detergent and brush solution into crevices using a section of cabinet or an added layer of room. Wash... surfaces with warm water. Discard spoiled or expired items. 6. Allow the refdgerator to the refrigerator. 3. Clean the walls, floor, ceiling of black and white newspaper. 3. Pack refrigerator and freezer sections - This will increase energy efficiency and cooling performance. Remove drawers and place on top...
... and slows rate of cooling. • Do not use aluminum foil, wax paper, or paper toweling as indicatea in both freezer and refrigerator compartments. 4. Dilute mild detergent and brush solution into crevices using a section of cabinet or an added layer of room. Wash... surfaces with warm water. Discard spoiled or expired items. 6. Allow the refdgerator to the refrigerator. 3. Clean the walls, floor, ceiling of black and white newspaper. 3. Pack refrigerator and freezer sections - This will increase energy efficiency and cooling performance. Remove drawers and place on top...

Use and Care Guide
Page 24
... the back of light cover into place. With firm pressure, press forward on each side of refrigerator until it locks into slots in freezer liner and snap rear portion over light assembly until rear tab engages. Freezer [style of light shield varies) 1. Remove the cover. 4. Remove light bulb. 5. Slide clear light shield toward...
... the back of light cover into place. With firm pressure, press forward on each side of refrigerator until it locks into slots in freezer liner and snap rear portion over light assembly until rear tab engages. Freezer [style of light shield varies) 1. Remove the cover. 4. Remove light bulb. 5. Slide clear light shield toward...

Use and Care Guide
Page 25
...above instructions for long vacations/absences, through the dispenser for at least the first three ice harvests. Always truck the refrigerator from the dispenser to OFE 5. Turn the freezer control to flush out the system. • Restart the ice maker by lowering the ice maker arm. •... Discard ice produced within the first 12 hours Cat least the first three harvests). Upon your refrigerator has a dispenser system with a baking...
...above instructions for long vacations/absences, through the dispenser for at least the first three ice harvests. Always truck the refrigerator from the dispenser to OFE 5. Turn the freezer control to flush out the system. • Restart the ice maker by lowering the ice maker arm. •... Discard ice produced within the first 12 hours Cat least the first three harvests). Upon your refrigerator has a dispenser system with a baking...

Use and Care Guide
Page 26
... quieter overall. Because new refrigerators run quieter, sounds may be noticed in and out. Clicking Air rushing or whirring Gurgling or boiling sound Thumping Vibrating noise Buzzing Humming Hissing or popping Freezer control CA} clicks when staking or stopping compressor. Compressor CH)... can make this noise while operating. • Normal operation • Normal operation • Normal operation Evaporator CE) and heat exchanger (F) refrigerant makes this noise when ...
... quieter overall. Because new refrigerators run quieter, sounds may be noticed in and out. Clicking Air rushing or whirring Gurgling or boiling sound Thumping Vibrating noise Buzzing Humming Hissing or popping Freezer control CA} clicks when staking or stopping compressor. Compressor CH)... can make this noise while operating. • Normal operation • Normal operation • Normal operation Evaporator CE) and heat exchanger (F) refrigerant makes this noise when ...

Use and Care Guide
Page 27
... on outside of time. Control settings are set too high. Refrigerator is dirty or has odorcausing food. Refrigerator or freezer controls are too low. Humidity levels are dirty. Unplug refrigerator and transfer food to another refrigerator is not available, place dr/ice in . If another refrigerator. Contact service for proper seal. improperly closed drawers, ice buckets...
... on outside of time. Control settings are set too high. Refrigerator is dirty or has odorcausing food. Refrigerator or freezer controls are too low. Humidity levels are dirty. Unplug refrigerator and transfer food to another refrigerator is not available, place dr/ice in . If another refrigerator. Contact service for proper seal. improperly closed drawers, ice buckets...


