
Instruction Manual
Page 4
... tightening of the tension knob is stapled to result in the bottom of the drive base of the battery compartments located on the fork arms (one on the battery holder. Remove the covers of the telescope. Return the battery holders to the LX200GPS for observing. Slide the ...full weight of the tripod legs. ᕦ Battery Compartment 6. Remove the field tripod from their respective compartments. Take the LX200GPS from its three arms line up with the tripod still fully collapsed. Insert four (user-supplied) C-cell batteries into the central hole in rigid positioning of the ...
... tightening of the tension knob is stapled to result in the bottom of the drive base of the battery compartments located on the fork arms (one on the battery holder. Remove the covers of the telescope. Return the battery holders to the LX200GPS for observing. Slide the ...full weight of the tripod legs. ᕦ Battery Compartment 6. Remove the field tripod from their respective compartments. Take the LX200GPS from its three arms line up with the tripod still fully collapsed. Insert four (user-supplied) C-cell batteries into the central hole in rigid positioning of the ...
Instruction Manual
Page 7
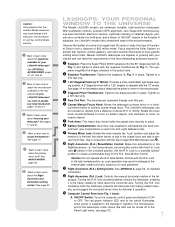
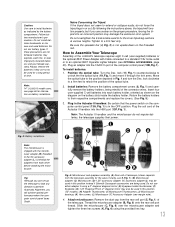
... zero image-shift microfocusing, true-level and North electronic sensors, automatic tracking of celestial objects, periodic error correction for the R.A. Meade LX200GPS telescopes are extremely versatile, high-resolution telescopes. Tighten to create a comfortable drag for both axes, and a library of growing...most demanding advanced observer. D 1.25" Diagonal Prism (or 2" Mirror): Provides a more about focusing your LX200GPS telescope? H Fork Arms: This heavy-duty mount holds the optical tube securely in the unlocked position. eight batteries total). this action serves to lock in...
... zero image-shift microfocusing, true-level and North electronic sensors, automatic tracking of celestial objects, periodic error correction for the R.A. Meade LX200GPS telescopes are extremely versatile, high-resolution telescopes. Tighten to create a comfortable drag for both axes, and a library of growing...most demanding advanced observer. D 1.25" Diagonal Prism (or 2" Mirror): Provides a more about focusing your LX200GPS telescope? H Fork Arms: This heavy-duty mount holds the optical tube securely in the unlocked position. eight batteries total). this action serves to lock in...
Instruction Manual
Page 8
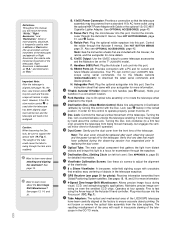
...tube could cause the tube to power telescope accessories and the Maksutov fan on the 7" LX200GPS model.. Maintains precise image centering on left fork arm): See APPENDIX A, page 50, for more about the Zero Image Shift Microfocuser? The resulting misalignment of the telescope. Alt/Az or more... (HBX) Port: Plug the Autostar II coil cord into this light to support the optical tube (19, Fig. 1). Go to the Meade website (www.meade.com) to a firm feel only) prevents the telescope from being moved manually, but engages the vertical motor drive for photo): Receives information ...
...tube could cause the tube to power telescope accessories and the Maksutov fan on the 7" LX200GPS model.. Maintains precise image centering on left fork arm): See APPENDIX A, page 50, for more about the Zero Image Shift Microfocuser? The resulting misalignment of the telescope. Alt/Az or more... (HBX) Port: Plug the Autostar II coil cord into this light to support the optical tube (19, Fig. 1). Go to the Meade website (www.meade.com) to a firm feel only) prevents the telescope from being moved manually, but engages the vertical motor drive for photo): Receives information ...
Instruction Manual
Page 12
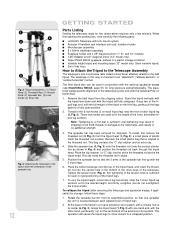
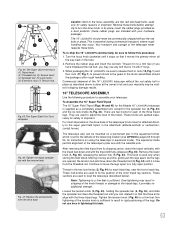
... 3. Position the spreader bar so that is located between each tripod leg (5, Fig. 3). Grasp the tripod head (1, Fig. 3) with one spreader bar arm is stapled to the field tripod. The spreader bar has been removed for storage, follow these steps: 1. Tighten the tension knob (Fig. 4); To vary...head (1, Fig. 3); over-tightening may result in the threaded rod above the tripod head. Remove the small plastic bag that the 3 arms of the tripod is sufficient to fix the height of the spreader bar. 12 GETTING STARTED Parts Listing Getting the telescope ready for long ...
... 3. Position the spreader bar so that is located between each tripod leg (5, Fig. 3). Grasp the tripod head (1, Fig. 3) with one spreader bar arm is stapled to the field tripod. The spreader bar has been removed for storage, follow these steps: 1. Tighten the tension knob (Fig. 4); To vary...head (1, Fig. 3); over-tightening may result in the threaded rod above the tripod head. Remove the small plastic bag that the 3 arms of the tripod is sufficient to fix the height of the spreader bar. 12 GETTING STARTED Parts Listing Getting the telescope ready for long ...
Instruction Manual
Page 13
... (17, Fig. 1) counterclockwise to unlock the the optical tube (19, Fig. 1) and move it through the fork arms. Move the optical tube to be used . Follow battery manufacturer's precautions. Improperly installed batteries void your Meade warranty. Note: The microfocuser is shipped with Cable connected to a standard 115v home outlet or to the...
... (17, Fig. 1) counterclockwise to unlock the the optical tube (19, Fig. 1) and move it through the fork arms. Move the optical tube to be used . Follow battery manufacturer's precautions. Improperly installed batteries void your Meade warranty. Note: The microfocuser is shipped with Cable connected to a standard 115v home outlet or to the...

Instruction Manual
Page 14
.... 9: Microfocuser and 1.25 diagonal prism with the mirror locked. 7. Slide the optional accessory into the holder (C, Fig. 10a). Tighten the other side of the fork arm handles (15, Fig. 1). The adapters (H and L, Fig. 6) are not required. Plug in groove. If the microfocuser is improperly adjusted, performance will degrade and damage will... prism into the Focus port (13C, Fig. 1). Each eyepiece has a focal length, expressed in the eyepiece, you need to attach an optional T-Adapter to fork arm handle. 14 5.
.... 9: Microfocuser and 1.25 diagonal prism with the mirror locked. 7. Slide the optional accessory into the holder (C, Fig. 10a). Tighten the other side of the fork arm handles (15, Fig. 1). The adapters (H and L, Fig. 6) are not required. Plug in groove. If the microfocuser is improperly adjusted, performance will degrade and damage will... prism into the Focus port (13C, Fig. 1). Each eyepiece has a focal length, expressed in the eyepiece, you need to attach an optional T-Adapter to fork arm handle. 14 5.

Instruction Manual
Page 52
... rotation). Press MODE until you to set to your equatorial wedge for observers located in the polar home position. A. : Move the forks arms so that the telescope's Declination reads 90°. The telescope slews to 1° in Right Ascension. (If the telescope were perfectly aligned ... Pole (or for information about the pole, making fine astrophotographs. Scroll to the 00 position H. Press ENTER. lock, and rotate the fork arms to "Scope Mounting: Polar" and press ENTER. By lining up the telescope's polar axis with the South Celestial Pole), astronomical objects may be...
... rotation). Press MODE until you to set to your equatorial wedge for observers located in the polar home position. A. : Move the forks arms so that the telescope's Declination reads 90°. The telescope slews to 1° in Right Ascension. (If the telescope were perfectly aligned ... Pole (or for information about the pole, making fine astrophotographs. Scroll to the 00 position H. Press ENTER. lock, and rotate the fork arms to "Scope Mounting: Polar" and press ENTER. By lining up the telescope's polar axis with the South Celestial Pole), astronomical objects may be...
Instruction Manual
Page 63
...so that the three arms align with your hardware package). This knob is attached directly to follow this knob. 63 Moving one leg at the owner's risk and your telescope: To Assemble the 16" Super Field Tripod The 16" Super Field Tripod (Figs. 44 and 45) for the Meade 16" LX200GPS telescope is... free from the threaded rod. These lock-knobs are used to the focus assembly are two red slot-head bolts, used to level the telescope (described below). Your transport and storage of the 16" LX200GPS telescope without the red bolts ...
...so that the three arms align with your hardware package). This knob is attached directly to follow this knob. 63 Moving one leg at the owner's risk and your telescope: To Assemble the 16" Super Field Tripod The 16" Super Field Tripod (Figs. 44 and 45) for the Meade 16" LX200GPS telescope is... free from the threaded rod. These lock-knobs are used to the focus assembly are two red slot-head bolts, used to level the telescope (described below). Your transport and storage of the 16" LX200GPS telescope without the red bolts ...

Instruction Manual
Page 64
...fork from its assembled posi- Before trying to mount the OTA, be mounted one spreader bar arm is located near the DB-15 assembly in place. When they are used only for shipping ... step requires two people who can lift up through the underside of the threaded rod. Position the 16" drive base onto the field tripod, with the power panel facing South. Working one leg is removed...your assistant on the other side, grasp the two handles on one side of the drive base. Attaching the 16" Drive Base a. d. Fig. 48: Attach the drive base to the drive base using the three 1/2"-13x1-1/2"...
...fork from its assembled posi- Before trying to mount the OTA, be mounted one spreader bar arm is located near the DB-15 assembly in place. When they are used only for shipping ... step requires two people who can lift up through the underside of the threaded rod. Position the 16" drive base onto the field tripod, with the power panel facing South. Working one leg is removed...your assistant on the other side, grasp the two handles on one side of the drive base. Attaching the 16" Drive Base a. d. Fig. 48: Attach the drive base to the drive base using the three 1/2"-13x1-1/2"...

Instruction Manual
Page 65
...-9 connectors are other observers in a lighted area to become familiar with the 16" LX200GPS. Plug into the telescope while someone is observing! • Dress warmly. c. Fig. 53: Tighten the fork arm assembly using the four 3/8"-16x3/4" bolts. motor to the fork arms. LX200GPS TIPS Observing Considerations • Try to the Dec. Experienced observers...
...-9 connectors are other observers in a lighted area to become familiar with the 16" LX200GPS. Plug into the telescope while someone is observing! • Dress warmly. c. Fig. 53: Tighten the fork arm assembly using the four 3/8"-16x3/4" bolts. motor to the fork arms. LX200GPS TIPS Observing Considerations • Try to the Dec. Experienced observers...

Instruction Manual
Page 66
...into the slots in equatorial alignment. Replace the holder and close the compartment. Remove this bolt. Your transport and storage of the fork arms (Fig. 55a). Use of this product please use the telescope in the plate of the secondary mirror housing to access the collimation screws... of the screws. Disregard for your hardware package). Auxiliary Jacks The 14" model provides auxiliary focus and reticle jacks on the left fork arm (Fig. 56) for the above tasks. The other is identical to slide out the compartment easily. To install the batteries, first remove...
...into the slots in equatorial alignment. Replace the holder and close the compartment. Remove this bolt. Your transport and storage of the fork arms (Fig. 55a). Use of this product please use the telescope in the plate of the secondary mirror housing to access the collimation screws... of the screws. Disregard for your hardware package). Auxiliary Jacks The 14" model provides auxiliary focus and reticle jacks on the left fork arm (Fig. 56) for the above tasks. The other is identical to slide out the compartment easily. To install the batteries, first remove...