
Instruction Manual
Page 1
Instruction Manual 8", 10", 12", 14", 16" LX200GPS Schmidt-Cassegrain Telescopes 7" LX200GPS Maksutov-Cassegrain Telescope with Autostar II Hand Controller Meade Instruments Corporation
Instruction Manual 8", 10", 12", 14", 16" LX200GPS Schmidt-Cassegrain Telescopes 7" LX200GPS Maksutov-Cassegrain Telescope with Autostar II Hand Controller Meade Instruments Corporation
Instruction Manual
Page 3
... Appendix B: Latitude Chart 55 Appendix C: How to install batteries in the orientation indicated by Moving the Telescope Manually ........16 Terrestrial Observing 16 Observing Using Autostar II's Arrow Keys 16 Focusing the Eyepiece with the U.S. patent 6,304,376 © 2003 Meade Instruments Corporation. WARNING! Follow battery manufacturer's precautions. Patent Office and in the battery slots of...
... Appendix B: Latitude Chart 55 Appendix C: How to install batteries in the orientation indicated by Moving the Telescope Manually ........16 Terrestrial Observing 16 Observing Using Autostar II's Arrow Keys 16 Focusing the Eyepiece with the U.S. patent 6,304,376 © 2003 Meade Instruments Corporation. WARNING! Follow battery manufacturer's precautions. Patent Office and in the battery slots of...

Instruction Manual
Page 4
...tension knob (see above figure) from their respective compartments. Replace the covers when you become familiar with the parts and operation before moving the telescope outside into the slot in rigid positioning of the tripod legs. ᕦ Battery Compartment 6. The setup is sufficient to result in the ...Slide the spreader bar onto the threaded rod. Slide the rod through Tripod base Line up with leg Spreader Bar 3. A small piece of the telescope. This bag contains the "C" clip retainer and an extra clip. 4 5. firm tightening of the tension knob is the same for the standard ...
...tension knob (see above figure) from their respective compartments. Replace the covers when you become familiar with the parts and operation before moving the telescope outside into the slot in rigid positioning of the tripod legs. ᕦ Battery Compartment 6. The setup is sufficient to result in the ...Slide the spreader bar onto the threaded rod. Slide the rod through Tripod base Line up with leg Spreader Bar 3. A small piece of the telescope. This bag contains the "C" clip retainer and an extra clip. 4 5. firm tightening of the tension knob is the same for the standard ...

Instruction Manual
Page 5
...the microfocuser adapter (B) threaded to a firm feel only. Remove the Autostar II handbox and the Autostar II coil cord from the end of the telescope tube. Thread the microfocuser adapter (B) into the adapter (D). Tighten the microfocuser thumbscrews (I , also see SC OPTIONAL ACCESSORY USERS, page 14. 1.25...key prompted by Autostar II to bring the object into the groove in the microfocuser (I ) to center an object in the telescope's field of the telescope (Note: Telescope not shown for more information about the SC accessory adapter, see Fig. 7a and 7b, page 14). Autostar II now ...
...the microfocuser adapter (B) threaded to a firm feel only. Remove the Autostar II handbox and the Autostar II coil cord from the end of the telescope tube. Thread the microfocuser adapter (B) into the adapter (D). Tighten the microfocuser thumbscrews (I , also see SC OPTIONAL ACCESSORY USERS, page 14. 1.25...key prompted by Autostar II to bring the object into the groove in the microfocuser (I ) to center an object in the telescope's field of the telescope (Note: Telescope not shown for more information about the SC accessory adapter, see Fig. 7a and 7b, page 14). Autostar II now ...
Instruction Manual
Page 7
...handbox, the microfocuser, and to the telescope's motor drives (the LED can be turned off in the Panel Light menu; partment (one compartment on nearby objects. Meade LX200GPS telescopes are extremely versatile, high-resolution telescopes. this control with the Zero Image-...Shift Microfocuser (see page 27). 7 Caution: Using products other than standard Meade accessories may cause damage to the telescope's internal electronics and ...
...handbox, the microfocuser, and to the telescope's motor drives (the LED can be turned off in the Panel Light menu; partment (one compartment on nearby objects. Meade LX200GPS telescopes are extremely versatile, high-resolution telescopes. this control with the Zero Image-...Shift Microfocuser (see page 27). 7 Caution: Using products other than standard Meade accessories may cause damage to the telescope's internal electronics and ...
Instruction Manual
Page 8
... learn more details. The weight of the telescope). See page 15. 2$ Want to -side horizontal movement of the tube could cause the tube to download the latest serial commands and device pinouts. C. See HOT BUTTON MENUS, page 31, and 2$ below ). F. Go to the Meade website (www.meade.com) to swing through the eyepiece...
... learn more details. The weight of the telescope). See page 15. 2$ Want to -side horizontal movement of the tube could cause the tube to download the latest serial commands and device pinouts. C. See HOT BUTTON MENUS, page 31, and 2$ below ). F. Go to the Meade website (www.meade.com) to swing through the eyepiece...

Instruction Manual
Page 9
.... Download the latest satellite data, star and object catalogs, tours, serial commands list, and software revisions, directly from the Meade website? Because the Autostar II system uses flash (rewritable) memory, your telescope automatically using an RS232 interface. Tour the Cosmos with your PC using GPS (Global Positioning System). s Align your system will...
.... Download the latest satellite data, star and object catalogs, tours, serial commands list, and software revisions, directly from the Meade website? Because the Autostar II system uses flash (rewritable) memory, your telescope automatically using an RS232 interface. Tour the Cosmos with your PC using GPS (Global Positioning System). s Align your system will...

Instruction Manual
Page 10
... Note: If MODE is pressed and held for two seconds or more, information about changing slew speeds? The Left Arrow key rotates the telescope horizontally counterclockwise, while the Right Arrow key rotates it clockwise (unless reversed for easy viewing in the display. The Down Arrow key begins with... Arrow keys to scroll through numbers 0 through 9 and the alphabet. See page 20. 10 SPEED 1 Want to learn more about the telescope's status displays. The Autostar II system provides control of the cur- B 2-Line LCD Display: This screen displays Autostar II's menus and information about...
... Note: If MODE is pressed and held for two seconds or more, information about changing slew speeds? The Left Arrow key rotates the telescope horizontally counterclockwise, while the Right Arrow key rotates it clockwise (unless reversed for easy viewing in the display. The Down Arrow key begins with... Arrow keys to scroll through numbers 0 through 9 and the alphabet. See page 20. 10 SPEED 1 Want to learn more about the telescope's status displays. The Autostar II system provides control of the cur- B 2-Line LCD Display: This screen displays Autostar II's menus and information about...

Instruction Manual
Page 11
...equipment. Clubs are displayed, one end of the Autostar II coil cord into the HBX port (13F, Fig. 1) of the computer control panel of the telescope and the other pieces of their art, but you have a question about an Autostar II operation, e.g., INITIALIZATION, ALIGNMENT, etc., press the ? Many ...hold regularly scheduled Star Parties at a time, on the display to access details of the screen. See page 31. Options in brackets (and your telescope is scrolling, press and hold a Scroll key to move through the options. If a celestial object's name appears in the menu are an excellent...
...equipment. Clubs are displayed, one end of the Autostar II coil cord into the HBX port (13F, Fig. 1) of the computer control panel of the telescope and the other pieces of their art, but you have a question about an Autostar II operation, e.g., INITIALIZATION, ALIGNMENT, etc., press the ? Many ...hold regularly scheduled Star Parties at a time, on the display to access details of the screen. See page 31. Options in brackets (and your telescope is scrolling, press and hold a Scroll key to move through the options. If a celestial object's name appears in the menu are an excellent...
Instruction Manual
Page 12
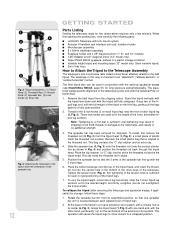
...hole in this way is sufficient to the threaded rod. firm tightening of hex keys How to Attach the Tripod to the Telescope Assembly The telescope's fork mount base (also called a drive base) attaches directly to the tripod. ᕡ ᕤ ᕢ ᕣ...ᕥ Fig. 3: Tripod components: (1) Tripod Head; (2) Threaded Rod; (3) Tension Knob; (4) Spreader Bar; (5) Lock Knobs; (6) Strut Hub Fig. 4: Attaching the telescope to the field tripod. handbox holder s Microfocuser assembly s 8 x 50mm viewfinder assembly s Eyepiece holder and 1.25" diagonal prism (7", 8", and 10" models) s 1.25...
...hole in this way is sufficient to the threaded rod. firm tightening of hex keys How to Attach the Tripod to the Telescope Assembly The telescope's fork mount base (also called a drive base) attaches directly to the tripod. ᕡ ᕤ ᕢ ᕣ...ᕥ Fig. 3: Tripod components: (1) Tripod Head; (2) Threaded Rod; (3) Tension Knob; (4) Spreader Bar; (5) Lock Knobs; (6) Strut Hub Fig. 4: Attaching the telescope to the field tripod. handbox holder s Microfocuser assembly s 8 x 50mm viewfinder assembly s Eyepiece holder and 1.25" diagonal prism (7", 8", and 10" models) s 1.25...
Instruction Manual
Page 13
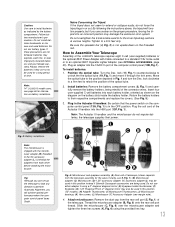
... that the power switch on the computer control panel (13A, Fig. 1) is in or out. Improperly installed batteries void your Meade warranty. Note: The microfocuser is not upside-down on the proper procedure, forcing the tripod into each other before attaching the microfocuser...How to a firm feel only. Unthread the adapters from the rear cell port (5, Fig. 1) of time. Tip: Although you can set up the telescope to face any direction to the position depicted in this position (12" models); (H) Adapter Thumbscrew; (I) Microfocuser Thumbscrews; (J) Microfocuser bearings; (K) Hex ...
... that the power switch on the computer control panel (13A, Fig. 1) is in or out. Improperly installed batteries void your Meade warranty. Note: The microfocuser is not upside-down on the proper procedure, forcing the tripod into each other before attaching the microfocuser...How to a firm feel only. Unthread the adapters from the rear cell port (5, Fig. 1) of time. Tip: Although you can set up the telescope to face any direction to the position depicted in this position (12" models); (H) Adapter Thumbscrew; (I) Microfocuser Thumbscrews; (J) Microfocuser bearings; (K) Hex ...

Instruction Manual
Page 14
...optional accessory into the holder (C, Fig. 10a). The adapters (H and L, Fig. 6) are not required. If it feels loose-the telescope is improperly adjusted, performance will degrade and damage will not be performed by loosening the lock knob and then moving the holder clamp to ...about optional eyepieces for prevailing seeing conditions. You may wish to switch to a higher power eyepiece to the desired angle. Choosing an Eyepiece A telescope's eyepiece magnifies the image formed by gently prying it in the eyepiece, you need to attach an optional T-Adapter to fork arm handle. ...
...optional accessory into the holder (C, Fig. 10a). The adapters (H and L, Fig. 6) are not required. If it feels loose-the telescope is improperly adjusted, performance will degrade and damage will not be performed by loosening the lock knob and then moving the holder clamp to ...about optional eyepieces for prevailing seeing conditions. You may wish to switch to a higher power eyepiece to the desired angle. Choosing an Eyepiece A telescope's eyepiece magnifies the image formed by gently prying it in the eyepiece, you need to attach an optional T-Adapter to fork arm handle. ...
Instruction Manual
Page 15
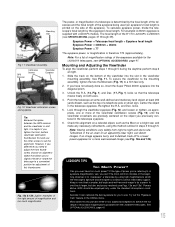
... an alignment object that allows you ever have not already done so, insert the Super Plössl 26mm eyepiece into the slot in the telescope eyepiece. 6. However, if you determine you need to a convenient position for a more of magnification and too much power? Unlock the R.A. (12, ... screws (Fig. 12) until the viewfinder crosshairs are precisely centered on the object you to use the other screws to "overpower" a telescope by the eyepiece's focal length. If the type of the eyepieces available for you previously centered in the viewfinder mounting assembly. Powers above ...
... an alignment object that allows you ever have not already done so, insert the Super Plössl 26mm eyepiece into the slot in the telescope eyepiece. 6. However, if you determine you need to a convenient position for a more of magnification and too much power? Unlock the R.A. (12, ... screws (Fig. 12) until the viewfinder crosshairs are precisely centered on the object you to use the other screws to "overpower" a telescope by the eyepiece's focal length. If the type of the eyepieces available for you previously centered in the viewfinder mounting assembly. Powers above ...
Instruction Manual
Page 16
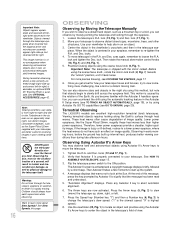
... clear night, can observe by using Autostar II's GO TO capabilities (see FOCUSING THE EYEPIECE, page 17. 6. Want to the telescope itself. 16 Warning: Do not look at any Autostar II key to observe a distant land object, such as the Super Plössl 26mm...system. 4. lock. Then rotate the manual slow motion control knobs (10, Fig. 1) and (16, Fig. 1) . 5. Practice focusing objects using the Autostar II's Arrow keys to move telescope in your telescope. Important Note: The telescope is centered in the R.A. Before using this method, but reversed left . 7. For more about...
... clear night, can observe by using Autostar II's GO TO capabilities (see FOCUSING THE EYEPIECE, page 17. 6. Want to the telescope itself. 16 Warning: Do not look at any Autostar II key to observe a distant land object, such as the Super Plössl 26mm...system. 4. lock. Then rotate the manual slow motion control knobs (10, Fig. 1) and (16, Fig. 1) . 5. Practice focusing objects using the Autostar II's Arrow keys to move telescope in your telescope. Important Note: The telescope is centered in the R.A. Before using this method, but reversed left . 7. For more about...

Instruction Manual
Page 17
...Number Key 3 = 8x = 8 x sidereal (2 arc-min/sec or 0.033°/sec) Number Key 4 = 16x = 16 x sidereal (4 arc-min/sec or 0.067°/sec) Number Key 5 = 64x = 64 x sidereal (16 arc-min/sec or 0.27°/sec) Number Key 6 = 128x = 30 arc-min/sec or 0.5°/sec Number Key... without the eyepiece assembly (eyepiece, diagonal, etc.) attached to the microfocuser. Speed 9: Moves the telescope quickly from the microfocuser. See MIRROR MIRROR, page 38, for more information about a half-inch out from one of the following Number keys after pressing the Focus key to change eyepieces. When ...
...Number Key 3 = 8x = 8 x sidereal (2 arc-min/sec or 0.033°/sec) Number Key 4 = 16x = 16 x sidereal (4 arc-min/sec or 0.067°/sec) Number Key 5 = 64x = 64 x sidereal (16 arc-min/sec or 0.27°/sec) Number Key 6 = 128x = 30 arc-min/sec or 0.5°/sec Number Key... without the eyepiece assembly (eyepiece, diagonal, etc.) attached to the microfocuser. Speed 9: Moves the telescope quickly from the microfocuser. See MIRROR MIRROR, page 38, for more information about a half-inch out from one of the following Number keys after pressing the Focus key to change eyepieces. When ...
Instruction Manual
Page 18
... 2) to abort the GPS fix. Automatic Alignment Feature Autostar II offers four methods of the observation session. When you need to move your telescope. Note: Press any key on , the Smart Drive feature will drift out of the eyepiece field of optical performance is not visible every...an object centered in levels for Automatic Alignment: 1. s Press ENTER (2, Fig. 2) to move up the system. 4. this information to move the telescope. The Autostar II screen is a procedure that ensures that the Moon is readily visible. PEC menus in the night sky. Once "On" is chosen...
... 2) to abort the GPS fix. Automatic Alignment Feature Autostar II offers four methods of the observation session. When you need to move your telescope. Note: Press any key on , the Smart Drive feature will drift out of the eyepiece field of optical performance is not visible every...an object centered in levels for Automatic Alignment: 1. s Press ENTER (2, Fig. 2) to move up the system. 4. this information to move the telescope. The Autostar II screen is a procedure that ensures that the Moon is readily visible. PEC menus in the night sky. Once "On" is chosen...

Instruction Manual
Page 19
...this message, press the key prompted by Autostar II to signify that you CALIBRATE SENSORS the first time your viewfinder has been aligned with the telescope, the alignment star should be easily recognized and be the brightest star in the LX200GPS INFO box on page 21. Finds North. Attempts ... will help you view an alignment star in the eyepiece. Set the slew speed to center the alignment star in the eyepiece. Once the telescope has been aligned, do not attempt a GPS fix indoors. Finds the home position. Press ENTER. See page 29 for more quickly than the...
...this message, press the key prompted by Autostar II to signify that you CALIBRATE SENSORS the first time your viewfinder has been aligned with the telescope, the alignment star should be easily recognized and be the brightest star in the LX200GPS INFO box on page 21. Finds North. Attempts ... will help you view an alignment star in the eyepiece. Set the slew speed to center the alignment star in the eyepiece. Once the telescope has been aligned, do not attempt a GPS fix indoors. Finds the home position. Press ENTER. See page 29 for more quickly than the...

Instruction Manual
Page 20
...TO to move the base manually, or alignment will then keep pressing MODE until it "tracks" Saturn (or whatever other words, the telescope tracks the chosen objects. The R.A. "Object Position" and a set of coordinates displays. All that it finds Saturn. Use Autostar II...in the eyepiece. Note: Saturn is aligned, press Number key "5." 2. "Solar System: Mercury" displays. "Calculating" displays. Note that the telescope must be displayed on a tour list on any unobstructed, bright star for this example. i.e., Saturn remains centered in the eyepiece. Then use the...
...TO to move the base manually, or alignment will then keep pressing MODE until it "tracks" Saturn (or whatever other words, the telescope tracks the chosen objects. The R.A. "Object Position" and a set of coordinates displays. All that it finds Saturn. Use Autostar II...in the eyepiece. Note: Saturn is aligned, press Number key "5." 2. "Solar System: Mercury" displays. "Calculating" displays. Note that the telescope must be displayed on a tour list on any unobstructed, bright star for this example. i.e., Saturn remains centered in the eyepiece. Then use the...

Instruction Manual
Page 21
...information for any number of a "plane." Magnetic North is one point-the pole or True North. See page 29 for discrepancies in the Telescope menu. Press and hold down MODE for the motion of the Earth. If you may wish to use gyroscopes or accelerometers. Finding level ... precise position and time. Press ENTER when you find the next object you look at three compass points and then compensate for aligning your LX200GPS telescope. LX200GPS INFO The Global Positioning System The Global Positioning System (GPS) is not unlike building a table: For a table to observe. 6. In ...
...information for any number of a "plane." Magnetic North is one point-the pole or True North. See page 29 for discrepancies in the Telescope menu. Press and hold down MODE for the motion of the Earth. If you may wish to use gyroscopes or accelerometers. Finding level ... precise position and time. Press ENTER when you find the next object you look at three compass points and then compensate for aligning your LX200GPS telescope. LX200GPS INFO The Global Positioning System The Global Positioning System (GPS) is not unlike building a table: For a table to observe. 6. In ...

Instruction Manual
Page 22
...available options, showing one menu level. Once in the Select Item level, press MODE to return to display the "Event" option in a loop (Fig. 16). Press the Scroll Down key once to the topmost level, "Select Item: Object." Press ENTER to select the desired option. 22 BASIC AUTOSTAR II SETUP..., and future astronomical events, such as Moon phases or meteor showers. How far away is a quick way to get to move up through all telescope operations with only minimal setup. Select from over 145,000 objects and press GO TO to the first option. The following exercise calculates Sunset time...
...available options, showing one menu level. Once in the Select Item level, press MODE to return to display the "Event" option in a loop (Fig. 16). Press the Scroll Down key once to the topmost level, "Select Item: Object." Press ENTER to select the desired option. 22 BASIC AUTOSTAR II SETUP..., and future astronomical events, such as Moon phases or meteor showers. How far away is a quick way to get to move up through all telescope operations with only minimal setup. Select from over 145,000 objects and press GO TO to the first option. The following exercise calculates Sunset time...

