

Info Sheet
Page 2
... • Wireless remote control • AC adapter Dimensions • Unit dimensions: 13.4" x 9.61" x 6" Package Information UPC CODE: 749720-00966-4 PACKAGING: full color giftbox PACK DIMENSIONS (WDH): 15.2" x 10.55" x 7.8" MASTER PACK: 2 units MASTER WEIGHT: 23.37 lbs. iPod nano CONNECTIVITY - and other countries. Auxiliary line-in the U.S. Mi1111 home stereo system for iPod...
... • Wireless remote control • AC adapter Dimensions • Unit dimensions: 13.4" x 9.61" x 6" Package Information UPC CODE: 749720-00966-4 PACKAGING: full color giftbox PACK DIMENSIONS (WDH): 15.2" x 10.55" x 7.8" MASTER PACK: 2 units MASTER WEIGHT: 23.37 lbs. iPod nano CONNECTIVITY - and other countries. Auxiliary line-in the U.S. Mi1111 home stereo system for iPod...

User's Manual
Page 7
... (I) Button 15. Tune/Skip/Time Down (-) Button 16. iPod Dock with Connector, Dock Adapter & Interchangeable Universal Docks 18. FM Wire Antenna (Rear of Unit) 10. Remote Sensor 22. FUNCTION Button 3. Tune/Skip/Time Up (+) Button 11. PLAY/PAUSE (®p) Button 12. REPEAT Button 13. Right Speaker 20. PRESET/FOLDER + / - Left Speaker...
... (I) Button 15. Tune/Skip/Time Down (-) Button 16. iPod Dock with Connector, Dock Adapter & Interchangeable Universal Docks 18. FM Wire Antenna (Rear of Unit) 10. Remote Sensor 22. FUNCTION Button 3. Tune/Skip/Time Up (+) Button 11. PLAY/PAUSE (®p) Button 12. REPEAT Button 13. Right Speaker 20. PRESET/FOLDER + / - Left Speaker...

User's Manual
Page 8
Button 9. Tune/Skip/Time Up (+) Button 17. Button Remote Control Part No. 0000-Mi11110-5800* *Consumer Replaceable Part (See page 32 to order.) 7 PROG./MEMO./ Clock Set Button 10. SLEEP Button 14. BASS + / - Button ... -MONO Button 11. POWER Button 2. TIMER Button 4. REPEAT Button 13. PRESET/FOLDER + / - RANDOM Button 3. PLAY/PAUSE (®p) Button 6. MUTE Button 12. LOCATION OF CONTROLS (CONTINUED) REMOTE 1 2 3 12 4 13 5 6 14 15 7 16 8 9 17 10 18 11 19 1. INTRO Button 7. TREBLE + / -
Button 9. Tune/Skip/Time Up (+) Button 17. Button Remote Control Part No. 0000-Mi11110-5800* *Consumer Replaceable Part (See page 32 to order.) 7 PROG./MEMO./ Clock Set Button 10. SLEEP Button 14. BASS + / - Button ... -MONO Button 11. POWER Button 2. TIMER Button 4. REPEAT Button 13. PRESET/FOLDER + / - RANDOM Button 3. PLAY/PAUSE (®p) Button 6. MUTE Button 12. LOCATION OF CONTROLS (CONTINUED) REMOTE 1 2 3 12 4 13 5 6 14 15 7 16 8 9 17 10 18 11 19 1. INTRO Button 7. TREBLE + / -
User's Manual
Page 9
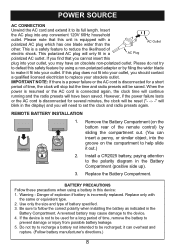
This is a safety feature to reduce the likelihood of explosion if battery is disconnected for a short period of the remote control) by filing the wider blade to the device. 4. If this plug does not fit into your outlet, you may cause damage to make it ...-polarized outlet. This polarized AC plug will blink in the display) and you find that this safety feature by using a battery in the Battery Compartment. REMOTE BATTERY INSTALLATION 1. POWER SOURCE AC CONNECTION Unwind the AC cord and extend it can insert a penny, or similar object, into the groove on the bottom...
This is a safety feature to reduce the likelihood of explosion if battery is disconnected for a short period of the remote control) by filing the wider blade to the device. 4. If this plug does not fit into your outlet, you may cause damage to make it ...-polarized outlet. This polarized AC plug will blink in the display) and you find that this safety feature by using a battery in the Battery Compartment. REMOTE BATTERY INSTALLATION 1. POWER SOURCE AC CONNECTION Unwind the AC cord and extend it can insert a penny, or similar object, into the groove on the bottom...

User's Manual
Page 14
... range is -6 to +6. 3 To adjust the bass: Press the BASS + and/or - button 1 on the remote (shown) or on the remote to unmute. NOTE: The range is turned off and back on the remote to increase and/or decrease the volume. button on again, the volume will blink in the display...or decrease the bass. OPERATION (CONTINUED) ADJUSTING THE VOLUME CONTROLS 1 2 1 1 2 To adjust the main volume: Press the VOLUME + and/or button 1 on the remote (shown) or on the remote;"MUTE" will resume at the level which you set before turning the unit off. 13 Press this unit is -6 to +6.
... range is -6 to +6. 3 To adjust the bass: Press the BASS + and/or - button 1 on the remote (shown) or on the remote to unmute. NOTE: The range is turned off and back on the remote to increase and/or decrease the volume. button on again, the volume will blink in the display...or decrease the bass. OPERATION (CONTINUED) ADJUSTING THE VOLUME CONTROLS 1 2 1 1 2 To adjust the main volume: Press the VOLUME + and/or button 1 on the remote (shown) or on the remote;"MUTE" will resume at the level which you set before turning the unit off. 13 Press this unit is -6 to +6.
User's Manual
Page 15
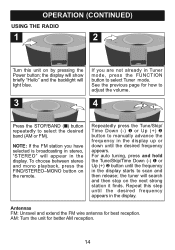
... in Tuner mode, press the FUNCTION button to select Tuner mode. the tuner will appear in stereo, "STEREO" will search and then stop on the remote. the display will show briefly "Hello" and the backlight will light blue. 3 1 If you have selected is broadcasting in the display. Antennas FM: Unravel and...
... in Tuner mode, press the FUNCTION button to select Tuner mode. the tuner will appear in stereo, "STEREO" will search and then stop on the remote. the display will show briefly "Hello" and the backlight will light blue. 3 1 If you have selected is broadcasting in the display. Antennas FM: Unravel and...

User's Manual
Page 20
... press the STOP/BAND (I ) button. To play the tracks/files on the disc, while in the Stop mode, press the RANDOM button on the remote; NOTE: To stop and cancel Intro playback, press the STOP/BAND (I ) button. see the previous page for how to cycle through the selected, ... until "INTRO" disappears from the display. To just cancel Repeat disc continuously) or "REP ALBUM" playback, press the REPEAT (will playback a folder on the remote; track/file continuously; RANDOM & INTRO PLAYBACK 1 2 To randomly play the intro (the first 10 seconds) of each track/file on the disc, while in...
... press the STOP/BAND (I ) button. To play the tracks/files on the disc, while in the Stop mode, press the RANDOM button on the remote; NOTE: To stop and cancel Intro playback, press the STOP/BAND (I ) button. see the previous page for how to cycle through the selected, ... until "INTRO" disappears from the display. To just cancel Repeat disc continuously) or "REP ALBUM" playback, press the REPEAT (will playback a folder on the remote; track/file continuously; RANDOM & INTRO PLAYBACK 1 2 To randomly play the intro (the first 10 seconds) of each track/file on the disc, while in...

User's Manual
Page 24
... search for a song by file name as follows: 1 2 1 2 With a MP3 disc inserted, while in the Stop mode, press the FIND/ STEREO-MONO button on the remote;
... search for a song by file name as follows: 1 2 1 2 With a MP3 disc inserted, while in the Stop mode, press the FIND/ STEREO-MONO button on the remote;

User's Manual
Page 25
... desired folder appears, press the Play/Pause (®p) button and playback will appear in the Stop mode, press the FIND/ STEREO-MONO button on the remote twice; OPERATION (CONTINUED) SEARCHING THROUGH MP3 FOLDERS You can select a particular folder for playback as follows: 1 2 1 2 With a MP3 disc inserted, while in the display. 3 Select...
... desired folder appears, press the Play/Pause (®p) button and playback will appear in the Stop mode, press the FIND/ STEREO-MONO button on the remote twice; OPERATION (CONTINUED) SEARCHING THROUGH MP3 FOLDERS You can select a particular folder for playback as follows: 1 2 1 2 With a MP3 disc inserted, while in the display. 3 Select...

User's Manual
Page 28
.... five seconds, the SLEEP time will turn off automatically after 90 minutes. SLEEP 1 OPERATION (CONTINUED) With the unit on, press the SLEEP button on the remote; Repeatedly press the SLEEP button to select the SLEEP time, 90-10 minutes (i.e., "80"-turns off automatically after 80 minutes, "70"-turns off after 70...
.... five seconds, the SLEEP time will turn off automatically after 90 minutes. SLEEP 1 OPERATION (CONTINUED) With the unit on, press the SLEEP button on the remote; Repeatedly press the SLEEP button to select the SLEEP time, 90-10 minutes (i.e., "80"-turns off automatically after 80 minutes, "70"-turns off after 70...

User's Manual
Page 33
PLEASE KEEP ALL PACKAGING MATERIAL FOR AT LEAST 90 DAYS IN CASE YOU NEED TO RETURN THIS PRODUCT TO YOUR PLACE OF PURCHASE OR MEMOREX. FOR ADDITIONAL SET-UP OR OPERATING ASSISTANCE, PLEASE VISIT OUR WEBSITE AT: WWW.MEMOREXELECTRONICS.COM OR CONTACT CUSTOMER SERVICE AT (954) 660-7100. FOR CONSUMER ... Diameter 4.72" (120mm) Optical Source Semiconductor laser Specifications are subject to change without notice. SPECIFICATIONS GENERAL Power Source (Main Unit AC 120V, 60Hz Power Source (Remote Control) . . . .
PLEASE KEEP ALL PACKAGING MATERIAL FOR AT LEAST 90 DAYS IN CASE YOU NEED TO RETURN THIS PRODUCT TO YOUR PLACE OF PURCHASE OR MEMOREX. FOR ADDITIONAL SET-UP OR OPERATING ASSISTANCE, PLEASE VISIT OUR WEBSITE AT: WWW.MEMOREXELECTRONICS.COM OR CONTACT CUSTOMER SERVICE AT (954) 660-7100. FOR CONSUMER ... Diameter 4.72" (120mm) Optical Source Semiconductor laser Specifications are subject to change without notice. SPECIFICATIONS GENERAL Power Source (Main Unit AC 120V, 60Hz Power Source (Remote Control) . . . .


