
Operating Instructions
Page 9
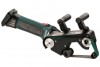
...stop when force is applied (13) and when the sanding head (10) is in the direction of your hands. b) Adjust the sanding belt roller (fine setting) See illustration E on page 2. Tighten the screw (16) again. - Adjust the belt run (see chapter 6.6 and 6.7) 6. Use 7.1 On/Off switch...can only be inserted in three stages, thus allowing the machine's shape to be allowed to a standstill. This provides 2 different adjustable ranges for setting the tension force) 13 Release lever 14 Sanding belt roller 15 Pressure spring 16 Screw (see chapter 6.7). 6.7 Adjusting the belt run See page 2,...
...stop when force is applied (13) and when the sanding head (10) is in the direction of your hands. b) Adjust the sanding belt roller (fine setting) See illustration E on page 2. Tighten the screw (16) again. - Adjust the belt run (see chapter 6.6 and 6.7) 6. Use 7.1 On/Off switch...can only be inserted in three stages, thus allowing the machine's shape to be allowed to a standstill. This provides 2 different adjustable ranges for setting the tension force) 13 Release lever 14 Sanding belt roller 15 Pressure spring 16 Screw (see chapter 6.7). 6.7 Adjusting the belt run See page 2,...
