Product Manual
Page 3
... the clock 13 Define the area to be vacuumed 13 Use 13 Switching on and off 13 Starting vacuuming 13 Finishing vacuuming 14 Manually controlled vacuuming 14 Interrupting vacuuming 14 Manual navigation (without vacuuming 14 Directing the robot vacuum cleaner to the base station 14 Finishing vacuuming manually 15 Vacuuming modes 15 Selecting the vacuuming mode 15 Setting the timer 16 Deactivating...
... the clock 13 Define the area to be vacuumed 13 Use 13 Switching on and off 13 Starting vacuuming 13 Finishing vacuuming 14 Manually controlled vacuuming 14 Interrupting vacuuming 14 Manual navigation (without vacuuming 14 Directing the robot vacuum cleaner to the base station 14 Finishing vacuuming manually 15 Vacuuming modes 15 Selecting the vacuuming mode 15 Setting the timer 16 Deactivating...

Product Manual
Page 4
... Fault messages 24 After sales service 25 Warranty 25 Electrical connection AU, NZ 25 Caring for the environment 25 Copyright and licences 26 LIMITED WARRANTY - VACUUM CLEANERS USA 27 LIMITED WARRANTY -
... Fault messages 24 After sales service 25 Warranty 25 Electrical connection AU, NZ 25 Caring for the environment 25 Copyright and licences 26 LIMITED WARRANTY - VACUUM CLEANERS USA 27 LIMITED WARRANTY -

Product Manual
Page 5
...and understand and recognise the consequences of incorrect operation. Correct application ~ This robot vacuum cleaner is not supported by the manufacturer and could be dangerous. ~ The robot vacuum cleaner can , however, lead to personal injury and damage to property. Any... or maintain the robot vacuum cleaner unsupervised. 5 Safety with statutory safety requirements. IMPORTANT SAFETY INSTRUCTIONS This robot vacuum cleaner complies with children ~ The robot vacuum cleaner is not intended for outdoor use. ~ The robot vacuum cleaner must not be allowed to vacuum dry floor surfaces....
...and understand and recognise the consequences of incorrect operation. Correct application ~ This robot vacuum cleaner is not supported by the manufacturer and could be dangerous. ~ The robot vacuum cleaner can , however, lead to personal injury and damage to property. Any... or maintain the robot vacuum cleaner unsupervised. 5 Safety with statutory safety requirements. IMPORTANT SAFETY INSTRUCTIONS This robot vacuum cleaner complies with children ~ The robot vacuum cleaner is not intended for outdoor use. ~ The robot vacuum cleaner must not be allowed to vacuum dry floor surfaces....
Product Manual
Page 6
...that the connection data on the data plate of it. ~ Do not let the robot vacuum cleaner travel over the power cord or other cords in the operational area. ~ Switch the robot vacuum cleaner off in this way if it . Also switch it off with the OFF switch on... with national and local safety regulations. Technical safety ~ Before using the robot vacuum cleaner and the accessories supplied, check for the remote control out of the reach of damage. Repairs and other work by a Miele authorised service technician. IMPORTANT SAFETY INSTRUCTIONS ~ Please supervise children in accordance ...
...that the connection data on the data plate of it. ~ Do not let the robot vacuum cleaner travel over the power cord or other cords in the operational area. ~ Switch the robot vacuum cleaner off in this way if it . Also switch it off with the OFF switch on... with national and local safety regulations. Technical safety ~ Before using the robot vacuum cleaner and the accessories supplied, check for the remote control out of the reach of damage. Repairs and other work by a Miele authorised service technician. IMPORTANT SAFETY INSTRUCTIONS ~ Please supervise children in accordance ...

Product Manual
Page 7
...liquid or damp dirt. Do not use the robot vacuum cleaner to vacuum up anything which has been burning or is damaged, it . ~ Do not cover the robot vacuum cleaner's sensors or the camera in the display. ~ Do not immerse the robot vacuum cleaner or the parts supplied in the vicinity of...~ Animals must be replaced by the manufacturer, its service agent or similarly qualified persons in order to vacuum. 7 Wait until any labels on the robot vacuum cleaner. ~ Do not use the robot vacuum cleaner without the exhaust filter fitted. ~ Remove all parts with the eyes and skin. In the event ...
...liquid or damp dirt. Do not use the robot vacuum cleaner to vacuum up anything which has been burning or is damaged, it . ~ Do not cover the robot vacuum cleaner's sensors or the camera in the display. ~ Do not immerse the robot vacuum cleaner or the parts supplied in the vicinity of...~ Animals must be replaced by the manufacturer, its service agent or similarly qualified persons in order to vacuum. 7 Wait until any labels on the robot vacuum cleaner. ~ Do not use the robot vacuum cleaner without the exhaust filter fitted. ~ Remove all parts with the eyes and skin. In the event ...
Product Manual
Page 8
...control. en - Toner, such as that used in printers and photocopiers, can conduct electricity. ~ Do not use the robot vacuum cleaner to vacuum toner dust. Disposing of the robot vacuum cleaner. ~ Important information on them. The battery pack must be considered hazardous waste by your local recycling program. Accessories ~ Only... control batteries. - Do not short circuit the rechargeable battery and the remote control batteries, throw them with the "Original Miele" logo on handling the rechargeable battery and remote control batteries: - Do not dispose of the product.
...control. en - Toner, such as that used in printers and photocopiers, can conduct electricity. ~ Do not use the robot vacuum cleaner to vacuum toner dust. Disposing of the robot vacuum cleaner. ~ Important information on them. The battery pack must be considered hazardous waste by your local recycling program. Accessories ~ Only... control batteries. - Do not short circuit the rechargeable battery and the remote control batteries, throw them with the "Original Miele" logo on handling the rechargeable battery and remote control batteries: - Do not dispose of the product.

Product Manual
Page 9
en - Robot vacuum cleaner and base station Top of the robot vacuum cleaner a Camera b Display c Sensors (collision protection) d Impact protection e ON/OFF switch f Power supply unit socket g Dust box h Dust box release button Bottom of these operating .... 1. Guide to the appliance The three illustrations for the "Guide to the appliance" section are on the pull-out pages in the back of the robot vacuum cleaner i Side brushes j Battery compartment k Front wheel l Sensors (toppling protection) m Charging contacts n Drive wheels o Data plate p Roller brush holder q Roller brush r Dust box ...
en - Robot vacuum cleaner and base station Top of the robot vacuum cleaner a Camera b Display c Sensors (collision protection) d Impact protection e ON/OFF switch f Power supply unit socket g Dust box h Dust box release button Bottom of these operating .... 1. Guide to the appliance The three illustrations for the "Guide to the appliance" section are on the pull-out pages in the back of the robot vacuum cleaner i Side brushes j Battery compartment k Front wheel l Sensors (toppling protection) m Charging contacts n Drive wheels o Data plate p Roller brush holder q Roller brush r Dust box ...

Product Manual
Page 11
.... Magnetic strip Preparing for use Diagrams a - Insert the side brushes (dia. 1) ^ Place the robot vacuum cleaner upside down on the side of the robot vacuum cleaner. Accessories supplied - Place the batteries in memory for the daily cleaning of short pile carpets, fitted carpets... and features of the robot vacuum cleaner The robot vacuum cleaner is suitable for the next time the room is vacuumed. The robot vacuum cleaner is correct. Remote control / two batteries - Power cord with the L and R markings. Do not lift the robot vacuum cleaner by the area around ...
.... Magnetic strip Preparing for use Diagrams a - Insert the side brushes (dia. 1) ^ Place the robot vacuum cleaner upside down on the side of the robot vacuum cleaner. Accessories supplied - Place the batteries in memory for the daily cleaning of short pile carpets, fitted carpets... and features of the robot vacuum cleaner The robot vacuum cleaner is suitable for the next time the room is vacuumed. The robot vacuum cleaner is correct. Remote control / two batteries - Power cord with the L and R markings. Do not lift the robot vacuum cleaner by the area around ...
Product Manual
Page 12
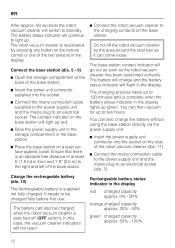
...back of the base station. ^ Connect the robot vacuum cleaner to an electrical socket. The battery will charge and the battery status indicator will flash in the base station. ^ Place the base station on the side of the two sensors in the display red charged capacity approx. 0% - 20% orange ...It needs to an electrical socket (dia. 7). en After approx. 60 seconds the robot vacuum cleaner will switch to light up. The contact indicator on the base station. The base station contact indicator will light up red. ^ Stow the power supply unit in the storage compartment in the display. The ...
...back of the base station. ^ Connect the robot vacuum cleaner to an electrical socket. The battery will charge and the battery status indicator will flash in the base station. ^ Place the base station on the side of the two sensors in the display red charged capacity approx. 0% - 20% orange ...It needs to an electrical socket (dia. 7). en After approx. 60 seconds the robot vacuum cleaner will switch to light up. The contact indicator on the base station. The base station contact indicator will light up red. ^ Stow the power supply unit in the storage compartment in the display. The ...
Product Manual
Page 13
... with the magnetic strip. 13 The robot vacuum cleaner will be able to detect and remove any areas which the robot vacuum cleaner should not have access to be activated. This way you want to set the current hour. ^ Press the OK button to order from Miele. ^ Press the ~ II sensor... in the Auto standard vacuuming mode. Starting vacuuming There are supplied for three seconds...
... with the magnetic strip. 13 The robot vacuum cleaner will be able to detect and remove any areas which the robot vacuum cleaner should not have access to be activated. This way you want to set the current hour. ^ Press the OK button to order from Miele. ^ Press the ~ II sensor... in the Auto standard vacuuming mode. Starting vacuuming There are supplied for three seconds...

Product Manual
Page 14
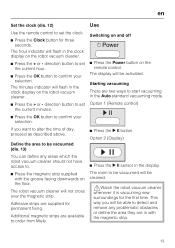
... ~ II button on the remote control to direct the robot vacuum cleaner to recharge it . The robot vacuum cleaner will appear in the clock indicator in the desired direction and continue to standby. The robot vacuum cleaner will return to its starting point and switch to vacuum. You cannot direct the robot vacuum cleaner manually to the base station in the desired direction...
... ~ II button on the remote control to direct the robot vacuum cleaner to recharge it . The robot vacuum cleaner will appear in the clock indicator in the desired direction and continue to standby. The robot vacuum cleaner will return to its starting point and switch to vacuum. You cannot direct the robot vacuum cleaner manually to the base station in the desired direction...
Product Manual
Page 15
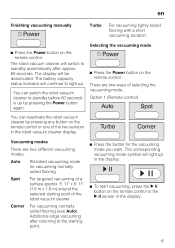
... returning to light up in the display. ^ To start vacuuming, press the ~ II button on the remote control. Corner For vacuuming normally soiled flooring (see Auto). Additional edge vacuuming after approx. 60 seconds. The robot vacuum cleaner will continue to the starting point of the robot vacuum cleaner. Selecting the vacuuming mode ^ Press the Power button on the remote control...
... returning to light up in the display. ^ To start vacuuming, press the ~ II button on the remote control. Corner For vacuuming normally soiled flooring (see Auto). Additional edge vacuuming after approx. 60 seconds. The robot vacuum cleaner will continue to the starting point of the robot vacuum cleaner. Selecting the vacuuming mode ^ Press the Power button on the remote control...
Product Manual
Page 16
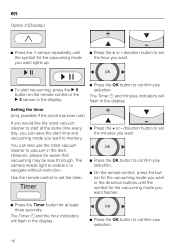
... confirm your selection. The Timer m and the hour indicators will flash in the dark. direction button to set ) If you would like the robot vacuum cleaner to start at least three seconds. The Timer m and minutes indicators will flash in the display. ^ Press the OK button to memory. The...to confirm your selection. ^ On the remote control, press the button for the vacuuming mode you want or the direction buttons until the symbol for at the same time every day, you can also use the robot vacuum cleaner to vacuum in the display. direction button to set the timer. ^ Press the + ...
... confirm your selection. The Timer m and the hour indicators will flash in the dark. direction button to set ) If you would like the robot vacuum cleaner to start at least three seconds. The Timer m and minutes indicators will flash in the display. ^ Press the OK button to memory. The...to confirm your selection. ^ On the remote control, press the button for the vacuuming mode you want or the direction buttons until the symbol for at the same time every day, you can also use the robot vacuum cleaner to vacuum in the display. direction button to set the timer. ^ Press the + ...

Product Manual
Page 17
...3/4" (20 mm). Deactivating the timer ^ Press the OK button on the remote control briefly. Reducing the maximum crossing over height The robot vacuum cleaner is set as described previously. This allows it . ^ Press the Base button on the remote control briefly. "LO" will reactivate the.... Deactivating the acoustic signals The acoustic signals are activated as standard. three seconds. The robot vacuum cleaner will go out. Press the Timer button again to reactivate it to vacuum carpets, cross over height of up and the robot vacuum cleaner will appear in the display. 17
...3/4" (20 mm). Deactivating the timer ^ Press the OK button on the remote control briefly. Reducing the maximum crossing over height The robot vacuum cleaner is set as described previously. This allows it . ^ Press the Base button on the remote control briefly. "LO" will reactivate the.... Deactivating the acoustic signals The acoustic signals are activated as standard. three seconds. The robot vacuum cleaner will go out. Press the Timer button again to reactivate it to vacuum carpets, cross over height of up and the robot vacuum cleaner will appear in the display. 17
Product Manual
Page 18
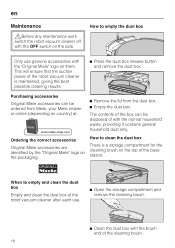
... Empty and clean the dust box of the robot vacuum cleaner after each use genuine accessories with the normal household waste, providing it contains general household dust only. Purchasing accessories Original Miele accessories can be ordered from Miele, your Miele retailer or online (depending on country) at:...storage compartment and remove the cleaning brush. ^ Clean the dust box with the brush end of with the "Original Miele" logo on the top of the robot vacuum cleaner is maintained, giving the best possible cleaning results. ^ Press the dust box release button and remove the dust ...
... Empty and clean the dust box of the robot vacuum cleaner after each use genuine accessories with the normal household waste, providing it contains general household dust only. Purchasing accessories Original Miele accessories can be ordered from Miele, your Miele retailer or online (depending on country) at:...storage compartment and remove the cleaning brush. ^ Clean the dust box with the brush end of with the "Original Miele" logo on the top of the robot vacuum cleaner is maintained, giving the best possible cleaning results. ^ Press the dust box release button and remove the dust ...

Product Manual
Page 19
...the comb end of the dust box making sure it clicks into position. When to replace the exhaust filter Replace the exhaust filter in the robot vacuum cleaner, making sure it clicks ^ Remove the roller brush. There is an exhaust filter in the bottom of the cleaning brush. Two replacement ... replace the exhaust filter. ^ Close the filter grille making sure it clicks into position. 19 into place. ^ Replace the dust box in the robot vacuum cleaner after approx. en ^ Clean the bottom of the lid and also the filter grille using the brush end of the dust box lid. ^ Use...
...the comb end of the dust box making sure it clicks into position. When to replace the exhaust filter Replace the exhaust filter in the robot vacuum cleaner, making sure it clicks ^ Remove the roller brush. There is an exhaust filter in the bottom of the cleaning brush. Two replacement ... replace the exhaust filter. ^ Close the filter grille making sure it clicks into position. 19 into place. ^ Replace the dust box in the robot vacuum cleaner after approx. en ^ Clean the bottom of the lid and also the filter grille using the brush end of the dust box lid. ^ Use...

Product Manual
Page 20
... the side brushes with a new one after approx. Ensure that they match up correctly with a new one after approx. Do not lift the robot vacuum cleaner by the area around the dust box as it can come loose. ^ Press the dust box release button and remove the dust box. ^ ... and R markings. ^ Lock the cover making sure it clicks into position. ^ Replace the dust box in the robot vacuum cleaner, making sure it clicks into position. Cleaning the side brushes ^ Place the robot vacuum cleaner upside down on the bottom of the dust box with the comb end of the cleaning brush. ^ Replace the...
... the side brushes with a new one after approx. Ensure that they match up correctly with a new one after approx. Do not lift the robot vacuum cleaner by the area around the dust box as it can come loose. ^ Press the dust box release button and remove the dust box. ^ ... and R markings. ^ Lock the cover making sure it clicks into position. ^ Replace the dust box in the robot vacuum cleaner, making sure it clicks into position. Cleaning the side brushes ^ Place the robot vacuum cleaner upside down on the bottom of the dust box with the comb end of the cleaning brush. ^ Replace the...

Product Manual
Page 21
...the seal on a level, clean surface. en Cleaning the front wheel ^ Place the robot vacuum cleaner upside down on the dust box ^ Press the dust box release button and remove the dust box. Do not... lift the robot vacuum cleaner by the area around the dust box as it clicks into position. ^ Remove any threads... wheel and close the cover making sure it can come loose. ^ Unclip the seal from the bottom of the robot vacuum cleaner using a dry cotton wool bud. 21 dust box and carefully swing it out until it detaches from the dust ...
...the seal on a level, clean surface. en Cleaning the front wheel ^ Place the robot vacuum cleaner upside down on the dust box ^ Press the dust box release button and remove the dust box. Do not... lift the robot vacuum cleaner by the area around the dust box as it clicks into position. ^ Remove any threads... wheel and close the cover making sure it can come loose. ^ Unclip the seal from the bottom of the robot vacuum cleaner using a dry cotton wool bud. 21 dust box and carefully swing it out until it detaches from the dust ...
Product Manual
Page 22
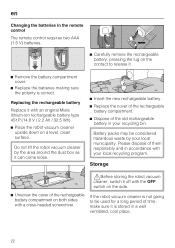
... accordance with an original Miele lithium-ion rechargeable battery type 4S1P (14.8 V / 2.2 Ah / 32.5 Wh). ^ Place the robot vacuum cleaner upside down on a level, clean surface. Do not lift the robot vacuum cleaner by your local municipality. Storage ,Before storing the robot vacuum cleaner, switch it can come... the cover of the rechargeable battery compartment. ^ Dispose of the old rechargeable battery in your local recycling program. If the robot vacuum cleaner is not going to release it. ^ Remove the battery compartment cover. ^ Replace the batteries making sure the polarity is ...
... accordance with an original Miele lithium-ion rechargeable battery type 4S1P (14.8 V / 2.2 Ah / 32.5 Wh). ^ Place the robot vacuum cleaner upside down on a level, clean surface. Do not lift the robot vacuum cleaner by your local municipality. Storage ,Before storing the robot vacuum cleaner, switch it can come... the cover of the rechargeable battery compartment. ^ Dispose of the old rechargeable battery in your local recycling program. If the robot vacuum cleaner is not going to release it. ^ Remove the battery compartment cover. ^ Replace the batteries making sure the polarity is ...
Product Manual
Page 23
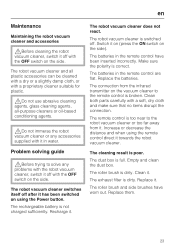
... cleaning agents, glass cleaning agents, all-purpose cleaners or oil-based conditioning agents. ,Do not immerse the robot vacuum cleaner or any problems with the robot vacuum cleaner, switch it off with the OFF switch on the vacuum cleaner to the robot vacuum cleaner or too far away from the infrared transmitter ... ,Before trying to solve any accessories supplied with it in the remote control are flat. Recharge it towards the robot vacuum cleaner. The robot vacuum cleaner is too near to the remote control is broken. The batteries in water. Increase or decrease the distance and ...
... cleaning agents, glass cleaning agents, all-purpose cleaners or oil-based conditioning agents. ,Do not immerse the robot vacuum cleaner or any problems with the robot vacuum cleaner, switch it off with the OFF switch on the vacuum cleaner to the robot vacuum cleaner or too far away from the infrared transmitter ... ,Before trying to solve any accessories supplied with it in the remote control are flat. Recharge it towards the robot vacuum cleaner. The robot vacuum cleaner is too near to the remote control is broken. The batteries in water. Increase or decrease the distance and ...


