
User Manual
Page 1
Dear customer, Motorola M800 Bag Phone was designed as a carry-case solution, which enables clients in a variety of portability, large, widely spaced keypad, high resolution display, voice activation feature and all round hands-free environments, the M800 Bag Phone is designed for easy reading using ...8 mm character height, with an adjustable backlight and contrast display setting. • A well-spaced keypad with Motorola's MPT program provides high-speed data transmission such as...
Dear customer, Motorola M800 Bag Phone was designed as a carry-case solution, which enables clients in a variety of portability, large, widely spaced keypad, high resolution display, voice activation feature and all round hands-free environments, the M800 Bag Phone is designed for easy reading using ...8 mm character height, with an adjustable backlight and contrast display setting. • A well-spaced keypad with Motorola's MPT program provides high-speed data transmission such as...
User Manual
Page 3
Total Customer Satisfaction Absolute customer satisfaction is Motorola's top priority. Motorola Australia Customer Care Motorola New Zealand Customer Care Motorola Canada Customer Care Motorola USA Customer Care 1300138 823 8am - 6pm Australia EST 0508 668-676 10am - 8pm 1-800-461-4575 866-289-6866 Total Customer Satisfaction - 1 If you have a question, suggestion or any other issue concerning the Motorola M800 Bag Phone, Motorola wants to hear from you.
Total Customer Satisfaction Absolute customer satisfaction is Motorola's top priority. Motorola Australia Customer Care Motorola New Zealand Customer Care Motorola Canada Customer Care Motorola USA Customer Care 1300138 823 8am - 6pm Australia EST 0508 668-676 10am - 8pm 1-800-461-4575 866-289-6866 Total Customer Satisfaction - 1 If you have a question, suggestion or any other issue concerning the Motorola M800 Bag Phone, Motorola wants to hear from you.
User Manual
Page 5
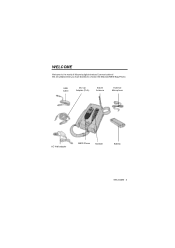
USB Cable DC Car Adapter (CLA) Swivel Antenna External Microphone AC Wall adapter M800 Phone Handset Battery WELCOME - 3 We are pleased that you have decided to the world of Motorola digital wireless Communications! WELCOME Welcome to choose the Motorola M800 Bag Phone.
USB Cable DC Car Adapter (CLA) Swivel Antenna External Microphone AC Wall adapter M800 Phone Handset Battery WELCOME - 3 We are pleased that you have decided to the world of Motorola digital wireless Communications! WELCOME Welcome to choose the Motorola M800 Bag Phone.

User Manual
Page 6
...Bag 7 The Handset 10 Battery Compartment 11 Swivel Antenna 12 Accessories 13 External Microphone 13 Power Adaptors 14 Optional Accessories 15 Using The Phone 16 Navigating To a Menu Feature 17 Menu Map 18 Main Menu 18 Settings 19 Getting Started 22 Turning Your... Phone On 22 Making a Call 22 Ending a Call 23 Answering a Call 23 Seeing Your Phone Number 23 Using Your Phone 24 Phone Display 24 Zooming In and Out 26 Adjusting Volume 26 Making and Answering Calls 27...
...Bag 7 The Handset 10 Battery Compartment 11 Swivel Antenna 12 Accessories 13 External Microphone 13 Power Adaptors 14 Optional Accessories 15 Using The Phone 16 Navigating To a Menu Feature 17 Menu Map 18 Main Menu 18 Settings 19 Getting Started 22 Turning Your... Phone On 22 Making a Call 22 Ending a Call 23 Answering a Call 23 Seeing Your Phone Number 23 Using Your Phone 24 Phone Display 24 Zooming In and Out 26 Adjusting Volume 26 Making and Answering Calls 27...

User Manual
Page 8
... Receiving a Data or Fax Call 107 Security 109 Assigning a New Code or Password 109 If You Forget a Code or Password 110 Locking and Unlocking Your Phone 110 Troubleshooting 112 Safety and General Information 116 Wireless...
... Receiving a Data or Fax Call 107 Security 109 Assigning a New Code or Password 109 If You Forget a Code or Password 110 Locking and Unlocking Your Phone 110 Troubleshooting 112 Safety and General Information 116 Wireless...
User Manual
Page 9
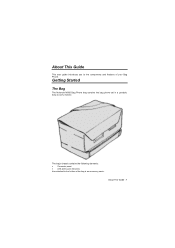
Getting Started The Bag The Motorola M800 Bag Phone bag contains the bag phone set in a portable, easy to the bottom of your Bag Phone. The bag's chassis contains the following elements: • Connector panel • LED and buzzer indicators Also attached to carry manner. About This Guide - 7 About This Guide This user guide introduces you to the components and features of the bag is an accessory pauch.
Getting Started The Bag The Motorola M800 Bag Phone bag contains the bag phone set in a portable, easy to the bottom of your Bag Phone. The bag's chassis contains the following elements: • Connector panel • LED and buzzer indicators Also attached to carry manner. About This Guide - 7 About This Guide This user guide introduces you to the components and features of the bag is an accessory pauch.

User Manual
Page 10
Charging Low battery Supply voltage from CLA or AC power supply and not charging. Connector Panel The connector panel is used to the Phone Bag. LED status Steady Green Blinking Orange and Green Blinking Red Blinking Green Description Working from back up battery 8 - Getting Started These elements are: • ...
Charging Low battery Supply voltage from CLA or AC power supply and not charging. Connector Panel The connector panel is used to the Phone Bag. LED status Steady Green Blinking Orange and Green Blinking Red Blinking Green Description Working from back up battery 8 - Getting Started These elements are: • ...
User Manual
Page 13
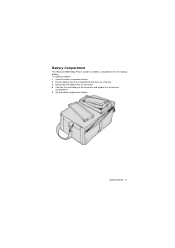
Getting Started - 11 To replace a battery: 1 Unzip the battery compartment zipper. 2 Pull the battery out of its compartment and then out of its box. 3 Disconnect the battery from its connector. 4 Connect the new battery to the connector and replace it in its box and compartment. 5 Zip the battery compartment zipper. Battery Compartment The Motorola M800 Bag Phone contains a Battery compartment for the backup battery.
Getting Started - 11 To replace a battery: 1 Unzip the battery compartment zipper. 2 Pull the battery out of its compartment and then out of its box. 3 Disconnect the battery from its connector. 4 Connect the new battery to the connector and replace it in its box and compartment. 5 Zip the battery compartment zipper. Battery Compartment The Motorola M800 Bag Phone contains a Battery compartment for the backup battery.
User Manual
Page 14
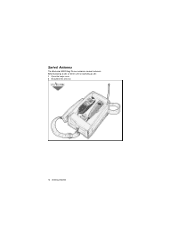
Getting Started Before placing a call, or when unit is expecting a call: 1 Open the bag's cover. 2 Straighten the antenna. 12 - Swivel Antenna The Motorola M800 Bag Phone contains a swivel antenna.
Getting Started Before placing a call, or when unit is expecting a call: 1 Open the bag's cover. 2 Straighten the antenna. 12 - Swivel Antenna The Motorola M800 Bag Phone contains a swivel antenna.

User Manual
Page 15
Accessories - 13 Place the cable in your driver seat's visor. Accessories External Microphone The M800 Bag Phone offers an external microphone for use in the Velcro loop to make sure the connector won't come out. 2 Slide the external microphone clip on the connector panel. Locate the external microphone away from the car window to the microphone connector located on your car. To connect the external microphone: 1 Connect the external microphone to avoid background noise.
Accessories - 13 Place the cable in your driver seat's visor. Accessories External Microphone The M800 Bag Phone offers an external microphone for use in the Velcro loop to make sure the connector won't come out. 2 Slide the external microphone clip on the connector panel. Locate the external microphone away from the car window to the microphone connector located on your car. To connect the external microphone: 1 Connect the external microphone to avoid background noise.

User Manual
Page 16
... your wall socket adaptor. Wall Socket Power Adaptor The wall socket power adaptor allows you to connect the M800 Bag Phone to your car's cigarette lighter adaptor, connect the adaptor to make sure the connector DC jack won 't come out. 14 - Place the cable in the Velcro loop ...to the DC socket in the Connector panel. To use the M800 Bag Phone with your car's cigarette lighter adaptor. CLA Power Adaptor The CLA power adaptor allows you to connect the M800 Bag Phone to your Wall Socket Power Adaptor, connect the adaptor to make sure the connector DC...
... your wall socket adaptor. Wall Socket Power Adaptor The wall socket power adaptor allows you to connect the M800 Bag Phone to your car's cigarette lighter adaptor, connect the adaptor to make sure the connector DC jack won 't come out. 14 - Place the cable in the Velcro loop ...to the DC socket in the Connector panel. To use the M800 Bag Phone with your car's cigarette lighter adaptor. CLA Power Adaptor The CLA power adaptor allows you to connect the M800 Bag Phone to your Wall Socket Power Adaptor, connect the adaptor to make sure the connector DC...

User Manual
Page 17
... to your portable computer. • The Booster is invalid in cases where the fault was caused by Motorola for distribution (paragraph 6 of its manufacture. It is emphasized that the warranty provided for the phone is used to equipment and/or devices that are at your network service provider for purchase from authorized...
... to your portable computer. • The Booster is invalid in cases where the fault was caused by Motorola for distribution (paragraph 6 of its manufacture. It is emphasized that the warranty provided for the phone is used to equipment and/or devices that are at your network service provider for purchase from authorized...

User Manual
Page 18
... prompt. Press up and hold the key for direct access to voicemail. Voicemail Press and hold to the many features of your Bag Phone's M800 mobile phone. End Key End phone calls, exit menu system. 2-Way Navigation Key Scroll through menus and lists. Send Key Send and answer calls, view recently dialed calls list... Handset connector port 16 - Volume Keys Adjust earpiece and ringer volume. Menu Key Right Soft Key Perform functions identified by left display prompt. Using The Phone This section introduces you to open browser.
... prompt. Press up and hold the key for direct access to voicemail. Voicemail Press and hold to the many features of your Bag Phone's M800 mobile phone. End Key End phone calls, exit menu system. 2-Way Navigation Key Scroll through menus and lists. Send Key Send and answer calls, view recently dialed calls list... Handset connector port 16 - Volume Keys Adjust earpiece and ringer volume. Menu Key Right Soft Key Perform functions identified by left display prompt. Using The Phone This section introduces you to open browser.

User Manual
Page 19
... , scroll using (Select), and subsequently scroll to access your service provider for purchase separately. Contact your phone's features. Optional Features This label identifies an optional network or subscription-dependent feature that requires an optional Motorola OriginalTM accessory available for more information about the availability and purchase of these features. Possibly not all...
... , scroll using (Select), and subsequently scroll to access your service provider for purchase separately. Contact your phone's features. Optional Features This label identifies an optional network or subscription-dependent feature that requires an optional Motorola OriginalTM accessory available for more information about the availability and purchase of these features. Possibly not all...

User Manual
Page 21
Number • Other Information ¾ Browser Setup ¾ Connection • Incoming Call ¾ In-Call Setup • In-Call Timer • Answer Options ¾ Security • Phone Lock • Lock Application • New Passwords ¾ Location • Location on ¾ Voice Activation • Language • Voice Comments • Training Menu Map - 19 Settings ¾ Ring Styles • Loud Detail • My Tones ¾ Phone status • My Tel.
Number • Other Information ¾ Browser Setup ¾ Connection • Incoming Call ¾ In-Call Setup • In-Call Timer • Answer Options ¾ Security • Phone Lock • Lock Application • New Passwords ¾ Location • Location on ¾ Voice Activation • Language • Voice Comments • Training Menu Map - 19 Settings ¾ Ring Styles • Loud Detail • My Tones ¾ Phone status • My Tel.

User Manual
Page 24
... Do this 1 Press and hold for 3 seconds To Turn on your phone On/Off Key 2 If required, key in the 4-digit Unlock the phone unlock code and press OK () The unlock code is set to the last 4 digits of your phone number. 3 While switching the vehicle on/off (using the ignition switch), the... device will turn on Making a Call Do this 1 Press the keypad keys To Dial the phone number Tip: If you made a mistake, press DELETE ( ) to delete the last digit, or press and hold DELETE ( ) to clear all digits. 2 Press Make the...
... Do this 1 Press and hold for 3 seconds To Turn on your phone On/Off Key 2 If required, key in the 4-digit Unlock the phone unlock code and press OK () The unlock code is set to the last 4 digits of your phone number. 3 While switching the vehicle on/off (using the ignition switch), the... device will turn on Making a Call Do this 1 Press the keypad keys To Dial the phone number Tip: If you made a mistake, press DELETE ( ) to delete the last digit, or press and hold DELETE ( ) to clear all digits. 2 Press Make the...

User Manual
Page 25
Seeing Your Phone Number Press To See your phone rings and/or lights up and displays an incoming call message. Press or press ANSWER or press the voice activation key To Answer the call Note: if your phone is locked, you receive a call, your phone number Getting Started - 23 Ending a Call Press or the voice activation key To End the call Answering a Call When you must unlock it to answer the call.
Seeing Your Phone Number Press To See your phone rings and/or lights up and displays an incoming call message. Press or press ANSWER or press the voice activation key To Answer the call Note: if your phone is locked, you receive a call, your phone number Getting Started - 23 Ending a Call Press or the voice activation key To End the call Answering a Call When you must unlock it to answer the call.

User Manual
Page 26
... page 16 for a basic phone diagram. Phone Display The idle display is the standard display that you see when you can press to enter the main menu. Digital Signal Indicator identifies a digital ... show the current functions of the network connection. You cannot make or receive calls when the (no signal) indicator is in progress. 24 - Using Your Phone Labels at the bottom center of the display indicates that a call or using the menu. In Use Indicator shows that you are not on a call...
... page 16 for a basic phone diagram. Phone Display The idle display is the standard display that you see when you can press to enter the main menu. Digital Signal Indicator identifies a digital ... show the current functions of the network connection. You cannot make or receive calls when the (no signal) indicator is in progress. 24 - Using Your Phone Labels at the bottom center of the display indicates that a call or using the menu. In Use Indicator shows that you are not on a call...

User Manual
Page 27
Menu Indicator indicates that you receive voicemail or a text message. Ring Style Indicator = Loud Detail My Tones to enter the main Using Your Phone - 25 Message Waiting Indicator appears when you can press menu or open a feature sub-menu.
Menu Indicator indicates that you receive voicemail or a text message. Ring Style Indicator = Loud Detail My Tones to enter the main Using Your Phone - 25 Message Waiting Indicator appears when you can press menu or open a feature sub-menu.

User Manual
Page 28
Zooming In and Out You can zoom in and out to : • Increase and decrease call volume in external speaker or handset during a call. • Increase and decrease the ringer volume when the idle display is visible. Using Your Phone Volume Keys 26 - Find The Feature > Settings > Other Settings > Initial Setup > Zoom Adjusting Volume Press the up and down volume keys to display more information on the screen.
Zooming In and Out You can zoom in and out to : • Increase and decrease call volume in external speaker or handset during a call. • Increase and decrease the ringer volume when the idle display is visible. Using Your Phone Volume Keys 26 - Find The Feature > Settings > Other Settings > Initial Setup > Zoom Adjusting Volume Press the up and down volume keys to display more information on the screen.


