
NP4100 : brochure
Page 2
...output Specifications for one year of America, Inc. IN THE BOX Remote control, batteries, power cord, 6-segment color wheel, user's manual on CD-ROM, quick start guide, product registration card, anti-theft screw for lens SIGNAL COMPATIBILITY/CONNECTIVITY Scan Rate Supported Video Standards...NP08ZL NP09ZL NP10ZL Lens Zoom Focus F-number NP06FL NP07ZL NP08ZL NP09ZL NP10ZL Shift Keystone Correction NP4100: 0.7" DMD - NEC Display Solutions 500 Park Boulevard, Suite 1100 Itasca, IL 60143 866-NEC-MORE InstaCare provides the original owner one year or 500 hours, whichever comes first. ...
...output Specifications for one year of America, Inc. IN THE BOX Remote control, batteries, power cord, 6-segment color wheel, user's manual on CD-ROM, quick start guide, product registration card, anti-theft screw for lens SIGNAL COMPATIBILITY/CONNECTIVITY Scan Rate Supported Video Standards...NP08ZL NP09ZL NP10ZL Lens Zoom Focus F-number NP06FL NP07ZL NP08ZL NP09ZL NP10ZL Shift Keystone Correction NP4100: 0.7" DMD - NEC Display Solutions 500 Park Boulevard, Suite 1100 Itasca, IL 60143 866-NEC-MORE InstaCare provides the original owner one year or 500 hours, whichever comes first. ...

NP4100 : user's manual
Page 1
Projector NP4100/NP4100W User's Manual
Projector NP4100/NP4100W User's Manual

NP4100 : user's manual
Page 2
... of International Business Machines Corpora- sion. (2) The contents of this user's manual may not be reprinted in part or whole without notice. (3) Great care has been taken in ...the preparation of this user's manual are subject to result from using the Projector. and other countries. • Windows,...of profit or other countries and areas. • Other product and company names mentioned in this user's manual; Second edition, March 2009 • DLP, BrilliantColor and DynamicBlack are trademarks of Texas Instruments. •...
... of International Business Machines Corpora- sion. (2) The contents of this user's manual may not be reprinted in part or whole without notice. (3) Great care has been taken in ...the preparation of this user's manual are subject to result from using the Projector. and other countries. • Windows,...of profit or other countries and areas. • Other product and company names mentioned in this user's manual; Second edition, March 2009 • DLP, BrilliantColor and DynamicBlack are trademarks of Texas Instruments. •...

NP4100 : user's manual
Page 3
...DOC Compliance Notice (for Germany only) The highest sound pressure level is less than 70 dB (A) in an outlet unless all requirements of this manual carefully before using your projector. Do NOT use this unit to rain or moisture. Machine Noise Information Regulation - 3. Therefore, it here: CAUTION... is located on the bottom of the unit. Your serial number is dangerous to make any part inside of your NEC NP4100/NP4100W projector and keep the manual handy for future reference. The power outlet socket should be installed as near to the equipment as possible, and should...
...DOC Compliance Notice (for Germany only) The highest sound pressure level is less than 70 dB (A) in an outlet unless all requirements of this manual carefully before using your projector. Do NOT use this unit to rain or moisture. Machine Noise Information Regulation - 3. Therefore, it here: CAUTION... is located on the bottom of the unit. Your serial number is dangerous to make any part inside of your NEC NP4100/NP4100W projector and keep the manual handy for future reference. The power outlet socket should be installed as near to the equipment as possible, and should...

NP4100 : user's manual
Page 5
...television reception, which the receiver is no guarantee that to which can radiate radio frequency energy and, if not installed and used in this manual. Please read them carefully and heed all warnings. These limits are to ensure the long life of the following conditions: On an unstable ... Amps) fuse installed for USA only) WARNING: The Federal Communications Commission does not allow any modifications or changes to correct the interference by NEC Display Solutions of paper or cloth, rugs or carpets. However, there is connected. In a dusty, smoky or steamy environment.
...television reception, which the receiver is no guarantee that to which can radiate radio frequency energy and, if not installed and used in this manual. Please read them carefully and heed all warnings. These limits are to ensure the long life of the following conditions: On an unstable ... Amps) fuse installed for USA only) WARNING: The Federal Communications Commission does not allow any modifications or changes to correct the interference by NEC Display Solutions of paper or cloth, rugs or carpets. However, there is connected. In a dusty, smoky or steamy environment.

NP4100 : user's manual
Page 8
... qualified service personnel under the following conditions: When the power cable or plug is powered on. If the projector exhibits a distinct change in this user's manual. Doing so could be damaged. • Do not unplug the power cable from the wall or ceiling) the projector can cause damage to carry or...
... qualified service personnel under the following conditions: When the power cable or plug is powered on. If the projector exhibits a distinct change in this user's manual. Doing so could be damaged. • Do not unplug the power cable from the wall or ceiling) the projector can cause damage to carry or...
NP4100 : user's manual
Page 13
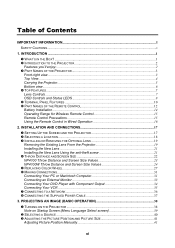
... 19 Installing the New Lens ...21 Installing the New Lens Using the anti-theft screw 21 THROW DISTANCE AND SCREEN SIZE 22 NP4100 Throw Distance and Screen Size Values 23 NP4100W Throw Distance and Screen Size Values 24 REPLACING COLOR WHEEL ...27 MAKING CONNECTIONS...31 ... ...38 Note on Startup Screen (Menu Language Select screen 39 SELECTING A SOURCE ...40 ADJUSTING THE PICTURE POSITION AND PICTURE SIZE 41 Adjusting Picture Position Manually 41 xi INTRODUCTION ...1 WHAT'S IN THE BOX? ...1 INTRODUCTION TO THE PROJECTOR 2 Features you'll enjoy:...2 PART NAMES OF THE PROJECTOR 3 Front-...
... 19 Installing the New Lens ...21 Installing the New Lens Using the anti-theft screw 21 THROW DISTANCE AND SCREEN SIZE 22 NP4100 Throw Distance and Screen Size Values 23 NP4100W Throw Distance and Screen Size Values 24 REPLACING COLOR WHEEL ...27 MAKING CONNECTIONS...31 ... ...38 Note on Startup Screen (Menu Language Select screen 39 SELECTING A SOURCE ...40 ADJUSTING THE PICTURE POSITION AND PICTURE SIZE 41 Adjusting Picture Position Manually 41 xi INTRODUCTION ...1 WHAT'S IN THE BOX? ...1 INTRODUCTION TO THE PROJECTOR 2 Features you'll enjoy:...2 PART NAMES OF THE PROJECTOR 3 Front-...

NP4100 : user's manual
Page 14
... Usage Time...101 Source ...102 LAN...103 xii CONVENIENT FEATURES ...50 TURNING OFF THE IMAGE AND SOUND 50 FREEZING A PICTURE ...50 ADJUSTING THE FOCUS/ZOOM MANUALLY 51 Adjusting by Using the OSD Control Panel 51 CHANGING LAMP MODE ...52 Changing Lamp Mode by Using the Projector's OSD Control Panel 52 Changing...
... Usage Time...101 Source ...102 LAN...103 xii CONVENIENT FEATURES ...50 TURNING OFF THE IMAGE AND SOUND 50 FREEZING A PICTURE ...50 ADJUSTING THE FOCUS/ZOOM MANUALLY 51 Adjusting by Using the OSD Control Panel 51 CHANGING LAMP MODE ...52 Changing Lamp Mode by Using the Projector's OSD Control Panel 52 Changing...
NP4100 : user's manual
Page 16
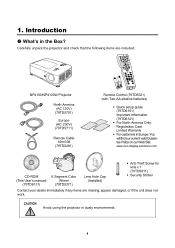
1. Introduction What's in Europe: You will find our current valid Guarantee Policy on our Web Site: www.nec-display-solutions.com CD-ROM (This User's manual) (79TD6131) 6 Segment Color Wheel (79TD5371) Lens Hole Cap (Installed) Anti-Theft Screw for lens x 1 (...79TD5811) Security Sticker Contact your dealer immediately if any items are missing, appear damaged, or if the unit does not work. Carefully unpack the projector and check that the following items are included: NP4100...
1. Introduction What's in Europe: You will find our current valid Guarantee Policy on our Web Site: www.nec-display-solutions.com CD-ROM (This User's manual) (79TD6131) 6 Segment Color Wheel (79TD5371) Lens Hole Cap (Installed) Anti-Theft Screw for lens x 1 (...79TD5811) Security Sticker Contact your dealer immediately if any items are missing, appear damaged, or if the unit does not work. Carefully unpack the projector and check that the following items are included: NP4100...

NP4100 : user's manual
Page 28
... the Power On button for a minimum of two seconds. 13 1. Avoid using the projector with bright fluorescent lighting turned on the remote control. This user's manual describes the functions based on . The buttons and keys on the projector have the same functions as projector screens. 3. Certain high- If the path between...
... the Power On button for a minimum of two seconds. 13 1. Avoid using the projector with bright fluorescent lighting turned on the remote control. This user's manual describes the functions based on . The buttons and keys on the projector have the same functions as projector screens. 3. Certain high- If the path between...

NP4100 : user's manual
Page 49
Installation and Connections Connecting Your DVD Player with Component Output To connect a DVD Player to the projector, refer to your DVD player's owner's manual for more information about your DVD player's video output requirements. 34 Turn on the Player or the projector. 2. Note: Refer to the following guide. 1. Connect the DVD Player to the projector as shown below before turning on the DVD Player (see Selecting a Source on page 40). 3. 2. Turn on the projector and select Component from the source menu before turning on the DVD Player.
Installation and Connections Connecting Your DVD Player with Component Output To connect a DVD Player to the projector, refer to your DVD player's owner's manual for more information about your DVD player's video output requirements. 34 Turn on the Player or the projector. 2. Note: Refer to the following guide. 1. Connect the DVD Player to the projector as shown below before turning on the DVD Player (see Selecting a Source on page 40). 3. 2. Turn on the projector and select Component from the source menu before turning on the DVD Player.

NP4100 : user's manual
Page 50
Note: Refer to the following diagram. Installation and Connections Connecting Your VCR To connect you VCR, refer to your VCR owner's manual for more information about your device's requirements. Images may not be displayed correctly when using an S-Video or Video connection to fast-forward or fast-rewind scanning. The AUDIO IN RCA jack is shared between VIDEO IN and S-VIDEO IN. 35 2.
Note: Refer to the following diagram. Installation and Connections Connecting Your VCR To connect you VCR, refer to your VCR owner's manual for more information about your device's requirements. Images may not be displayed correctly when using an S-Video or Video connection to fast-forward or fast-rewind scanning. The AUDIO IN RCA jack is shared between VIDEO IN and S-VIDEO IN. 35 2.

NP4100 : user's manual
Page 56
Press Enter to adjust Picture Position manually. Refer to the following guides to open the Adjust menu. Press the Select keypad in ...9658; to select Image Options followed by ▲or▼ to bring up the Lens Shift window. 2. Adjusting Picture Position Manually 1. Press the directional key as required to shift the image. To alter the picture size, press Menu and select the Adjust ...) Adjusting the Picture Position and Picture Size The Picture Position and Picture Size can be adjusted manually from the lens control panel or from the remote control unit. Press Enter. 41 3.
Press Enter to adjust Picture Position manually. Refer to the following guides to open the Adjust menu. Press the Select keypad in ...9658; to select Image Options followed by ▲or▼ to bring up the Lens Shift window. 2. Adjusting Picture Position Manually 1. Press the directional key as required to shift the image. To alter the picture size, press Menu and select the Adjust ...) Adjusting the Picture Position and Picture Size The Picture Position and Picture Size can be adjusted manually from the lens control panel or from the remote control unit. Press Enter. 41 3.

NP4100 : user's manual
Page 66
Adjusting by Using the OSD Control Panel 1. Press Exit to return to adjust the focus and zoom manually. 4. Convenient Features Adjusting the Focus/Zoom Manually The focus and zoom can be adjusted manually from the projector focus/zoom panel or from the remote control unit. Adjust the focus/zoom using the increase and decrease buttons as required. 3. Refer to the following guides to the projected image. 51 Press the Focus or Zoom button on the projector panel to display the appropriate window. 2.
Adjusting by Using the OSD Control Panel 1. Press Exit to return to adjust the focus and zoom manually. 4. Convenient Features Adjusting the Focus/Zoom Manually The focus and zoom can be adjusted manually from the projector focus/zoom panel or from the remote control unit. Adjust the focus/zoom using the increase and decrease buttons as required. 3. Refer to the following guides to the projected image. 51 Press the Focus or Zoom button on the projector panel to display the appropriate window. 2.

NP4100 : user's manual
Page 70
...; to select Image Options and scroll using ▲or▼ and press Enter to adjust the Keystone Distortion manually. 4. Convenient Features Adjusting Position/Clock The Position/Clock/Phase and Keystone Correction can be adjusted manually from the projector's control panel or from the remote control unit. Adjust the Horizontal, Vertical, Clock, or...
...; to select Image Options and scroll using ▲or▼ and press Enter to adjust the Keystone Distortion manually. 4. Convenient Features Adjusting Position/Clock The Position/Clock/Phase and Keystone Correction can be adjusted manually from the projector's control panel or from the remote control unit. Adjust the Horizontal, Vertical, Clock, or...

NP4100 : user's manual
Page 80
... Network Settings Options Standby Mode PC Control Auto Power On (AC) Desktop Front/Ceiling Rear/Desktop Rear/Ceiling Front 4800bps/9600bps/19200bps/38400bps Color/Monochrome Manual/Auto 5 sec/Auto 15 sec/Auto 45 sec Blue/Black/Logo Off/On Off/On Off/On Front/Back, Front, Back DHCP Enable/Disable... Auto/NTSC3.58/NTSC4.43/PAL/PAL-M/PAL-N/PAL60/SECAM S-Video WXGA Mode Source Display Auto/NTSC3.58/NTSC4.43/PAL/PAL-M/PAL-N/PAL60/SECAM NP4100: Off/On NP4100W: Off/ On Off/ On Control ID 1-254 Filter Message Lamp 1 Life Remaining, Lamp 2 Life Remaining Lamp 1 Hours Used, Lamp 2 Hours ...
... Network Settings Options Standby Mode PC Control Auto Power On (AC) Desktop Front/Ceiling Rear/Desktop Rear/Ceiling Front 4800bps/9600bps/19200bps/38400bps Color/Monochrome Manual/Auto 5 sec/Auto 15 sec/Auto 45 sec Blue/Black/Logo Off/On Off/On Off/On Front/Back, Front, Back DHCP Enable/Disable... Auto/NTSC3.58/NTSC4.43/PAL/PAL-M/PAL-N/PAL60/SECAM S-Video WXGA Mode Source Display Auto/NTSC3.58/NTSC4.43/PAL/PAL-M/PAL-N/PAL60/SECAM NP4100: Off/On NP4100W: Off/ On Off/ On Control ID 1-254 Filter Message Lamp 1 Life Remaining, Lamp 2 Life Remaining Lamp 1 Hours Used, Lamp 2 Hours ...

NP4100 : user's manual
Page 101
...-Screen Display Installation The Installation tab contains menu options for various setup conditions such as orientation and remote sensor mode and is no signal. Range: Manual, Auto 5s, Auto 15s, Auto 45s Background Select Background appearance when there is accessed through the Setup menu. Menu Display Time Select Display Time. Range...
...-Screen Display Installation The Installation tab contains menu options for various setup conditions such as orientation and remote sensor mode and is no signal. Range: Manual, Auto 5s, Auto 15s, Auto 45s Background Select Background appearance when there is accessed through the Setup menu. Menu Display Time Select Display Time. Range...

NP4100 : user's manual
Page 104
Select from the following options: Color 5. Auto 5 sec - Auto 15 sec - Using On-Screen Display Monochrome Display Time Sets the amount of time a menu is pressed again. Menus stay on screen until the Menu button is displayed. Menu is displayed for 5 seconds. Menu is displayed for 45 seconds. 89 Menu is displayed for 15 seconds. Select from the following : Manual - Auto 45 sec -
Select from the following options: Color 5. Auto 5 sec - Auto 15 sec - Using On-Screen Display Monochrome Display Time Sets the amount of time a menu is pressed again. Menus stay on screen until the Menu button is displayed. Menu is displayed for 5 seconds. Menu is displayed for 45 seconds. 89 Menu is displayed for 15 seconds. Select from the following : Manual - Auto 45 sec -

NP4100 : user's manual
Page 114
When the projector has difficulty detecting the video standard, you to select video standards manually. In this case, select Off. When "WXGA Mode" is recognized, go to be done for Video and S-Video Connector separately. Source Display This option turns ...
When the projector has difficulty detecting the video standard, you to select video standards manually. In this case, select Off. When "WXGA Mode" is recognized, go to be done for Video and S-Video Connector separately. Source Display This option turns ...

NP4100 : user's manual
Page 145
... VESA D * VESA D * VESA D HDTV (1080p/60) - HDTV (1080i)(1125i) - HDTV (720p) - DVD YCbCr - DVD YCbCr - Images above may be displayed correctly. Manual adjustment of "Clock" and "Phase" may not be compressed. RESOLUTION (DPI) 1280 x 960 1280 x 1024 1400 x 1050 1440 x 900 1440 x 900 1920 x 1080 1920 x... of your PC for composite sync signals or sync on your PC. Signals other than the projector's native resolution (1024 x 768: NP4100, 1280 x 800: NP4100W) will be available for procedures. 130 HDTV (1080p/50) - SDTV(576p)(625p) - If this should happen...
... VESA D * VESA D * VESA D HDTV (1080p/60) - HDTV (1080i)(1125i) - HDTV (720p) - DVD YCbCr - DVD YCbCr - Images above may be displayed correctly. Manual adjustment of "Clock" and "Phase" may not be compressed. RESOLUTION (DPI) 1280 x 960 1280 x 1024 1400 x 1050 1440 x 900 1440 x 900 1920 x 1080 1920 x... of your PC for composite sync signals or sync on your PC. Signals other than the projector's native resolution (1024 x 768: NP4100, 1280 x 800: NP4100W) will be available for procedures. 130 HDTV (1080p/50) - SDTV(576p)(625p) - If this should happen...


