
NP4100 : brochure
Page 2
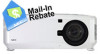
... service program to 2 years Extends term of InstaCare service program to 3 years Maintenance plan for NP4100 series Extends maintenance plan for 3rd year including parts & labor Extends maintenance plan for one touch ...NEC-MORE The lamp is covered for 4th year including parts & labor Projector recycling program, disposal certificate Additional accessories are trademarks of projector AutoSense™ automatically syncs with any computer signal and features one year or 500 hours, whichever comes first. IN THE BOX Remote control, batteries, power cord, 6-segment color wheel, user's manual...
... service program to 2 years Extends term of InstaCare service program to 3 years Maintenance plan for NP4100 series Extends maintenance plan for 3rd year including parts & labor Extends maintenance plan for one touch ...NEC-MORE The lamp is covered for 4th year including parts & labor Projector recycling program, disposal certificate Additional accessories are trademarks of projector AutoSense™ automatically syncs with any computer signal and features one year or 500 hours, whichever comes first. IN THE BOX Remote control, batteries, power cord, 6-segment color wheel, user's manual...

NP4100 : user's manual
Page 1
Projector NP4100/NP4100W User's Manual
Projector NP4100/NP4100W User's Manual

NP4100 : user's manual
Page 2
sion. (2) The contents of this user's manual are subject to result from using the Projector. Notes (1) The contents of this user's manual may not be reprinted in part or whole without notice. (3) Great care has been taken in Japan, the ... trademark of International Business Machines Corpora- however, should you notice any questionable points, errors or omissions, please contact us. (4) Notwithstanding article (3), NEC will not be the trademarks or registered trademarks of their respective holders. Second edition, March 2009 • DLP, BrilliantColor and DynamicBlack are trademarks...
sion. (2) The contents of this user's manual are subject to result from using the Projector. Notes (1) The contents of this user's manual may not be reprinted in part or whole without notice. (3) Great care has been taken in Japan, the ... trademark of International Business Machines Corpora- however, should you notice any questionable points, errors or omissions, please contact us. (4) Notwithstanding article (3), NEC will not be the trademarks or registered trademarks of their respective holders. Second edition, March 2009 • DLP, BrilliantColor and DynamicBlack are trademarks...

NP4100 : user's manual
Page 3
...the plug from power outlet. Do NOT use this unit's plug with an extension cord or in accordance with any kind of your NEC NP4100/NP4100W projector and keep the manual handy for Canada only) This Class B digital apparatus meets all the prongs can be read this unit to rain or moisture. ...Important Information Safety Cautions Precautions Please read carefully to avoid problems. WARNING: To prevent fire or shock, do NOT expose this manual carefully before using your projector. i Your serial number is located on the bottom of contact with EN ISO 7779.
...the plug from power outlet. Do NOT use this unit's plug with an extension cord or in accordance with any kind of your NEC NP4100/NP4100W projector and keep the manual handy for Canada only) This Class B digital apparatus meets all the prongs can be read this unit to rain or moisture. ...Important Information Safety Cautions Precautions Please read carefully to avoid problems. WARNING: To prevent fire or shock, do NOT expose this manual carefully before using your projector. i Your serial number is located on the bottom of contact with EN ISO 7779.

NP4100 : user's manual
Page 5
...your supplier. Increase the separation between the equipment and receiver. Installation • Do not place the projector in a residential installation. iii Consult the dealer or an experienced radio / TV technician for use... equipment. If a power cable is encouraged to try to the unit EXCEPT those specified by NEC Display Solutions of America, Inc. Important Information RF Interference (for USA only) WARNING: The ... table. in a particular installation. If this manual. Near water, baths or damp rooms. In direct sunlight, near heaters or heat radiating appliances.
...your supplier. Increase the separation between the equipment and receiver. Installation • Do not place the projector in a residential installation. iii Consult the dealer or an experienced radio / TV technician for use... equipment. If a power cable is encouraged to try to the unit EXCEPT those specified by NEC Display Solutions of America, Inc. Important Information RF Interference (for USA only) WARNING: The ... table. in a particular installation. If this manual. Near water, baths or damp rooms. In direct sunlight, near heaters or heat radiating appliances.

NP4100 : user's manual
Page 8
... period after the lamp is turned on the rear as using a LAN cable: For safety, do not connect to the projector. • Do not send the projector in this user's manual. vi If the projector has been dropped or the cabinet has been damaged. Misuses such as it is turned off. • Do not...
... period after the lamp is turned on the rear as using a LAN cable: For safety, do not connect to the projector. • Do not send the projector in this user's manual. vi If the projector has been dropped or the cabinet has been damaged. Misuses such as it is turned off. • Do not...
NP4100 : user's manual
Page 13
...Select screen 39 SELECTING A SOURCE ...40 ADJUSTING THE PICTURE POSITION AND PICTURE SIZE 41 Adjusting Picture Position Manually 41 xi INSTALLATION AND CONNECTIONS 17 SETTING UP THE SCREEN AND THE PROJECTOR 17 SELECTING A LOCATION...18 INSTALLING OR REMOVING THE OPTIONAL LENS 19 Removing the Existing Lens From the... Projector 19 Installing the New Lens ...21 Installing the New Lens Using the anti-theft screw 21 THROW DISTANCE AND SCREEN SIZE 22 NP4100 Throw Distance and Screen Size Values 23 NP4100W Throw Distance and ...
...Select screen 39 SELECTING A SOURCE ...40 ADJUSTING THE PICTURE POSITION AND PICTURE SIZE 41 Adjusting Picture Position Manually 41 xi INSTALLATION AND CONNECTIONS 17 SETTING UP THE SCREEN AND THE PROJECTOR 17 SELECTING A LOCATION...18 INSTALLING OR REMOVING THE OPTIONAL LENS 19 Removing the Existing Lens From the... Projector 19 Installing the New Lens ...21 Installing the New Lens Using the anti-theft screw 21 THROW DISTANCE AND SCREEN SIZE 22 NP4100 Throw Distance and Screen Size Values 23 NP4100W Throw Distance and ...

NP4100 : user's manual
Page 14
......45 OPTIMIZING AN RGB IMAGE AUTOMATICALLY 46 Adjusting the Image Using Auto Adjust 46 ADJUSTING VOLUME UP AND DOWN 47 TURNING OFF THE PROJECTOR ...48 About Direct Power Off...49 After Use...49 4. USING ON-SCREEN DISPLAY 62 USING THE MENUS ...62 Navigating the OSD ...62 MENU TREE ...50 TURNING OFF THE IMAGE AND SOUND 50 FREEZING A PICTURE ...50 ADJUSTING THE FOCUS/ZOOM MANUALLY 51 Adjusting by Using the OSD Control Panel 51 CHANGING LAMP MODE ...52 Changing Lamp Mode by Using the Projector's OSD Control Panel 52 Changing Lamp Mode by Using the Remote Control 53 GETTING INFORMATION...54...
......45 OPTIMIZING AN RGB IMAGE AUTOMATICALLY 46 Adjusting the Image Using Auto Adjust 46 ADJUSTING VOLUME UP AND DOWN 47 TURNING OFF THE PROJECTOR ...48 About Direct Power Off...49 After Use...49 4. USING ON-SCREEN DISPLAY 62 USING THE MENUS ...62 Navigating the OSD ...62 MENU TREE ...50 TURNING OFF THE IMAGE AND SOUND 50 FREEZING A PICTURE ...50 ADJUSTING THE FOCUS/ZOOM MANUALLY 51 Adjusting by Using the OSD Control Panel 51 CHANGING LAMP MODE ...52 Changing Lamp Mode by Using the Projector's OSD Control Panel 52 Changing Lamp Mode by Using the Remote Control 53 GETTING INFORMATION...54...
NP4100 : user's manual
Page 16
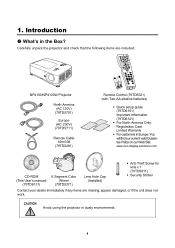
... check that the following items are included: NP4100/NP4100W Projector North America (AC 120V) (79TD5701) Europe (AC 230V) (79TD5711) Remote Cable 10m/33ft (79TD5481) Remote Control (79TD5521) (with Two AA alkaline batteries) Quick setup guide ... Only: Registration Card Limited Warranty For customers in dusty environments. 1 CAUTION Avoid using the projector in Europe: You will find our current valid Guarantee Policy on our Web Site: www.nec-display-solutions.com CD-ROM (This User's manual) (79TD6131) 6 Segment Color Wheel (79TD5371) Lens Hole Cap (Installed) Anti-Theft Screw for ...
... check that the following items are included: NP4100/NP4100W Projector North America (AC 120V) (79TD5701) Europe (AC 230V) (79TD5711) Remote Cable 10m/33ft (79TD5481) Remote Control (79TD5521) (with Two AA alkaline batteries) Quick setup guide ... Only: Registration Card Limited Warranty For customers in dusty environments. 1 CAUTION Avoid using the projector in Europe: You will find our current valid Guarantee Policy on our Web Site: www.nec-display-solutions.com CD-ROM (This User's manual) (79TD6131) 6 Segment Color Wheel (79TD5371) Lens Hole Cap (Installed) Anti-Theft Screw for ...

NP4100 : user's manual
Page 28
...manual describes the functions based on . If the path between the remote control and the projec- frequency fluorescent lights can bounce the remote signal off the projector, press the Power OFF button twice. **To turn on the projector have the same functions as projector screens. 3. tor. Avoid using the projector ... such as the corresponding buttons on the remote control. 1. Introduction Important: 1. Certain high- The buttons and keys on the projector, press and hold the Power On button for a minimum of two seconds. 13 Be sure nothing obstructs the path between remote and...
...manual describes the functions based on . If the path between the remote control and the projec- frequency fluorescent lights can bounce the remote signal off the projector, press the Power OFF button twice. **To turn on the projector have the same functions as projector screens. 3. tor. Avoid using the projector ... such as the corresponding buttons on the remote control. 1. Introduction Important: 1. Certain high- The buttons and keys on the projector, press and hold the Power On button for a minimum of two seconds. 13 Be sure nothing obstructs the path between remote and...

NP4100 : user's manual
Page 49
2. Turn on page 40). 3. Connect the DVD Player to your DVD player's owner's manual for more information about your DVD player's video output requirements. 34 Note: Refer to the projector as shown below before turning on the DVD Player (see Selecting a Source on the DVD Player. Turn on the projector and select Component from the source menu before turning on the Player or the projector. 2. Installation and Connections Connecting Your DVD Player with Component Output To connect a DVD Player to the projector, refer to the following guide. 1.
2. Turn on page 40). 3. Connect the DVD Player to your DVD player's owner's manual for more information about your DVD player's video output requirements. 34 Note: Refer to the projector as shown below before turning on the DVD Player (see Selecting a Source on the DVD Player. Turn on the projector and select Component from the source menu before turning on the Player or the projector. 2. Installation and Connections Connecting Your DVD Player with Component Output To connect a DVD Player to the projector, refer to the following guide. 1.

NP4100 : user's manual
Page 66
Adjusting by Using the OSD Control Panel 1. Press the Focus or Zoom button on the projector panel to the projected image. 51 Adjust the focus/zoom using the increase and decrease buttons as required. 3. 4. Press Exit to return to display the appropriate window. 2. Convenient Features Adjusting the Focus/Zoom Manually The focus and zoom can be adjusted manually from the projector focus/zoom panel or from the remote control unit. Refer to the following guides to adjust the focus and zoom manually.
Adjusting by Using the OSD Control Panel 1. Press the Focus or Zoom button on the projector panel to the projected image. 51 Adjust the focus/zoom using the increase and decrease buttons as required. 3. 4. Press Exit to return to display the appropriate window. 2. Convenient Features Adjusting the Focus/Zoom Manually The focus and zoom can be adjusted manually from the projector focus/zoom panel or from the remote control unit. Refer to the following guides to adjust the focus and zoom manually.

NP4100 : user's manual
Page 70
... Press Exit to return to display the Main menu. Convenient Features Adjusting Position/Clock The Position/Clock/Phase and Keystone Correction can be adjusted manually from the projector's control panel or from the remote control unit. Adjusting Position/Clock/Phase by Using the OSD Control Panel 1. From the Adjust menu, press ◄...
... Press Exit to return to display the Main menu. Convenient Features Adjusting Position/Clock The Position/Clock/Phase and Keystone Correction can be adjusted manually from the projector's control panel or from the remote control unit. Adjusting Position/Clock/Phase by Using the OSD Control Panel 1. From the Adjust menu, press ◄...

NP4100 : user's manual
Page 114
Using On-Screen Display Color System Color System enables you can select the appropriate video standard from the menu. When the projector has difficulty detecting the video standard, you to "Source" under "Information" menu (see page 102). This must be displayed on NP4100W. To check if the ..., an XGA (1024 x 768) signal may not be recognized on the top right of the screen. 99 5. In the normal condition, select Auto and the projector will give priority to a WXGA (1280 x 800) signal in recognizing an input signal. When "WXGA Mode" is recognized, go to select video standards...
Using On-Screen Display Color System Color System enables you can select the appropriate video standard from the menu. When the projector has difficulty detecting the video standard, you to "Source" under "Information" menu (see page 102). This must be displayed on NP4100W. To check if the ..., an XGA (1024 x 768) signal may not be recognized on the top right of the screen. 99 5. In the normal condition, select Auto and the projector will give priority to a WXGA (1280 x 800) signal in recognizing an input signal. When "WXGA Mode" is recognized, go to select video standards...

NP4100 : user's manual
Page 145
... "D" are supported by digital signal. An image with "*" are supported by the NP4100W only. Manual adjustment of "Clock" and "Phase" may not be compressed. Signals other than the projector's native resolution (1024 x 768: NP4100, 1280 x 800: NP4100W) will be available for procedures. 130 HDTV (1080p/50) - HDTV... conditions of input signals, the auto adjustment of video images may not be available even though the AUTO ADJUST button is pressed, and manual adjustment of your PC for composite sync signals or sync on your PC. If this should happen, change the refresh rate or resolution ...
... "D" are supported by digital signal. An image with "*" are supported by the NP4100W only. Manual adjustment of "Clock" and "Phase" may not be compressed. Signals other than the projector's native resolution (1024 x 768: NP4100, 1280 x 800: NP4100W) will be available for procedures. 130 HDTV (1080p/50) - HDTV... conditions of input signals, the auto adjustment of video images may not be available even though the AUTO ADJUST button is pressed, and manual adjustment of your PC for composite sync signals or sync on your PC. If this should happen, change the refresh rate or resolution ...

NP4100 : user's manual
Page 155
... unchanged even though you adjusted the volume level. No sound. Troubleshooting Check List Before contacting your user's manual. Enabling your notebook PC's signal output to your problem more efficiently. Image is shifted in the projector's menu. Parts of function keys will help us solve your audio equipment (only models with the AUDIO...
... unchanged even though you adjusted the volume level. No sound. Troubleshooting Check List Before contacting your user's manual. Enabling your notebook PC's signal output to your problem more efficiently. Image is shifted in the projector's menu. Parts of function keys will help us solve your audio equipment (only models with the AUDIO...


