
User Manual
Page 3
...available separately), unplug the AC adapter and remove the batteries immediately, taking care to a Nikon-authorized service center for use electronic equipment in this section are using the camera strap Never place the strap around the neck of battery. Do not use the product will read before using... your Nikon product or injury to yourself or to insert them . After removing the batteries, take the product to avoid burns...
...available separately), unplug the AC adapter and remove the batteries immediately, taking care to a Nikon-authorized service center for use electronic equipment in this section are using the camera strap Never place the strap around the neck of battery. Do not use the product will read before using... your Nikon product or injury to yourself or to insert them . After removing the batteries, take the product to avoid burns...

User Manual
Page 4
... with product regulations. Removing memory cards Memory cards may become hot during use only the cables provided or sold by Nikon for an extended period, the batteries may become hot. CD-ROMs The CD-ROMs on which the software and manuals are prone to leakage when fully ... to water. • Do not transport or store with metal objects such as discoloration or deformation. Before removing the batteries, turn the camera off and allow the batteries to your subject's eyes could cause hearing loss or damage the equipment. Observe due caution when removing memory cards from...
... with product regulations. Removing memory cards Memory cards may become hot during use only the cables provided or sold by Nikon for an extended period, the batteries may become hot. CD-ROMs The CD-ROMs on which the software and manuals are prone to leakage when fully ... to water. • Do not transport or store with metal objects such as discoloration or deformation. Before removing the batteries, turn the camera off and allow the batteries to your subject's eyes could cause hearing loss or damage the equipment. Observe due caution when removing memory cards from...

User Manual
Page 5
...recorded or deleted. Turn the product off before exposing it to sudden changes in water or subjected to the connector, card slot, or battery chamber covers. Strong static charges or the magnetic fields produced by equipment such as occur when entering or leaving a heated building on ...source Do not unplug the product or remove the batteries while the product is connected. Notices/For Your Safety Cautions To ensure continued enjoyment of your Nikon product, observe the following precautions when storing or using or storing the camera. To prevent condensation, place the device in ...
...recorded or deleted. Turn the product off before exposing it to sudden changes in water or subjected to the connector, card slot, or battery chamber covers. Strong static charges or the magnetic fields produced by equipment such as occur when entering or leaving a heated building on ...source Do not unplug the product or remove the batteries while the product is connected. Notices/For Your Safety Cautions To ensure continued enjoyment of your Nikon product, observe the following precautions when storing or using or storing the camera. To prevent condensation, place the device in ...

User Manual
Page 8
... your local authorized Nikon dealer. vi Only Nikon brand electronic accessories (including battery chargers, batteries, and AC adapters) certified by Nikon specifically for damages or lost profits that the camera is designed to operate within the operational and safety requirements of this electronic circuitry. For more information about Nikon brand accessories, contact your Nikon digital camera are engineered and proven...
... your local authorized Nikon dealer. vi Only Nikon brand electronic accessories (including battery chargers, batteries, and AC adapters) certified by Nikon specifically for damages or lost profits that the camera is designed to operate within the operational and safety requirements of this electronic circuitry. For more information about Nikon brand accessories, contact your Nikon digital camera are engineered and proven...

User Manual
Page 9
...Cautions ...iii Notices ...iv Before You Begin 1 Introduction 1 Parts of the Camera 2 The Monitor 4 The Mode Dial 6 Navigating the Menus 7 The Shutter-Release Button 7 First Steps 8 Inserting Batteries 8 Inserting Memory Cards 10 Checking the Battery Level 12 Basic Setup 14 Basic Photography 16 Step 1 - View the Results...up Mode 27 Assist and Scene Modes 28 Framing Assist 29 e Scene Mode 34 More on Playback 40 Viewing Pictures on the Camera 40 Cropping Pictures 42 Voice Memos: Recording and Playback (E3200 only 43 Viewing Pictures on TV 44 Viewing Pictures on a Computer...
...Cautions ...iii Notices ...iv Before You Begin 1 Introduction 1 Parts of the Camera 2 The Monitor 4 The Mode Dial 6 Navigating the Menus 7 The Shutter-Release Button 7 First Steps 8 Inserting Batteries 8 Inserting Memory Cards 10 Checking the Battery Level 12 Basic Setup 14 Basic Photography 16 Step 1 - View the Results...up Mode 27 Assist and Scene Modes 28 Framing Assist 29 e Scene Mode 34 More on Playback 40 Viewing Pictures on the Camera 40 Cropping Pictures 42 Voice Memos: Recording and Playback (E3200 only 43 Viewing Pictures on TV 44 Viewing Pictures on a Computer...

User Manual
Page 10
... Imprint 87 Brightness ...89 Sound Settings 90 Blur Warning 91 Auto Off...92 Format memory/card 93 Language ...94 Video Mode 94 Reset All ...94 Battery Type 96 Firmware Version 96 Technical Notes 97 Optional Accessories 97 Caring for Your Camera 98 Error Messages 100 Troubleshooting 103 Specifications 106 Index ...108 viii
... Imprint 87 Brightness ...89 Sound Settings 90 Blur Warning 91 Auto Off...92 Format memory/card 93 Language ...94 Video Mode 94 Reset All ...94 Battery Type 96 Firmware Version 96 Technical Notes 97 Optional Accessories 97 Caring for Your Camera 98 Error Messages 100 Troubleshooting 103 Specifications 106 Index ...108 viii

User Manual
Page 13
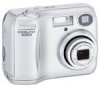
Before You Begin Parts of the Camera Red (!) lamp (Q 20) Green (AF) lamp (Q 20) Viewfinder (Q 18) Mode dial (Q 6) Zoom (l/O ) buttons (Q 18) MENU button (Q 61) Multi selector (!/Y/&/V) (Q 7) u(delete) button (Q 22, 23) x(play) button (Q 22, 23) Monitor (Q 5, 18) Interface connector cover (Q 44, 46) Tripod socket (Q 25, 26) Battery-chamber cover (Q 8) Battery-chamber cover latch (Q 8) Interface connector cover USB connector (Q 46) Audio/video (AV) out connector (E3200 only) (Q 44)/ Video output connector (E2200 only) (Q 44) 3
Before You Begin Parts of the Camera Red (!) lamp (Q 20) Green (AF) lamp (Q 20) Viewfinder (Q 18) Mode dial (Q 6) Zoom (l/O ) buttons (Q 18) MENU button (Q 61) Multi selector (!/Y/&/V) (Q 7) u(delete) button (Q 22, 23) x(play) button (Q 22, 23) Monitor (Q 5, 18) Interface connector cover (Q 44, 46) Tripod socket (Q 25, 26) Battery-chamber cover (Q 8) Battery-chamber cover latch (Q 8) Interface connector cover USB connector (Q 46) Audio/video (AV) out connector (E3200 only) (Q 44)/ Video output connector (E2200 only) (Q 44) 3

User Manual
Page 14
... 89 AUTO 14 10 11 12 999 13 1 Shooting mode 16 2 AE-L1 38 3 Focus indicator 20 4 Zoom indicator2 18 5 Battery level indicator3 12 6 Internal memory/memory card indicator 16 7 Camera shake icon4 25 8 Time zone 84 9 "Date not set . 6 Indicates that 4 pictures may be blurred. 12 Date counter/ stored .... . . . 68 19 Best Shot Selector (BSS 69 20 White balance 65 21 Color options 70 22 Macro close-up mode 27 5 Appears when camera clock has not been set " icon5 14 10 Self-timer indicator 26 11 Date imprint indicator 87 1 Appears when taking pictures with Panorama Assist 2 Displayed...
... 89 AUTO 14 10 11 12 999 13 1 Shooting mode 16 2 AE-L1 38 3 Focus indicator 20 4 Zoom indicator2 18 5 Battery level indicator3 12 6 Internal memory/memory card indicator 16 7 Camera shake icon4 25 8 Time zone 84 9 "Date not set . 6 Indicates that 4 pictures may be blurred. 12 Date counter/ stored .... . . . 68 19 Best Shot Selector (BSS 69 20 White balance 65 21 Color options 70 22 Macro close-up mode 27 5 Appears when camera clock has not been set " icon5 14 10 Self-timer indicator 26 11 Date imprint indicator 87 1 Appears when taking pictures with Panorama Assist 2 Displayed...

User Manual
Page 15
...75 14 Print-order icon 48 15 Transfer icon 76 16 Time of recording 14-15 17 Date of movie . . 23, 60 1 Appears when batteries are running low. 2 E3200 only. Monitor off while flash is charging (Q 20). Before You Begin The Monitor Playback 17 2004.08.05 1 ...:00 2 3 15 12 14 13 11 10 4 5 6 7 8 10 8 9 1 Current folder 23 2 File number and type 23 3 Internal memory/memory card indicator 16 4 Battery level indicator1 12 5 Volume indicator2 60 6 Voice memo recording guide2 . . 43 7 Voice memo playback guide2 . . . 43 8 Current frame number/total number of frames/length of...
...75 14 Print-order icon 48 15 Transfer icon 76 16 Time of recording 14-15 17 Date of movie . . 23, 60 1 Appears when batteries are running low. 2 E3200 only. Monitor off while flash is charging (Q 20). Before You Begin The Monitor Playback 17 2004.08.05 1 ...:00 2 3 15 12 14 13 11 10 4 5 6 7 8 10 8 9 1 Current folder 23 2 File number and type 23 3 Internal memory/memory card indicator 16 4 Battery level indicator1 12 5 Volume indicator2 60 6 Voice memo recording guide2 . . 43 7 Voice memo playback guide2 . . . 43 8 Current frame number/total number of frames/length of...

User Manual
Page 18
... Inserting Batteries Your camera uses: • LR6 (AA) alkaline batteries (×2), or • Nikon EN-MH1 rechargeable nickel-metal hydride (NiMH) batteries (×2), or • ZR6 (AA) nickel manganese batteries (×2), or • FR6/L91 (AA) lithium batteries (×2), or • CR-V3 lithium batteries (×1) 1 2 1 Open the battery-chamber cover • Pressing the battery-chamber latch (g;c), slide the battery-chamber...
... Inserting Batteries Your camera uses: • LR6 (AA) alkaline batteries (×2), or • Nikon EN-MH1 rechargeable nickel-metal hydride (NiMH) batteries (×2), or • ZR6 (AA) nickel manganese batteries (×2), or • FR6/L91 (AA) lithium batteries (×2), or • CR-V3 lithium batteries (×1) 1 2 1 Open the battery-chamber cover • Pressing the battery-chamber latch (g;c), slide the battery-chamber...

User Manual
Page 19
... retain a charge for an extended period. Inserting Batteries Replacing Batteries Turn the camera off and make or model of the battery and not the area around the negative terminal. EN-MH1 Batteries Using an MH-70 battery charger, charge EN-MH1 batteries before removing or inserting batteries. Note that EN-MH1 batteries may discharge quickly immediately after purchase or...
... retain a charge for an extended period. Inserting Batteries Replacing Batteries Turn the camera off and make or model of the battery and not the area around the negative terminal. EN-MH1 Batteries Using an MH-70 battery charger, charge EN-MH1 batteries before removing or inserting batteries. Note that EN-MH1 batteries may discharge quickly immediately after purchase or...

User Manual
Page 22
... Your most recent picture will be displayed. First Steps The x Button The camera can also be turned on • Press the power switch. AUTO 19 2 Check the battery level in the monitor • When the camera is displayed. See "First Steps: Basic Setup" (Q 14). • ...Before checking the battery level, select the appropriate Battery type option in the monitor (Q 22). 12 WARNING!! Checking the Battery Level 1 Turn the camera on by pressing the ...
... Your most recent picture will be displayed. First Steps The x Button The camera can also be turned on • Press the power switch. AUTO 19 2 Check the battery level in the monitor • When the camera is displayed. See "First Steps: Basic Setup" (Q 14). • ...Before checking the battery level, select the appropriate Battery type option in the monitor (Q 22). 12 WARNING!! Checking the Battery Level 1 Turn the camera on by pressing the ...

User Manual
Page 23
Sleep Mode Turning sleep mode on will enter standby mode to reduce the drain on the batteries. Checking the Battery Level Turning the Camera Off To turn the camera off, press the power switch when the power-on lamp is no change in the brightness of time before the time selected in the setup ..., the power-on lamp will be changed using the Auto off after the camera enters standby mode, the camera will turn off automatically and the power-on lamp has gone out. First Steps 13 Do not remove the batteries or disconnect the EH-62B AC adapter until the power-on lamp will turn...
Sleep Mode Turning sleep mode on will enter standby mode to reduce the drain on the batteries. Checking the Battery Level Turning the Camera Off To turn the camera off, press the power switch when the power-on lamp is no change in the brightness of time before the time selected in the setup ..., the power-on lamp will be changed using the Auto off after the camera enters standby mode, the camera will turn off automatically and the power-on lamp has gone out. First Steps 13 Do not remove the batteries or disconnect the EH-62B AC adapter until the power-on lamp will turn...

User Manual
Page 24
.... † To turn daylight saving time on , a language-selection dialog will charge in the monitor. The Clock Battery When the main batteries are installed or the camera is checked, time will automatically be displayed in about ten hours. Set time and date? If you exit without setting... selector. Follow the steps below to mode currently selected with mode dial. When DaylightSaving is powered by an AC adapter, the clock battery will be advanced one hour (Q 85). To return to highlight current time zone. No No Yes Yes Confirmation dialog displayed. Highlight Yes...
.... † To turn daylight saving time on , a language-selection dialog will charge in the monitor. The Clock Battery When the main batteries are installed or the camera is checked, time will automatically be displayed in about ten hours. Set time and date? If you exit without setting... selector. Follow the steps below to mode currently selected with mode dial. When DaylightSaving is powered by an AC adapter, the clock battery will be advanced one hour (Q 85). To return to highlight current time zone. No No Yes Yes Confirmation dialog displayed. Highlight Yes...

User Manual
Page 65
...has been created. After checking the printer and resolving any problems as directed in doubt, recharge the battery before printing or use the optional EH-62B AC adapter. Turn camera off and disconnect USB cable. • Select Cancel to exit without printing pictures. DPOF Printing The...007 prints + Start print 002/007 YOU MAY TURN + OFF THE CAMERA Confirm Cancel Cancel Resume Display confirmation dialog. More on Playback Before Printing Before printing via direct USB connection, be sure the battery is complete. To interrupt printing, press center of the multi selector to ...
...has been created. After checking the printer and resolving any problems as directed in doubt, recharge the battery before printing or use the optional EH-62B AC adapter. Turn camera off and disconnect USB cable. • Select Cancel to exit without printing pictures. DPOF Printing The...007 prints + Start print 002/007 YOU MAY TURN + OFF THE CAMERA Confirm Cancel Cancel Resume Display confirmation dialog. More on Playback Before Printing Before printing via direct USB connection, be sure the battery is complete. To interrupt printing, press center of the multi selector to ...

User Manual
Page 92
...settings Blur warning Auto off Format memory/ card Language USB Video mode Reset all Battery type Firmware version Description Q Choose the welcome screen displayed when the camera is turned on. 83 Set the camera clock. 84-85 Hide or display the monitor indicators. 86 Imprint pictures with ... to your computer's operating system. 45 Select the video mode from NTSC and PAL. 94 Restore camera settings to default values. 94 Choose the type of batteries inserted in the camera. 96 Display the current firmware version. 96 SET-UP 1/5 Welcome screen Date Monitor settings To clear...
...settings Blur warning Auto off Format memory/ card Language USB Video mode Reset all Battery type Firmware version Description Q Choose the welcome screen displayed when the camera is turned on. 83 Set the camera clock. 84-85 Hide or display the monitor indicators. 86 Imprint pictures with ... to your computer's operating system. 45 Select the video mode from NTSC and PAL. 94 Restore camera settings to default values. 94 Choose the type of batteries inserted in the camera. 96 Display the current firmware version. 96 SET-UP 1/5 Welcome screen Date Monitor settings To clear...

User Manual
Page 102
... in AUTO OFF menu has elapsed. The Setup Menu Auto Off To save battery power, the camera will enter standby mode if no operations are performed for a preset length of time. When powered by AC adapter, camera will remain on for three minutes when menus are performed for thirty minutes. ...Auto off AUTO OFF Auto off automatically. If On is selected, camera will enter sleep mode after one minute (1m) default setting, five minutes (5m) and thirty minutes (30m). The camera will enter standby mode when there is set to thirty seconds (30s) or one minute...
... in AUTO OFF menu has elapsed. The Setup Menu Auto Off To save battery power, the camera will enter standby mode if no operations are performed for a preset length of time. When powered by AC adapter, camera will remain on for three minutes when menus are performed for thirty minutes. ...Auto off AUTO OFF Auto off automatically. If On is selected, camera will enter sleep mode after one minute (1m) default setting, five minutes (5m) and thirty minutes (30m). The camera will enter standby mode when there is set to thirty seconds (30s) or one minute...

User Manual
Page 106
... Alkaline COOLPIX (NiMH) CR-V3 Description Select this option to display the current firmware version. Firmware version E3200 Ver.XX Back 96 The Setup Menu Battery Type Battery type This option is not charged sufficiently, the battery type setting may revert to choose the type of batteries inserted in the camera. Backup Battery If the backup battery (Q 14...
... Alkaline COOLPIX (NiMH) CR-V3 Description Select this option to display the current firmware version. Firmware version E3200 Ver.XX Back 96 The Setup Menu Battery Type Battery type This option is not charged sufficiently, the battery type setting may revert to choose the type of batteries inserted in the camera. Backup Battery If the backup battery (Q 14...

User Manual
Page 107
... or over Technical Notes 97 Contact your local retailer or Nikon representative for use with your retailer or local Nikon representative. Rechargeable battery Battery charger AC adapter Carrying case Water-proof Case Additional EN-MH1 NiMH batteries are available from your Nikon digital camera: San Disk Toshiba Panasonic 16 MB, 32 MB, 64... have been tested and approved for details. Approved Memory Cards The following optional accessories were available for EN-MH1 batteries EH-62B AC adapter CS-CP18 soft case*1 WP-CP1*2 *1 Not available in U.S. *2 Not available in some areas.
... or over Technical Notes 97 Contact your local retailer or Nikon representative for use with your retailer or local Nikon representative. Rechargeable battery Battery charger AC adapter Carrying case Water-proof Case Additional EN-MH1 NiMH batteries are available from your Nikon digital camera: San Disk Toshiba Panasonic 16 MB, 32 MB, 64... have been tested and approved for details. Approved Memory Cards The following optional accessories were available for EN-MH1 batteries EH-62B AC adapter CS-CP18 soft case*1 WP-CP1*2 *1 Not available in U.S. *2 Not available in some areas.

User Manual
Page 109
...replacement when taking pictures on important occasions.You may find it difficult to purchase replacement batteries on lamp is off before use. • Used batteries are a valuable resource. Do not store your camera with naptha or camphor moth balls or in locations that: • are poorly ...damp • are next to equipment that you will not be replaced at least once a month. Batteries • When turning the camera on a sunny day) • are charged. Keep spare batteries in a plastic bag containing a desiccant. for example near a space heater or in a closed vehicle ...
...replacement when taking pictures on important occasions.You may find it difficult to purchase replacement batteries on lamp is off before use. • Used batteries are a valuable resource. Do not store your camera with naptha or camphor moth balls or in locations that: • are poorly ...damp • are next to equipment that you will not be replaced at least once a month. Batteries • When turning the camera on a sunny day) • are charged. Keep spare batteries in a plastic bag containing a desiccant. for example near a space heater or in a closed vehicle ...


