
User Manual
Page 5
...images are especially susceptible to damage. Notices/For Your Safety Cautions To ensure continued enjoyment of your Nikon product, observe the following precautions when storing or using or storing the camera. To prevent an accidental interruption of power, avoid carrying the product from strong magnetic fields Do.... To prevent condensation, place the device in these circumstances could interfere with care Do not apply force to the lens or lens cover, or to sudden changes in the vicinity of equipment that generates strong electromagnetic radiation or magnetic fields. Do not point ...
...images are especially susceptible to damage. Notices/For Your Safety Cautions To ensure continued enjoyment of your Nikon product, observe the following precautions when storing or using or storing the camera. To prevent an accidental interruption of power, avoid carrying the product from strong magnetic fields Do.... To prevent condensation, place the device in these circumstances could interfere with care Do not apply force to the lens or lens cover, or to sudden changes in the vicinity of equipment that generates strong electromagnetic radiation or magnetic fields. Do not point ...

User Manual
Page 12
Before You Begin Parts of the Camera Power switch Power-on lamp (Q 12) (Q 12) Shutter-release button (Q 7) Speaker (E3200 only) Built-in Speedlight (Q 24) Microphone (E3200 only) Eyelet for camera strap Viewfinder (Q 18) Self-timer lamp (Q 26)/ Red-eye reduction lamp (E3200 only) (Q 24) AF-Assist illuminator (E3200 only) (Q 24) Memory card slot cover (Q 10) Lens (Q 18) Attaching the Camera Strap 2
Before You Begin Parts of the Camera Power switch Power-on lamp (Q 12) (Q 12) Shutter-release button (Q 7) Speaker (E3200 only) Built-in Speedlight (Q 24) Microphone (E3200 only) Eyelet for camera strap Viewfinder (Q 18) Self-timer lamp (Q 26)/ Red-eye reduction lamp (E3200 only) (Q 24) AF-Assist illuminator (E3200 only) (Q 24) Memory card slot cover (Q 10) Lens (Q 18) Attaching the Camera Strap 2

User Manual
Page 15
... or display indicators in the monitor, select the Monitor settings option in the setup menu. (Q 86) AUTO 19 Monitor shows current settings and view through lens Monitor shows view through lens only Monitor shows framing grid Monitor turns off 5
... or display indicators in the monitor, select the Monitor settings option in the setup menu. (Q 86) AUTO 19 Monitor shows current settings and view through lens Monitor shows view through lens only Monitor shows framing grid Monitor turns off 5

User Manual
Page 26
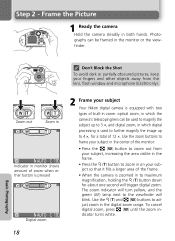
... use the picture (Q 63). In this automatic, "point-and-shoot" mode, the majority of camera settings are controlled by the camera in response to shoot when the monitor shows the view through the camera lens. The default setting is ready to shooting conditions, producing optimal results in the... camera, } is !# (auto). 16 AUTO 19 Number of exposures remaining The number of the memory or memory card and the option chosen...
... use the picture (Q 63). In this automatic, "point-and-shoot" mode, the majority of camera settings are controlled by the camera in response to shoot when the monitor shows the view through the camera lens. The default setting is ready to shooting conditions, producing optimal results in the... camera, } is !# (auto). 16 AUTO 19 Number of exposures remaining The number of the memory or memory card and the option chosen...
User Manual
Page 28
... subject, increasing the area visible in the frame. • Press the O (T) button to zoom in on your subject Your Nikon digital camera is equipped with two types of built-in zoom: optical zoom, in which the camera's telescoping lens can be used to magnify the subject up to adjust zoom in both hands. To cancel...
... subject, increasing the area visible in the frame. • Press the O (T) button to zoom in on your subject Your Nikon digital camera is equipped with two types of built-in zoom: optical zoom, in which the camera's telescoping lens can be used to magnify the subject up to adjust zoom in both hands. To cancel...

User Manual
Page 46
other modes can be selected. œ Camera focuses continuously, even when shutter-release button is not pressed halfway. sion first. ! $ Y OFF* & OFF* * Other modes can be selected. •Photography may be selected. ... increasing time before pictures are saved to memory or memory card. ! $ Y OFF* & OFF AClose up Use to the lens, adjust zoom until the macro close -up icon (&) in close -up shots of inadvertent camera movement. •Macro close-up turns off ($) automatically. Flash mode automatically set to produce stunning night landscapes. Auto...
other modes can be selected. œ Camera focuses continuously, even when shutter-release button is not pressed halfway. sion first. ! $ Y OFF* & OFF* * Other modes can be selected. •Photography may be selected. ... increasing time before pictures are saved to memory or memory card. ! $ Y OFF* & OFF AClose up Use to the lens, adjust zoom until the macro close -up icon (&) in close -up shots of inadvertent camera movement. •Macro close-up turns off ($) automatically. Flash mode automatically set to produce stunning night landscapes. Auto...

User Manual
Page 49
...appear on left to right, picture will also end if a new mode is selected or camera enters standby mode. Pan direction dis- played in white. 19 5 AE-L Take first picture. More on view through lens (if pan direction is left side of monitor). 18 6 AE-L 7 18 Compose ...the next shot to overlap with a name consisting of "P_" preceded by a three-digit folder number and followed by a three-digit sequence number (e.g., "101P_002"). 39 About one third ...
...appear on left to right, picture will also end if a new mode is selected or camera enters standby mode. Pan direction dis- played in white. 19 5 AE-L Take first picture. More on view through lens (if pan direction is left side of monitor). 18 6 AE-L 7 18 Compose ...the next shot to overlap with a name consisting of "P_" preceded by a three-digit folder number and followed by a three-digit sequence number (e.g., "101P_002"). 39 About one third ...

User Manual
Page 108
...always lit or that whiten toward either end may be affected. • When you pump to remove dust and lint, then wipe gently with your Nikon service representative. 98 Technical Notes Avoid contact with liquid crystal Should the monitor break, care should be removed with a blower, wipe the... using the product will not be difficult to see in the center of air out the other volatile chemicals. Caring for Your Camera Cleaning Lens One key to cleaning the lens is to dim or flicker, contact your fingers. Should the monitor begin to not touch it with a soft, dry cloth. Some ...
...always lit or that whiten toward either end may be affected. • When you pump to remove dust and lint, then wipe gently with your Nikon service representative. 98 Technical Notes Avoid contact with liquid crystal Should the monitor break, care should be removed with a blower, wipe the... using the product will not be difficult to see in the center of air out the other volatile chemicals. Caring for Your Camera Cleaning Lens One key to cleaning the lens is to dim or flicker, contact your fingers. Should the monitor begin to not touch it with a soft, dry cloth. Some ...

User Manual
Page 112
... menu and reconnect cam- If error persists, contact retailer or Nikon representative. memory card, then turn camera on. era on Error has occurred during lens again. nect cable, then choose new USB setting in camera's internal circuitry. tact retailer or Nikon repre- Q 6 75 45-47 45 47, 76-77 12 46 84 - 8-9, 12 102 Technical...
... menu and reconnect cam- If error persists, contact retailer or Nikon representative. memory card, then turn camera on. era on Error has occurred during lens again. nect cable, then choose new USB setting in camera's internal circuitry. tact retailer or Nikon repre- Q 6 75 45-47 45 47, 76-77 12 46 84 - 8-9, 12 102 Technical...
User Manual
Page 116
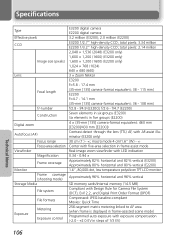
... CCD; Specifications Type Effective pixels CCD Image size (pixels) Lens Focal length f/-number Construction Digital zoom Autofocus (AF) Viewfinder Focus range Focus-area selection Magnification Frame coverage Monitor Frame coverage (shooting mode) Storage Media File system File formats Exposure Metering Exposure control E3200 digital camera E2200 digital camera 3.2 million (E3200); 2.0 million (E2200) E3200 1/2.7" high-density CCD...
... CCD; Specifications Type Effective pixels CCD Image size (pixels) Lens Focal length f/-number Construction Digital zoom Autofocus (AF) Viewfinder Focus range Focus-area selection Magnification Frame coverage Monitor Frame coverage (shooting mode) Storage Media File system File formats Exposure Metering Exposure control E3200 digital camera E2200 digital camera 3.2 million (E3200); 2.0 million (E2200) E3200 1/2.7" high-density CCD...

User Manual
Page 118
..., see Image mode ISO, 25 J JPEG, 23, 106 L Lamp, green (AF), 3, 7, 12, 20, 104 Lamp, red (!), 3, 12, 20, 104 Language, 14, 94 Language, choosing, 14 Lens, iii, 2, 99, 106 M Macro mode, 27, 30-33, 3538 Memory cards, ii, 2, 10-11, 106 approved, 97 capacity of, 16, 64 formatting, 11, 75, 93..., see Batteries D Date, 14-15, 51, 82, 84, 87 Date imprint, 51, 82, 87 DCF, see Design rule for Camera File system, 106, 107 Digital Print Order Format, 48, 52, 106 DPOF, see Digital Print Order Format Dusk/Dawn, 28, 35, 104 E E-mail, 63, 64, 78 EN-MH1, see Batteries Error messages, 100...
..., see Image mode ISO, 25 J JPEG, 23, 106 L Lamp, green (AF), 3, 7, 12, 20, 104 Lamp, red (!), 3, 12, 20, 104 Language, 14, 94 Language, choosing, 14 Lens, iii, 2, 99, 106 M Macro mode, 27, 30-33, 3538 Memory cards, ii, 2, 10-11, 106 approved, 97 capacity of, 16, 64 formatting, 11, 75, 93..., see Batteries D Date, 14-15, 51, 82, 84, 87 Date imprint, 51, 82, 87 DCF, see Design rule for Camera File system, 106, 107 Digital Print Order Format, 48, 52, 106 DPOF, see Digital Print Order Format Dusk/Dawn, 28, 35, 104 E E-mail, 63, 64, 78 EN-MH1, see Batteries Error messages, 100...


