Reference Manual
Page 4
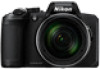
... photography. https://imaging.nikon.com/ Use Only Nikon Brand Electronic Accessories Nikon COOLPIX cameras are engineered and proven to operate within the operational and safety requirements of this electronic circuitry. THE USE OF NON-NIKON ELECTRONIC ACCESSORIES COULD DAMAGE THE CAMERA AND MAY VOID YOUR NIKON WARRANTY. Before Taking Important Pictures Before taking pictures on important occasions (such...
... photography. https://imaging.nikon.com/ Use Only Nikon Brand Electronic Accessories Nikon COOLPIX cameras are engineered and proven to operate within the operational and safety requirements of this electronic circuitry. THE USE OF NON-NIKON ELECTRONIC ACCESSORIES COULD DAMAGE THE CAMERA AND MAY VOID YOUR NIKON WARRANTY. Before Taking Important Pictures Before taking pictures on important occasions (such...

Reference Manual
Page 11
......44 Setting the Flash Mode, Self-timer, Macro Mode, and Exposure Compensation.......... 46 Flash Mode...47 Self-timer ...49 Macro Mode (Taking Close-up Pictures 50 Exposure Compensation (Adjusting Brightness 51 Using the Zoom...52 Focusing...54 The Shutter-release Button...54 Using Target Finding AF ...55 Using Face Detection...Lighting: Enhancing Brightness and Contrast 70 Red-eye Correction: Correcting Red-eye When Shooting with the Flash 71 Glamour Retouch: Enhancing Human Faces 71 Small Picture: Reducing the Size of an Image 73 Crop: Creating a Cropped Copy...74 xi Table of Contents
......44 Setting the Flash Mode, Self-timer, Macro Mode, and Exposure Compensation.......... 46 Flash Mode...47 Self-timer ...49 Macro Mode (Taking Close-up Pictures 50 Exposure Compensation (Adjusting Brightness 51 Using the Zoom...52 Focusing...54 The Shutter-release Button...54 Using Target Finding AF ...55 Using Face Detection...Lighting: Enhancing Brightness and Contrast 70 Red-eye Correction: Correcting Red-eye When Shooting with the Flash 71 Glamour Retouch: Enhancing Human Faces 71 Small Picture: Reducing the Size of an Image 73 Crop: Creating a Cropped Copy...74 xi Table of Contents

Reference Manual
Page 22
.../2019 12:00 21 20 17 16 12 13 14 15 19 18 1 List by date icon 66 2 Protect icon 126 Sequence display (when Individual 3 pictures is selected 128 4 Glamour retouch icon 71 5 Quick effects icon 69 6 D-Lighting icon 70 7 Quick retouch icon 70 8 Red-eye correction icon 71 9 Internal memory... 11 Movie length or elapsed playback time 12 Volume indicator 83 13 Image mode 104 14 Movie options 117 15 Easy panorama 38 16 Small picture icon 73 17 Crop icon 64, 74 Easy panorama playback guide 18 Sequence playback guide Movie playback guide 19 Quick effects guide 20 Time of...
.../2019 12:00 21 20 17 16 12 13 14 15 19 18 1 List by date icon 66 2 Protect icon 126 Sequence display (when Individual 3 pictures is selected 128 4 Glamour retouch icon 71 5 Quick effects icon 69 6 D-Lighting icon 70 7 Quick retouch icon 70 8 Red-eye correction icon 71 9 Internal memory... 11 Movie length or elapsed playback time 12 Volume indicator 83 13 Image mode 104 14 Movie options 117 15 Easy panorama 38 16 Small picture icon 73 17 Crop icon 64, 74 Easy panorama playback guide 18 Sequence playback guide Movie playback guide 19 Quick effects guide 20 Time of...
Reference Manual
Page 32
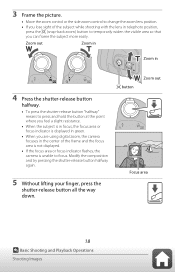
... finger, press the shutter-release button all the way down. q button Zoom out 1 / 2 5 0 F 3.3 Focus area 18 Basic Shooting and Playback Operations Shooting Images 3 Frame the picture. • Move the zoom control or the side zoom control to change the zoom lens position. • If you lose sight of the subject while...
... finger, press the shutter-release button all the way down. q button Zoom out 1 / 2 5 0 F 3.3 Focus area 18 Basic Shooting and Playback Operations Shooting Images 3 Frame the picture. • Move the zoom control or the side zoom control to change the zoom lens position. • If you lose sight of the subject while...

Reference Manual
Page 35
..., or self-collage function, are saved as a sequence, and only one image in the sequence (the key picture) is displayed in playback mode (default setting). • If you press the l button while a key picture is displayed for a sequence of images, all images in the sequence are deleted. 0004.JPG 15/11/2019...
..., or self-collage function, are saved as a sequence, and only one image in the sequence (the key picture) is displayed in playback mode (default setting). • If you press the l button while a key picture is displayed for a sequence of images, all images in the sequence are deleted. 0004.JPG 15/11/2019...

Reference Manual
Page 37
... Shooting 41 Setting the Flash Mode, Self-timer, Macro Mode, and Exposure Compensation ...46 Flash Mode...47 Self-timer ...49 Macro Mode (Taking Close-up Pictures 50 Exposure Compensation (Adjusting Brightness 51 Using the Zoom ...52 Focusing ...54 Default Settings (Flash Mode, Self-timer, and Macro Mode 59 Functions That Cannot...
... Shooting 41 Setting the Flash Mode, Self-timer, Macro Mode, and Exposure Compensation ...46 Flash Mode...47 Self-timer ...49 Macro Mode (Taking Close-up Pictures 50 Exposure Compensation (Adjusting Brightness 51 Using the Zoom ...52 Focusing ...54 Default Settings (Flash Mode, Self-timer, and Macro Mode 59 Functions That Cannot...
Reference Manual
Page 38
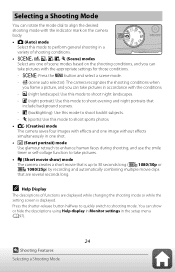
... (Smart portrait) mode Use glamour retouch to enhance human faces during shooting, and use the smile timer or self-collage function to take pictures with the appropriate settings for those conditions. - You can show ) mode The camera creates a short movie that is displayed. j ...(night landscape): Use this mode to shoot backlit subjects. - B (scene auto selector): The camera recognizes the shooting conditions when you frame a picture, and you can take pictures in a variety of shooting conditions. • y, B, j, e, o, d (Scene) modes Select any one of functions are several seconds long...
... (Smart portrait) mode Use glamour retouch to enhance human faces during shooting, and use the smile timer or self-collage function to take pictures with the appropriate settings for those conditions. - You can show ) mode The camera creates a short movie that is displayed. j ...(night landscape): Use this mode to shoot backlit subjects. - B (scene auto selector): The camera recognizes the shooting conditions when you frame a picture, and you can take pictures in a variety of shooting conditions. • y, B, j, e, o, d (Scene) modes Select any one of functions are several seconds long...

Reference Manual
Page 41
... shutter speed is slow. 4 Use of scene modes based on the shooting conditions, and you can take pictures with the conditions. Set Photo VR (A138) to j, e, o, or d and take pictures in the setup menu when using the multi selector. b Portrait (default setting) c Landscape1, 2 U... Multiple exp. B (scene auto selector) (A28) The camera recognizes the shooting conditions when you frame a picture, and you can take pictures. j Night landscape1, 2 (A28), e Night portrait (A29), o Backlighting2 (A30), d Sports2 (A30) Rotate the mode dial to Off in ...
... shutter speed is slow. 4 Use of scene modes based on the shooting conditions, and you can take pictures with the conditions. Set Photo VR (A138) to j, e, o, or d and take pictures in the setup menu when using the multi selector. b Portrait (default setting) c Landscape1, 2 U... Multiple exp. B (scene auto selector) (A28) The camera recognizes the shooting conditions when you frame a picture, and you can take pictures. j Night landscape1, 2 (A28), e Night portrait (A29), o Backlighting2 (A30), d Sports2 (A30) Rotate the mode dial to Off in ...
Reference Manual
Page 42
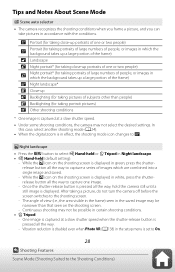
... icon on the shooting screen is displayed. The angle of images which are combined into a single image and saved. - After taking portrait pictures) d Other shooting conditions * One image is captured at a slow shutter speed when the shutter-release button is pressed all the way, ...Shooting Conditions) Tips and Notes About Scene Mode B Scene auto selector • The camera recognizes the shooting conditions when you frame a picture, and you can take pictures in certain shooting conditions. • Z Tripod: - e Portrait (for taking close-up portraits of one or two people) b ...
... icon on the shooting screen is displayed. The angle of images which are combined into a single image and saved. - After taking portrait pictures) d Other shooting conditions * One image is captured at a slow shutter speed when the shutter-release button is pressed all the way, ...Shooting Conditions) Tips and Notes About Scene Mode B Scene auto selector • The camera recognizes the shooting conditions when you frame a picture, and you can take pictures in certain shooting conditions. • Z Tripod: - e Portrait (for taking close-up portraits of one or two people) b ...
Reference Manual
Page 43
... portrait. • Y Hand-held (default setting): - Vibration reduction is displayed in green, press the shutterrelease button all the way to capture one image. - After taking a picture, do not turn the camera off before shooting. • Press the d button to select Y Hand-held or Z Tripod in certain shooting conditions. • Z Tripod: - One...
... portrait. • Y Hand-held (default setting): - Vibration reduction is displayed in green, press the shutterrelease button all the way to capture one image. - After taking a picture, do not turn the camera off before shooting. • Press the d button to select Y Hand-held or Z Tripod in certain shooting conditions. • Z Tripod: - One...

Reference Manual
Page 44
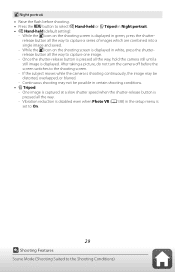
... between the bright and dark areas, the HDR icon on the shooting screen changes to prevent the subject from being hidden in shadow. After taking pictures with the first image. 30 Shooting Features Scene Mode (Shooting Suited to the shooting screen. - A non-HDR composite image - The angle of view (i.e., ... the values determined with very bright and dark areas in the setup menu when using a tripod to save one image. • On: Use when taking a picture, do not turn the camera off before shooting. - Set Photo VR (A138) to Off in the same frame. - d Sports • While the shutter-...
... between the bright and dark areas, the HDR icon on the shooting screen changes to prevent the subject from being hidden in shadow. After taking pictures with the first image. 30 Shooting Features Scene Mode (Shooting Suited to the shooting screen. - A non-HDR composite image - The angle of view (i.e., ... the values determined with very bright and dark areas in the setup menu when using a tripod to save one image. • On: Use when taking a picture, do not turn the camera off before shooting. - Set Photo VR (A138) to Off in the same frame. - d Sports • While the shutter-...

Reference Manual
Page 45
... a shutter speed of 25 seconds about every 5 seconds. When 50 shots are grouped as a sequence, and the first image saved is used as the key picture (A67). 31 Shooting Features Scene Mode (Shooting Suited to capture the motion of stars with trails overlapped from the start of shooting is automatically saved...
... a shutter speed of 25 seconds about every 5 seconds. When 50 shots are grouped as a sequence, and the first image saved is used as the key picture (A67). 31 Shooting Features Scene Mode (Shooting Suited to capture the motion of stars with trails overlapped from the start of shooting is automatically saved...
Reference Manual
Page 53
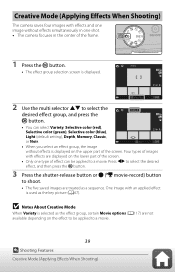
... effects are treated as a sequence. Creative Mode (Applying Effects When Shooting) The camera saves four images with an applied effect is used as the key picture (A67).
... effects are treated as a sequence. Creative Mode (Applying Effects When Shooting) The camera saves four images with an applied effect is used as the key picture (A67).

Reference Manual
Page 55
... Portrait Mode • The amount of effect. • You can simultaneously apply multiple effects. Smart Portrait Mode (Enhancing Human Faces When Shooting) You can take a picture with the glamour retouch function to enhance human faces. 1 Press the multi selector K. 2 Apply an effect. • Use JK to select the desired effect. •... f Exit. See "Using the Histogram" (A51) for more information. 41 Shooting Features Smart Portrait Mode (Enhancing Human Faces When Shooting) Skin softening Effects 3 Frame the picture and press the shutter-release button.
... Portrait Mode • The amount of effect. • You can simultaneously apply multiple effects. Smart Portrait Mode (Enhancing Human Faces When Shooting) You can take a picture with the glamour retouch function to enhance human faces. 1 Press the multi selector K. 2 Apply an effect. • Use JK to select the desired effect. •... f Exit. See "Using the Histogram" (A51) for more information. 41 Shooting Features Smart Portrait Mode (Enhancing Human Faces When Shooting) Skin softening Effects 3 Frame the picture and press the shutter-release button.

Reference Manual
Page 57
... B Notes About Smile Timer Under some shooting conditions, the camera may be used for shooting. The shutter-release button can also be unable to take a picture, smile timer is released. 43 Shooting Features Smart Portrait Mode (Enhancing Human Faces When Shooting) C When the Self-timer Lamp Flashes When using smile timer...
... B Notes About Smile Timer Under some shooting conditions, the camera may be used for shooting. The shutter-release button can also be unable to take a picture, smile timer is released. 43 Shooting Features Smart Portrait Mode (Enhancing Human Faces When Shooting) C When the Self-timer Lamp Flashes When using smile timer...

Reference Manual
Page 58
...saved. 44 Shooting Features Smart Portrait Mode (Enhancing Human Faces When Shooting) Using Self-Collage The camera can configure the settings for the remaining pictures. Collage before shooting. 2 • The number of shots, Interval, and Shutter sound (A115). • If you press the d ...released. • The camera automatically releases the shutter for Number of shots is indicated by U on the screen. Self-Collage 2 Take a picture. • When you press the shutter-release button, a countdown starts (about three seconds before pressing J, you can capture a series of...
...saved. 44 Shooting Features Smart Portrait Mode (Enhancing Human Faces When Shooting) Using Self-Collage The camera can configure the settings for the remaining pictures. Collage before shooting. 2 • The number of shots, Interval, and Shutter sound (A115). • If you press the d ...released. • The camera automatically releases the shutter for Number of shots is indicated by U on the screen. Self-Collage 2 Take a picture. • When you press the shutter-release button, a countdown starts (about three seconds before pressing J, you can capture a series of...

Reference Manual
Page 59
The pictures that were taken before the camera takes the specified number of the aggregated image. Press the shutter-release button - The date and time cannot be ...
The pictures that were taken before the camera takes the specified number of the aggregated image. Press the shutter-release button - The date and time cannot be ...
Reference Manual
Page 60
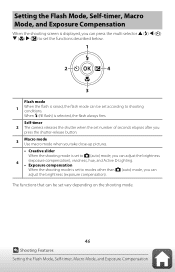
... shutter when the set number of seconds elapses after you press the shutter-release button. 3 Macro mode Use macro mode when you take close-up pictures. • Creative slider When the shooting mode is set to A (auto) mode, you can adjust the brightness 4 (exposure compensation), vividness, hue, and Active D-Lighting. •...
... shutter when the set number of seconds elapses after you press the shutter-release button. 3 Macro mode Use macro mode when you take close-up pictures. • Creative slider When the shooting mode is set to A (auto) mode, you can adjust the brightness 4 (exposure compensation), vividness, hue, and Active D-Lighting. •...

Reference Manual
Page 62
... processed to "fill-in" (illuminate) shadows and backlit subjects. In these cases, select another flash mode and take the picture again. 48 Shooting Features Flash Mode Fill flash The flash fires whenever a picture is required to a telephoto position. Use to reduce red-eye before the image is saved in some shooting modes...
... processed to "fill-in" (illuminate) shadows and backlit subjects. In these cases, select another flash mode and take the picture again. 48 Shooting Features Flash Mode Fill flash The flash fires whenever a picture is required to a telephoto position. Use to reduce red-eye before the image is saved in some shooting modes...

Reference Manual
Page 63
... when using it to prevent camera shake. • If the setting is not applied by pressing the k button, the selection will be canceled. 3 Frame the picture and press the shutter-release button halfway. • Confirm that the subject is released, and press the k button. • n10s (10 seconds): Use on important...
... when using it to prevent camera shake. • If the setting is not applied by pressing the k button, the selection will be canceled. 3 Frame the picture and press the shutter-release button halfway. • Confirm that the subject is released, and press the k button. • n10s (10 seconds): Use on important...


