
Reference Manual
Page 7
... cables) certified by Nikon specifically for use with the latest product information, tips, answers to frequently asked questions (FAQs), and general advice on a trip), take a test shot to the highest standards and include complex electronic circuitry. THE USE OF NON-NIKON ELECTRONIC...circuitry. Visit the site below for contact information: http://imaging.nikon.com/ Use Only Nikon Brand Electronic Accessories Nikon COOLPIX cameras are engineered and proven to operate within the operational and safety requirements of Nikon's "Life-Long Learning" commitment to ongoing product support and...
... cables) certified by Nikon specifically for use with the latest product information, tips, answers to frequently asked questions (FAQs), and general advice on a trip), take a test shot to the highest standards and include complex electronic circuitry. THE USE OF NON-NIKON ELECTRONIC...circuitry. Visit the site below for contact information: http://imaging.nikon.com/ Use Only Nikon Brand Electronic Accessories Nikon COOLPIX cameras are engineered and proven to operate within the operational and safety requirements of Nikon's "Life-Long Learning" commitment to ongoing product support and...

Reference Manual
Page 12
To avoid damage to the product, be sure to heat or flame. x • Do not handle the power cable or go near the metal parts of water. Continued use could result in fire or electric shock. • Dust on or near the battery charger ...during lightning storms. Failure to observe this precaution could result in electric shock. • Do not damage, modify, forcibly tug or bend the power cable, place it under heavy objects, or expose it to observe these precautions could result in fire or electric shock. • Do not handle the plug...
To avoid damage to the product, be sure to heat or flame. x • Do not handle the power cable or go near the metal parts of water. Continued use could result in fire or electric shock. • Dust on or near the battery charger ...during lightning storms. Failure to observe this precaution could result in electric shock. • Do not damage, modify, forcibly tug or bend the power cable, place it under heavy objects, or expose it to observe these precautions could result in fire or electric shock. • Do not handle the plug...
Reference Manual
Page 13
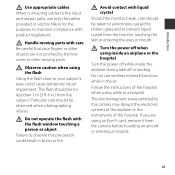
... Be careful that your subject's eyes could result in .) from the monitor touching the skin or entering the eyes or mouth. Introduction Use appropriate cables When connecting cables to the input and output jacks, use wireless network functions while in a hospital. The flash should be no less than 1 m (3 ft ...by the lens cover or other moving parts with liquid crystal Should the monitor break, care should be taken to avoid injury caused by Nikon for the purpose, to maintain compliance with the flash window touching a person or object Failure to observe this camera may disrupt the ...
... Be careful that your subject's eyes could result in .) from the monitor touching the skin or entering the eyes or mouth. Introduction Use appropriate cables When connecting cables to the input and output jacks, use wireless network functions while in a hospital. The flash should be no less than 1 m (3 ft ...by the lens cover or other moving parts with liquid crystal Should the monitor break, care should be taken to avoid injury caused by Nikon for the purpose, to maintain compliance with the flash window touching a person or object Failure to observe this camera may disrupt the ...

Reference Manual
Page 15
... is designated for human health and the environment that electrical and electronic equipment is to cause birth defects or other interface cables may exceed the limits of Class B Part 15 of the FCC rules. Wash hands after handling. Do not dispose of waste management...Tel: 631-547-4200 Notice for customers in Canada CAN ICES-3 B / NMB-3 B Notice for your equipment. Introduction Interface Cables Use the interface cables sold or provided by Nikon for Customers in Europe This symbol indicates that might result from incorrect disposal. • For more information, contact the retailer ...
... is designated for human health and the environment that electrical and electronic equipment is to cause birth defects or other interface cables may exceed the limits of Class B Part 15 of the FCC rules. Wash hands after handling. Do not dispose of waste management...Tel: 631-547-4200 Notice for customers in Canada CAN ICES-3 B / NMB-3 B Notice for your equipment. Introduction Interface Cables Use the interface cables sold or provided by Nikon for Customers in Europe This symbol indicates that might result from incorrect disposal. • For more information, contact the retailer ...

Reference Manual
Page 47
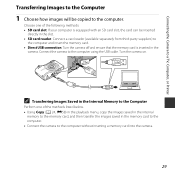
Connection method: Connect the camera to the computer's USB port with the USB Cable UC-E16. 27 Connection method: Connect the camera directly to the printer's USB port with the USB Cable UC-E16. • Before connecting to a computer, install ViewNX 2 on the computer (A 28). Connection ...method: Connect the video and audio plugs of the Audio Video Cable EG-CP14 to perform simple retouching and manage image data. Printing images without using a computer. Connecting the Camera to a TV, Computer, or ...
Connection method: Connect the camera to the computer's USB port with the USB Cable UC-E16. 27 Connection method: Connect the camera directly to the printer's USB port with the USB Cable UC-E16. • Before connecting to a computer, install ViewNX 2 on the computer (A 28). Connection ...method: Connect the video and audio plugs of the Audio Video Cable EG-CP14 to perform simple retouching and manage image data. Printing images without using a computer. Connecting the Camera to a TV, Computer, or ...
Reference Manual
Page 49
...: • SD card slot: If your computer is equipped with an SD card slot, the card can be copied to the computer using the USB cable. Connecting the Camera to a TV, Computer, or Printer Transferring Images to the Computer 1 Choose how images will be inserted directly in the slot. • SD...
...: • SD card slot: If your computer is equipped with an SD card slot, the card can be copied to the computer using the USB cable. Connecting the Camera to a TV, Computer, or Printer Transferring Images to the Computer 1 Choose how images will be inserted directly in the slot. • SD...

Reference Manual
Page 50
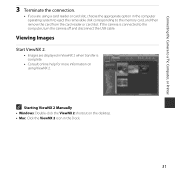
...2 starts. Start Transfer • At default settings, all the images on the memory card will be displayed; B Connecting the USB Cable The connection may take a while for Nikon Transfer 2 to select Nikon Transfer 2. 1 Under Import pictures and videos, click Change program. select Import File using Windows 7 If the dialog shown at right ..., follow the steps below to start. Connecting the Camera to a TV, Computer, or Printer If a message is displayed prompting you to choose a program, select Nikon Transfer 2. • When using Nikon Transfer 2 and click OK. 2 Double-click Import File.
...2 starts. Start Transfer • At default settings, all the images on the memory card will be displayed; B Connecting the USB Cable The connection may take a while for Nikon Transfer 2 to select Nikon Transfer 2. 1 Under Import pictures and videos, click Change program. select Import File using Windows 7 If the dialog shown at right ..., follow the steps below to start. Connecting the Camera to a TV, Computer, or Printer If a message is displayed prompting you to choose a program, select Nikon Transfer 2. • When using Nikon Transfer 2 and click OK. 2 Double-click Import File.
Reference Manual
Page 51
... the appropriate option in the computer operating system to eject the removable disk corresponding to the computer, turn the camera off and disconnect the USB cable. Connecting the Camera to a TV, Computer, or Printer 3 Terminate the connection. • If you are displayed in ViewNX 2 when transfer is connected to the memory...
... the appropriate option in the computer operating system to eject the removable disk corresponding to the computer, turn the camera off and disconnect the USB cable. Connecting the Camera to a TV, Computer, or Printer 3 Terminate the connection. • If you are displayed in ViewNX 2 when transfer is connected to the memory...

Reference Manual
Page 84
E32 Reference Section Connecting the Camera to a TV (Viewing Images on a TV) Connect the camera to a TV using an audio/video cable (E78) to play back images or movies on the TV. 1 Turn off the camera and connect it to the TV. • Make sure that Video ...
E32 Reference Section Connecting the Camera to a TV (Viewing Images on a TV) Connect the camera to a TV using an audio/video cable (E78) to play back images or movies on the TV. 1 Turn off the camera and connect it to the TV. • Make sure that Video ...

Reference Manual
Page 85
Do not insert or remove the plugs at an angle when connecting or disconnecting them. E33 Reference Section Connecting the Camera to a Printer (Direct Print) Users of PictBridge-compatible printers can connect the camera directly to the printer using a computer. Connecting the Camera to a Printer 1 Turn off the camera. 2 Turn on the printer. • Check printer settings. 3 Connect the camera to the printer and print images without using the USB cable. • Make sure that the plugs are properly oriented.
Do not insert or remove the plugs at an angle when connecting or disconnecting them. E33 Reference Section Connecting the Camera to a Printer (Direct Print) Users of PictBridge-compatible printers can connect the camera directly to the printer using a computer. Connecting the Camera to a Printer 1 Turn off the camera. 2 Turn on the printer. • Check printer settings. 3 Connect the camera to the printer and print images without using the USB cable. • Make sure that the plugs are properly oriented.

Reference Manual
Page 87
... k button. • Printing starts. E35 PictBridge 004 prints Start print Copies Paper size 8 When printing is complete, turn the camera off and disconnect the USB cable.
... k button. • Printing starts. E35 PictBridge 004 prints Start print Copies Paper size 8 When printing is complete, turn the camera off and disconnect the USB cable.

Reference Manual
Page 90
Reference Section E38 DPOF printing 010 prints Start print View images Cancel 6 When printing is displayed, select Start print and press the k button to start printing. To print images, press the k button again. To view the current print order, select View images and press the k button. DPOF printing Print images for which a print order was created using the Print order option (E52). • When the screen shown on the right is complete, turn the camera off and disconnect the USB cable.
Reference Section E38 DPOF printing 010 prints Start print View images Cancel 6 When printing is displayed, select Start print and press the k button to start printing. To print images, press the k button again. To view the current print order, select View images and press the k button. DPOF printing Print images for which a print order was created using the Print order option (E52). • When the screen shown on the right is complete, turn the camera off and disconnect the USB cable.

Reference Manual
Page 120
..., the camera enters standby mode when there is no change in the following situations: • When a menu is displayed: 3 minutes • When the audio/video cable is connected: 30 minutes Reference Section E68 C Notes About Auto Off The time that elapses before the camera enters standby mode is fixed in the...
..., the camera enters standby mode when there is no change in the following situations: • When a menu is displayed: 3 minutes • When the audio/video cable is connected: 30 minutes Reference Section E68 C Notes About Auto Off The time that elapses before the camera enters standby mode is fixed in the...

Reference Manual
Page 128
..., and turn the camera on again. If the error persists, contact your retailer or Nikon-authorized service representative. If the error persists, contact your retailer or Nikon-authorized service representative. Turn the camera off and reconnect the USB cable. After solving the problem, select Resume and press the k button to resume printing.* Printer...
..., and turn the camera on again. If the error persists, contact your retailer or Nikon-authorized service representative. If the error persists, contact your retailer or Nikon-authorized service representative. Turn the camera off and reconnect the USB cable. After solving the problem, select Resume and press the k button to resume printing.* Printer...

Reference Manual
Page 130
...or region. Do not use only Battery Charger MH-72 or MH-73. Availability may be damaged when the cover is closed. USB Cable UC-E16 Audio Video Cable EG-CP14 * To charge EN-MH2 batteries, use these battery chargers to charge any other type of four EN-MH2 batteries)* Battery ... Ni-MH batteries)* Battery Charger MH-73 (includes four EN-MH2 rechargeable Ni-MH batteries)* AC Adapter EH-65A (connect as shown) 1 1 2 2 USB cable Audio/video cable Make sure that the power connector cord has been properly aligned in the battery-chamber groove before closing the battery-chamber/memory card slot...
...or region. Do not use only Battery Charger MH-72 or MH-73. Availability may be damaged when the cover is closed. USB Cable UC-E16 Audio Video Cable EG-CP14 * To charge EN-MH2 batteries, use these battery chargers to charge any other type of four EN-MH2 batteries)* Battery ... Ni-MH batteries)* Battery Charger MH-73 (includes four EN-MH2 rechargeable Ni-MH batteries)* AC Adapter EH-65A (connect as shown) 1 1 2 2 USB cable Audio/video cable Make sure that the power connector cord has been properly aligned in the battery-chamber groove before closing the battery-chamber/memory card slot...

Reference Manual
Page 138
...turn the camera off , remove and reinsert the battery or batteries or, if you are connected via a USB cable. • The camera and TV are using an AC adapter, disconnect and reconnect the AC adapter. Power, ...exhausted. • The camera has entered standby mode to charge. • The camera and computer are connected via an audio/ video cable. 8 10 1, 11 2, E13 26, 29 26, E32 F8 Camera turns off function). • The camera or batteries have...the flash is off until the inside of common problems below before consulting your retailer or Nikon-authorized service representative.
...turn the camera off , remove and reinsert the battery or batteries or, if you are connected via a USB cable. • The camera and TV are using an AC adapter, disconnect and reconnect the AC adapter. Power, ...exhausted. • The camera has entered standby mode to charge. • The camera and computer are connected via an audio/ video cable. 8 10 1, 11 2, E13 26, 29 26, E32 F8 Camera turns off function). • The camera or batteries have...the flash is off until the inside of common problems below before consulting your retailer or Nikon-authorized service representative.

Reference Manual
Page 140
..., and electric lights is recommended. Smear occurs when extremely bright light strikes the image sensor. E48, F3 Technical Notes and Index F10 Disconnect the USB cable. 26, 29, E33 No image captured when the shutter-release button is pressed. • When the camera is too close.
..., and electric lights is recommended. Smear occurs when extremely bright light strikes the image sensor. E48, F3 Technical Notes and Index F10 Disconnect the USB cable. 26, 29, E33 No image captured when the shutter-release button is pressed. • When the camera is too close.
Reference Manual
Page 143
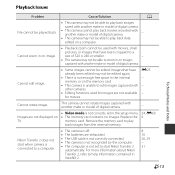
...camera cannot rotate images captured with another make or model of digital camera. - Images are not displayed on a computer. For more information about Nikon Transfer 2, refer to edit images captured with other cameras. • Editing functions used with movies, small pictures, or images that have been ... able to start when camera is connected to a computer. • The camera is off. • The batteries are exhausted. • The USB cable is not correctly connected. • The camera is not recognized by the computer. • The computer is not set in ViewNX 2. 8 10 26...
...camera cannot rotate images captured with another make or model of digital camera. - Images are not displayed on a computer. For more information about Nikon Transfer 2, refer to edit images captured with other cameras. • Editing functions used with movies, small pictures, or images that have been ... able to start when camera is connected to a computer. • The camera is off. • The batteries are exhausted. • The USB cable is not correctly connected. • The camera is not recognized by the computer. • The computer is not set in ViewNX 2. 8 10 26...

Reference Manual
Page 151
... mode 19, E11 n Self-timer 19, E14 p Macro mode 19, E15 o Exposure compensation ...... 19, E16 j Help E4 A AC adapter E78 Aperture value 14 Audio/video cable........ 27, E32, E78 Audio/video-in jack 27, E32 Auto flash E12 Auto mode 20, E10 Auto off 11, E68 Autofocus E21, E60 Autofocus mode...
... mode 19, E11 n Self-timer 19, E14 p Macro mode 19, E15 o Exposure compensation ...... 19, E16 j Help E4 A AC adapter E78 Aperture value 14 Audio/video cable........ 27, E32, E78 Audio/video-in jack 27, E32 Auto flash E12 Auto mode 20, E10 Auto off 11, E68 Autofocus E21, E60 Autofocus mode...

Reference Manual
Page 154
... iii Sunset h E4 T Thumbnail playback 16, E24 Time difference E62 Time zone 9, E62 Time zone and date 8, E62 Tripod socket 2, F17 TV 27, E32 U USB cable 27, 29, E33, E78 USB/audio/video output connector 2, 26, 29, E32, E33 V Video mode E69 ViewNX 2 28 Volume E41 W Welcome screen E61 White balance...
... iii Sunset h E4 T Thumbnail playback 16, E24 Time difference E62 Time zone 9, E62 Time zone and date 8, E62 Tripod socket 2, F17 TV 27, E32 U USB cable 27, 29, E33, E78 USB/audio/video output connector 2, 26, 29, E32, E33 V Video mode E69 ViewNX 2 28 Volume E41 W Welcome screen E61 White balance...


